Build Road
Create a Road Outline
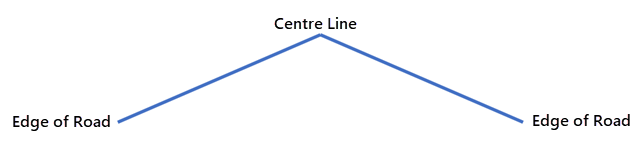
Use this option to create a road outline around a centre line. This option also to apply gradients to the centre line before the creation of the road outline strings.
Note: The Build Road option can also be accessed by selecting the  Build Road button from the Ramps toolbar.
Instructions
Note: You must have a line already loaded into Envisage as a layer before starting this option.
On the Open Pit menu, point to Ramps, then click Build Road.
Follow these steps:
-
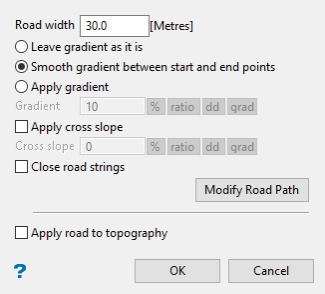
You will be asked to select a centre line for the road. The following panel is then displayed.
 Note
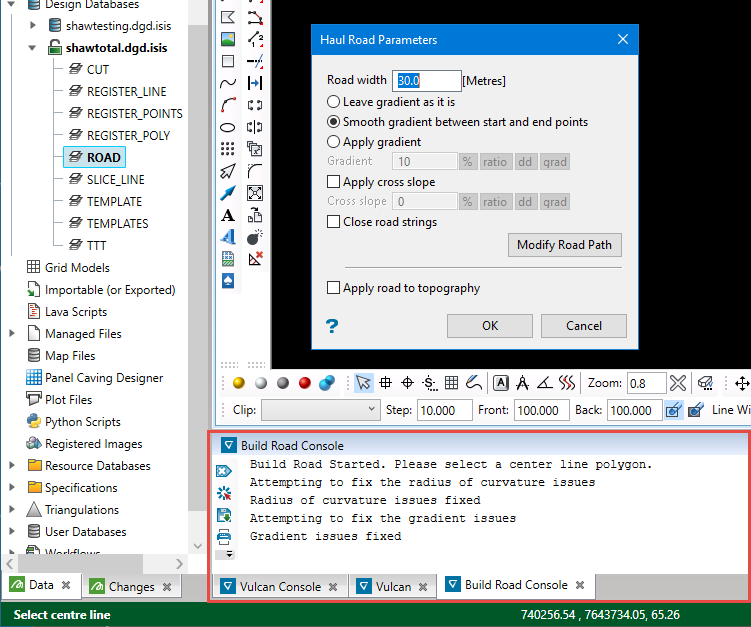
NoteEach step will be recorded in the Build Road Console report window.
-
Enter the width of the road into Road width.
-
Select a gradient option. You have three options:
-
Leave gradient as is - Select this option to leave the centre line unaltered.
-
Smooth gradient between start and end points - Select this option to calculate the gradient of the centre line by using the two end points. The remaining points are then moved to suit this gradient.
-
Apply gradient - Select this option to apply a nominated gradient to the centre line. The gradient is applied to the centre line in the direction of the point sequence. Point one remains at its original location and the remainder of the string is re-graded as specified.

The gradient value can be entered as a percentage, a ratio or as a decimal degrees. To do so, select the appropriate angle format option and enter the value. The format of
<negative value>:<value>must be used when entering negative ratios, For example,-1:7.Example: To enter a gradient value of 50%, select the
 option and enter
 50.Select a different angle format option if you want to convert a value.
-
-
Select Apply cross slope if you want to adjust the profile of the road.
The gradient value can be entered as a percentage, a ratio or as a decimal degrees. To do so, select the appropriate angle format option and enter the value. The format of
<negative value>:<value>must be used when entering negative ratios.
-
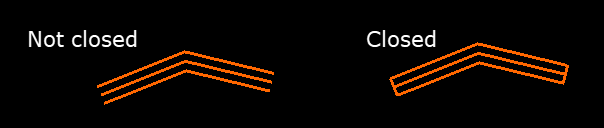
Select Close road strings to close the road strings to create a closed polygon.
-
Click the Modify Road Path button to make edits to the shape and contour of the road, or to fix issues that are causing problems.
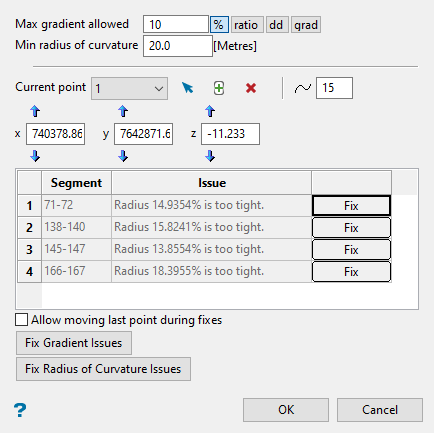
Set the maximum gradient in Max gradient allowed. Any segment of the road that exceeds this threshold will be flagged as being too steep.
Set the minimum curvature radius in Min radius of curvature. Any curve along the road that has less of a radius than this threshold will be flagged as being too tight of a curve.
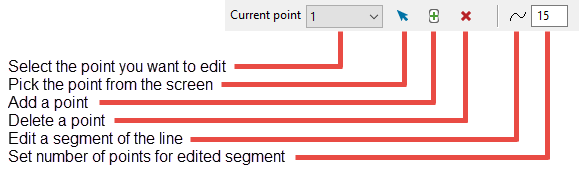
Use the following controls to edit the string making up the road.
If you want Vulcan to attempt fixing the string automatically in areas where issues have been flagged, click the Fix button. Rather than one button for all flags, Vulcan will separate each flagged problem area and show the reason it was flagged.
Enable Allow moving last point during fixes if you want to allow Vulcan to move the last point of the line segment being fixed to be moved during the attempt to fix any issues. If this is not enabled, the point will remain fixed in place.
Click the Fix Gradient Issues or Fix Radius of Curve Issues to allow Vulcan to fix all issues at once.
Click OK when you are finished with this panel to return to the main panel.
-
Clicking Apply road to topography will enlarge the panel and display topography options.
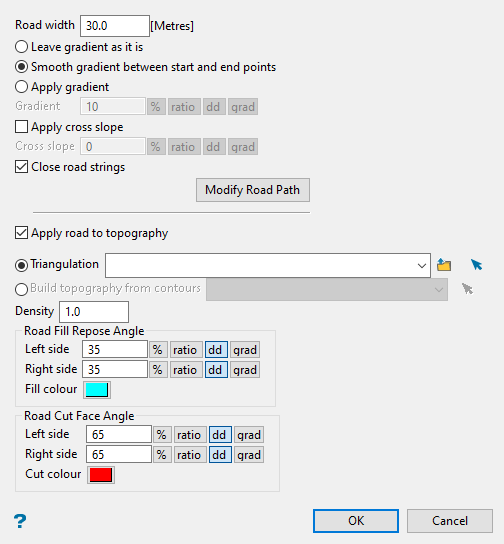
 Triangulation
Select a triangulation to use from the drop-down list, use the browse button, or the screen pick button.
Build topography
Select a design layer from the drop-down list, or the screen pick button. A surface will be created from the lines and be used as the selected triangulation.
Density
The density to use for reporting purposes only.
Road fill parameters
These are the parameters to use when creating the fill solid. Sides are determined by the sequence of the road.
Left side
The angle to use on the left wall of the solid
Right side
The angle to use on the right wall of the solid.
Colour
The colour to use for the solid.
Road cut parameters
These are same as the above but regarding the cut solid.
-
Click OK to exit the option and save your results.

