Preferences - Miscellaneous
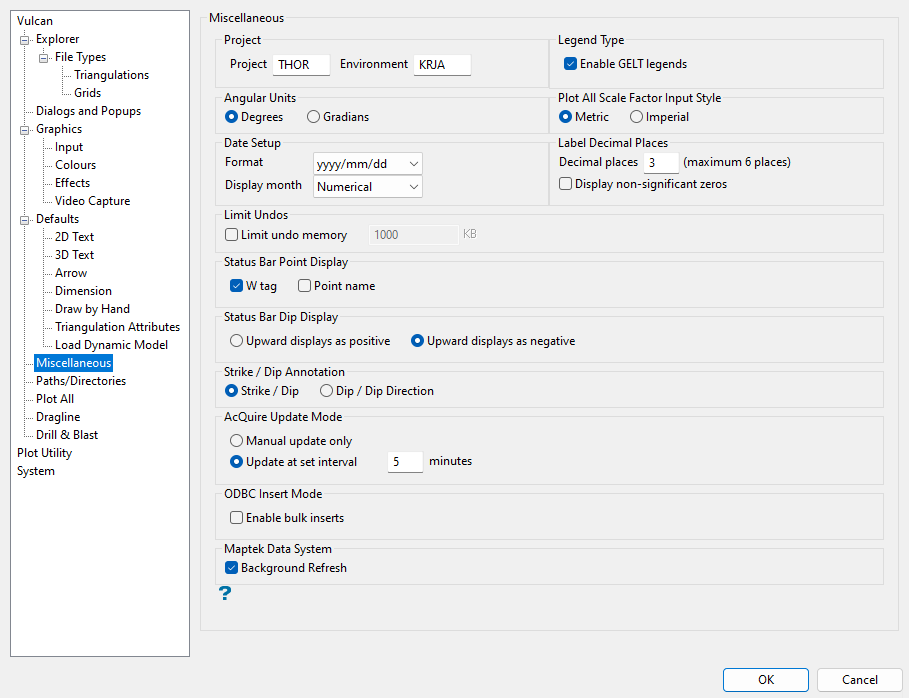
Project
The project code is used in some naming conventions to organise or group files. Some options will automatically prefix the project code when generating file names.
Design databases are constructed from the project code, followed by an optional database identifier (odi). This project code must then be supplied with the <odi> when subsequently referencing the file.
Environment
The environment code is used when referring to the structure of Isis Library Databases. These databases require additional information to define the way in which the data are stored internally. This information is found in the <env>dd.ilb file, which must be present in order for the database to be accessed. Use Isis, the database editor, to manipulate the contents of the <env>dd.ilb files.
By convention, the project and environment codes should not be the same.
For convenience, both the project code and the environment code are written into the vulcan.chk file in your current working directory. This allows other utilities, such as external block modelling programs, to run without explicitly supplying the project code.
Since Vulcan writes the vulcan.chk file, you will not need to alter these values unless you intend to run an external utility without first starting Vulcan. Setting the project code on this panel will write to the vulcan.chk file. However, other programs, such as Vulcan, also write to this file and may overwrite this value. If you only have one project and one environment code in a single directory, then this value will always reflect the correct value.
Legend Type
Enable GELT legends
Select this check box to enable GELT legends. This means that you will be able to use ranges when displaying legends.
Angular Units
Select Degrees or Gradians to specify the angular units format to be used in Vulcan.
Plot All Scale Factor Input Style
Select Metric or Imperial to specify the plotter units to be used by Vulcan.
Date Setup
This section of the interface allows you to configure the date and month formats that are to be used in Vulcan.
The following date formats are available:
-
yyyy/mm/dd (year, month, day)
-
dd/mm/yyyy (day, month, year)
-
mm/dd/yyyy (month, day, year)
The following month formats are available:
-
Numerical: 10/01/2014
-
Abbreviation: 10/Jan/2014
-
Full: 10/January/2014
Label Decimal Places
Decimal places
Enter the maximum number of decimal places for the labels. You can specify up to six decimal places in a single label.
Display non-significant zeros
Select this check box if you want the numeric labels to be filled out with zeros up to the number of specified decimal places.
For example, if three decimal places are specified and this check box is selected, then 1.9 will become 1.900 and 1.09 becomes 1.090.
Limit Undos
This section allows you to use a specified amount of memory to store cancelled changes to design objects. Changes are cancelled by selecting the Design > Undo option or clicking the  Undo button on the Standard toolbar.
Limit undo memory
Select this check box to place the cancelled changes into memory. You must specify the amount of the memory (in KB) that can be used for the storage. If this check box is not selected, then the cancelled changes will be stored in the work file (.wrk).
Status Bar Point Display
This section allows you to specify how point information is displayed in the Workbench Status bar when you hover over a point in the Vulcan workspace.
W tag
Select this check box to display the W tag of points in the Workbench Status bar.
Point name
Select this check box to display point names in the Workbench Status bar.
Status Bar Dip Display
This section allows you to specify how dip values are displayed in the Workbench Status bar when digitising points.
Upward displays as positive
Select this option to display increasing dip values using a positive value:

Figure 1 : Upward displays as positive
Upward displays as negative
Select this option to display increasing dip values using a negative value:

Figure 2 : Upward displays as negative
Strike/Dip Annotation
Select Strike/Dip or Dip/Dip Direction to specify how to display the visual annotation.
This option will only change the annotations for future usages of the option and will not affect any previous Strike/Dip calculations made.
AcQuire Update Mode
For AcQuire connections using either "Standard Caching" or "Smart Caching" methods, select between the update modes for the cache.
Manual update only
If you select this option, the cache will not be updated automatically. You can manually update the cache by right-clicking the AcQuire database connection file (.acq.isis) in Vulcan Explorer and selecting Update AcQuire Cache from the menu. The method is recommended for users with a slow connection to the AcQuire database and for users who want to control when the cache is updated. This method provides the best performance.
Update at set interval
If you select this option, the AcQuire cache will be updated automatically at a specified interval (in minutes). The cache update will happen a maximum of once every X minutes where X is the time specified as the update interval. It is recommended that the update interval not be set too low as this may impact performance when using the AcQuire database.
ODBC Insert Mode
Select the Enable bulk inserts check box to allow bulk inserts with ODBC databases. This improves the speed and performance of insert actions.
Maptek Data System
Select the Background Refresh check box to display updates automatically for currently loaded objects if they are edited by a remote user.
Corporate Standards
The Corporate Standards section is only available if Corporate Standards is active. For further information, refer to the Corporate Standards section of the Vulcan Help.
Legends use corporate standards scheme file
Select this check box to use legends found in the corporate standards scheme file. This check box is selected by default.
Source legends from
If you do not want to use the legends found in the corporate standards scheme file, select an alternate legend from the drop-down list or enter the legend name. Use the Browse button to select a legend from another directory. This option is only available if the Legends use corporate standards scheme file check box is not selected.

