Find Entry Point
Use the Find Entry Point option to use a grade value to locate the nearest path between a point and an object. The resulting solution can be saved in the layer containing the centreline object.
Instructions
On the Underground menu, point to Analyse, and then click Find Entry Point to display the Find Entry Point panel.
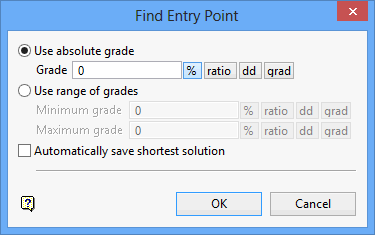
Specify whether you want to use a single grade value or a range of grade values. The gradient values can be entered as a percentage, a ratio, in decimal degrees or in gradian units. To do so, select the appropriate angle format button and enter the value. The format of <negative value>:<value> must be used when entering negative ratios, for example '-1:7'.
For example, to enter a gradient value of 10%, select the <<b>% button and enter '1-'. Select a different angle format button to convert a value.
Automatically save shortest solution
Select this check box to automatically save the solution. If this check box is not selected, you will be asked to select the solution that you want to maintain.
Click OK.
Indicate the starting point. Any position on the object can be indicated, that is, you don't need to use an existing point. You can, however, use either Snap to Objects ![]() or Snap to Points
or Snap to Points ![]() modes to snap exactly onto existing points. See the Digitise toolbar for details on these modes.
modes to snap exactly onto existing points. See the Digitise toolbar for details on these modes.
Nominate a centreline. Once nominated, the shortest path solution will be displayed onscreen. If you didn't check the Automatically save shortest solution check box, then you will be asked whether or not you want to retain the connection.
Tip: When using a range of grades, the Find Entry Point option will only give at most two lines per segment. If you want to increase the number of solutions between the range of grades, then you can insert additional points into your centreline through using the Measure option (under the Design > Point Insert submenu).

