Pillars/LT Outlines
Use Pillars/LT Outlines to create pillar scheduling blocks in areas surrounded by roadways. The pillar blocks are stepped away from the survey lines by the specified roadway width. This option also to create (optionally) long-term reserve scheduling blocks.
The pillar scheduling blocks are stored as separate objects with the name: <name>/Pn
where <name> = heading or crosscut name, P = pillar and n = the number of the pillar generated in the drivage/panel. The blocks are assigned the feature PILLAR$PAN for panels or PILLAR$DRV for drivages.
The long-term scheduling blocks is a single polygon surrounding the area of interest (panel, group, etc.). They can be used for long-term in situ reserve calculations where day- to-day block details are not required. The polygon has the feature LT_RESERVE.
Instructions
On the Underground menu, point to Coal Development, and then click Pillars/LT Outlines to display the Pillar/Long Term Outline Generation panel.
(If a working layer was not defined prior to selecting this option, then the Set Working Layer panel is displayed first.)
Working name
Enter, or select from the drop-down list, the name of the working layer. The chosen layer will be set as the active working for underground coal operations. It does not affect the layer set through the Layer option (under the Design > Create submenu)
To create a new layer, enter the layer name. The layer name...
- may contain up to 40 characters.
- must begin with an alphanumeric character [0 - 9] or [a - z].
- cannot include spaces.
- can include hyphens [ - ], plus signs [ + ], underscores [ _ ], periods/dots [. ].
- can include the special characters of ÁÂÃÀÇÉÊÍÓÔÕÚÜÑ that are used in the Spanish and Portuguese languages.
Description
Enter a description to further describe the contents of this layer. The description can be up to 80 alphanumeric characters and may include spaces. If a description is not entered, then a default description will be used instead. If the chosen layer already has an assigned description, the description will be displayed when the layer is selected. Existing layer descriptions can be overwritten.
To add to an existing working layer, the layer must be loaded onto the screen. If a working layer by the same name already exists in the currently open database, but has not been loaded, then you will be asked whether you want to select the layer or replace it.
Click OK.
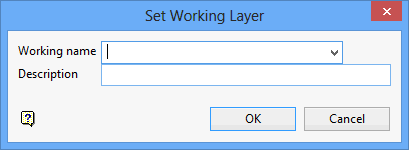
Set Working Layer panel
Working name
Enter, or select from the drop-down list, the name of the working layer. The chosen layer will be set as the active working for underground coal operations. It does not affect the layer set through the Layer option (under the Design > Create submenu).
To create a new layer, enter the layer name. The layer name:
- may contain up to 40 characters.
- must begin with an alphanumeric character [0-9] or [a-z].
- cannot include spaces.
- can include hyphens [ - ], plus signs [ + ], underscores [ _ ], periods/dots [. ].
- can include the special characters of ÁÂÃÀÇÉÊÍÓÔÕÚÜÑ that are used in the Spanish and Portuguese languages.
Description
Enter a description to further describe the contents of this layer. The description can be up to 80 alphanumeric characters and may include spaces. If a description is not entered, then a default description will be used instead. If the chosen layer already has an assigned description, the description will be displayed when the layer is selected. Existing layer descriptions can be overwritten.
To add to an existing working layer, the layer must be loaded onto the screen. If a working layer by the same name already exists in the currently open database, but has not been loaded, then you will be asked whether you want to select the layer or replace it.
Select OK.
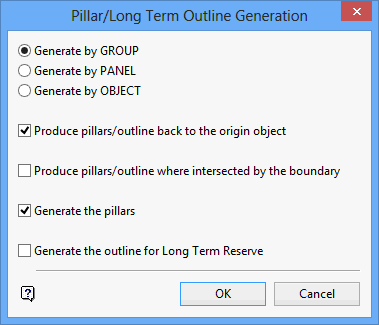
Pillars and long-term reserves can be generated by group, panel or object.
Produce pillars/outline back to the origin object
If you select this box and the workings you select originated from another object such as another panel, then you will include the edge of this object in the pillar/outline generation process. This means that the outline will follow the centreline of the origin object instead of following the outlines of the roadways. Similarly, if you choose to generate pillars with this box checked, then the first row of pillars between the workings you selected and the origin object will be generated. If the box is not checked, then the pillars will not be generated.
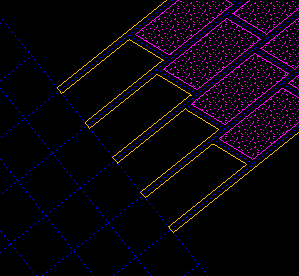
Figure 1 : Unchecked
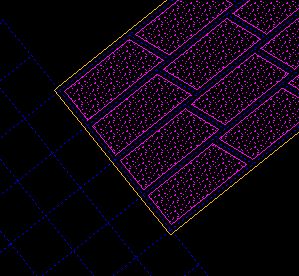
Figure 2 : Checked
Tip: Use a fill pattern such as stippled (set in the Graphical Attributes option) otherwise you will not be able to see them if other objects, such as outlines and road blocks, are also visible.
Produce pillars/outline where intersected by the boundary
If you select this check box, then the pillars and the outline will be generated including the boundary string that limits the extent of the workings. If this check box is not selected, then the pillars between the last crosscuts and the boundary string will not be created and the boundary string will follow the edges of the roadways.
Generate the pillars
Select this check box to generate pillars.
Generate the outline for Long Term Reserve
Select this check box to generate a long-term reserve outline.
Click OK.
You will then be prompted to select an object. Once selected, all objects in the specified category (group, panel or object) are highlighted. In the case of selecting by object, and that object happens to be a heading survey line, all crosscuts that start from that heading will also be highlighted. Each selection needs to be confirmed. Upon confirmation, the pillars, long-term reserves and walls (outlines) are generated.
If pillars and outlines already existed, then you will be asked whether or not to delete them before the new ones are generated.

