Project
Use the Project option to create the 3D blocks that will be used to reserve.
Note: Triangulation surfaces are usually stored as <tfi>.<mv>t. However, the Coal Reserves module requires a project code in from of the triangulation file identifier. Before using Coal Reserves, we recommend that you rename the required triangulations to <proj><tfi>.<mv>t.
Instructions
On the Underground menu, point to Coal Reserves, then click Project.
Follow these steps:
-
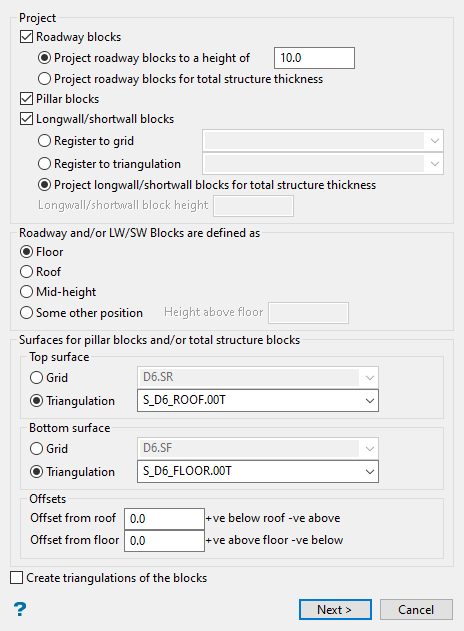
Select Roadway blocks to project blocks to a specified height for reserves, or for a total structure thickness. The latter is used for thin seams that will be mined all at once.
-
Project roadway blocks to a height of - With this option roadway blocks also need to be registered onto either the coal floor, the roof, or a mid-height position. This is specified below in the section Roadway and/or LW/SW blocks defined (located further down in the same panel).
-
Project roadway blocks for total structure thickness - Select this option if you would prefer to nominate the position of upper and lower surfaces of the roadway blocks. The top and bottom surfaces can then be defined in the appropriate boxes in the lower part of this panel under Surfaces for pillar blocks and/or total structure roadway blocks.
-
-
Select Pillar blocks to project pillar blocks.
-
Select Longwall/shortwall blocks to specify the height and surface that was used as the register surface. This may be a grid or a triangulation.
Blocks can also need to be registered onto either the coal floor, the roof, or a mid-height position. This is specified below in the section Roadway and/or LW/SW blocks defined (located further down in the same panel).
-
Select Roadway and/or LW/SW blocks defined to define how you want the blocks projected.
-
Floor - Original blocks will be the floor of the projected blocks
-
Roof - Original blocks will be the roof of the projected blocks
-
Mid-height - Original blocks will be the roof of the projected in the middle
-
Some other position - to specify the position by entering the height of the blocks
-
-
Define the two surfaces to project between (for pillar and roadway blocks - total seam thickness) in the section labelled Surfaces for pillar blocks and/or total structure blocks. The block projection is based on the surfaces and the offsets between the blocks and the surfaces.
-
Top surface - The top surface may be a triangulation (<tfi>) or a grid (<gfi>). The file name can either be manually entered or selected from the drop-down list. Remember that this option requires a triangulation to have a project code.
-
Bottom surface - As per top surface.
-
Offset from roof - A positive value indicates below roof, a negative value indicates above roof.
-
Offset from floor - A positive value indicates above floor, a negative value indicates below floor.
-
-
Select Create a triangulation for the blocks to create a triangulation of the projected blocks.
-
Click Next to display the Reserve Block Projection panel.
-
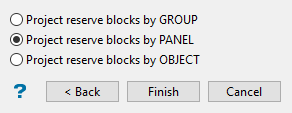
Select the required projection method (by group, panel or object).
-
Click OK.
You are then prompted to select an object (block) in the specified category. This selection will need to be confirmed.
Upon confirmation, the Load Triangulation panel displays (assuming you indicated on the previous panel that you wanted to create a triangulation from the projected blocks).

