Reserve Setup
Use the Reserve Setup option to set up the reserve calculation parameters. These parameters are stored in a file named<proj><reserve_run_name><job_id>.st3. An example is provided in Appendix A .Instructions
On the Underground menu, point to Coal Reserves, and then click Reserve Setup to display the Reserve Setup panel.

Reserve Run Name
Enter the name of the file in which the parameters will be stored (a maximum of 20 alphanumeric characters).
Reserve Job ID
Enter the job identification (a maximum of 20 alphanumeric characters). The Run Reserve option needs this job identification to know which job (set of blocks) is to be reserved.
Product Code
Enter the product code. This represents the coal in which you are interested.
Product Density Variable
Enter the product density variable. This will be used to determine the name of the grid showing the product density distribution.
Default Product Density
Enter the default density associated with the Product Code.
Waste Density
Enter the density value associated with the Waste Code.
Waste Code
Enter the waste code. This represents the overlying waste.
Smut Code
Enter the smut code. This represents the non-coal constituents in a coal seam.
Smut Density
Enter the smut value associated with the Smut Code. This value will be used as the smut density if the value is greater than 0.0; if the value is equal to 0.0, then the product density is used as the smut density; if the value is less than 0.0, then an absolute value is used as a factor of product density.
Scan Cell Area
Enter the scan cell area, This refers to the accuracy of the grid and block size. The default value is '1.0'.
Note: This is a square area. Hence an area of 25 corresponds to a sampling distance of 5 x 5. The scan cell area should ideally be less than the block intended to be reserved. For example, if your pillars are set to 25 metres x 45 metres, then this gives an area of 1,125 square metres. Your scan cell area should therefore be less than this, perhaps 1,000 square metres.
Click OK to display the Reserve Setup selection panel.
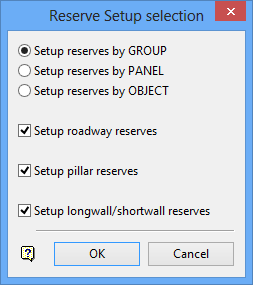
This panel is similar to the Reserve Project panel, but this time the entries refer to setting up reserves instead of projections.
Click OK.
You are then prompted to select an object from the current working layer. The objects in the selected category (group, panel, object) will then be highlighted. Confirmation of the selection is required.
Upon confirmation the specification file is generated and stored in your current working directory.

