Expand Ring
Use the Expand Ring option to expand a shape, such as a stope or drive.
Note: If different expansion widths are required, then assign expansion values to each segment of the shape (see Define Ring option) before using this option.
The direction of digitising determines the sense of projection. A clockwise string projects outwards, and an anticlockwise string projects inwards. If the direction of digitising is unknown, then use the Point Label option (under the Analyse > Label submenu). You can use the Reverse option (Design > Object Edit submenu) to change the digitised direction.
Instructions
On the Underground menu, point to Development, and then click Expand Ring.
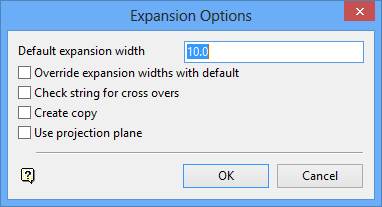
Select the shape to expand, that is, stope or drive, to display the Expansion Options panel.

Default expansion width
Enter the expansion width. This width is applied to the segments that were not assigned expansion widths in the Define Ring option. The unit of measurement is set in the.dg1 file. The default expansion width can also be used to replace all existing expansion widths (see below).
Override expansion widths with default
Select this check box to replace all existing expansion widths with the specified default expansion width.
For example, entering '10.0' as the default expansion width, will project all segments out 10 metres regardless of the expansion widths, which may have previously been assigned to the shape.
If this check box is not selected, then any expansion widths that have been previously assigned are used in the projection. The default expansion width is only used when an expansion width has not been previously assigned to a segment.
Note: Expansion widths used in the projection are retained in the projected string so that it can be used for the next projection.
Check strings for cross overs
Expanding causes an object to "shrink" or "grow". As a result cross overs may occur, that is, "butterflies" can form at some corners. Select this check box to remove these cross overs.
Create copy
Select this check box to replace the original object with the expanded object. If this check box is not selected, then the original object is maintained and the expanded object will be created as a new object.
Use projection plane
Select this check box to expand (in sections) by defining a projection plane.
Click OK.
The expanded shape displays as a highlighted string, and you are asked whether or not to keep the projection. Upon confirmation, you will then be prompted to select another shape to expand.
If the Use projection plane check box was selected, then the Projection Plane panel displays before you are asked to confirm the projection.

