Model Backs/Floors
Use Model Backs/Floors to create a solid model from wall outline polygons. Roadways that cross over each other will not be created correctly - if this happens a warning will be displayed. Either split the roadway or use primitives to construct a solid.Instructions
On the Underground menu, point to Development, and then click Model Backs/Floors to display the Model Backs and Floors panel.
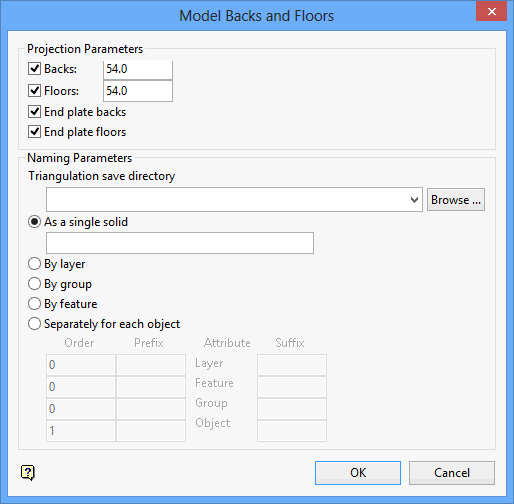
Projection Parameters
Backs
Select this check box to project backs (roof) by a specified height.
Floors
Check this box to project floors by a specified height.
End plate backs
Check this box to close off the solid triangulation by triangulating the back 'end polygon' of the solid
End plate floors
Check this box to close off the solid triangulation by triangulating the floor 'end polygon' of the solid.
Naming Parameters
Triangulation save directory
Select the directory that will be used to store the resulting triangulations. leave this field blank of you want to save the resulting triangulations in your current working directory. Use the Browse button to nominate a different storage location.
To save your triangulation in an existing triangulation database, use the Browse button to locate the applicable '.tri' file. Once found, click on the file before clicking OK.
If you want to store the triangulations in a subdirectory of your triangulation database, double-click on the '.tri' file to display the Select Directory panel.
Once you have located the desired storage folder, click on the folder name before clicking OK.
The triangulations that are created from the polygons can be named using one of the next four methods:
As a single solid
Select this option to save all of the triangulations as one triangulation with internal walls. Enter, or select from the drop-down list, the name (<tfi>) of the triangulation.
By layer
Select this option to name each triangulation with the layer name of the polygon(s).
By group
Select this option to name each triangulation with the group name assigned to the polygon(s).
By feature codes
Select this option to name each triangulation with the feature name assigned to the polygon(s).
Separately for each object
Select this option to create a separate triangulation for each polygon.
The triangulations can be named with various combinations of layer, feature and group. The order determines if the attribute is going to be incorporated into the name or ignored. Orders of less than or equal to zero are ignored, where as a value greater than one will be included.
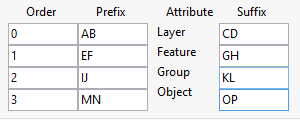
If the values shown above were used, then the triangulation will be named:
ef<feature_name>ghij<group_name>klmn<object_name>pq.00t
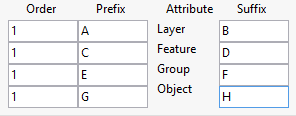
If the values shown above were used, then the triangulation will be named:
a<layer_name>bc<feature_name>de<group_name>fg<object_name>h.00t
Click OK.
The Multiple Selection box is then displayed. This to select the wall outlines by category.
Once the wall outlines have been selected, the triangulation is created and saved. Use the options under Design > Attribute Edit, or the Triangulation Properties button ![]() on the Status toolbar to change the model attributes, such as line, colour and pattern file.
on the Status toolbar to change the model attributes, such as line, colour and pattern file.

