Load Ring 
Use Load Ring to automatically load all the blastholes with explosive loadings into the current ring. The loading is done according to a set of sequential rules that rely on the following three values:
- Minimum loading length.
- Desired stemming length.
- Minimum column spacing.
Refer to the Create/Edit Specification File option (under the Underground > Ring Design submenu) for a description of these three values.
The rules used by the Load Ring option are as follows:
- Assign an Explosive column to each blasthole
If the blasthole's length is less than the minimum loading length, then the explosive column's length will equal the blasthole's length. If the blasthole's length is less than the minimum loading length plus the desired stemming length, then the explosive column's length is equal to the minimum loading length. Else the explosive column length is equal to the blasthole length minus the desired stemming length. - Adjust each Explosive column's start position so that the minimum distance between all explosive columns is greater than the minimum column spacing.
This can result in some explosive columns being shortened in length, which means that some lengths may be below the minimum loading length. The optimisation routine may remove an explosive column completely, these modifications are temporary until the changes are accepted.
This option can also be accessed by selecting the Load Ring button from the UG Explosives toolbar.
Instructions
On the Underground menu, point to Explosives Loading, and then click Load Ring.
If you have not already loaded a blast database, you will be prompted to do so. For more information on this panel, see Open Blast Database.
If you have not already set a current ring, you will be prompting you to pick a ring. For more information on this panel, see Display Rings.
The Load Ring panel displays. Any manually created or previously generated explosive columns for the current ring will also be displayed if not already visible.
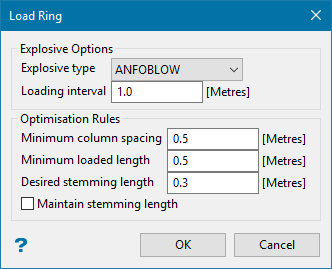
Explosives Options
Refers to the explosive type used for the explosive columns and the loading interval used in the creation of the columns.
Explosive type
Refers to a drop-down list, read from the explosive library found in the underground blast design specification file. An explosive type can either be selected from the drop-down list or the current default value can be used.
Loading Interval
Whenever a blasthole is loaded with explosives, it is common practice to load to the nearest metre, foot, yard or half metre. This option to create explosive columns that snap to the closest loading interval.
Optimisation Rules
Refers to the section where values are entered for the ring optimisation or automatic ring load generation (see the description at the start of this option's description for the use of these values).
Minimum loaded length
Enter the minimum length of an explosive column (the default value is '10.0' ).
Desired stemming length
Enter the stemming length value preferred for the stemming of a hole. This value is used by the Load Ring option as part of the rules to optimise automatically a ring design.
If the minimum loading length, and the desired stemming length are greater than the design hole length, then the stemming length will be shrunk to fit the blasthole. This means that the minimum loading length will precede the desired stemming length in the automatic load optimisation.
Maintain stemming length
The desired stemming length takes priority over loaded length. However, the minimum loaded length still takes priority over this option.
Minimum column spacing
Enter the minimum distance between two explosive columns. This value, which can contain up to 3 decimal places, is used by the Load Ring option as part of the rules to optimise a ring design. If two columns are too close together, then one of the columns is adjusted. The column can also be removed, this is temporary until you accept the load optimisation.
Lock/Unlock Loadings
To include or exclude holes in the Fixed Holes list, click the appropriate Lock Loadings or Unlock Loadings button.
The Select Holes dialog box appears.
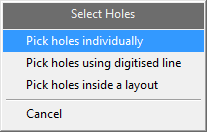
Pick holes individually
Select this option to individually pick the blasthole.
Pick holes using a digitised line
Select this option if you only want to select the blastholes that cross a digitised line within the working plane. The line will need to be digitised once this option has been selected.
Pick holes inside a layout
Select this option to select all of the blastholes in a layout by using a single hole from the screen. All blastholes within the layout that are associated with the chosen hole will be selected.
The Load Ring panel is redisplayed once the holes have been selected.
Load Ring
Use the Load Ring button to perform the generation of explosive columns for an entire ring.
The automatic ring loading needs some help with the 3D relationships between the blastholes and explosive columns. You will be prompted to select the desired reference line, which normally is located in the drive polygon. This reference line pierces the working plane for this ring. The point at which the reference line intersects the working plane is used to calculate the 3D positioning of each blasthole. See Diagram 1 for an example of a reference line passing through the drive polygon.
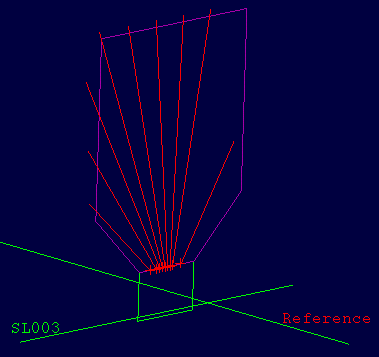
Figure 1 : Reference Line Through Drive Polygon
When the reference line has been chosen, the next step is to select a starting point for the optimisation. In this case it is best to select a hole or loading from which to start. This hole will not be adjusted, but instead will be used as a reference to access the remaining holes in the ring. A secondary advantage of selecting this option, is that the start hole is more likely to be the hole with the first explosive column in the current ring to explode. Select the appropriate hole.
The ring will now be loaded. See Diagram 2 and 3 for a before and after view of an automatically loaded ring.
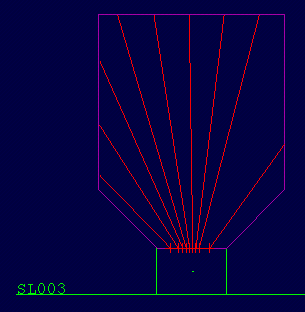
Figure 2 : Before Auto Load
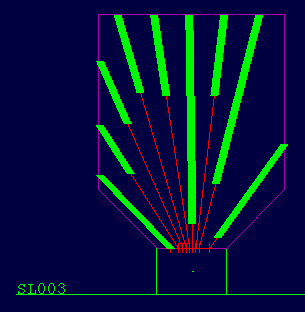
Figure 3 : After Auto Load
As seen in the diagrams, the explosive columns were generated by setting the minimum column spacing to 2. This has resulted in a staggered pattern being produced. Displayed loadings are temporary until you accept them. In which case they will be saved into the database overwriting any previous loadings. Rejecting the loadings will remove the adjusted versions from screen and any previously created loadings will be restored.
After accepting or rejecting the optimisation, you will be returned to the Load Ring panel. Any blastholes placed in the Fixed Hole list will be removed from the list.

