Adjust Hole Length 
Use the Adjust Hole Lengths option to adjust the lengths of a group of blastholes.
The lengths can be adjusted by using one of the following four methods:
- By a set distance from the current length.
- By a set distance from the intersection of the original blasthole with a set of bounding lines.
- By using the closest intersection point to the collar point.
- By using the furthest intersection point to the collar point.
This option can also be accessed by selecting the ![]() Adjust Lengths button from the UG Ring Design toolbar.
Adjust Lengths button from the UG Ring Design toolbar.
Instructions
On the Underground menu, point to Ring Design, and then click Adjust Hole Lengths to display the Adjust Hole Lengths panel.
(If you have not already loaded a blast database, you will be prompted to do so. For more information on this panel, see Open Blast Database .)
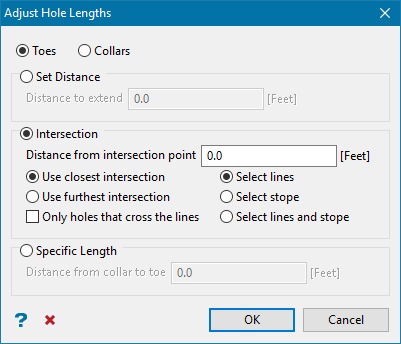
Toes / Collars
Specify the location from which to adjust the blastholes. Blastholes can be shortened or extended from the hole collars or toes.
Set Distance
Select this option to specify an adjustment distance. A positive number will extend the length of the selected blastholes, while a negative number will reduce it.
Intersection
Distance from intersection point
Select this option to adjust the blasthole lengths according to the intersection of the original blasthole with a set of bounding lines. You will need to enter the distance from the intersection point. This value will be used to adjust the blasthole length.
Example: A value of '0' will have the blastholes terminating at the intersection point, while a value of '2.000' will have the blasthole terminating 2.000 units beyond the intersection point.
The following options are only available when using the Intersection option.
Use closest intersection
Select this option to adjust the length by using the closest intersection point to the collar point.
Use furthest intersection
Select this option to adjust the length by using the furthest intersection point to the collar point.
Only holes that cross the lines
Select this check box if you only want to adjust the lengths of blastholes that originally crossed the bounding lines.
Select bounding lines
-
Select lines
-
Select stopes
-
Select lines and stopes
When a stope polygon is used, the furthest blasthole intersection on the stope polygon, if it is closer than the bounding lines intersection, is considered to have a higher priority.
Note: When a bounding line represents where the patterns are suppose to interlock, the holes will be adjusted according to a stope polygon first and the bounding lines second.
Specific length
Select this option to explicitly define the length of the adjusted blastholes. You will need to specify the length (from collar to toe) for the selected holes
Select OK.
The Hole Picking dialog box is then displayed. From this box, select the holes to adjust. If you chose to adjust the blastholes according to bounding lines, then you will also be prompted to select the bounding lines and, if applicable, a stope polygon.
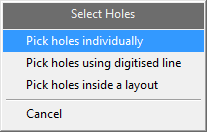
Pick holes individually
Select this option to individually pick the blasthole.
Pick holes using a digitised line
Select this option if you only want to select the blastholes that cross a digitised line within the working plane. The line will need to be digitised once this option has been selected.
Pick holes inside a layout
Select this option to select all of the blastholes in a layout by using a single hole from the screen. All blastholes within the layout that are associated with the chosen hole will be selected.
You will need to confirm the adjustments in the confirm dialog box shown below, before any of the holes can be updated.
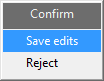
Figure 1 : Confirm dialog box
Once you have completed the adjust hole lengths operation, right-click to cancel, and when the Select Holes dialog box appears, right-click to cancel again. Finally, in the Adjust Hole Lengths panel, click Cancel to finish your edits.

