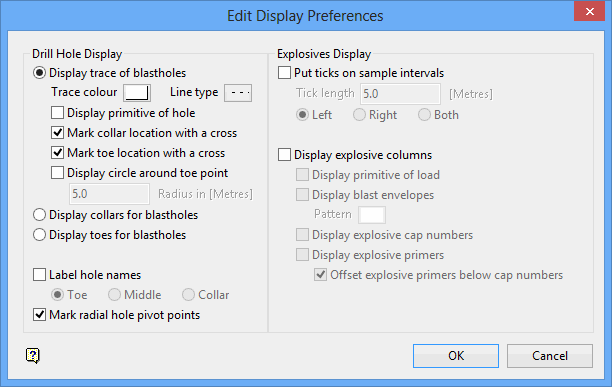
Edit Display Preferences 
Use the Display Preferences option to view/modify the default display settings. When a blasthole is loaded for the first time, or updated after an editing operation, the hole is displayed according to the specified display settings. The display settings will be saved to the BlastDisplay.prefs specification file. This file will be stored in your users profile area.
This option can also be accessed by selecting the ![]() Display Preferences button from the UG Ring Design toolbar.
Display Preferences button from the UG Ring Design toolbar.
Instructions
On the Underground menu, point to Ring Design, then click Edit Display Preferences to display the Edit Display Preferences panel.

Drill Hole Display
Display trace of blastholes
Select this option to display the blastholes as a hole trace. You will need to specify the colour and line type for the blasthole trace. The colour is selected from the current colour table, and the line type (and line thickness) from a list of line types delivered with Vulcan. The following options are available when displaying blasthole traces:
Display primitive of hole
Select this check box to display the hole trace as a circular primitive, thus showing the holes as cylinders giving them weight.
Note: You must have a primitives file (.pgd) in your current working directory to use primitive displays on drillholes. If you choose to display primitives in this panel and a primitive file does not already exist in your working directory, then Vulcan will create one automatically. If you copy an existing.pgd file into your working directory it must be named with the project (.dg1 file) prefix. That is, <proj>.pgd. For more information about Primitives, go to Design > Attribute Edit > Create/Edit Primitives.
Mark collar location with a cross
Select this check box to mark the collar location for the hole with a cross.
Mark toe location with a cross
Select this check box to mark the toe location for the hole with a cross.
Display circle around toe point
Select this check box to display a circle around the toe point of a hole, which can be used to show toe spacings at the end of a hole. The circle is drawn parallel to the current working plane. You will need to specify the radius of the circle.
Display collars for blastholes
Select this option to display a blasthole's collar position rather than its hole trace. Each collar point will be displayed as a cross.
Display toes for blastholes
Select this option to display a blasthole's toe position rather than its hole trace. Each toe point displays as a cross.
Label hole names
Select this check box to display the sequence numbers at the collar, middle or toe of the holes.
Mark radial hole pivot points
Select this check box if you want a 3D cross displayed at the pivot point of radial blastholes.
Explosives Display
The objects listed under this section of the panel are only applicable to the hole trace method.
Put checks on sample intervals
Select this check box if you want the sample intervals for a hole indicated with marks at the interval's depths. You will need to specify the length, as well as where the marks should be placed (for example left, right or both sides of the hole).
Display explosive columns
Select this check box to load and display the blasthole's explosive columns. The default explosive colour and line type will be used The following options are available when displaying explosive columns:
Display primitive of load
Select this check box to display the explosive column as a circular primitive, thus showing the holes as cylinders giving them weight.
Display blast envelopes
Select this check box to display blasthole envelopes, that is, a rectangle that surrounds the explosives column. You will need to select the pattern that will be used for the envelopes.
Display explosive cap numbers
Select this check box to display the cap number at the toe of the blastholes.
Click OK.
The display settings are saved to the BlastDisplay.prefs specification file. This file will be stored in your users profile area.

