Export to IREDES
The Export to IREDES tool exports underground blastholes to XML files that follow the IREDES format. Each XML file contains holes belonging to only one ring.
Instructions
On the Underground menu, point to Ring Design, and then click Export to IREDES to display the Export to IREDES panel.
The panel contains three tabs:
- General
- Advanced
- Output
Basic Workflow
- Fill in panel options.
- Select holes from one ring or select multiple rings.
- Select reference line and the forward direction if transforming to local coordinates (An arrow indicating the forward direction will appear on the reference line).
- Select drive profiles if including drive profiles.
General
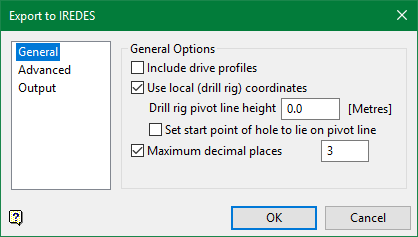
Include drive profiles
Drive/tunnel profile information can be included in the XML output. If selected, you are prompted to select the drive profiles using the standard selection menu. Only the drive profiles should be selected. Polylines that do not lie on the ring planes are ignored.
Use local (drill rig) coordinates
By default, the blasthole coordinates are exported as worlds coordinates. However, some drill rigs require the coordinates to be relative to the drill rig itself.
If this check box is selected, you are prompted to select a reference line and the forward facing direction. The reference line and the drill rig pivot line height together determine the origin of the local coordinate system.
Drill rig pivot line height
This is the vertical offset of the drill rig origin relative to the reference line that was selected.
Set hole start point to lie on pivot line
By default, the start point of a hole is the collar. Some drill rigs require the starting point of the hole to le on the pivot line. Select this check box if this is the case. This option in only applicable when transforming to local coordinates.
Maximum decimal places
Enter the maximum number of decimal places to export the coordinates with.
Advanced
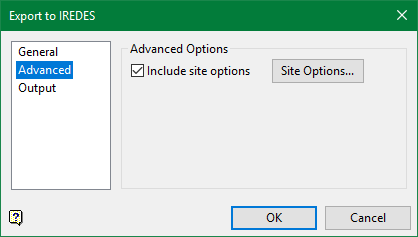
Include site options
Select this check box to add custom information relating to the site to the output XML files. Click the Site Options button and the following panel is displayed.
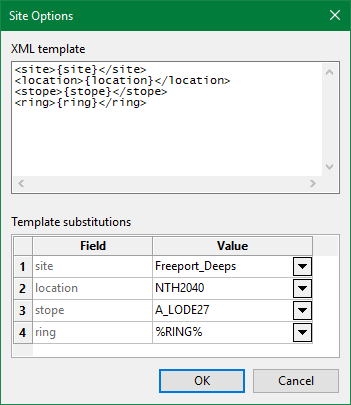
XML template
The XML template is a string of XML that will be placed inside the <IR:SiteOptions><IR:OptionData> section of the XML file.
The template string used may contain optional fields or keywords. Fields are of the form {FIELD}. Each field in the template string will appear as a row in the Field-Value grid to be filled out by the user.
Keywords are of the form %KEYWORD% and contain special values. Keywords may be used in a field's value. A list of available keywords can be found in the drop-down list in the Value column.
Available Keywords
%RING% - substituted by the current ring.
Example
The example above shows how to use the XML template.
The {site} field is replace by "Freeport_Deeps'.
The location field is replace by 'NTH2040'.
The {stope} field is replaces by 'A_LODE27'.
The {ring} field is replaced by the keyword %RING%, which is then replaced by the current ring 1BD18001.
Result of the SiteOptions section of the produced XML file
...
<IR:SiteOptions>
<IR:OptionData>
<Site>Freeport_Deeps</Site>
<Location>NTH2040</Location>
<Stope>A_LODE27</Stope>
<Ring>1BD18001</Ring>
</IR:OptionData>
</IR:SiteOptions>
...
Output
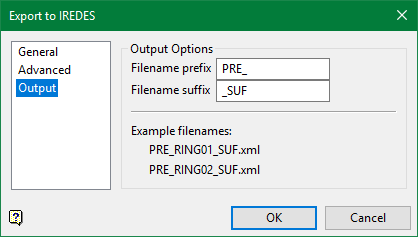
Output Options
Files are named after the ring exported, and may include an optional prefix and/or suffix. The full filename is <prefix><ring><suffix>.xml.
Example
The example shows sample filenames using the prefix 'PRE' and suffix 'SUF'.

