Previous Ring
Use the Previous Ring option to set the working layout for the current Vulcan session. Any new holes (digitised or laid out automatically) will be associated with this layout in the blasthole database.
Note: In order to use this option, a blasthole database must be open. Refer to the Open Blast Database option for information on how to load an existing blasthole database, or the Create Blast Database option for information on how to create a new blasthole database.
This option can also be accessed by selecting the ![]() Navigate Sections button from the UG Ring Design toolbar.
Navigate Sections button from the UG Ring Design toolbar.
Instructions
On the Underground menu, point to Ring Design, and then click Previous Ring.
Once selected, the Set Layout dialog box displays. If this is the first time that you're using this option in the current Vulcan session, then the Current Layout panel displays before the Set Layout dialog box.
The Set Layout dialog box contains the following options:
Step Forward
Select this option to set the next layout as the working layout. The ![]() Step Forwards button, which can be selected from the UG Ring Design toolbar, can also be used to set the next layout as the working layout.
Step Forwards button, which can be selected from the UG Ring Design toolbar, can also be used to set the next layout as the working layout.
Step Backward
Select this option to set the previous layout as the working layout. The ![]() Step Backwards button, which can be selected from the UG Ring Design toolbar, can also be used to set the previous layout as the working layout.
Step Backwards button, which can be selected from the UG Ring Design toolbar, can also be used to set the previous layout as the working layout.
Jump to Front
Select this option to set the first layout as the working layout.
Jump to Back
Select this option to set the last layout as the working layout.
Pick by Line
Select this option to use an existing section line to set the working layout. You will be required to select the section line from the screen. We recommend that you return to Plan view (through using the ![]() Reset View button on the Window : Graphics toolbar) before selecting the desired section line.
Reset View button on the Window : Graphics toolbar) before selecting the desired section line.
Pick by Name
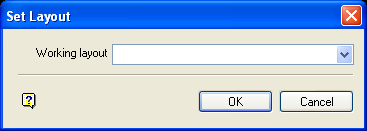
Select this option to set the working layout by name. Once selected, the Set Layout panel displays.

Select the name of the layout from the drop-down list. Press the OK button to return to the Set Layout dialog box.
View Settings
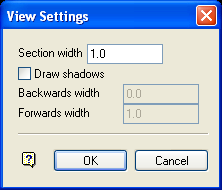
Select this option to view/alter the default width of the section view extents. Once selected, the View Settings panel displays.

Enter the new section width value. Check the Draw shadows check box to shadow the data that falls outside the section. You will need to specify the width of data that will be shadowed on either side of the section.
Tip: The Section Shadow Visible and Section Shadow Invisible options (under the View > Visibility submenu), or the ![]() Section Shadow Visible and
Section Shadow Visible and ![]() Section Shadow Invisible icons (on the Visibility toolbar), can be used to manipulate what is shadowed, for example drillholes and/or stope outlines.
Section Shadow Invisible icons (on the Visibility toolbar), can be used to manipulate what is shadowed, for example drillholes and/or stope outlines.
Select the OK button to return to the Set Layout dialog box. The settings defined through the View Settings panel will be stored in your Blast Design specification file (Blasting.spc).
The Set Layout dialog is then redisplayed. Cancel when you have finished setting the working layout.
Use the Display Current Layout/Plane option to display the current layout and, if applicable, the current working plane angle.

