Move Holes
Use the Move Holes option to reposition selected holes by interactively dragging them across the screen. If you require an accurate transformation, then we recommend that you use the Drill and Blast > Edit > Translate Holes option.
It is also possible to reposition holes through the Vulcan context menu. To do so, right-click on the desired holes and select Move from the displayed context menu.
Instructions
Follow these steps:
-
Make sure that the drill holes have been loaded on the screen by using Drill and Blast > Files > Load.
ImportantThe drill holes must be loaded in this manner. If you load the drill holes onto the screen by loading a layer from the Vulcan Explorer they will not be recognised as drill holes by the Drill and Blast Move Holes option. -
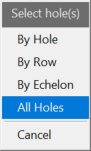
On the Drill and Blast menu, point to Edit, and then click Move Holes. The Select hole(s) dialog box is then displayed.
-
Select a method by which to select the holes using the dialog box. You have the choice of selecting By Hole, By Row, By Echelon., or All Holes.
By Hole - One hole at a time.
By Row - The entire row is selected. For example:
A01, A02, A03, A04,etc.By Echelon - Selection of holes all having the same Echelon ID property.
All Holes - Move all of the holes from a particular blast.
Note: Preselected data can be used with this option, that is, the holes are selected prior to running the Move Holes option. Using preselected data will allow you to bypass the Select holes by dialog box.
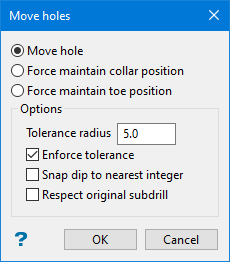
Once chosen, the Move Holes panel is displayed.
-
Select how you want to edit the drill hole. There are three options to move the selected hole(s).
-
Move hole - This is the default and normal way to move hole(s).
And
-
Force maintain collar position
-
Force maintain toe position
These options allow users to move one end of the hole(s) while keeping the other end fixed. The new position can be selected freely using a mouse, within a bounding circle, with a tolerance set in the panel.
NoteThe move options Force maintain collar position and Force maintain toe position will act using a preview line (with a hatched like pattern on the line) that will denote the hole line and its subdrill, if it has one.
While using these two options, information about the hole will be presented on the upper right side of the screen. Below it, a diagram of the dip angle (which aids on visualization, since this tool is to be used exclusively in plan view) and below that, a visual representation of the hole, always in a vertical state that serves to visualize the ratio between the hole body and the subdrill (which will be drawn in a thicker vertical line), or if its a standoff, it will be visualized as a shortening of the main hole body.
While in these two modes, the use of the mouse wheel will be modified. Instead of zooming in/out as normal, it will now manage the dip of the hole (increasing it by rolling it forward and decreasing it by rolling it backward, always 1 degree at a time).
Also, the usage of Alt key will not have the usual behaviour of the operating system and will be modified to allow the user to zoom in/out using the mouse wheel.
While holding the left Shift key, the usage of the mouse wheel will be changed to handle the dip value of the hole, increasing it by rolling forward, and decreasing it by rolling it backward.
After setting the new position by using left mouse wheel, or cancelling by using the right mouse wheel or [ESCAPE], the controls will be back to normal.
The holes are finally set by a top - down method when moving toe (maintaining collar fixed), and bottom-up method when moving the collar (maintaining toe fixed).
-
-
Enter a Tolerance radius. This determines the size of the bounding circle that limits the movement of the selected end of the hole.
Note: This option works only when selecting By Hole.
-
Select Respect original subdrill: This option will be left enabled by default to maintain the normal use of the move tool, in which the subdrill will be maintained to the original value or calculated depending on an intersecting surface. If this option is disabled (unchecked), the subdrill value will be recalculated in order to maintain the distance from the start of the subdrill (the point) and the toe of the hole. This distance is in the direction of the vector of the hole.
-
Click OK. Once you press OK, the selected holes are shadowed and their original positions are shown.
-
Move the selected holes to a new position using your mouse.
-
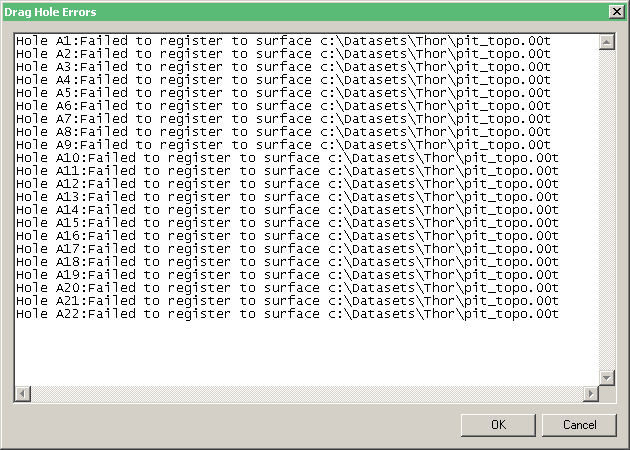
Click to accept the new position. If the proposed hole positions do not register with the surface, then messages similar to the following displays through both the Drag Hole Errors Window and the Report Window.
The Select holes by dialog box is then redisplayed. Select Cancel or right-click with your mouse when you are ready to exit the Move Holes option. Use the Undo option (under the Design menu) or select the Undo button on the Standard toolbar to undo the recently made changes.

