Grade Control Preferences
Set display preferences for Grade Control.
Note: The Grade Control Display toolbar contains many of the most-used options from the Grade Control Preferences panel.
Instructions
On the Grade Control menu, point to Setup, then click Preferences.
Display
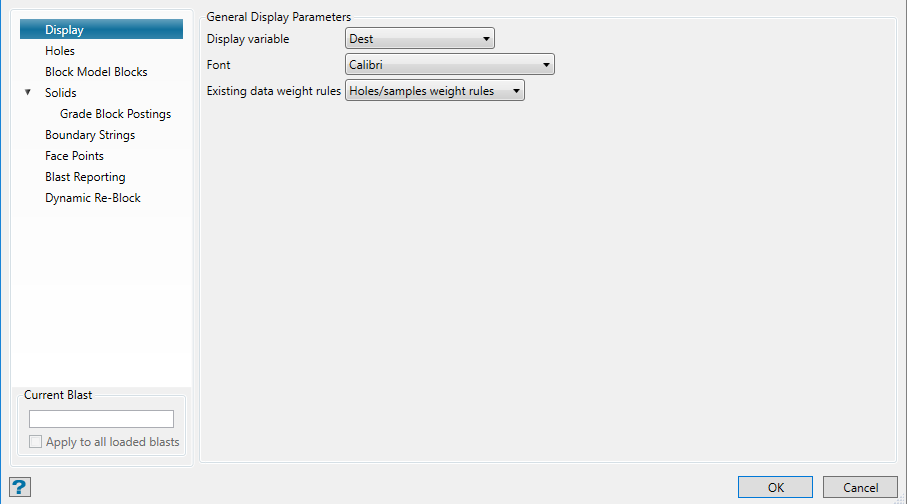
Display Variable
Select the variable to be used when colouring or drawing blast holes, block model blocks and grade blocks. The resulting colour is based upon the variable selected and its corresponding sample legend (selected from the grid's Legend drop-down list). If you want to force the variable colour, then check the Force Colour check box and select a colour from the Colour column.
Note: If you plan on using a configuration file and database from an earlier version of Vulcan.
Font
Enter the font type to be used to display the associated variable, or select it from the drop-down list.
Existing data weight rules
The weighting rules to use when loading the existing data from the grade control database.
Holes
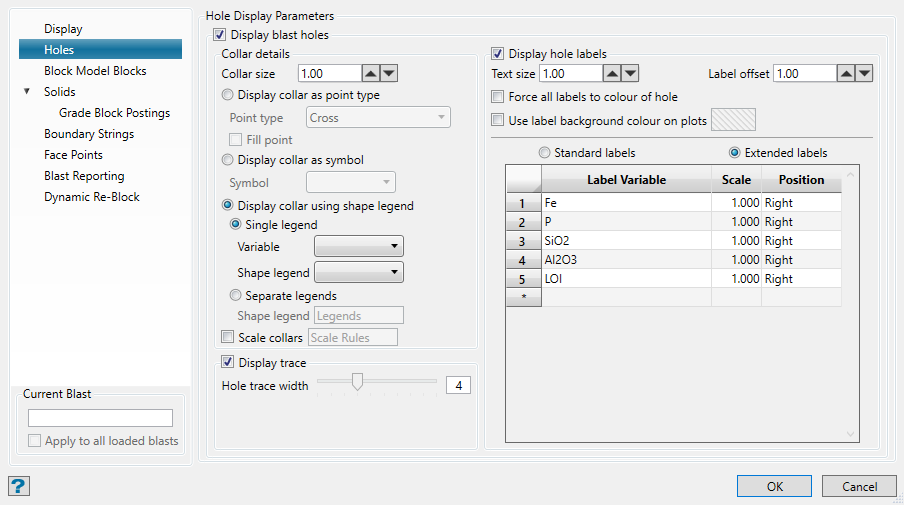
Display Holes
Select this check box to display the holes. If this check box is selected, then you can specify the size of the blast hole collars.
Note: The Display Holes check box is also available as a toggle button from the Grade Control - Display toolbar.
Collar details
Display collar as point type
Select this option to display the hole collars as one of an assortment of point types available from the drop-down list.
Display collar as symbol
Select this option to display the hole collars using a nominated symbol. The symbols can be scaled and offset by specific values.
Display collar using shape legend
Display collar as a shape at the location of the blast hole.
Single legend
Select to be able to use all of the shape characteristics (such as shape, colour, pattern) from a single legend item in a shape legend.
Scale collars
Select this option to scale the collar size according to data values. The size at which the collars will be displayed will be the Collar size multiplied by the computed scale.
Display trace
Select this check box to display the blast hole traces.
Hole trace width
This field to control the width of the blast hole traces. The trace width can either be entered or it can be specified through using the available slider bar. This field will be disabled, that is unavailable, if the Display trace check box has not been selected.
Test Size
Enter the size of the text to be used for the hole labels.
Force all labels to colour of hole
Select this check box to force the colour of the hole labels. If this check box is selected, then the colour of hole label will be the same as the hole it is attached to.
Use label background colour on plots
Select this check box to draw a background (rectangle) behind the hole labels to improve readability when plotting. You will need to select a colour to fill the background. The hole backgrounds are only visible when viewed through the Plotting Utility.
Standard labels
These labels are placed to the right of the marker and extend downward.
Extended labels
These labels can be placed in one or more group position octants around or on the marker and the label text can also be scaled.
Block Model Blocks
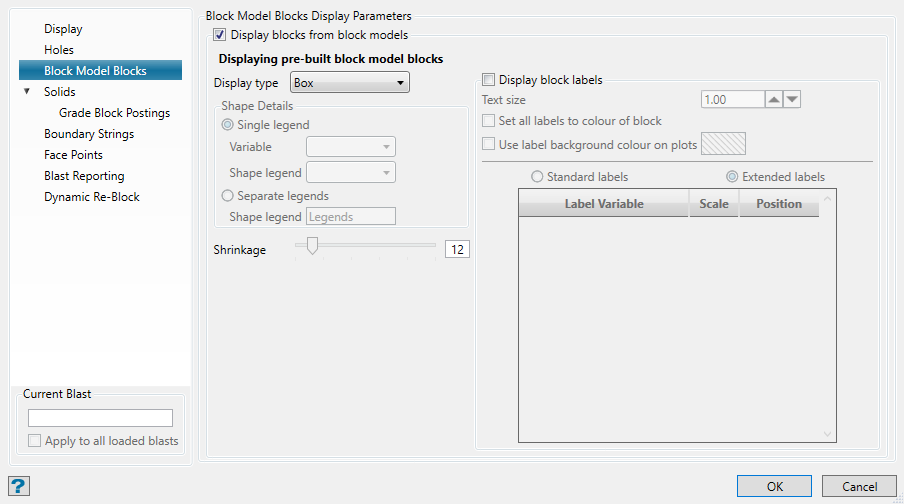
Display Blocks
Select this check box to display the block model blocks.
Note: The Display Blocks check box is also available as a toggle button from the Grade Control - Display toolbar.
Generated Blocks
Select this check box to display the generated block model blocks.
You have the ability to select a block representation method for the blocks.
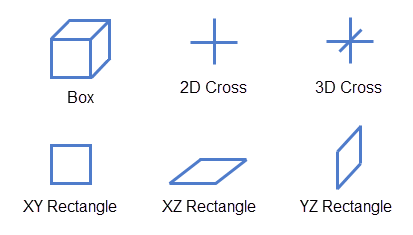
Figure 1: Block Representation Methods
Shrinkage
Apply a level of shrinkage to the blocks by moving the position of the slider. If the slider is moved to the left, then the solid is opaque (i.e. not translucent at all). If the slider is moved to the right, then the solid is invisible (i.e. completely translucent).
Display Labels
Select this check box to display the block labels.
Text Size
Enter the size of the text to be used for the block labels.
Solids

Display Solids
Select this check box to display either the grade blocks or blast solid.
Translucency
Use the slider to adjust the translucency of the blast solid. No translucency is 0 on the scale, and total translucency is 100 on the scale.
Solid Type
Note: The Blast Solid and Grade Blocks options are also available from the Grade Control - Display toolbar.
Display blast-solid
Select this option to display the blast solid.
Display grade blocks
Select this option to display the grade blocks.
The following options are only applicable to grade blocks.
Polygon Generation
There are a number of different ways to generate boundary polygons around your blast. In a simple situation where the blast has vertical sides the Outline option will generally be used. This works as if you were looking down on a blast in Plan view and seeing the plan shape of the grade blocks.
If a blast has dipping sides, or dipping boundaries between the grade blocks, then the Profile option may be of more use. This option creates an outline of the grade blocks at a specific RL. You can then edit the RL through either using the available slide bar or by manually entering an RL value.
In certain complex situations, especially where the grade block has a complex topology, a polygon may not be generated automatically. The Display User Polygons option to associate a manually created polygon with the grade block and store it in the Grade Control database.
To associate a user polygon with a grade block. select the User Polygon option or right-click on the grade block and select the User Polygon option from the display context menu. If the grade block already has a user polygon associated with it, then you will be required to confirm whether or not you want to delete it.
Polygon Display
Display Polygons Only
Select this check box if you only want to display the grade block polygons.
Note: The Display Polygons Only check box is also available as a toggle button from the Grade Control - Display toolbar.
Line Style
Select the line style that you want to apply to the grade block polygons. The line style (and line thickness) is selected from the list of line types that were delivered with Vulcan.
Display Labels
Select this check box to display the grade block labels.
On top of solid
Select this check box if you want the grade block labels to be displayed on top of the grade block. If this check box is not selected, then the labels displays at the grade block centroids and may not be visible if your block is solid rather than translucent.
Tip: Use the Reposition Centroid option to reposition existing grade block centroids. This option is also available through the Vulcan right-click context menu.
Override colour
Select this check box to override the current grade block colouring conventions, which have been defined through using the Pattern Legend and Force Colour columns of the Advanced section.
Tip: We recommend that you check the Override colour check box if you are unable to view grade block labels even when the Display Labels check box has been selected. Grade block labels may "disappear" when the grade block and grade block label are coloured by the same scheme.
Text Size
Enter the size of the text to be used for the labels.
Display data
Existing
Select this option to display the grade of each block based on the information in the database.
Holes
Select this option to use the blast hole grade estimation method.
Block Model
Select this option to use the block model grade estimation method.
Generated Block Model
Select this option to use the generated block model grade estimation method.
Grade Block Postings
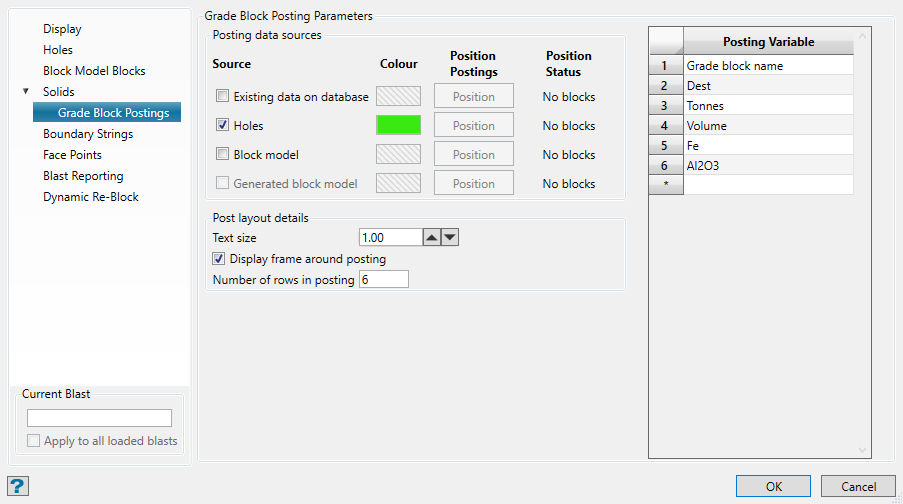
Note: The Existing Data, Holes, Block Model, and Generated Block Model check boxes described in the Postings section below are also available in a drop-down listing from the Grade Control - Display toolbar. Use the Display Postings Toggle button to toggle the selection on or off. Use the Reposition Postings button to rearrange the location of the postings. An All option is also available - use this option to select all four postings at once.
Postings
Select the appropriate check box to display the grade of each grade block based on the associated grade estimation method. If a check box is selected, then you can specify the colour to be used to identify the postings, as well as the number of postings per row (via the Rows field) and the text size.
Position Posting
Select this option to rearrange the position of the report that is currently displayed. Use the mouse to indicate the new position. The Position button is only enabled if the corresponding postings box has been selected. The position status for each posting, i.e. all defined or none defined, displays next to each available button.
Tip: The posting positions can be saved to your database so that they reappear in the same locations when the blast is reloaded. Refer to the Save Posting and Report Positions section for more information.
Display Frame
Select this check box to display a frame around the displayed postings.
Posting Variable
Select the variables that you want to display from the available grid.
Boundary Strings
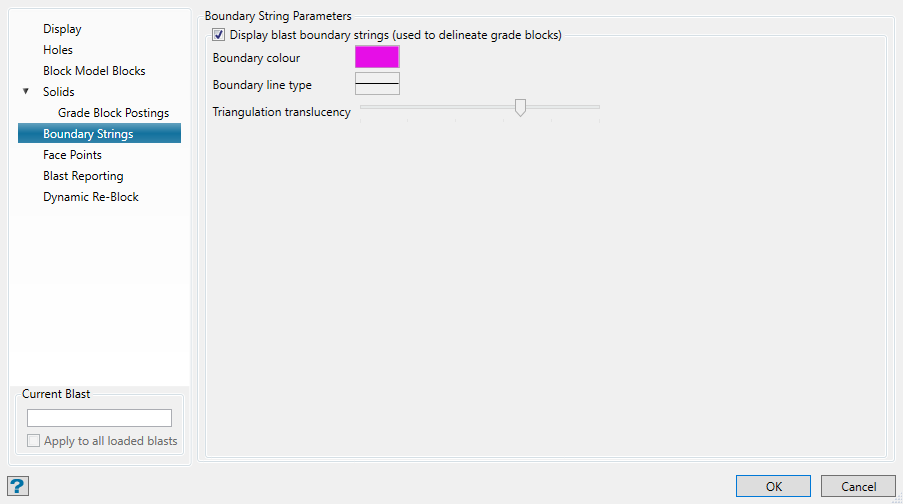
Boundaries
Select this check box to display the boundary strings. You will need to select the colour and line style that will be used to identify the boundaries. The colour will be selected from the current colour table, and the line style (and line thickness) from the list of line types that were delivered with Vulcan.
Translucency
This section to apply a level of translucency to the boundary triangulation by moving the position of the slider. If the slider is moved to the far left, then the solid is opaque (that is, not translucent at all). If the slider is moved to the far right, then the solid is invisible (that is, completely translucent).
Face Points
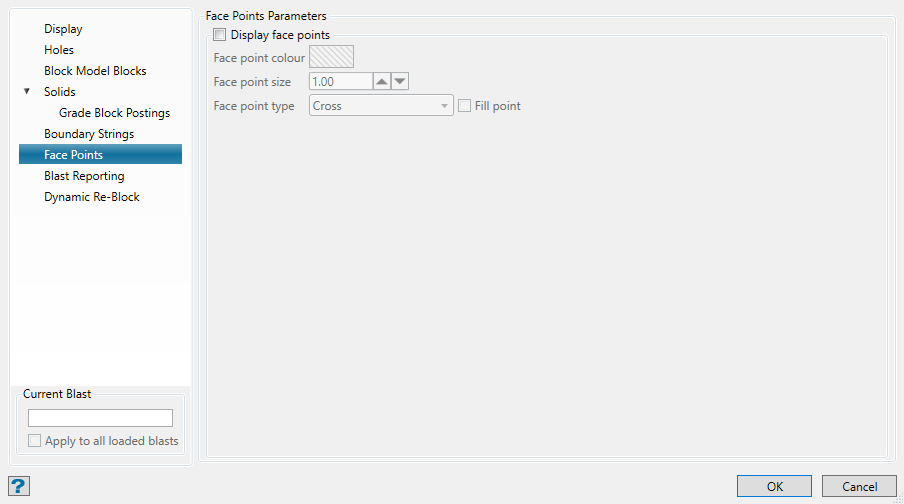
Display face points
Select this check box to display the face points. You will need to select the colour to be used to identify the face points. The colour will be selected from the current colour table.
Face Point size
Enter the size of the markers (+) that are used to identify the face points.
Face point type
Select the symbol that will be used for the points. When applicable, the option to fill will become available.
Blast Reporting

Note: The Existing Data, Holes, Block Model, and Generated Block Model check boxes described in the Reporting section below are also available in a drop-down listing from the Grade Control - Display toolbar. Use the Display Reports Toggle button to toggle the selection on or off. Use the Reposition Reports button to rearrange the location of the reports. Additionally, an All option is also available, allowing you to select all four reporting types at once.
Reporting
Existing Data
Select this check box to display the existing estimation information. You will need to select the colour for the report.
Holes
Select this check boc if you want the estimation for the blast report to be performed using the blast holes. You will need to select the colour for the report.
Block Model
Select this check box if you want the estimation for the blast report to be performed using the block model. You will need to select the colour for the report.
Generated Block Model
Select this check box if you want the estimation for the blast report to be performed using the generated block models. You will need to select the colour for the report.
Text Size
Enter the size of the text to be used for the blast report.
Display Frame
Select this check box to display a frame around the blast report.
Display section separators
Select this check box to display the section separators in the blast report. The section separators are chosen through the Variable section.
Select the variables that you want to report on from the available grid. You can also specify the width for each column as well as the sorting priority.
The report posting positions can be saved to your database so that they reappear in the same locations when the blast is reloaded. Refer to the Save Posting and Report Positions section for more information.
Use the "Separator" value to create a new row in the report.
Position Report
Select this option to rearrange the position of the report that is currently displayed. Use the mouse to indicate the new position. The Position button is only enabled if the corresponding check box has been selected. The position status for each posting, that is defined or undefined, displays next to each available button.
Dynamic Re-Block
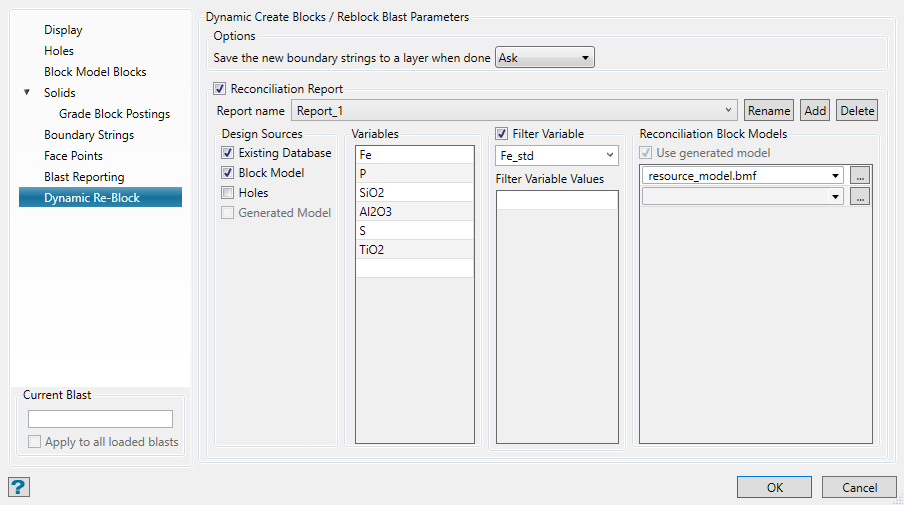
Reconciliation Report
If this checkbox is checked, then after any edition during Dynamic Create Blocks or Dynamic Reblock Blast, the configured reports will be printed to the Grade Control window.
Report Name
This manages the report name, a way to identify a report afterwards.
Buttons:
Rename - Rename the current report.
Add - Create a new report.
Remove - Remove the current report.
Design Sources
The checkboxes control which sources will be used for the reconciliation process. At least one of them must be checked for the report to be printed.
Variables
This is the list of variables that will be used for calculation. The reporting system will check if the variable is numeric or string-based, and will do breakdown reporting for string variables.
Filter Variable
If you want to filter the data by a variable value, then a variable needs to be selected and the values which the filter uses need to be entered into the textboxes.
Reconciliation Block Models
By default, this will display the generated block model selected, along with any other block models that has been defined for reconciliation in Setup > Define Data Sources > Block Models. Additional block models can be used as well.

