Polygons
Create Triangulations from Polygons
Use the Polygons option to create triangulations from polygons for use in block modelling. This option is especially useful for complex polygons as the Create option may take considerably more time.
Note: The polygons you create do not have to be planar. They cannot, however, cross back over themselves.
Instructions
On the Model menu, point to Triangle Solid, and then click Polygons.

Triangulation Save Directory
Select the directory that will be used to store the resulting triangulations. Leave this field blank if you want to save the resulting triangulations within your current working directory. Use the Browse button if you want to nominate a different storage location.
To save your triangulations within an existing triangulation database, use the Browse button to locate the applicable .tri file. Once found, click on the file before clicking OK.
If you want to store the triangulations within a subdirectory of your triangulation database, double-click on the .tri file to display the Select Directory panel.
Select a directory from the list, or create a new directory by entering the full path name, for example 'C:\MyData\New_Directory.tri\'. If you enter a new directory, a message displays after you click OK that the specified directory does not exist and confirm that you want to create the new directory. Select Directory does not exist - create it? to create the specified directory. Selecting the Do not create option from the displayed dialog will return you to the Solid by Polygon panel.
Tip: If you select the Disable confirms check box under the Tools > Preferences > Vulcan > Dialogs and Popups section of the Preferences interface, the system bypasses the confirmation prompt and creates the specified directory when you click OK.
Save triangulations
The triangulations that are created from the polygons can be named using one of the next four methods.
-
As a single solid
Select this option to save all of the triangulations as one triangulation with internal walls. -
By layer
Select this option to name each triangulation with the layer name of the polygon(s). -
By group
Select this option to name each triangulation with the group name assigned to the polygon(s). -
By feature
Select this option to name each triangulation with the feature name assigned to the polygon(s). -
Separately for each object
Select this option to create a separate triangulation for each polygon. If you select this option, the Triangulation naming section becomes available, and you can specify the order, prefix, and suffix for each attribute.
Triangulation Naming
The triangulations can be named with various combinations of layer, feature and group.
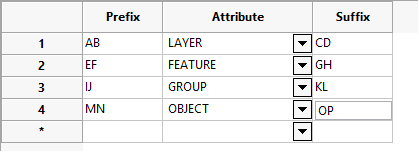
If the values shown above were used, then the triangulation will be named:
ef<feature_name>ghij<group_name>klmn<object_name>op.00t
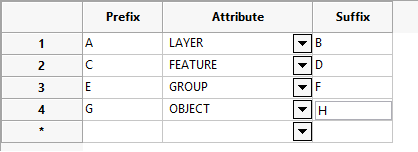
If the values shown above were used, then the triangulation will be named:
a<layer_name>bc<feature_name>de<group_name>fg<object_name>h.00t
Append solids with same names into single triangulation
Select this check box if you want to append the triangulations instead of overwrite the triangulations.
Projection width
The width of the triangulations can be a specified projection width that is assigned to all triangulations or the object value (width of the triangulation) of each polygon. Selecting Use object value as projection width may result in different widths for each triangulation.
Polygon position
The polygon's position in the triangulation can be one of the three positions:
-
Top
The triangulation will be created at the bottom of the polygon (or to the negative side if it is in section view or out of view). -
Middle
The triangulation will be created at an equal distance either side of the polygon. -
Bottom
The triangulation will be created above the polygon (or to the positive side if it is in section view or out of view).
Use directional adjustment on the sides
Select this check box to project the solid in a direction other than in the Z-axis. Enter the bearing in degrees that the solid will be projected in and the inclination from vertical.
Project polygons onto plane
Select this check box to project the polygons onto a defined plane.
Build and construct
Two modes of triangulation construction are available. Select the Build solid and attempt to maintain holes (donuts) option to build walls for each string, while maintaining holes in donut configurations. Select the Build solid without maintaining holes option to fill in the holes.
Construct top end plate
Select this check box to close the top of the triangulations.
Construct bottom end plate
Select this check box to close the bottom of the triangulations.
Display triangulations after build
Select this check box to display the resulting triangulations once they have been constructed. If this check box is not selected, then you will need to manually load the resulting triangulations. You can load these using the Model > Triangle Utility > Load or Model > Triangle Utility > List options.
Note: Only 5,000 triangulation files can be displayed when using the Display triangulations after build check box.
Prompt for triangulations display attributes
Select this check box to specify how the triangulations should be displayed. If this check box is selected, the standard Triangulation Properties panel displays once the necessary polygons have been selected.
Click OK.
The Multiple Selection box is then displayed. From this box, choose your method of selecting the polygons and select the polygons.
The triangulations are then created and, if applicable, displayed on the screen. If you selected the Prompt for triangulations display attributes check box, the standard Triangulation Properties panel displays before the triangulations are created.

