Configuring Preferences
Preferences are settings and options that allow you to tailor your experience within an application. Preferences are remembered between application sessions and are not tied to any particular project. Every Maptek Workbench application such as Vulcan or PointStudio has its own set of preferences that apply only to that application. In addition, Workbench itself has a set of preferences that control Workbench user interface options, Workbench tools, and settings related to Maptek Extend (i.e. Maptek Python SDK and Workflows). This page discusses Workbench preferences only. For individual application preferences, refer to the application’s help.
Accessing the preferences
You can access Workbench and individual application preferences from the ![]() (Preferences) menu located in the Workbench title bar.
(Preferences) menu located in the Workbench title bar.
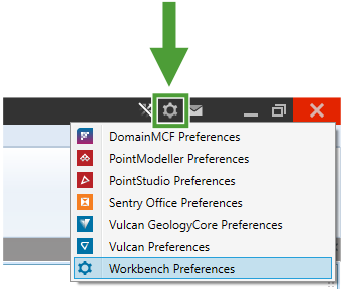
Alternatively, navigate to ![]() (Launch Button) > Preferences.
(Launch Button) > Preferences.
Note: Many applications require an instance to be running for the application preferences to be available. If your application’s preferences are not appearing in the drop-down menu, make sure the application is running first and try again.
Select ![]() Workbench Preferences from the menu to launch the Workbench preferences panel.
Workbench Preferences from the menu to launch the Workbench preferences panel.
Workbench Preferences
Related Workbench preferences are grouped together into tabs selectable in the list on the left side of the panel.
General
The ![]() General tab contains general Workbench user interface preferences.
General tab contains general Workbench user interface preferences.
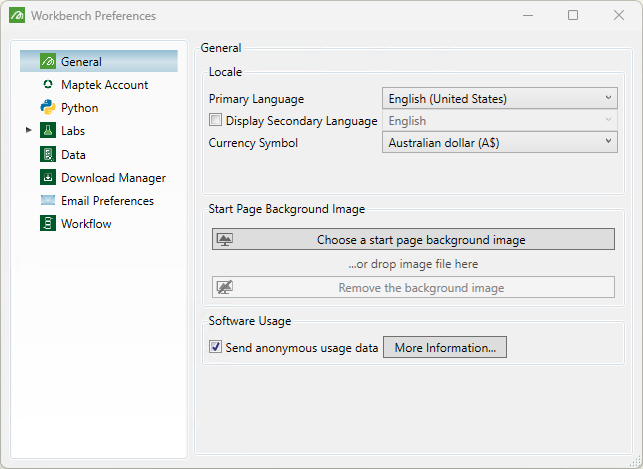
| Locale |
Many Maptek applications support languages other than English.
Workbench can also display a secondary language. If the Display Secondary Language checkbox is selected, software-generated text labels such as menu commands and panel options will be displayed in both the primary language and the secondary language. The secondary language will appear in parentheses.
|
||||
| Start Page Background Image |
Choose a custom background image such as a corporate logo to use as the background on the Start Page. |
||||
| Preferred User Interface |
Select the preferred user interface to use for applications. Many Workbench applications use a modern ribbon menu interface for access to application tools and commands. Some applications only support a traditional menus-and-toolbars interface. Some applications support both. Select your preferred user interface from the drop-down menu. The recommended option is Application Default.
|
||||
| Software Usage |
Maptek collects anonymous information about your hardware configuration and how you use Maptek software for the purpose of improving our software for our customers collectively. You can opt out of this data collection by clearing the Send anonymous usage data checkbox. See Software Usage Information Statement on the Maptek Account website for more information. |
Maptek Account
The ![]() Maptek Account tab contains preferences related to Maptek Account licensing in Workbench.
Maptek Account tab contains preferences related to Maptek Account licensing in Workbench.
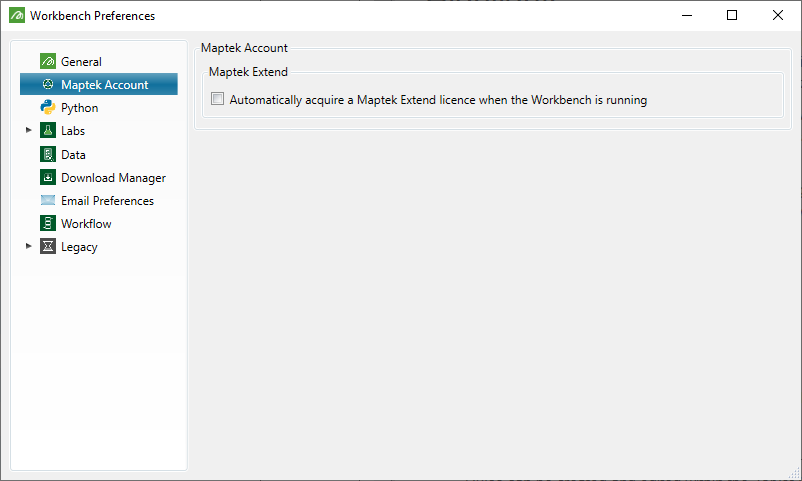
There is a single option under Maptek Extend, namely Automatically acquire a Maptek Extend licence when the Workbench is running. A Maptek Extend licence is required to make use of some Extend features such as Maptek Python SDK. If this option is selected, a seat for Maptek Extend will be held while Workbench is running, even when not required. This reserves the seat and ensures it can be borrowed for offline working.
Note: Regardless of whether this preference is set or not, Workbench will automatically attempt to acquire a Maptek Extend licence when required, for example, when you run a Python script.
Python
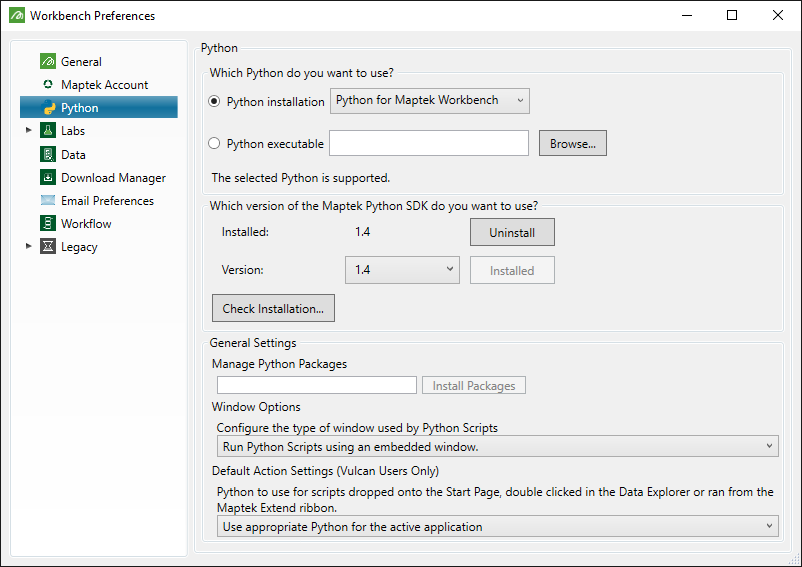
The ![]() Python tab contains preferences related to working with Python scripts and Maptek Python SDK.
Python tab contains preferences related to working with Python scripts and Maptek Python SDK.
Tip: If you’re new to using Maptek Python SDK, we recommend reading Getting Started in the Maptek Python SDK help for more detailed information on setting up your environment.
The following Python preferences can be configured here:
| Which Python do you want to use? |
See Configuring Python below. |
| Which version of the Maptek Python SDK do you want to use? | See Configuring Maptek Python SDK below. |
| General Settings | Manage Python Packages |
This allows you to install Python packages required by your scripts into the selected Python version. The effect is similar to running pip install in a shell. To install a Python package:
A message will display if the package is installed successfully. |
| General Settings | Window Options |
Select the type of window to used by Python scripts from the following options:
|
| General Settings | Default Action Settings (Vulcan Users Only) |
Python scripts require the correct Python environment to run. Scripts developed for use in Vulcan may not be compatible with Python environments configured for use with Maptek Python SDK, and vice-versa. Configure this preference to determine the behaviour when a Python script is dragged onto the Start Page or double-clicked in the data explorer. |


Configuring Workbench to use Python
To run Python scripts using Maptek Python SDK, you need to have the following installed and configured in Workbench:
-
A Python interpreter
This is the Python program that can read and execute Python scripts. We recommend using Python for Workbench, which you can install from the Download Manager.
-
Maptek Python SDK
This is a Python library that needs to be installed into your selected Python environment. You include modules from this library in your Python scripts to make use of the SDK classes and functions.
It is possible to have multiple Python interpreters installed at once. The version of Maptek Python SDK installed into the Python environment must be compatible with that version of Python.
Installing Python and Maptek Python SDK
Before configuring Python in Workbench preferences, you must have a Python interpreter and the SDK installed. You can install both Python for Workbench and Maptek Python SDK from the Download Manager. See Getting Started in the Maptek Python SDK help for detailed instructions. You can also use an existing Python distribution you have installed on your computer, as long as it is compatible with the SDK. See Python SDK–interpreter compatibility in the Maptek Python SDK help for version compatibility details.
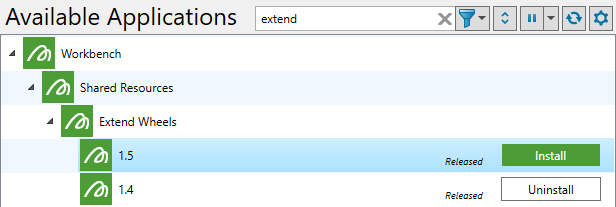
Maptek Python SDK is listed as Extend Wheels in the Download Manager.
Note: Installing Maptek Python SDK via Download Manager installs the SDK into Workbench (i.e. makes it available for use), but not into any particular Python environment. You need to install the SDK into any Python environment that you want to use to run Python scripts (see Configuring Python below).
Configuring Python
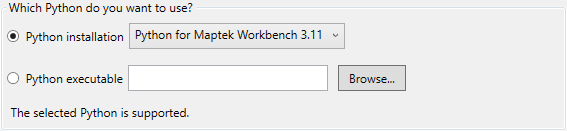
Under Which Python do you want to use?, specify which Python interpreter you want Workbench to use to run Python scripts. This affects all Python scripts run from the Maptek Extend ribbon, within Workflows, or from customised locations such as context menus. We recommend using Python for Maptek Workbench, a Python distribution that you can install through the Workbench Download Manager.
-
To use a Python distribution already installed on your computer, or to use Python for Workbench, make sure the Python installation radio button is selected, and then select the Python installation from the drop-down list. The list displays supported Python distributions installed on your machine detected by Workbench, and any installations of Python for Workbench.
Note: If Python for Maptek Workbench does not appear in the Python installation drop-down, it means it has not been installed. See Installing Python and Maptek Python SDK for information on installing Python distributions.
-
To use a Python interpreter not listed in the Python installation drop-down, select Python executable, and then specify the path to the Python executable (usually python.exe).
After selecting the version of Python to use, you will also need to make sure Maptek Python SDK is installed into that Python environment (see Configuring Maptek Python SDK below).
Configuring Maptek Python SDK
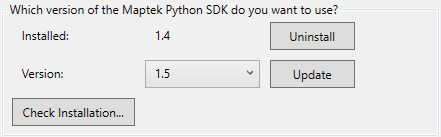
Under Which version of the Maptek Python SDK do you want to use?, configure the SDK to use for the Python installation selected under Which Python do you want to use?.
If the Python installation already has a version of the SDK installed, the version will appear next to the Installed: label. SDK versions that have been installed in Workbench and are available for use appear in the drop-down list next to the Version: label.
Note: If the drop-down list next to the Version: label is empty or does not list your desired SDK version, you will need to download and install the SDK into Workbench first. See Installing Python and Maptek Python SDK for information on installing the Python SDK.
-
Click Uninstall to uninstall the SDK from the selected Python environment.
Note: This does not uninstall the SDK from Workbench; you can do this from the Download Manager if desired.
-
If the Python installation does not have a version of the SDK installed, or you wish to change the SDK version to use with the Python installation, select the SDK version from the Version: drop-down and click Install or Upgrade.
Important: Scripts that are developed with one version of Python or the SDK may need to be modified before they can run with newer versions of Python or the SDK.
NoteIf the button is greyed out with a message starting with Requires, it means the selected SDK version is not compatible with the selected Python version.

Either select a different SDK version, or select a different version of Python under Which Python do you want to use?.
-
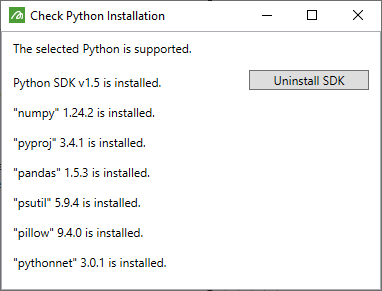
Click Check Installation... to check the status of the SDK installation selected in the Version: drop-down list. If the selected SDK is installed into the Python environment correctly, a report similar to the one below will display, including a list of all dependencies installed.
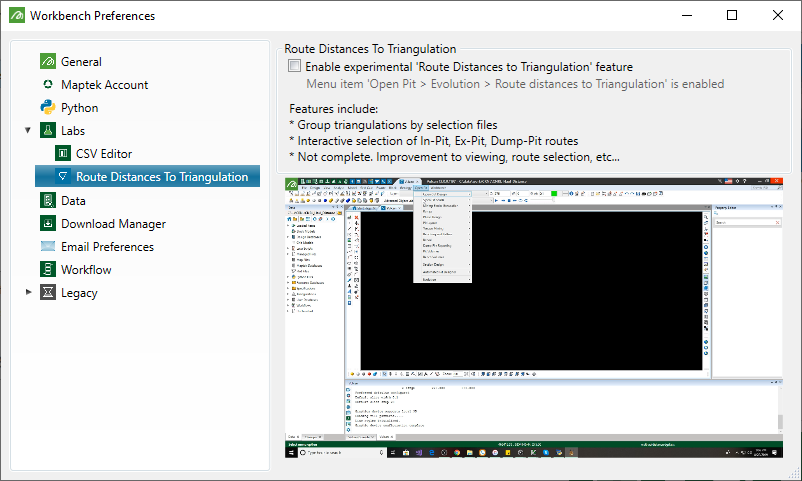
Labs
![]() Labs preferences allow you to enable certain experimental features.
Labs preferences allow you to enable certain experimental features.
-
To see specific labs preferences, click the
 button next to the
  Labs tab (or double-click on Labs).
 -
Select the checkbox for any preference you would like to enable.
Data
The ![]() Data tab allows you to set preferences related to data folders and the data explorer.
Data tab allows you to set preferences related to data folders and the data explorer.
The following data preferences are available:
| Profile |
A profile is a collection of data preferences configured on this tab. Data preferences can be modified on a per-project basis. Choose between the following:
|
| Explorer Category Visibility | Choose the categories of files to show in the data explorer. For example, if you don’t want to see Plot Files appearing in the data explorer, clear the Plot Files checkbox in the drop-down list. Note that some explorer categories are only shown if there are data types for that category in the selected project. |
| Enable summary tool tips | Choose whether to show a summary of file details when hovering over the explorer item. |
| Show descriptions inline | Choose whether to show descriptions inline. |
| Show node connection lines | Choose whether to show node connection lines. |
| Disable click to rename | Choose whether to disable click to rename. |
| Custom Paths |
Add custom paths to other folders (including remote directories) to be included the data explorer.
|
Download Manager
The ![]() Download Manager tab contains preferences relating to downloading and installing applications.
Download Manager tab contains preferences relating to downloading and installing applications.

Configure Download Manager preferences as follows:
| Automatic update |
If selected, Workbench will automatically download and install newer versions of applications that you have already installed. Note: Workbench will not download and install a newer version of an application if you have never installed the application previously, or if you have explicitly uninstalled that particular version.
|
| Installation folder | Select the folder that Workbench applications are installed to. |
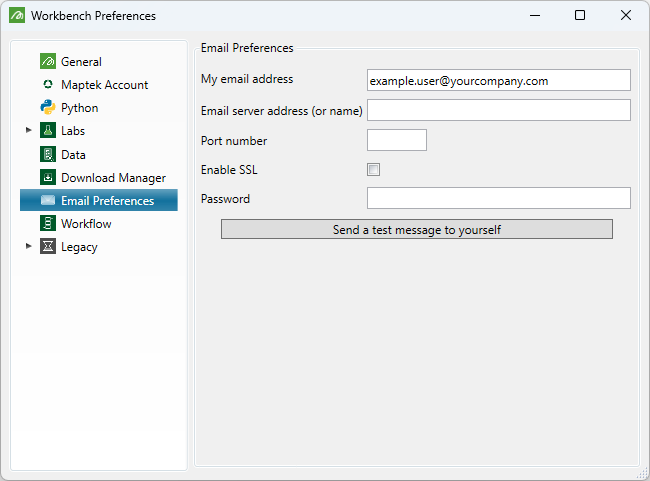
Email Preferences
The ![]() Email Preferences tab allows you to configure your email settings. The email configuration is used primarily when using a workflow to send an email. See the Workflows help documentation for more information on workflows.
Email Preferences tab allows you to configure your email settings. The email configuration is used primarily when using a workflow to send an email. See the Workflows help documentation for more information on workflows.
Workflow
The ![]() Workflow tab allows you to configure preferences related to workflows. See the Workflows help documentation for more information on workflows.
Workflow tab allows you to configure preferences related to workflows. See the Workflows help documentation for more information on workflows.

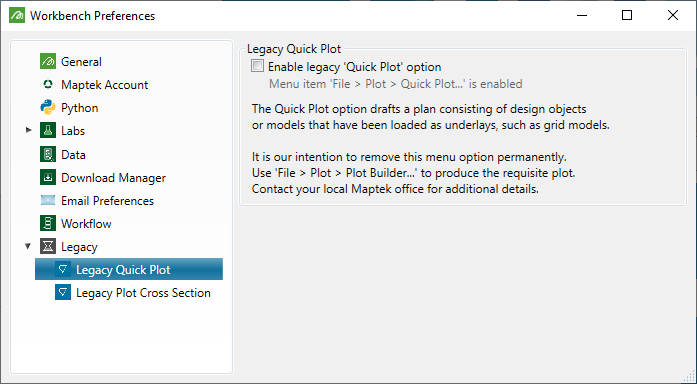
Legacy
Legacy preferences allow you to enable certain legacy menu options that are not available by default. Legacy features are those that have been replaced by new or updated versions, but are available temporarily to ease the transition to the new feature.
Important: Legacy options should not be relied upon to create new integrations, as they are likely to be removed in a future release.
-
To see specific legacy preferences, click the
button next to the  Legacy tab (or double-click on Legacy).
 -
Select the checkbox for any legacy option you would like to enable.