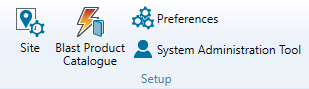
Setup
The Setup group of the Home ribbon contains tools for managing your site configuration.
 Site
Site
The Site tool allows you to configure your site setup, including personnel, machinery, custom properties, and colour schemes. To open the tool, navigate to the Setup group in the Home ribbon, and select ![]() Site. The Site Setup panel will appear. The panel consists of two elements:
Site. The Site Setup panel will appear. The panel consists of two elements:
- A list of sub-tabs
- A workspace containing fields related to the selected sub-tab
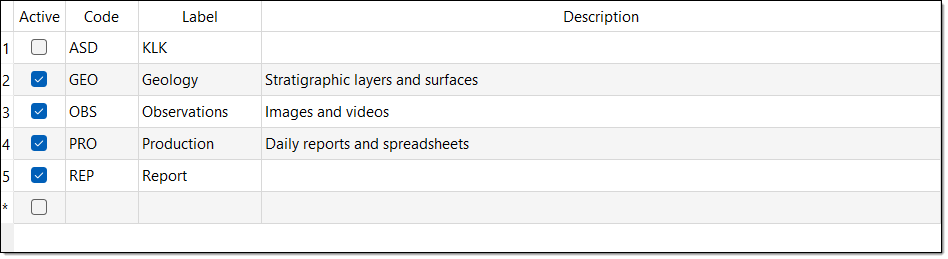
Attachment types
The Attachment types tab allows you to create and configure different attachment types. Before you can publish an attachment, you must associate it with an attachment type. In this tab, you can define these types and mark the types as active or inactive.
Creating an attachment type
To create an attachment type, follow these steps:
-
Select the Label column in the bottom empty row of the table and enter an attachment type label.
-
Enter the appropriate information into the Code and Description cells of the same row.
-
Select the checkbox in the Active column to use the type in BlastLogic.
-
Click OK or Apply.
Other operations
-
To cut, copy or paste in the table, right-click on the desired row and select the corresponding option in the context menu.
-
To insert rows in the table, right-click on the desired row and select an insert option from the context menu.
-
To delete a row, you must first clear the checkbox in the Active column. You can then right-click on the row and select Delete rows from the context menu.
Blast properties
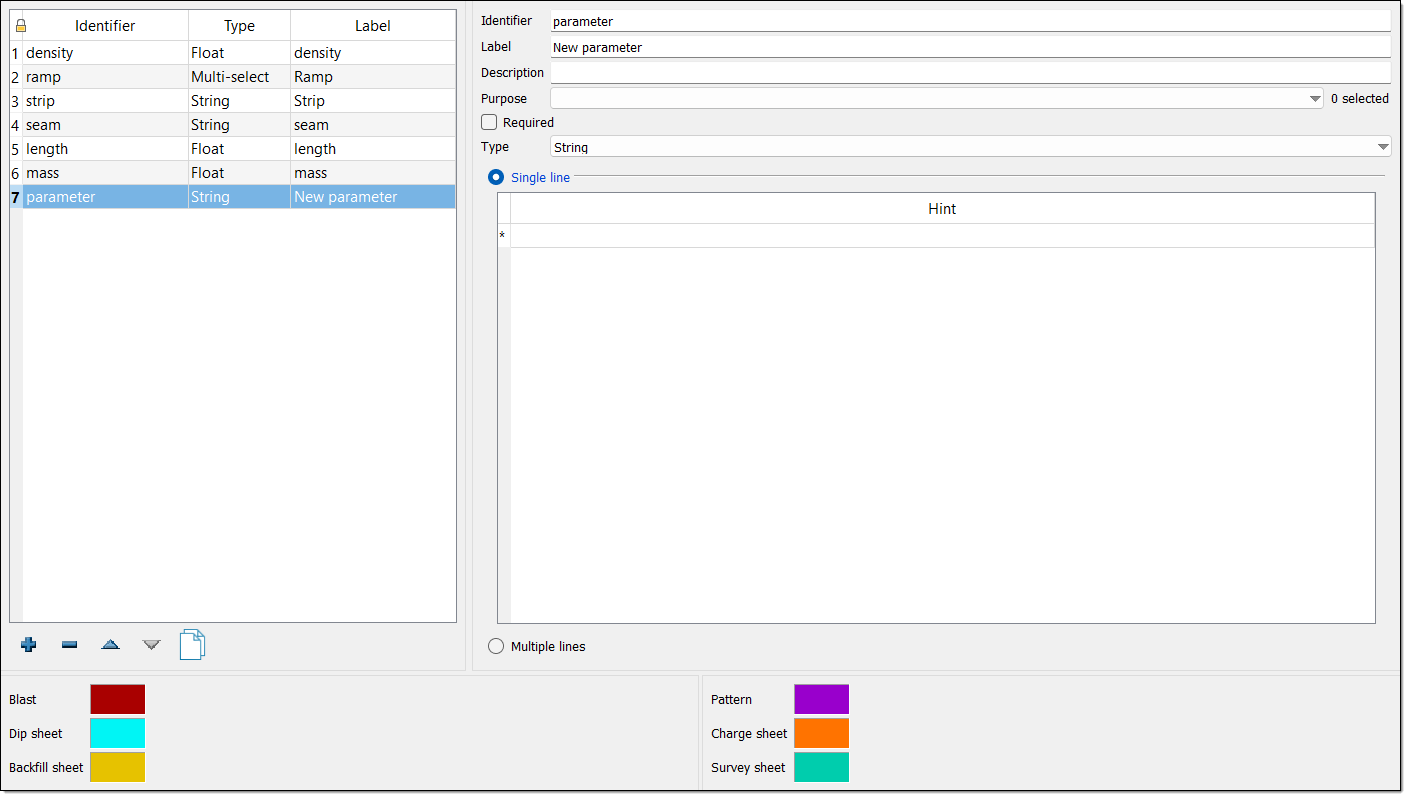
The Blast properties tab allows you to define a set of custom fields specific to a blasts on a particular site.
Adding custom properties
To add a custom property, follow these steps:
-
Click
 . BlastLogic adds the new property to the properties table and opens the property detail fields on the right side of the panel.
 -
Enter the desired information into the Identifier, Label and Description fields.
Note:You can only enter letters, digits and underscores into the Identifier field as BlastLogic references this name internally.
-
Select the appropriate information in the Purpose drop-down. Select Blast observation to make the property available on the BlastLogic tablet.
-
Select the Required checkbox if you wish to make the property mandatory.
-
Select the property type using the Type drop-down. There are six types to choose from in BlastLogic:
- Boolean. You can turn these types on or off via a checkbox.
-
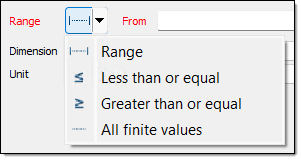
Float. These types must have a range set as greater than a given value, less than a given value, in between two values, or all values. You must also define the dimension and units of float properties.
-
Range. These types must have their dimension and units set.
-
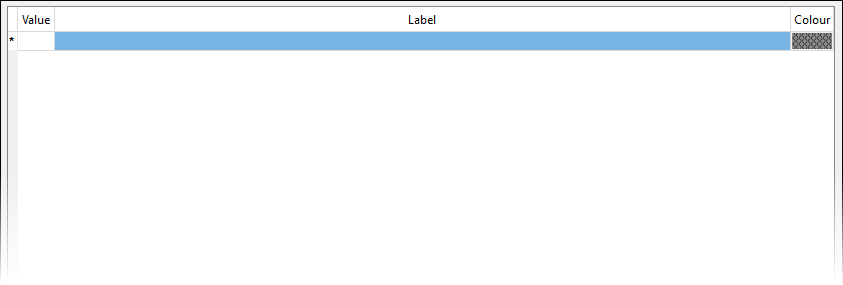
Select. This type is a field in which you can create different values to select from during data entry. You can enter these values and an associated labels in the displayed table. During data entry, you can only select one of the field values.
-
Multi-select. These fields are the same as select fields, except you can select multiple values from the drop-down list.
-
String. These types can be either a single line or a multiple line string. Single line strings can have one or more hints to store commonly entered values.
-
You can also set the following fields, depending on the selected type:
-
Range. Set the range of the property by selecting how you wish to define the range and entering the desired values.
-
Dimension. Set the dimension using the corresponding drop-down.
-
Unit. Set the units using the corresponding drop-down.
-
Value. Set the label and colour associated with a particular value.
-
Hint. Set commonly entered values.
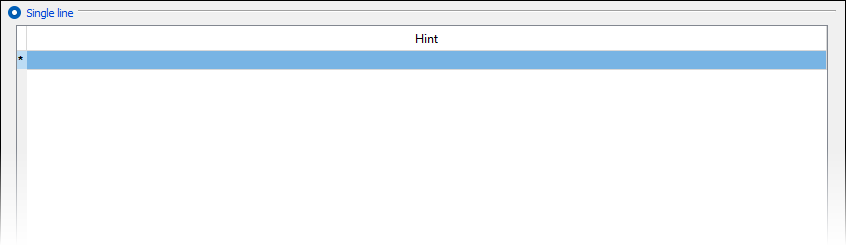
Optionally, select the Multiple lines radio button for a multiple line string. You cannot define hints for this option.
-
-
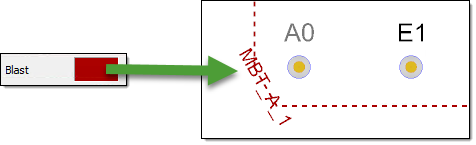
Optionally, edit the view boundary colours. The bottom of the panel contains the colours for each blast, pattern or sheet boundary as displayed in the view. To edit these values, click on the colour boxes and select the desired colour from the colour palette.
-
Click OK or Apply.
Editing blast properties
To edit a blast property, follow these steps:
-
Click on a blast property in the table. BlastLogic displays the property information on the right hand side of the panel.
-
Edit the Label and Description fields. Depending on the type of property, additional information fields may be editable.
-
Click OK or Apply.
Other operations
-
To remove a blast property, select the property and click
 .
. -
To clone a blast property, select the property and click
 .
. -
To reorder the blast properties, select the property you wish to move and click the
 and
and  arrows.
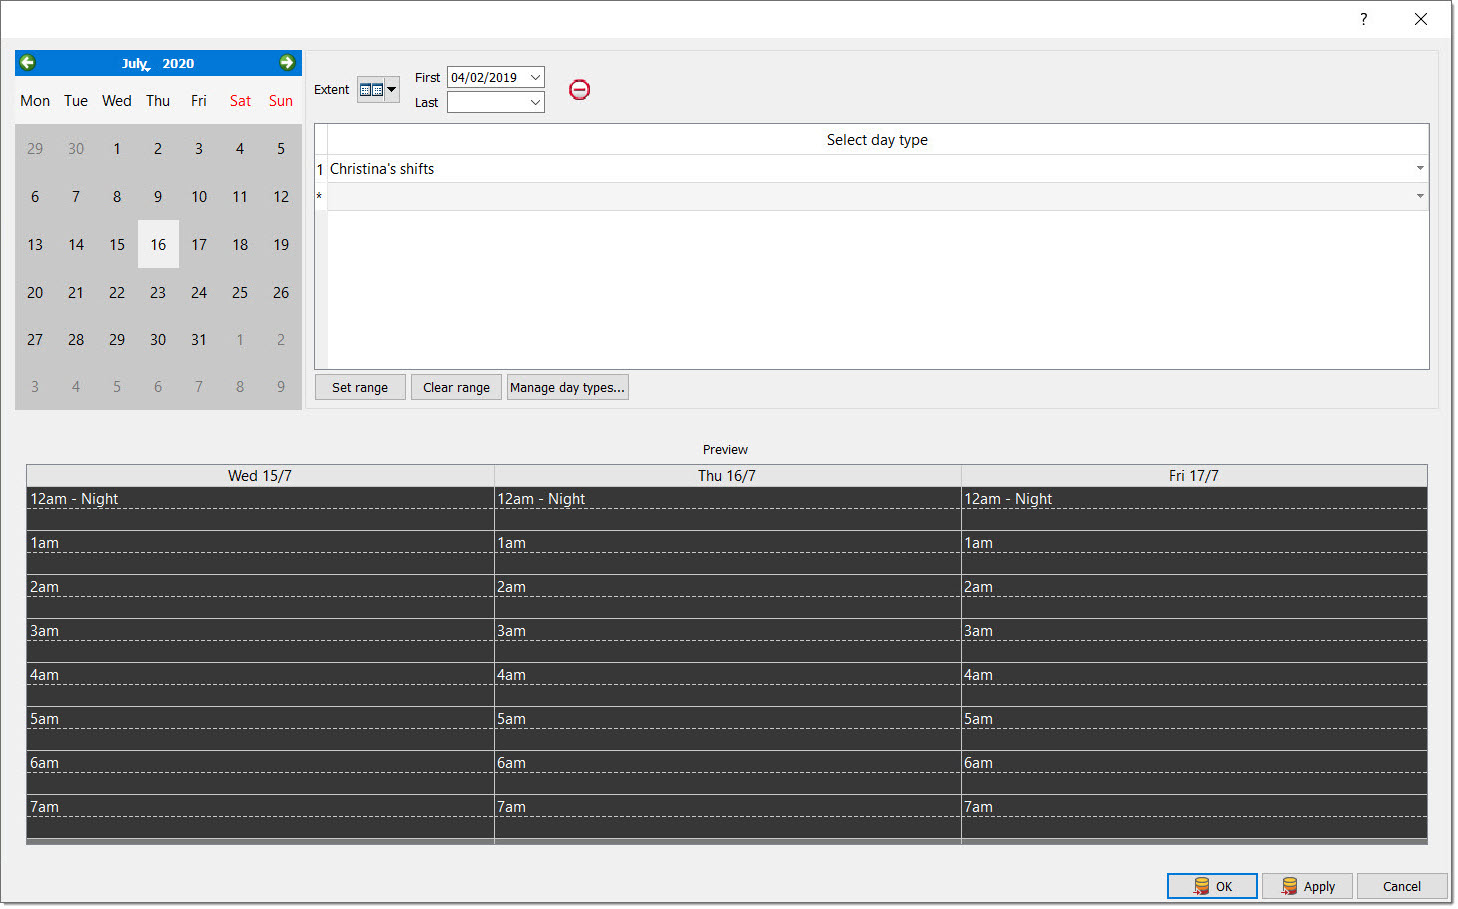
Charging shifts
The Charging shifts tab allows you to configure a charging shift schedule at the start of the drill and blast life cycle.
Cost properties
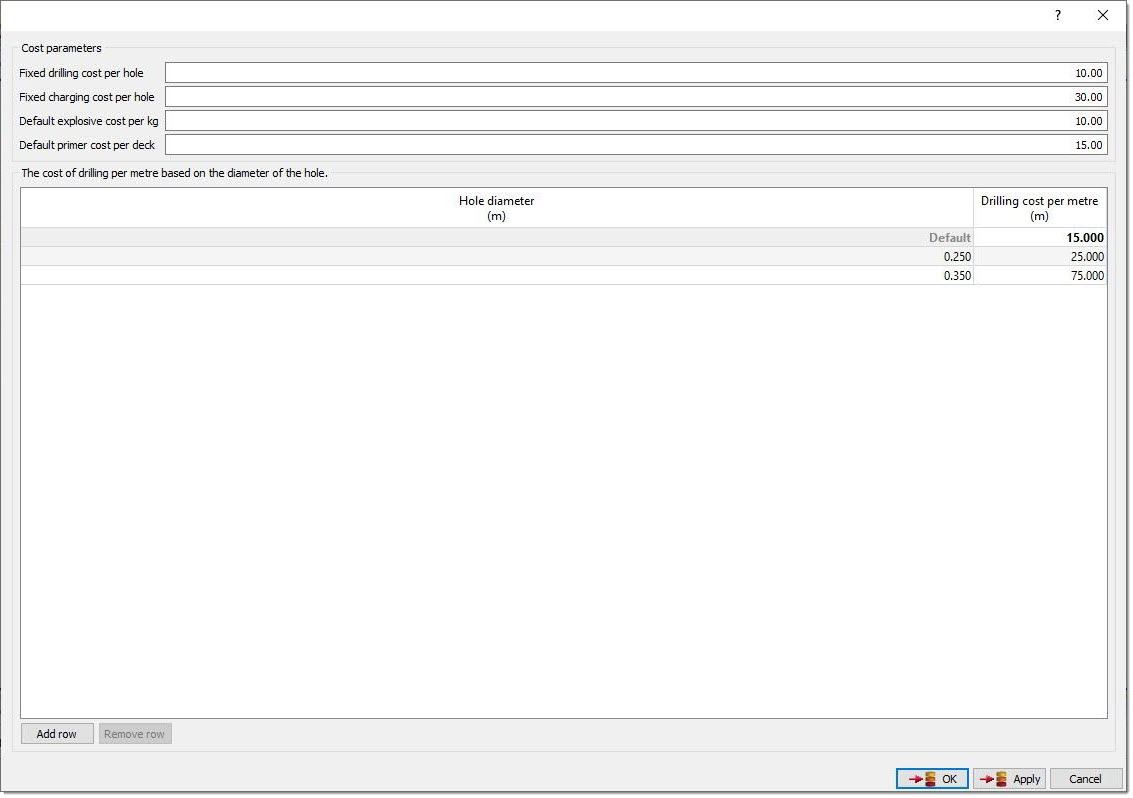
The Cost properties tab allows you set default cost parameters which you can use in cost reporting. This is beneficial if not all values are set in the Blast Product Catalogue. In the panel table, you can define these parameters by entering the desired values into the Cost parameter section fields.
BlastLogic also lets you define drilling cost per metre values for different hole diameters. In the panel table, you can define the hole diameters you wish to define in the Hole diameter (m) column and assign a corresponding cost in the Drilling cost per metre (m) column. BlastLogic will use the Default value for undefined hole diameters. You can also click the Add row and Remove row buttons to add or remove table rows.
Crews
The Crews tab allows you to add crews to a site. You can assign these crews to a combination of drill and blast operations, such as dipping, backfilling, charging or tie-up. Once you add a crew, you cannot remove it from a site—only mark it as inactive.
-
To add a crew, enter the appropriate data into the bottom blank line of the table.
-
To edit the name of a crew, double click on the corresponding cell in the Name column.
-
To set the appropriate jobs for a crew, select the desired table checkboxes.
-
To set a crew as active, select the corresponding crew checkbox in the Active column. Setting a crew to active will allow you to select the crew from the drop-down menus during data entry.
-
To set a crew as inactive, deselect the corresponding crew checkbox in the Active column.

Custom colour schemes
The Custom colour schemes tab allows you to edit existing colours schemes and create new schemes. BlastLogic utilises colour schemes to highlight data changes in functions such as surface generation and blast modelling.
Adding custom colour schemes
To add a custom colour scheme, follow these steps:
-
Select the Name column in the bottom empty row of the table and enter a scheme name. BlastLogic will automatically set the active checkbox in the Active column and mark the scheme as Dimensionless in the Dimension column drop-down.
-
Optionally, clear the active checkbox in the Active column if you do not wish to use the scheme.
-
Select the desired dimensions in the Dimension column drop-down.
-
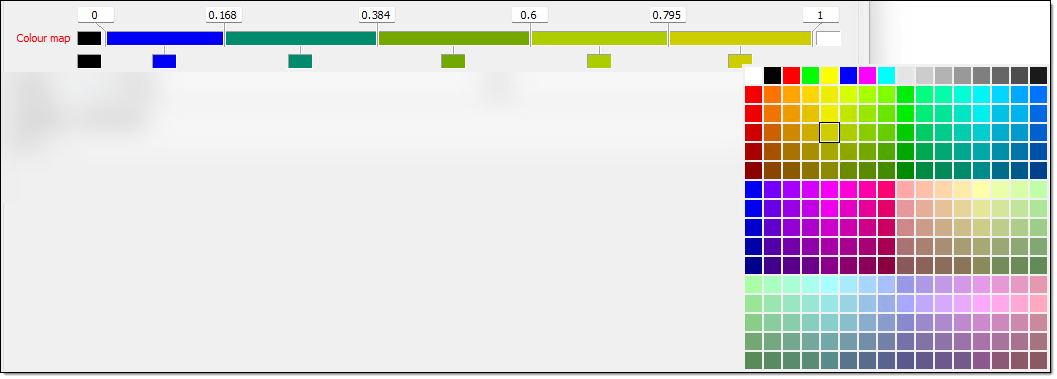
To set the interval and colours in the colour map, follow these steps:
-
Set the minimum and maximum boundary fields. By default, BlastLogic sets these fields to 0 and 1 respectively.
-
Set the additional boundaries.
-
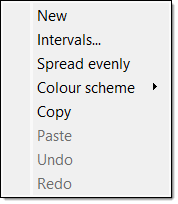
Right-click on the colour band. The following context menu will appear.
-
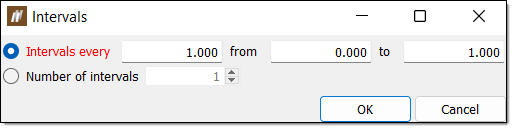
Select Intervals.... The Intervals panel will appear.
-
Select either Intervals every or Number of intervals using the corresponding radio buttons.
-
Enter the desired intervals.
-
For Intervals every, enter the space between intervals along with the start and end points in the associated fields.
-
For Number of intervals, enter the number of intervals in the associated field.
-
-
Click OK.
-
Move the mouse to the edge of the colour band such that the cursor changes to a horizontal resize cursor and click.

-
Drag the cursor to the desired boundary position. Continue this process until you have defined the necessary boundaries.
 Tip!
Tip!Click
 above a boundary to delete it.
 -
Set the boundary colours. You can do this in either of the following ways:
-
Right-click on the colour band and hover over the Colour scheme option in the context menu. Select the desired colour scheme from the list.
-
Select the colour block corresponding to a boundary and select the desired colour from the colour palette.
-
 Expand for an alternative boundary setting method
You can also use the following method to set additional boundaries:
-
-
Click OK or Apply.
Other operations
-
To cut, copy or paste in the table, right-click on the desired row and select the corresponding option in the context menu.
-
To insert rows in the table, right-click on the desired row and select an insert option from the context menu.
-
To delete a row, you must first clear the checkbox in the Active column. You can then right-click on the row and select Delete rows from the context menu.
Drill machines
The Drill machines tab allows you to define a list of drill machines. BlastLogic displays this machines in the drill machine drop-down menu during data entry.
-
To add a new machine, enter the appropriate data into the bottom blank line of the table.
-
To edit the name of a machine, double click on the corresponding cell in the Name column.
-
To set a machine to active, select the corresponding checkbox in the Active column. Setting a machine to active will allow you to select the machine from the drop-down menu during data entry.
-
To set a machine to inactive, deselect the corresponding checkbox in the Active column.
Drill measurements
The Drill measurements tab allows you to define downhole data. This tab contains the following editable, predefined variables:
- Rate of penetration
- Torque
- Weight on bit
- Drill rotational speed
Adding custom properties
To add a custom property, follow these steps:
-
Click
. BlastLogic adds the new property to the properties table and opens the property detail fields on the right side of the panel. -
Enter the desired information into the Identifier, Label and Description fields.
Note:You can only enter letters, digits and underscores into the Identifier field as BlastLogic references this name internally.
-
Set a colour for the property by clicking on the Colour box field and selecting a colour from the drop-down palette.
-
Select the property type using the Type drop-down. There are five types to choose from in BlastLogic:
-
Boolean. You can turn these types on or off via a checkbox.
-
Float. These types must have a range set as greater than a given value, less than a given value, in between two values, or all values. You must also define the dimension and units of float properties.
-
Select. This type is a field in which you can create different values to select from during data entry. You can enter these values and an associated labels in the displayed table. During data entry, you can only select one of the field values.
-
Multi-select. These types are the same as select fields, except you can select multiple values from the drop-down list.
-
String. These types can be either a single line or a multiple line string. Single line strings can have one or more hints to store commonly entered values.
-
-
You can also set the following fields, depending on the selected type:
-
Colour map. To set the colours in the colour map, follow these steps:
-
Set the minimum and maximum boundary fields. By default, BlastLogic sets these fields to 0 and 1 respectively.
-
Set the additional boundaries.
-
Right-click on the colour band. The following context menu will appear.
-
Select Intervals.... The Intervals panel will appear.
-
Select either Intervals every or Number of intervals using the corresponding radio buttons.
-
Enter the desired intervals.
-
For Intervals every, enter the space between intervals along with the starting and end points in the associated fields.
-
For Number of intervals, enter the number of intervals in the associated field.
-
-
Click OK.
Expand for an alternative boundary setting method.
You can also use the following method to set additional boundaries:
-
Move the mouse to the edge of the colour band such that the cursor changes to a horizontal resize cursor and click.
-
Drag the cursor to the desired boundary position. Continue this process until you have defined the necessary boundaries.
Tip!Click
above a boundary to delete it.
-
-
Set the boundary colours. You can do this in either of the following ways:
-
Right-click on the colour band and hover over the Colour scheme option in the context menu. Select the desired colour scheme from the list.
-
Select the colour block corresponding to a boundary and select the desired colour from the colour palette.
-
-
-
Range. Set the range of the property by selecting how you wish to define the range and entering the desired values.
-
Dimension. Set the dimension using the corresponding drop-down.
-
Unit. Set the units using the corresponding drop-down.
-
Value. Set the label and colour associated with a particular value.
-
Hint. Set commonly entered values.
Optionally, select the Multiple lines radio button for a multiple line string. You cannot define hints for this option.
-
-
Click OK or Apply.
Editing drill measurements
To edit a drill measurement, follow these steps:
-
Click on a measurement property in the table. BlastLogic displays the property information on the right hand side of the panel.
-
Edit the desired fields. Depending on the property type, certain information fields may not be editable.
-
Click OK or Apply.
Other operations
-
To remove a drill measurement, select the measurement and click
. -
To clone a drill measurement, select the measurement and click
. -
To reorder the drill measurements, select the measurement you wish to move and click the
and buttons.
Drilling properties
The Drilling properties tab allows to create and configure custom drilling properties.
Adding custom properties
To add a custom property, follow these steps:
-
Click
. BlastLogic adds the new property to the properties table and opens the property detail fields on the right side of the panel. -
Enter the desired information into the Identifier, Label and Description fields.
Note:You can only enter letters, digits and underscores into the Identifier field as BlastLogic references this name internally.
-
Select the Show on tablet checkbox if you wish to display this property on the BlastLogic tablet.
-
Select the Required checkbox if you wish to make the property mandatory.
-
Select the property type using the Type drop-down. There are six types to choose from in BlastLogic:
- Boolean. You can turn these types on or off via a checkbox.
-
Float. These types must have a range set as greater than a given value, less than a given value, in between two values, or all values. You must also define the dimension and units of float properties.
-
Select. This type is a field in which you can create different values to select from during data entry. You can enter these values and an associated labels in the displayed table. During data entry, you can only select one of the field values.
-
Multi-select. These fields are the same as select fields, except you can select multiple values from the drop-down list.
-
String. These types can be either a single line or a multiple line string. Single line strings can have one or more hints to store commonly entered values.
-
You can also set the following fields, depending on the selected type:
-
Range. Set the range of the property by selecting how you wish to define the range and entering the desired values.
-
Dimension. Set the dimension using the corresponding drop-down.
-
Unit. Set the units using the corresponding drop-down.
-
Value. Set the label and colour associated with a particular value.
-
Hint. Set commonly entered values.
Optionally, select the Multiple lines radio button for a multiple line string. You cannot define hints for this option.
-
-
Click OK or Apply.
Editing drilling properties
To edit a drilling property, follow these steps:
-
Click on a drilling property in the table. BlastLogic displays the property information on the right hand side of the panel.
-
Edit the Label and Description fields. Depending on the type of property, additional information fields may be editable.
-
Click OK or Apply.
Other operations
-
To remove a drilling property, select the property and click
. -
To clone a drilling property, select the property and click
. -
To reorder the drilling properties, select the property you wish to move and click the
and buttons.
After configuring a property, you can provide values for it when creating drilling data via BLIS, the validate drilling tool or drill data entries. BlastLogic then stores the data on the server.
Drilling shifts
The Drilling shifts tab allows you to configure a drilling shift schedule at the start of the drill and blast lifecycle.
Hole properties
The Hole properties tab allows you to create and configure custom hole properties.
Adding custom properties
To add a custom property, follow these steps:
-
Click
. BlastLogic adds the new property to the properties table and opens the property detail fields on the right side of the panel. -
Enter the desired information into the Identifier, Label and Description fields.
Note:You can only enter letters, digits and underscores into the Identifier field as BlastLogic references this name internally.
-
Select the tablet module you wish to display the property in, from the Purpose drop-down.
-
Select the Required checkbox if you wish to make the property mandatory.
-
Select the property type using the Type drop-down. There are six types to choose from in BlastLogic:
- Boolean. You can turn these types on or off via a checkbox.
-
Float. These types must have a range set as greater than a given value, less than a given value, in between two values, or all values. You must also define the dimension and units of float properties.
-
Range. These types must have their dimension and units set.
-
Select. This type is a field in which you can create different values to select from during data entry. You can enter these values and an associated labels in the displayed table. During data entry, you can only select one of the field values.
-
Multi-select. These fields are the same as select fields, except you can select multiple values from the drop-down list.
-
String. These types can be either a single line or a multiple line string. Single line strings can have one or more hints to store commonly entered values.
-
You can also set the following fields, depending on the selected type:
-
Range. Set the range of the property by selecting how you wish to define the range and entering the desired values.
-
Dimension. Set the dimension using the corresponding drop-down.
-
Unit. Set the units using the corresponding drop-down.
-
Value. Set the label and colour associated with a particular value.
-
Hint. Set commonly entered values.
Optionally, select the Multiple lines radio button for a multiple line string. You cannot define hints for this option.
-
-
Optionally, edit the hole status colours and attributes. The bottom of the panel contains the colours and symbols for each hole status as displayed in the view. To edit these, click on the colour or shape cells and select the desired colour from the colour palette or shape from the drop-down.
-
Click OK or Apply.
Editing hole properties
To edit a hole property, follow these steps:
-
Click on a hole property in the table. BlastLogic displays the property information on the right hand side of the panel.
-
Edit the Label and Description fields. Depending on the type of property, additional information fields may be editable.
-
Click OK or Apply.
Other operations
-
To remove a hole property, select the property and click
. -
To clone a hole property, select the property and click
. -
To reorder the hole properties, select the property you wish to move and click the
and buttons.

Interval labels
The Interval labels tab allows you to define interval labels. You can select from these labels when defining intervals for objects. Once you add an interval, you cannot remove it from BlastLogic—only mark it as inactive.
Adding a custom interval label
To add a custom interval label, follow these steps:
-
Select Add interval label.... The following panel will appear.
-
Enter the appropriate information into the Name and Description fields.
-
Click the Colour field and select the desired label colour from the drop-down colour palette.
-
Click OK. BlastLogic will add the label to the panel table and automatically select the checkbox in the Active column.
-
Optionally, clear the checkbox in the Active column if you do not wish to use the label.
-
Click OK or Apply.
Other operations
-
To cut, copy or paste in the table, right-click on the desired row and select the corresponding option in the context menu.
-
To export a label, select the desired label and click Export.... The file explorer will appear, allowing you to select a location to save the label. Click OK to export the label.
Loading trucks
The Loading trucks tab allows you to define a list of loading trucks. BlastLogic displays the trucks in the loading truck drop-down menus during data entry.
-
To add a new truck, enter the appropriate data into the bottom blank line of the table.
-
To edit the name of a truck, double click on the corresponding cell in the Name column.
-
To set a truck to active, select the corresponding checkbox in the Active column. Setting a truck to active will allow you to select the truck from the drop-down menus during data entry.
-
To set a truck to inactive, deselect the corresponding checkbox in the Active column.

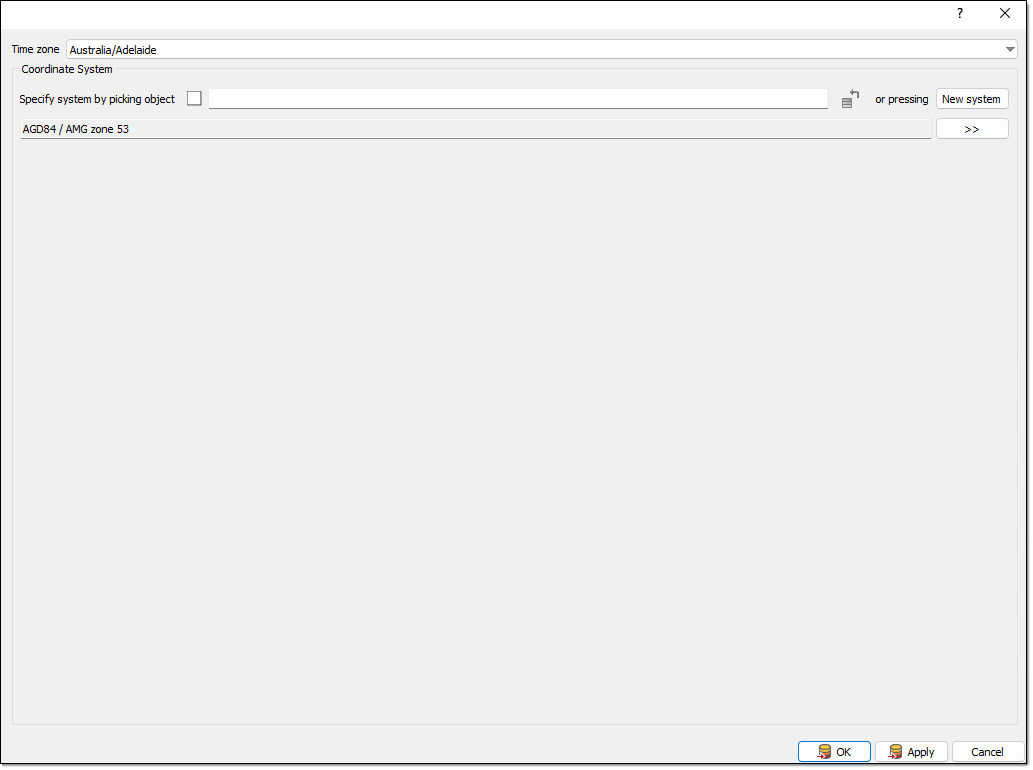
Locale
The Locale tab allows you to select the time zone that the drill and blast operations will be conducted in. You can provide BlastLogic with additional information regarding the coordinate system by clicking New System.
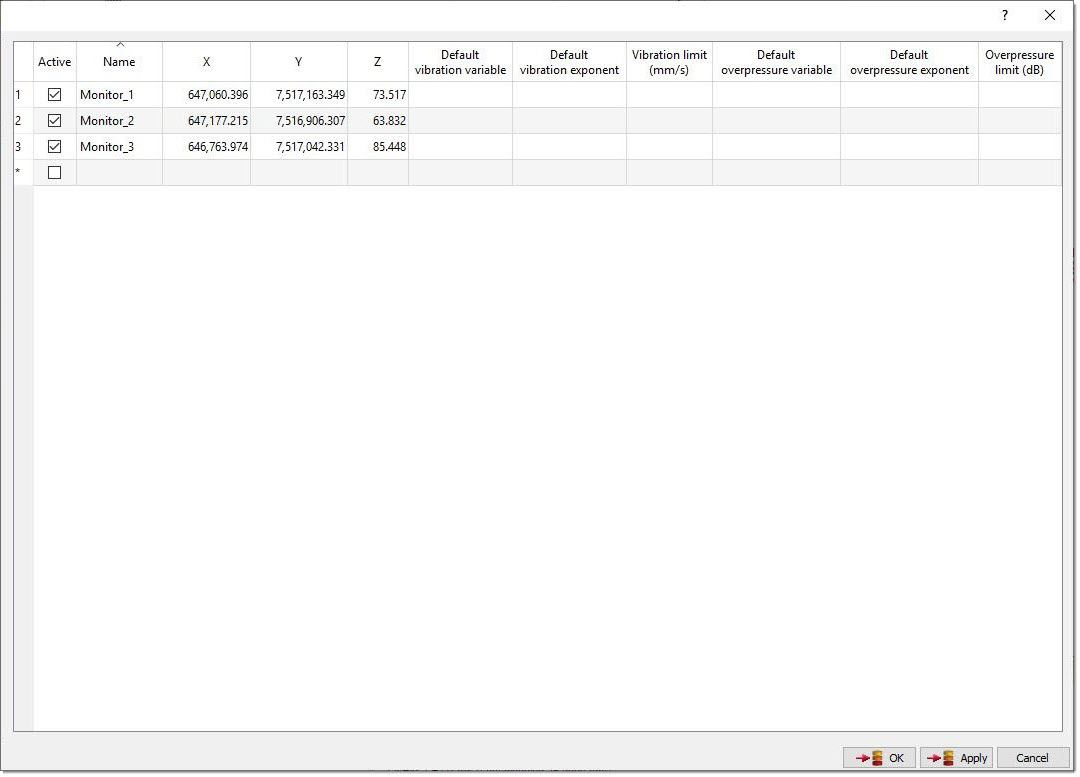
Locations
The Locations tab allows you to create monitoring stations at specific locations for vibration and overpressure analysis. Once you add a location, you cannot remove it from a site—only mark it as inactive.
-
To add a location, enter the appropriate data into the bottom blank line of the table.
-
To edit the name of a location, double click on the corresponding cell in the Name column.
-
To set the details of a location, enter the appropriate information into the variable table columns.
-
To set a location as active, select the corresponding location checkbox in the Active column. Setting a location to active will allow you to select the location from the drop-down menus during data entry.
-
To set a location as inactive, deselect the corresponding location checkbox in the Active column.
Magazines
The Magazines tab allows you to add magazines to your site. Magazines are storage sites for blast products.
-
To add a magazine, enter the appropriate data into the bottom blank line of the table.
-
To edit the name of a magazine, double click on the corresponding cell in the Name column.
-
To set the details of a magazine, enter the appropriate information into the Location and Comments table columns.
-
To set a magazine as active, select the corresponding magazine checkbox in the Active column. Setting a magazine to active will allow you to select the magazine from the drop-down menus during data entry.
-
To set a magazine as inactive, deselect the corresponding magazine checkbox in the Active column, corresponding to the magazine. Once you create and add stock to a magazine, you cannot make it inactive.

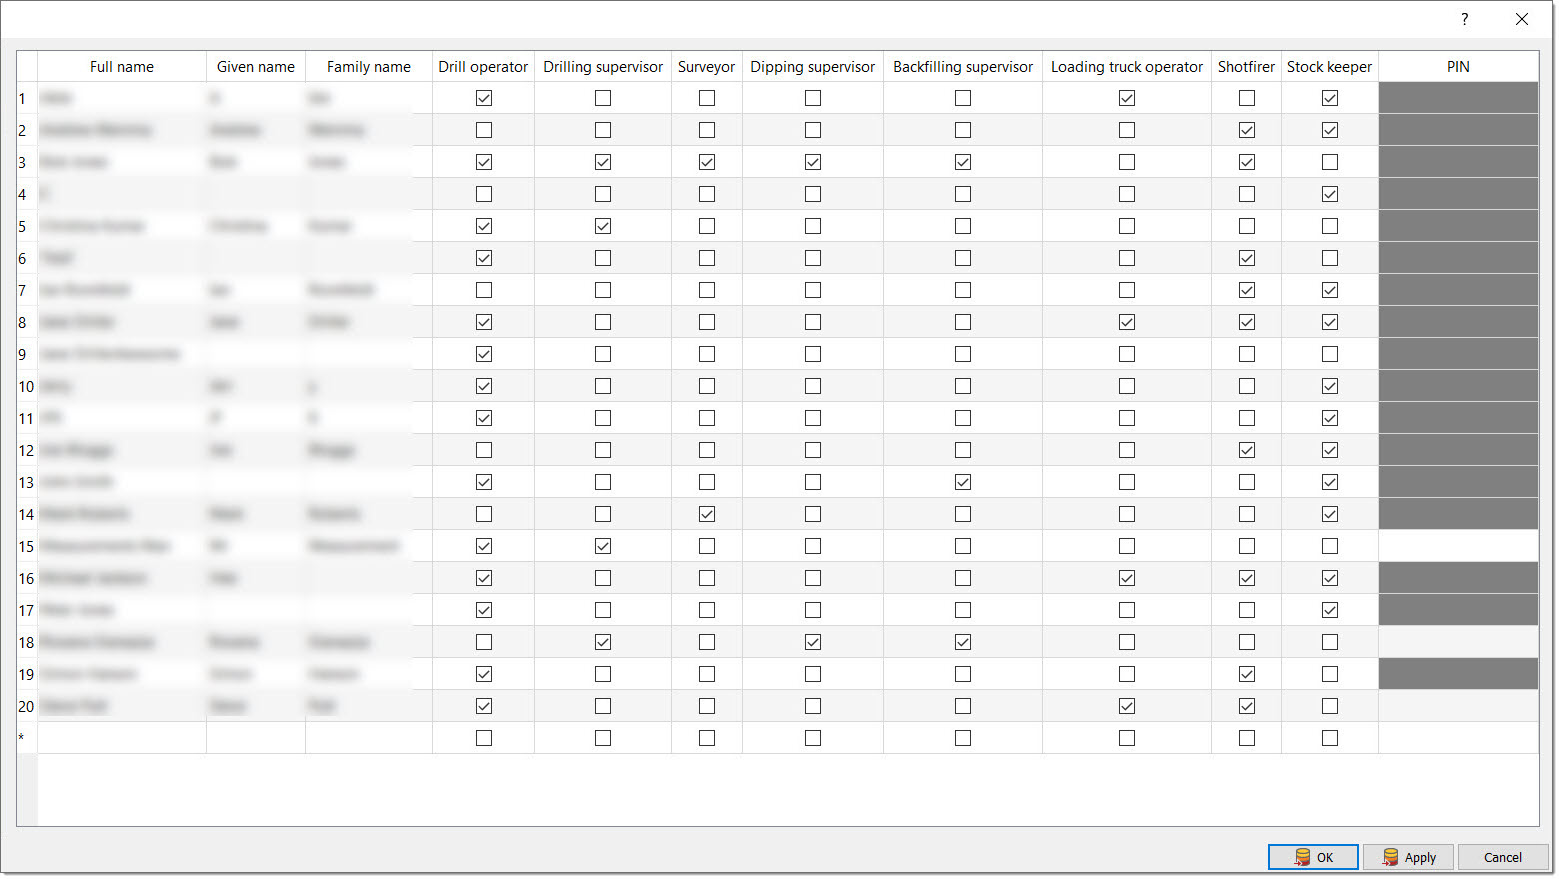
Personnel
The Personnel tab allows you to add operators, surveyors, supervisors, shotfirers and stock keepers to your setup.
-
To add new personnel, enter the appropriate data into the bottom blank line of the table.
-
To edit the name of personnel, double click on the corresponding cell in the Full Name column.
-
To set the appropriate jobs for the personnel, select the desired table checkboxes.
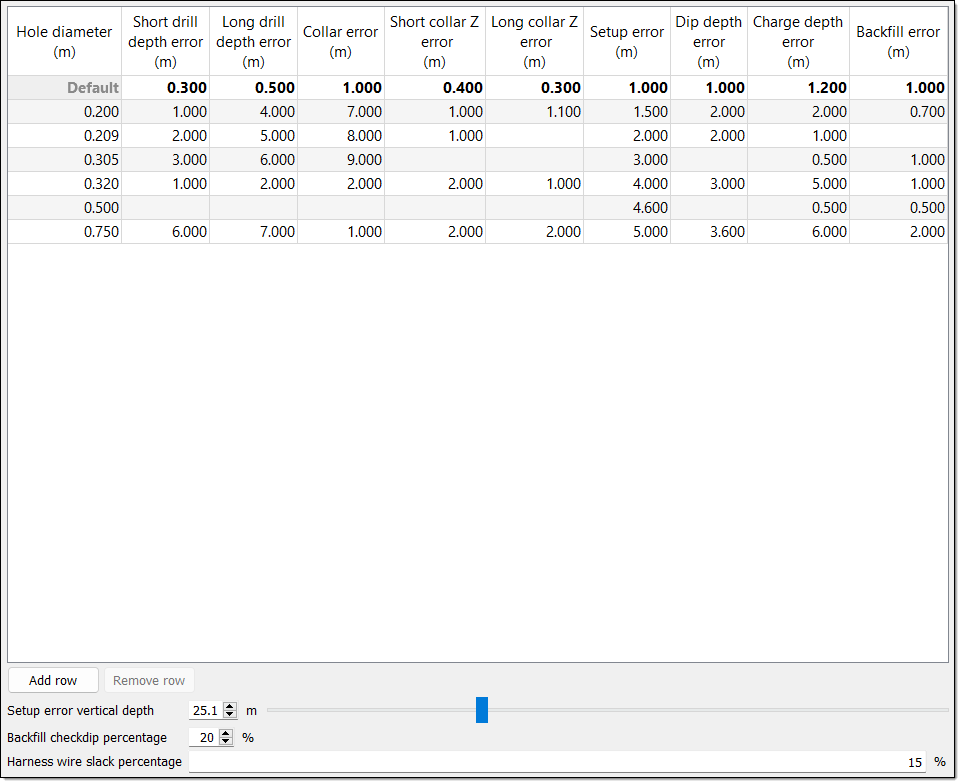
Process tolerances
The Process tolerances tab allows you to set process tolerances per hole diameter. BlastLogic will use the Default value for any undefined hole diameters.
During the design of a blast, idealised or vacuum conditions are in place. When you first introduce real world data to the setup, BlastLogic adjusts the design data to establish a point of reference. As you update the data in the setup, this data is compared with the point of reference (design) data.
A process tolerance defines an acceptable range for the new data to deviate from the design data. You can view these tolerances during drill validation and when generating reports. If the tolerance is exceeded, BlastLogic will notify the drill and blast engineer such that the necessary action can be taken.
Adding a tolerance
To add a tolerance, follow these steps:
-
Select Add row. BlastLogic will add a new row to the table.
-
Select each cell in the row and enter the desired information.
Expand for more information on the per hole diameter tolerances.
You can define values for the following:
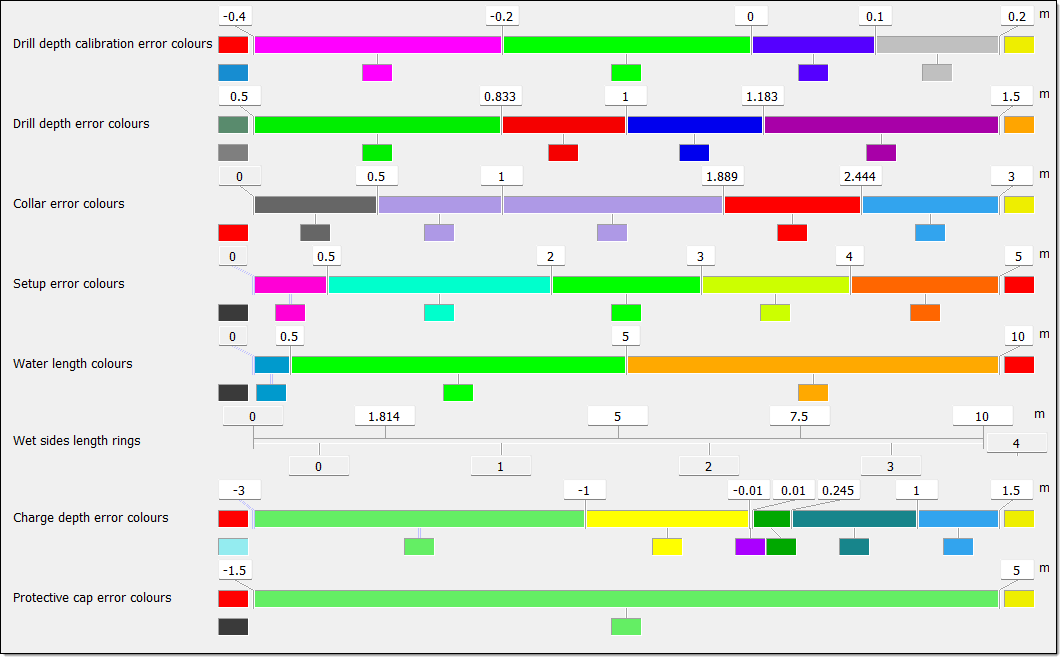
Term Definition Reports Short drill depth error The maximum tolerated difference between the target drill depth and the as-drilled depth, if the as-drilled drill depth is shorter than expected. If the error exceeds the limit set, BlastLogic will highlight the corresponding cell in the validate drilling table in red. -
Drill Depth Accuracy report
Long drill depth error The maximum tolerated difference between the target drill depth and the as-drilled depth, if the as-drilled drill depth is longer than expected. If the error exceeds the limit set, BlastLogic will highlight the corresponding cell in the validate drilling table in red. -
Drill Depth Accuracy report
Collar error The maximum tolerated difference between the as-drilled collar and the design drill collar. BlastLogic only considers the X and Y axes. If the error exceeds the limit set, BlastLogic highlights the corresponding cell in the validate drilling table in red. -
Drill Collar Accuracy report
Short collar Z error The maximum tolerated difference between the as-drilled collar Z value and the design collar Z value, if the as-drilled collar Z value is less than the design collar Z value. If the error exceeds the limit set, BlastLogic will highlight the corresponding cell in the validate drilling table in red. NA Long collar Z error The maximum tolerated difference between the as-drilled collar Z value and the design collar Z value, if the as-drilled collar Z value is greater than the design collar Z value. If the error exceeds the limit set, BlastLogic will highlight the corresponding cell in the validate drilling table in red. NA Setup error A measure of the horizontal distance between the actual toe and the design toe, at the setup error vertical depth (set in the Process tolerances tab). This difference can arise due to difference in the design and actual angle/bearing. If the error exceeds the limit set, BlastLogic will highlight the corresponding cell in the validate drilling table in red.
-
Drilling Setup Accuracy report
Dip depth error The maximum tolerated difference between the actual dip depth and the target dip depth (the previously recorded dip depth). For dip data entry, the cell is colored in red when the recorded dip depth is more than the dip depth tolerance greater than the previous known depth. NA Charge depth error The maximum tolerated difference between the actual charge depth (after loading charge) and the target charge depth. - Pre-charging Depth Accuracy report
- Charge Placement Accuracy report
- Pattern Condition report
Backfill error The maximum tolerated difference between the dip depth after backfilling and the target charge depth. -
Backfill Compliance report
You can view the Validate Drilling panel by navigating to the Drilling ribbon and selecting Validate Drilling. In this panel, open the Validation tab to view the tolerances. For more information on this tool, refer to the Validation page.
-
-
Click OK or Apply.
Other operations
-
To remove a tolerance row, select the row and click Remove row.
-
To set per holes process tolerances, you can enter the desired information into the Setup error vertical depth, Backfill checkdip percentage and Harness wire slack percentage fields.
Expand for more information on the per hole tolerances.
You can define values for the following:
Term Definition Setup error vertical depth The depth at which BlastLogic calculates the setup errors. backfill checkdip percentage The proportion of backfilled holes which require checkdipping on the backfill sheet. Harness wire slack percentage The percentage of additional harness wire used when connecting holes in a tie-up due to slack in the wire. You can use this definition in tie-up design.
Report exclusions
The Report exclusions tab allows you to define filters to exclude holes from reports if they do not meet certain criteria.
To define these filters, follow these steps:
-
Select the report you wish to configure from the Report drop-down.
-
Select the type of properties you wish to filter using the side navigation bar.
-
Use the property checkboxes and field to exclude certain holes.
Tip!All of the checkboxes have the following three states:

Do not filter this criteria 
Filter this criteria with the entered values 
Filter for instances of this criteria that are undefined (do not have values entered)
-
Click OK or Apply.

Report setup
The Report setup tab allows you to define the colours and boundaries of report histograms. You can generate these reports via the Report ribbon.
To set the colours and intervals, follow these steps:
-
Set the minimum and maximum boundary fields. By default, BlastLogic sets these fields to 0 and 1 respectively.
-
Set the additional boundaries.
-
Right-click on the colour band. The following context menu will appear.
-
Select Intervals.... The Intervals panel will appear.
-
Select either Intervals every or Number of intervals using the corresponding radio buttons.
-
Enter the desired intervals.
- For Intervals every, enter the space between intervals along with the start and end points in the associated fields.
- For Number of intervals, enter the number of intervals in the associated field.
-
Click OK.
-
Move the mouse to the edge of the colour band such that the cursor changes to a horizontal resize cursor and click.
-
Drag the cursor to the desired boundary position. Continue this process until you have defined the necessary boundaries.
Tip!Click
above a boundary to delete it.
Expand for an alternative boundary setting method
You can also use the following method to set additional boundaries:
-
-
Set the boundary colours. You can do this in either of the following ways:
-
Right-click on the colour band and hover over the Colour scheme option in the context menu. Select the desired colour scheme from the list.
-
Select the colour block corresponding to a boundary and select the desired colour from the colour palette.
-
-
Click OK or Apply.
Spatial measurements
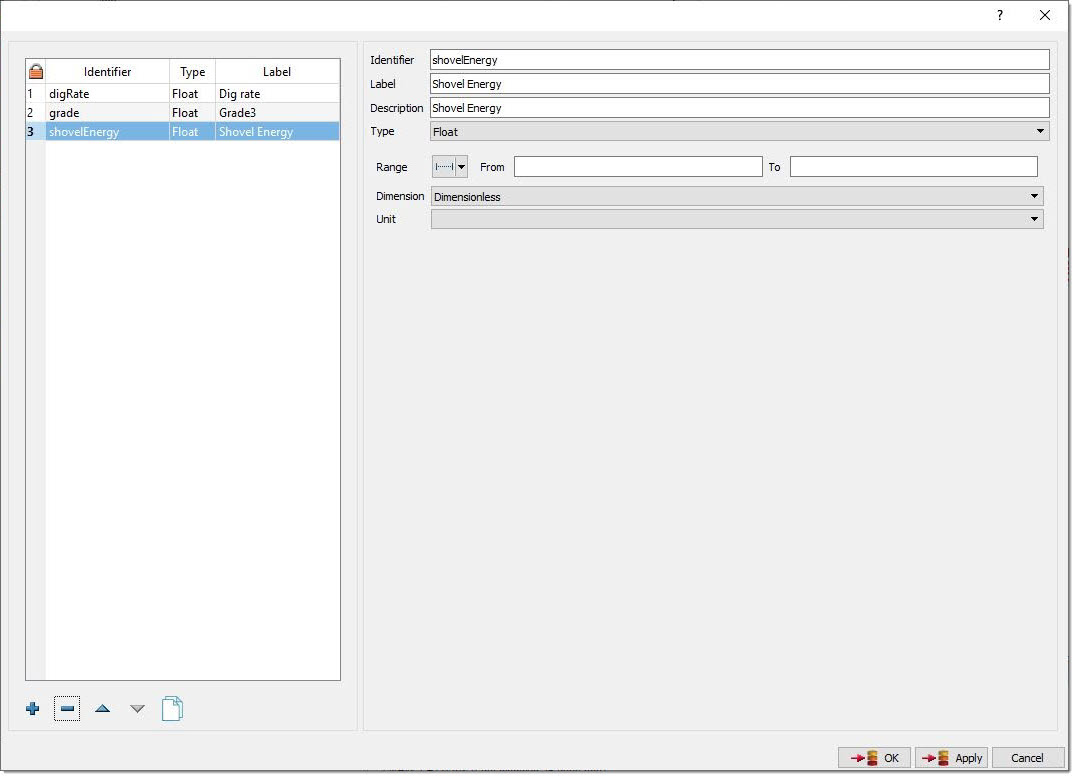
The Spatial Measurements tab provides you with an interface to define custom spatial measurement properties. You can then define and query these spatial measurements for certain objects. You can also copy these measurements to custom hole properties based on an inverse distance procedure.
Adding custom properties
To add a custom property, follow these steps:
-
Click
 . BlastLogic will give the new property default names in the Identifier and Label fields.
 -
Enter the desired information into the Identifier, Label and Description fields.
Note:You can only enter letters, digits and underscores into the Identifier field as BlastLogic references this name internally.
-
Select the property type using the Type drop-down.
-
Configure the following options:
-
Range. Set the range of the property by selecting how you wish to define the range and entering the desired values.
-
Dimension. Set the dimension using the corresponding drop-down.
-
Unit. Set the unit using the corresponding drop-down.
-
-
Click OKor Apply.
Editing spatial measurements
To edit a spatial measurement, follow these steps:
-
Click on a measurement property in the table. BlastLogic displays the property information on the right hand side of the panel.
-
Edit the Label and Description fields.
Note:To preserve existing data, the remaining custom property fields are not editable.
-
Click OK or Apply.
Other operations
-
To remove a spatial measurement, select the measurement and click
. -
To clone a spatial measurement, select the measurement and click
. -
To reorder the spatial measurements, select the measurement you wish to move and click the
and buttons.
Tablet hole display rules
The Tablet hole display rules tab allows you to add and configure unique rules which control how the BlastLogic tablet displays holes. This tab provides you with the following options:
To create a hole display rule, follow these steps:
-
Click
 . The Create Tablet Hole Display Rule panel will appear.
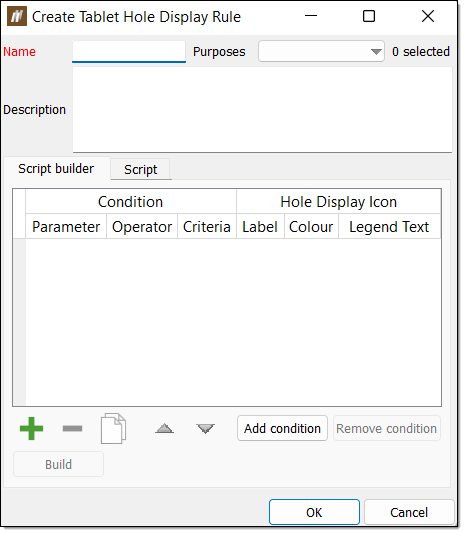
-
Enter the desired information into the Name and Description fields.
-
Select the desired tablet menus from the Purposes drop-down. The tablet menus you select will contain the rule as a hole display option in the tablet view.
-
Create a script for the rule. The script allows you to define conditions and corresponding visualisations which BlastLogic will use to categorise the holes in the tablet view. You can do this using either of the following tabs:
-
Script builder
The Script builder tab allows you to create table rows which form the hole display rule. Each row contains the following two sections:-
A condition section. This section allows you to define the conditions of a row. These conditions provide BlastLogic with criteria to categorise the holes.
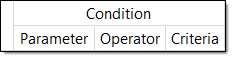
-
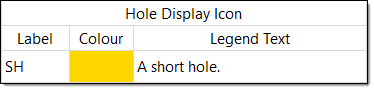
A hole display icon section. This section allows you to define the label, colour and text BlastLogic will assign to a hole, if the hole meets the corresponding row conditions.

To create conditions using the script builder, follow these steps:
-
Click
. BlastLogic will add a row to the table. -
Select the desired hole parameter from the Parameter column drop-down. In this drop-down, you can select one of the following hole property groups to use as a parameter:
- design
- drilling
- dipping
- backfilling
- charging
- custom
-
Select the desired operator from the Operator column drop-down. The options in the drop-down can change depending on the parameter you define. For example, if the parameter you select is a numerical value, such as Drill design - depth, then the Operator drop-down will contain the following options:
- equals
- greater than or equal
- less than or equal
Expand for more information on the Operator drop-down options.
The table below summarises the types Operator and Criteria types required, depending on the parameter type you select.
Parameter Type Example Parameter Operator Drop-Down Options Criteria Type A numerical property Drill design - depth - equals
- greater than or equal
- less than or equal
A numerical value in the following form:
5.000
A time period property Drilling - start drilled time - is before
- is after
A date and time in the following form:
26/08/2022 3:04 PM
A property which contains multiple instances for each hole Charging (reconciled) - deck quantities - any are equal to
- any are greater than or equal to
- any are less than or equal to
- all are equal to
- all are greater than or equal to
- all are less than or equal to
- none are equal to
- none are greater than or equal to
- none are less than or equal to
- sum equals
- sum is greater than or equal to
- sum is less than or equal to
A numerical value in the following form:
5.000
A property containing a sequence of numbers Hole ID - contains
- does not contain
- equals
A sequence of number in the following form:
123
A string property Charging (loaded) - crew names - any contain
- any are equal to
- all contain
- all are equal to
- none contain
- none are equal to
A string in the form of a name or comment:
John Smith
Abandoned due to redrill.
A boolean property Drilling - is validated - equals
- does not equal
Select or clear the checkbox as desired. -
Enter the desired value into the Criteria column cell.
Tip!The operator you select specifies how you want BlastLogic to evaluate the value you enter into the Criteria column cell. For example, if you set the Parameter drop-down to Drill design - depth, the Operator drop-down as less than or equal to and the Criteria as 5, then a hole will meet this condition if its drill design depth is less than or equal to 5 m.

-
Optionally, add multiple conditions to the row. This allows you to add more detail to the rule, as a hole must satisfy all of the conditions in a row to be assigned the corresponding colour and label. To do this, follow these steps:
-
Select the desired row and click Add condition. BlastLogic will add a second condition, titled Condition 2, to the table.
Note:BlastLogic relates two or more conditions with an AND operator. For example, if you have two conditions in one row, BlastLogic will assign holes to that row which satisfy both condition 1 AND condition 2.

-
Select the desired information in the Parameter and Operator drop-downs and enter the appropriate value into the Criteria cell.
-
Continue adding conditions and the appropriate information as desired.
-
-
Select the desired row and click Add condition. BlastLogic will add a second condition, Condition 2, to the table.
Note:BlastLogic connects two or more conditions by an AND operator. For example, if you have condition 1 and condition 2 in one row, BlastLogic will assign holes to that row which satisfy both condition 1 AND condition 2.
-
Select a colour for the label using the Colour column field. BlastLogic will colour the hole icon this colour in the tablet view.
-
Enter the desired legend text in the Legend Text column cell. BlastLogic will display this text in the tablet view legend.
-
Add and configure additional rows by repeating these steps. Adding more rows allows you to create additional sets of conditions with corresponding colours and labels.

-
Optionally, rearrange the order of the rows by selecting the desired row and clicking the
and buttons. Important!BlastLogic will compare each hole to the conditions of each row, in the order that the rows appear in the table. It is useful to check that the conditions you want BlastLogic to check for first are in the first row of the table. For example, if a hole meets the conditions of the first and second row of the rule, BlastLogic will always assign it to the first row.
-
Click Build. BlastLogic will populate the Script tab with the code for the hole display rule.
-
-
Script
The Script tab allows you to create a hole display rule script from scratch, using the coding language JavaScript. If you need additional help creating a script, visit our support site, Maptek Support, to contact a member of our technical services team.
-
-
Click OK. BlastLogic will add the tablet hole display rule to the table.
Other operations
-
To remove a tablet hole display rule, select the rule and click
. -
To edit an existing tablet hole display rule, select Edit in the end column of the rule row.
-
To clone a tablet hole display rule, select the rule and click
. -
To reorder the tablet hole display rules, select the rule you wish to move and click the
and buttons.
Validation settings
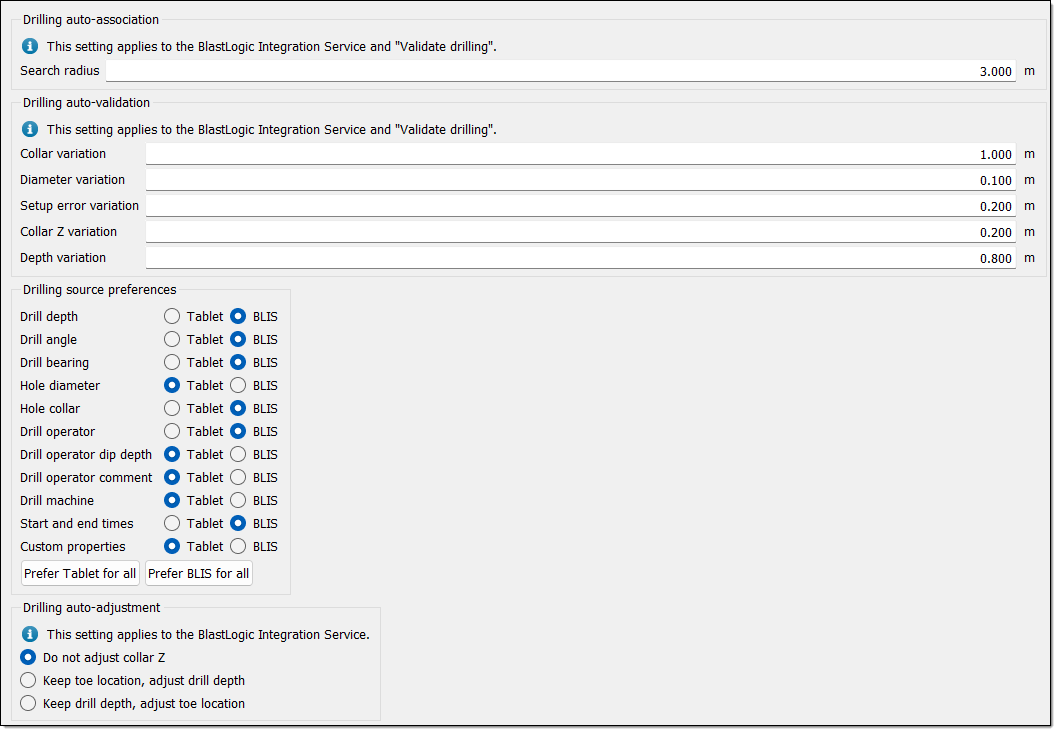
The Validation settings tab allows you to set criteria to control how users perform validation and association of drill data events and design holes. You can use either the BlastLogic Integration Service (BLIS), a web service which allows you to work with drill navigation systems, or the validate drilling panel, which is a part of the desktop application to auto-validate and associate holes.
This tab contains the following sections which you can edit with the corresponding fields or radio buttons:
-
Drilling auto-association:BlastLogic will search for holes in the database with target collar values within the radius you set in the Search radius field.
-
Drilling auto-validation:BlastLogic will validate as-drilled data if it falls within the set variations.
-
Collar variation: The difference between the as-drilled and design X and Y collar values. The collar variation is usually wider than the collar error defined in the Process tolerances tab.
-
Diameter variation: The difference between the as-drilled and design diameter values.
-
Setup error variation: The difference in the as-drilled toe and design toe, if it was drilled at the standard depth.
-
Collar Z variation: The difference between the as-drilled collar Z and design collar Z. The collar Z variation is usually wider than the collar Z error defined in the Process tolerances tab.
-
Depth variation: The difference between the as-drilled depth and design drill depth.
-
-
Drilling source preferences In this section, use the radio buttons to specify whether you wish to source different types of drilling data from the Tablet or the BlastLogic Integration System (BLIS).
-
Drilling auto-adjustment:BlastLogic automatically adjusts the as-drilled collar Z, based on the settings you select in this section. You can choose to leave the collar Z as is or adjust the toe location or drill depth, using the corresponding radio buttons.
Click OK or Apply to save these settings.
Blast product catalogue
The Blast Product Catalogue tool allows you to add a variety of blast product families to a drill and blast process.
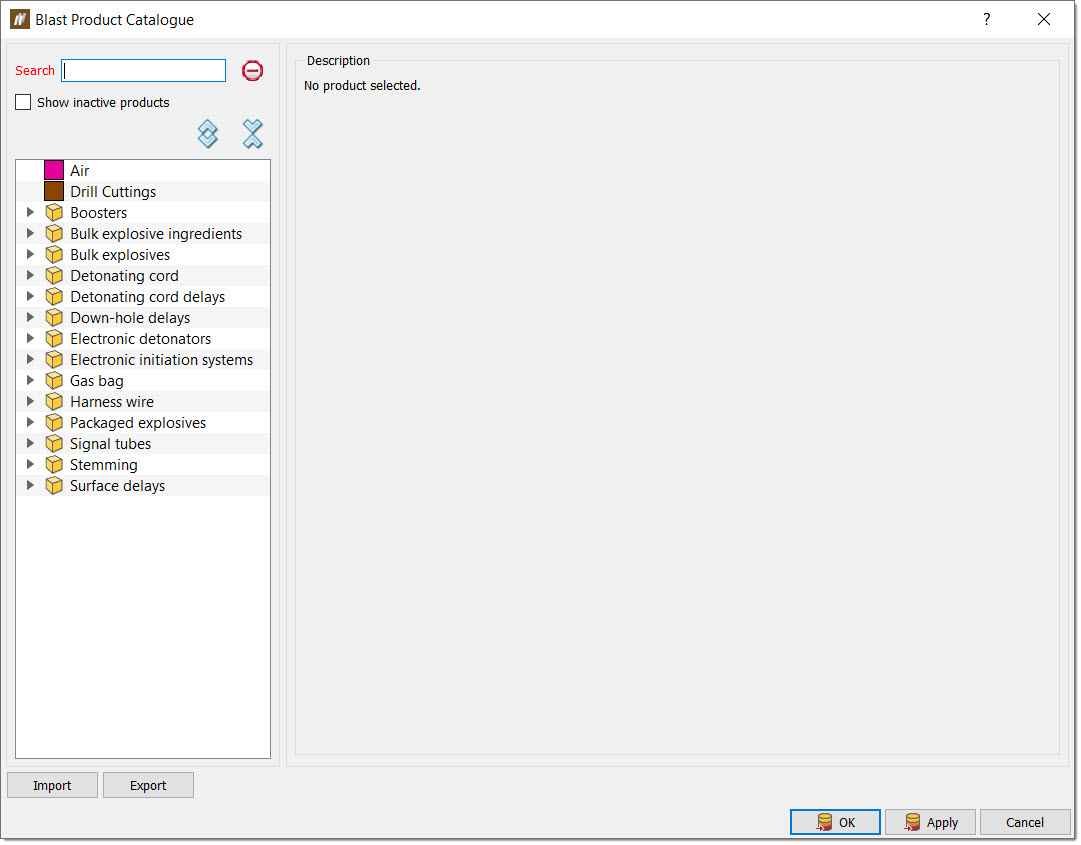
To open this tool, navigate to the Home ribbon, in the Setup group and select Blast Product Catalogue. The Blast Product Catalogue panel will appear, which you can configure with the following options:
-
To import products into the blast product catalogue, select Import. The file explorer will appear, allowing you to select the file you wish to import. Click Open to import the product.
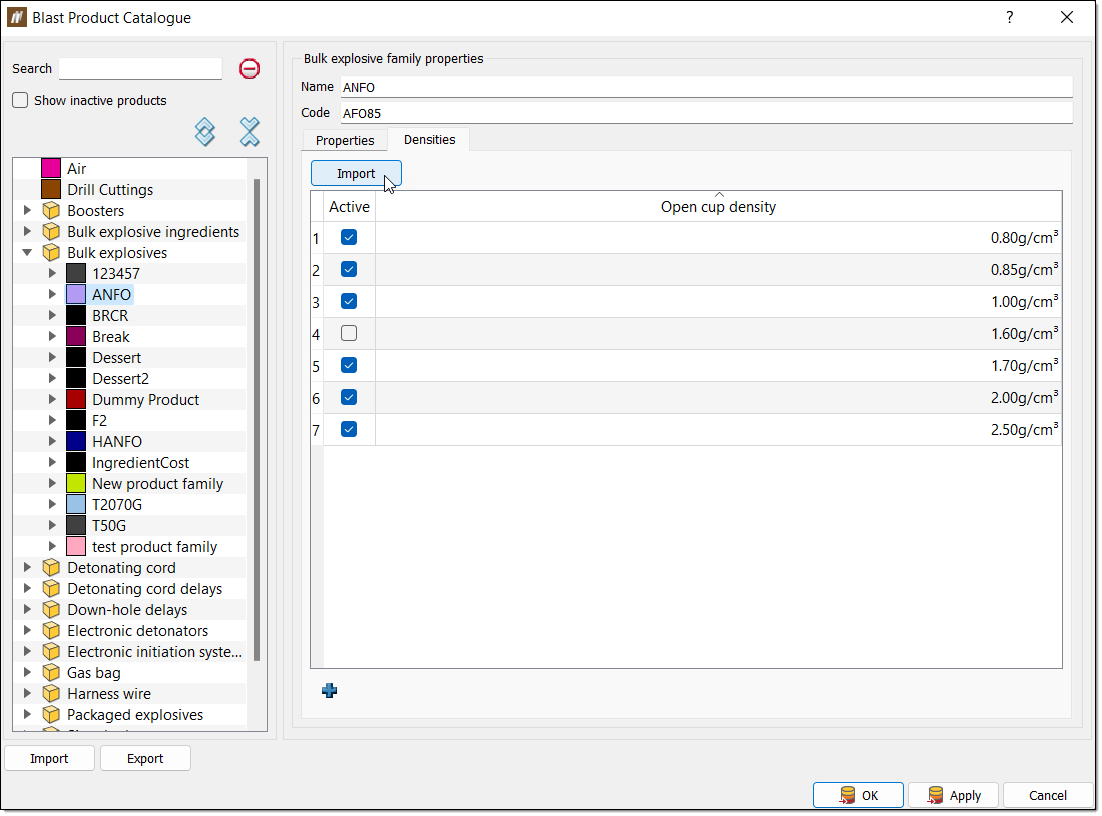
-
To import a density table (CSV format) for a family of bulk explosive products, follow these steps:
-
Select the parent product in the left side bar.
-
Select the Densities tab.
-
Click Import. The file explorer will appear.
-
Select an appropriate CSV file from the file explorer. The CSV should use the format demonstrated in the table below.
Depth Avg.In-Hole Toe Avg.In-Hole Toe Avg.In-Hole Toe 0 0.9 0.9 0.95 0.95 1 1 1 0.92 0.94 0.97 0.99 1.02 1.04 2 0.94 0.98 0.99 1.02 1.03 1.07 3 0.96 1.01 1 1.05 1.05 1.09 4 0.97 1.03 1.02 1.08 1.06 1.12 5 0.99 1.06 1.03 1.1 1.07 1.14 6 1 1.08 1.04 1.12 1.09 1.15 7 1.01 1.1 1.05 1.14 1.1 1.17 8 1.02 1.12 1.07 1.15 1.11 1.18 9 1.04 1.14 1.08 1.17 1.11 1.2 10 1.05 1.15 1.08 1.18 1.12 1.21 -
Click Open. If you select a child product, you should be able to see the density table populated.
-
-
To export products from the blast product catalogue, select Export. The file explorer will appear, allowing you to select a location to store the BlastLogic catalogue file. Click Save to save the file to the specified location.
-
To assign a cost to a product, follow these steps:
-
Select the desired product from the left side bar.
-
Enter the cost into the Cost field.
Note:BlastLogic will use the cost you enter to perform cost analysis on a drill and blast process. You can view this evaluation by selecting the Cost Report tool, located in the Analysis group, on the Report ribbon. For more information on this tool, refer to the Cost report section of the report page.
-
Click OK or Apply.
-
-
To set the range of tolerated density readings for an explosive product, follow these steps:
-
Select the explosive product.
-
Go to the list of products on the left.
-
Expand Bulk explosives by clicking the arrow next to it.
-
Expand the bulk explosive product family from the drop-down list by clicking the arrow next to it.
-
Select an explosive product from the list.
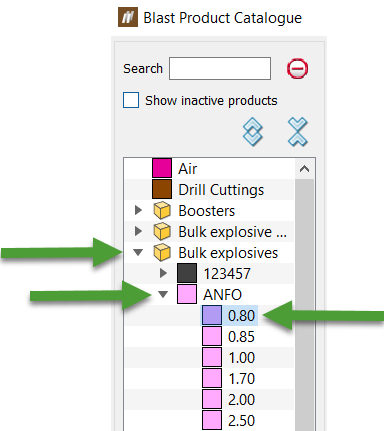
-
Specify the From and To values under Density tolerance.
-
-
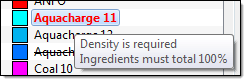
To review any product errors, check for red product labels in the left side bar. This red font indicates there is an error with the product details. You can hover over the red product label to view the error and perform the necessary changes to fix the issue.
-
To check the state of a product, view the name in the left side bar. BlastLogic emboldens edited blast products and italicises new blast products.
-
To mark a product as inactive, select the product from the left side bar and clear the Active checkbox in the <family type> properties section. You cannot delete products, only mark them as inactive.
 Preferences
The Preferences tool allows you to configure global settings in BlastLogic, such as language, date and unit settings. To open this tool, navigate to the Home ribbon, in the Setup group and select ![]() Preferences. This Preferences panel will appear, which contains the following tabs:
Preferences. This Preferences panel will appear, which contains the following tabs:
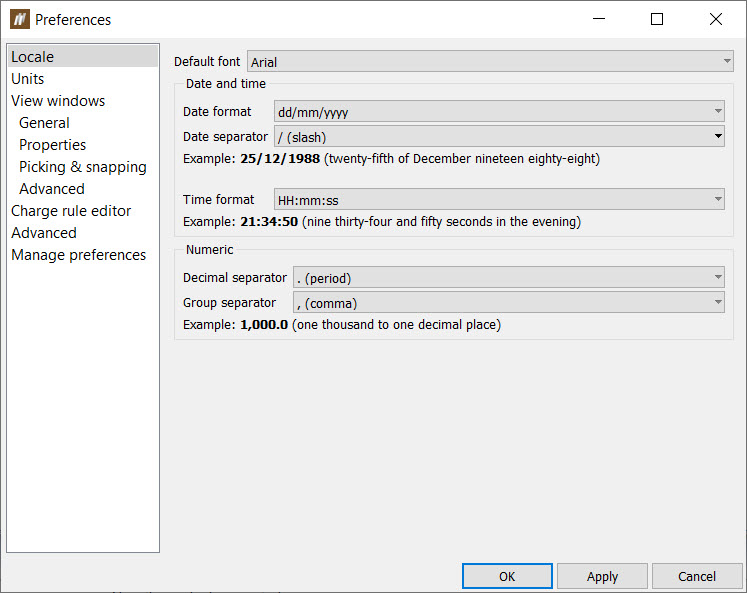
Locale
The Locale tab contains the font, date and numeric settings. You can edit each option by setting the desired information in the field drop-downs.
English is the only available language in BlastLogic.
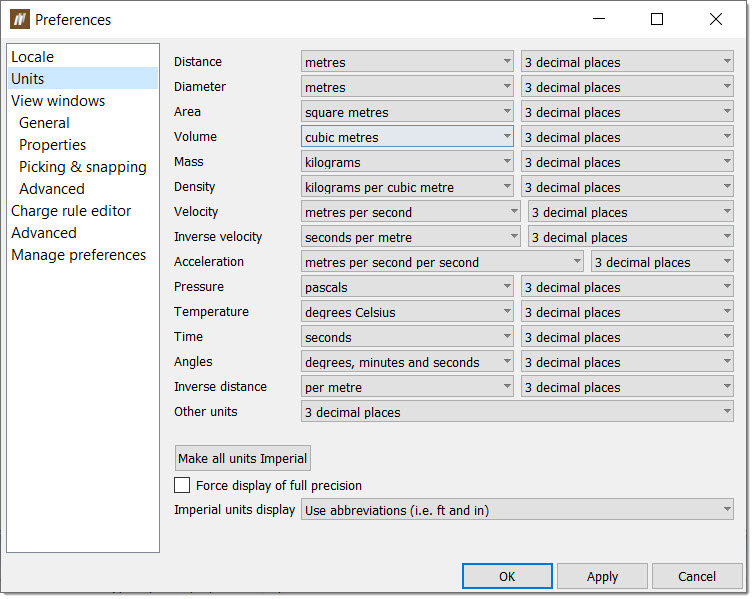
Units
The Units panel contains the unit type and precision settings. By default, BlastLogic will use the computer locale and an appropriate base unit. For example, if the locale is determined to be metric, BlastLogic will set the distance unit to metres. Alternatively, if the locale is determined to be imperial, BlastLogic will set the distance unit to feet.
You can override this by setting each dimension to the desired unit and precision. Use the unit and decimal places drop-downs to configure the units you wish to edit.
-
Setting the precision of Other units will set the precision for values that don't use one of the specified dimensions.
-
The Imperial units display drop-down allows you to specify how BlastLogic should display feet and inches. For example, 6ft 2in or 6'2".
-
Selecting the Force display of full precision option will display all floating point values, regardless of their unit and precision settings.
View windows
In the View windows tab, you can configure the following four sub-tabs.
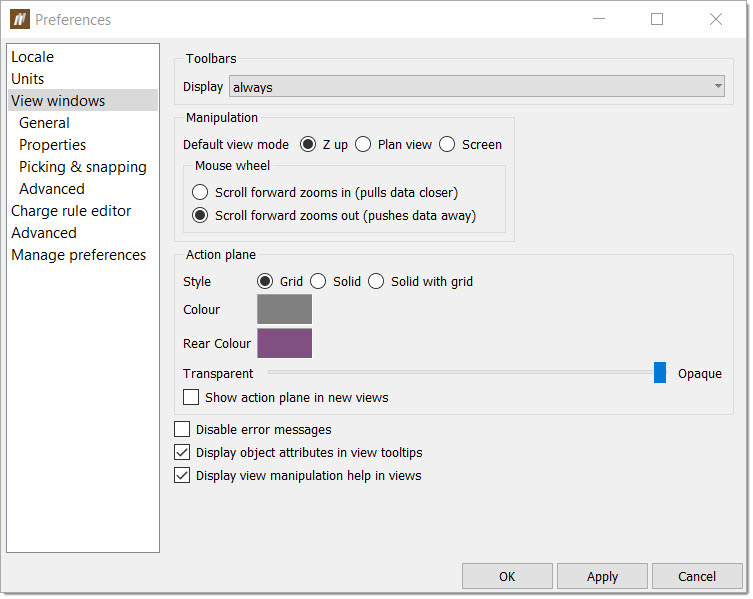
General
The General tab contains the default preferences for the view windows, including the functionality of the mouse wheel. To configure these settings, set the option drop-downs or select/clear the option checkboxes.
You can edit the settings for individual view windows by right-clicking on the view window background.
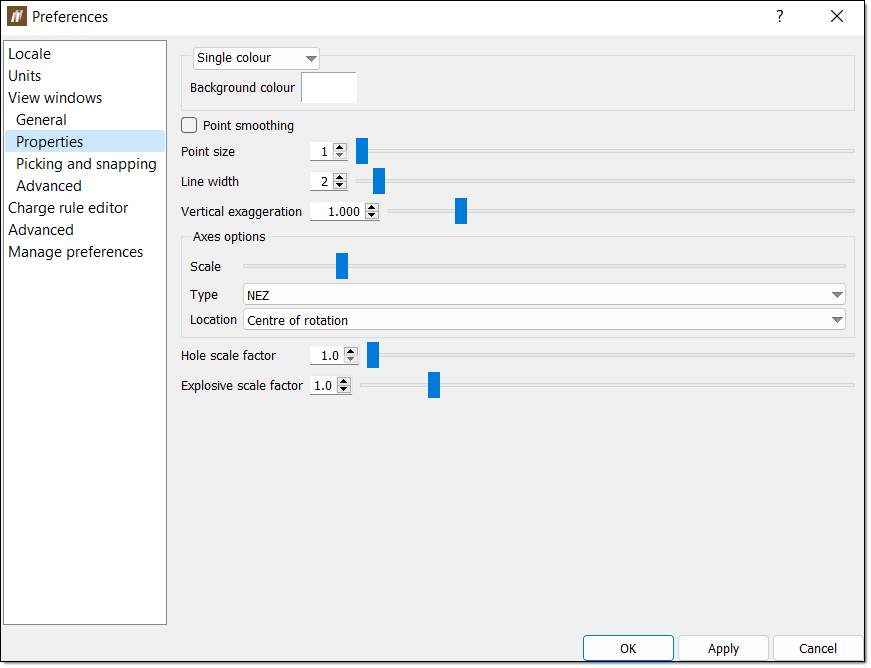
Properties
The Properties tab contains the background colour settings as well as line and point settings for objects, such as holes, lines and polygons. To configure these settings, set the option drop-downs or drag the option sliders.
Picking and snapping
The Picking and snapping tab contains the picking and snapping settings. BlastLogic provides picking and snapping options for drawing 2D CAD objects in the view, such as lines and polygons. The BlastLogic Desktop doesn't provide full support for drawing 2D lines and polygons. To create a line or polygon on a 2D plane, show the action plane and then draw the line or polygon by picking points on the plane.
To configure these settings, set the option fields or select/clear the option checkboxes.

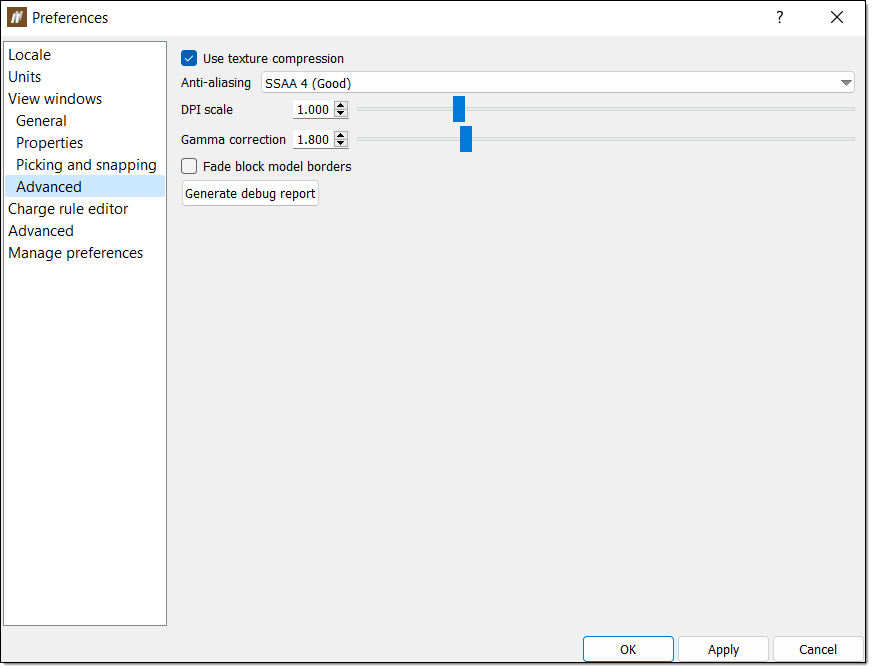
Advanced
The Advanced tab contains several performance settings. To configure these settings, set the option drop-downs or drag the option sliders.
BlastLogic provides you with the option to turn off anti-aliasing in the view window when operations in the view window are performing poorly. This can help to improve performance, however it can also reduce the quality of the objects in the viewer.
 `
`
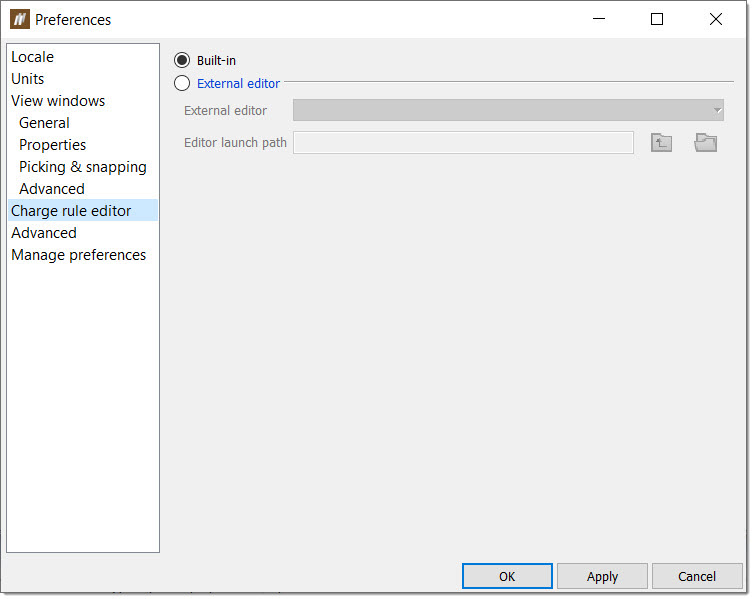
Charge rule editor
The Charge rule editor tab contains the default settings for external charge rule editing environments. To configure this tab, select from the radio button options.
BlastLogic only supports Notepad++ and Visual Studio Code as external editors.
Advanced
The Advanced tab contains application and project settings. To configure these settings, select/clear the radio buttons and checkboxes.
The Application logging options allow you to specify how BlastLogic logs your data. The logged data assists with fault diagnosis when using the send feedback tool.

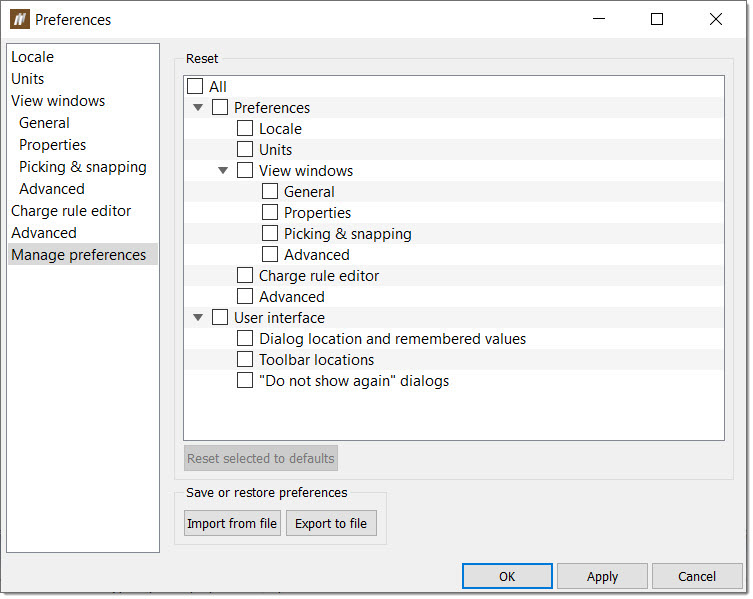
Manage preferences
The Manage preferences tab contains options to reset the specified preferences back to the default state, along with import and export options.
-
To reset a preference to its default settings, select the preference in the preference tree and click Reset selected to defaults.
-
To reset all the preference tabs to their default settings, select All in the preference tree and click Reset selected to defaults.
-
To import preferences, select Import from file. The file explorer will appear, allowing you to select the import file. Click Open to open the file. BlastLogic will query this import by displaying a Question panel. Click Yes to confirm the import.
-
To export preferences, select Export to file. The file explorer will appear, allowing you to select the file location. Click Save to save to save the file to the selected location.
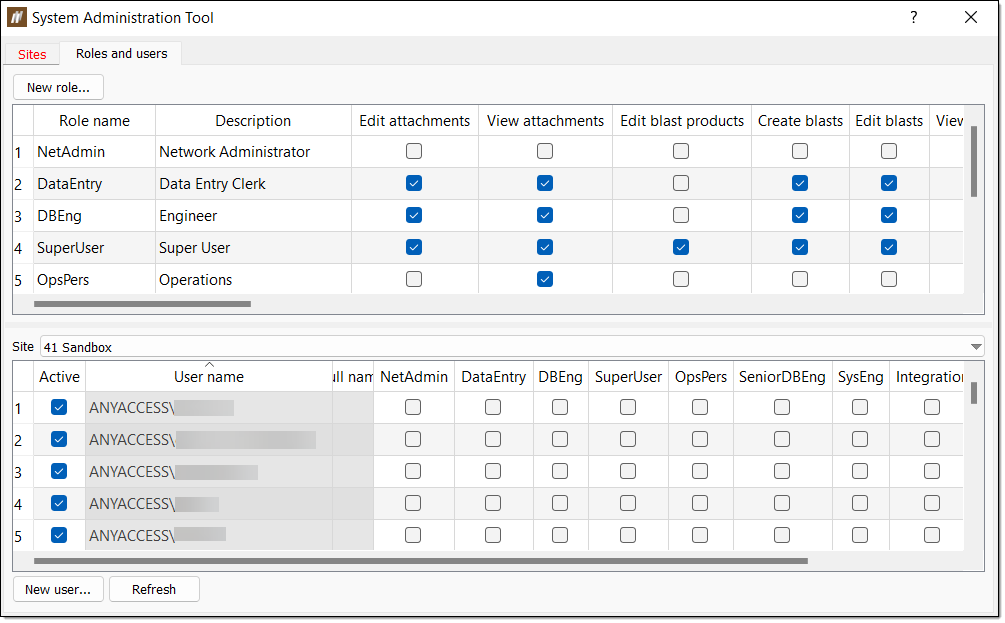
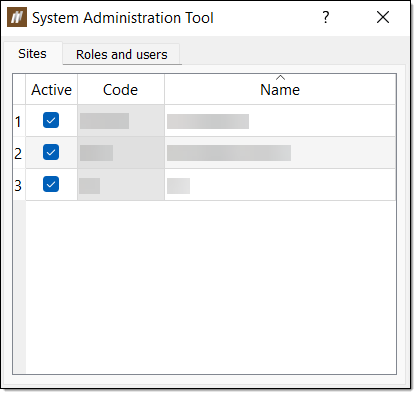
System administration tool
The System Administration Tool allows you to create and manage sites, roles and users. To open this tool, navigate to the Home ribbon, in the Setup group, and select System Administration Tool. The System Administration Tool panel will appear, which contains the following tabs.
Sites
The Sites tab allows you to mark sites as active and inactive, using the Active column checkboxes. When a site is active, you can access it during data entry. You cannot access an inactive site during data entry.
Roles and users
The Roles and users tab allows you to define users and their roles on site. The top table displays the roles, including nine default roles and the bottom table displays the users.
Adding a new role
To add a new role, follow these steps:
-
Select New role.... The Create a New Role panel will appear.

-
Enter the desired information into the Role and Description fields.
-
Select the checkboxes of the permissions you wish to grant this role in the Permissions section.
-
Click OK. BlastLogic will add this new role into the roles table.
-
Optionally, you can edit the permissions of the role by selecting or clearing the desired checkboxes in the role row of the table.
Adding a new user
To add a new user, follow these steps:
-
Select the desired site from the Site drop-down.
-
Select New user.... The Add a New User panel will appear.
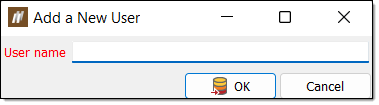
-
Enter the name of the user into the User name field.
-
Click OK. BlastLogic will add the user to the users table.
-
Edit the roles of the user by selecting the desired role checkboxes in the users table.
-
Optionally, you can mark a user as active or inactive by selecting or clearing the Active column checkbox.