Road Network
Source file: origin-reserve-setups-viewer-road-network.htm
Road network and waypoints
The Road Network window in the ![]() Viewer tab allows you to calculate the time it takes to transport material from one point to another. You can flag these points on the road network by adding waypoints. The following waypoint types are available in Origin Solids:
Viewer tab allows you to calculate the time it takes to transport material from one point to another. You can flag these points on the road network by adding waypoints. The following waypoint types are available in Origin Solids:
| Source | A point on the road network defined as the exit point from the pit or stockpile. |
| Destination | An exit point from the road network to a destination such as a mill, stockpile, waste utility, or virtual waste dump. |
| Permission | A point in a pathway that only accepts material transported by certain kinds of trucks. |
| Force | A point in a pathway that the included trucks must pass through. |
For more information on road networks in Evolution, see Road Networks. For more information on waypoints, see Adding and Removing Waypoints, Using the Waypoint Editor, and Creating a Waypoint Collection.
Note: The Road Network tab is only available in Origin Equipment setups.
The Road Network window contains the following tabs:
Configuration
Use the ![]() Configuration tab to link source and destination waypoints that you have added to the road network.
Configuration tab to link source and destination waypoints that you have added to the road network.
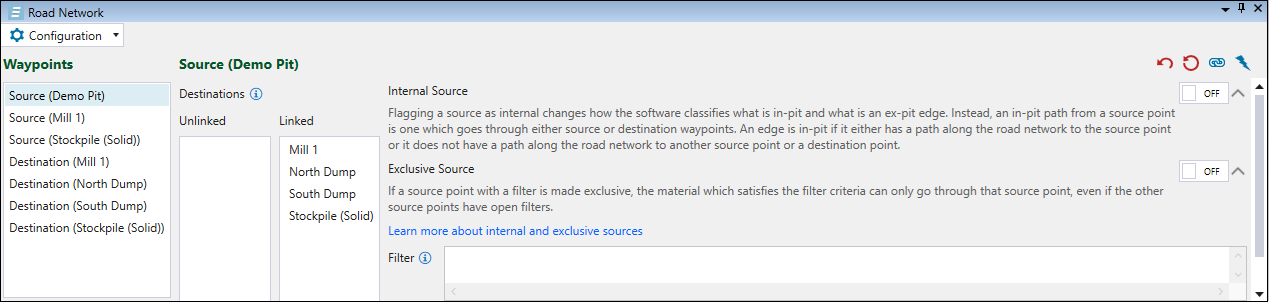
The Waypoints column features all waypoints that were assigned to the given network. All waypoints assigned to the pits in your setup will be marked as Source waypoints, whereas the waypoints assigned to the mills, waste utilities, and virtual waste dumps will be marked as Destination waypoints. The waypoints assigned to the stockpiles will be Source or Destination waypoints. See Road network and waypoints for information on each waypoint type.
Important: As Origin Solids allows for enabling waste tailings in the mill configuration, source waypoints can also be assigned to mills. This does not apply to Origin Blocks and Epoch setups. See Enable Waste Tailings for more information.
-
Click on the waypoint to link and unlink its destinations (for pits and stockpiles) or its sources (for stockpiles, mills, and waste dumps). A destination represents an exit point from the road network to a destination such as a mill, stockpile, or waste dump. A source waypoint represents a boundary between the in-pit and ex-pit path for a pit or an exit point of a stockpile.
Important: You must link the source and destination waypoint to send the material between them.
-
Drag a destination or source waypoint to the Linked or Unlinked field to link or unlink it from a given waypoint.
You can flag a Source waypoint as an Internal and Exclusive Source by toggling the corresponding button (![]() and
and ![]() ).
).
-
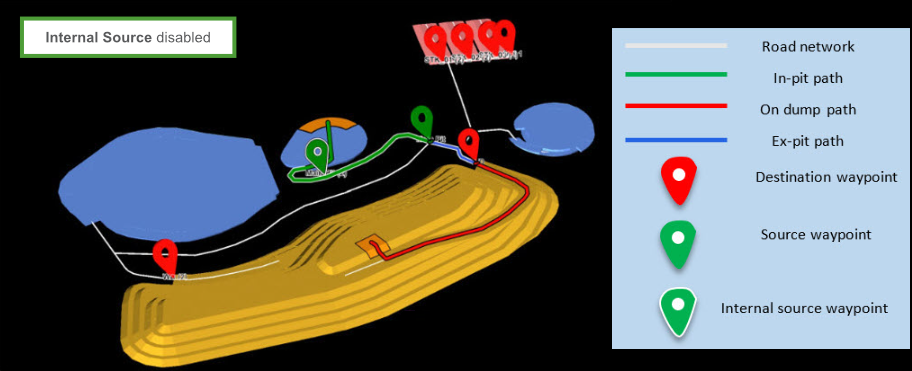
Internal Source: Flagging a source as Internal changes how Evolution classifies the in-pit and ex-pit path edge.
Note: Evolution derives these paths by calculating the in-pit, followed by ex-pit, and finally, the on-dump (if on-dump is required). Once these components are calculated, Evolution connects them together. See Glossary for definition of each component.
The table below shows the differences in Evolution behaviour when the Internal Source is disabled and enabled.
Internal Source disabled
(default setting)In-pit path: The path taken from the source solid, along the bench to the road network, and along the road network until it reaches a source waypoint.
Ex-pit path: The path taken along the road network between a source waypoint and a destination waypoint.
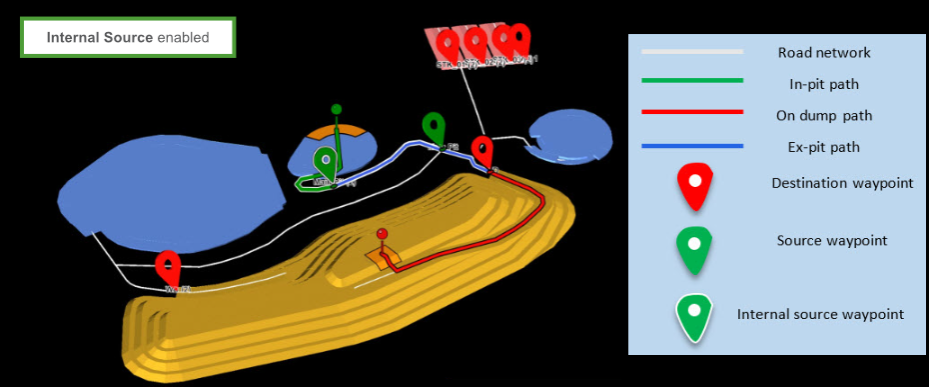
Internal Source enabled In-pit path: The path taken from the source solid up to the internal source point.
Ex-pit path: The path taken from the internal source waypoint up to the destination waypoint.
-
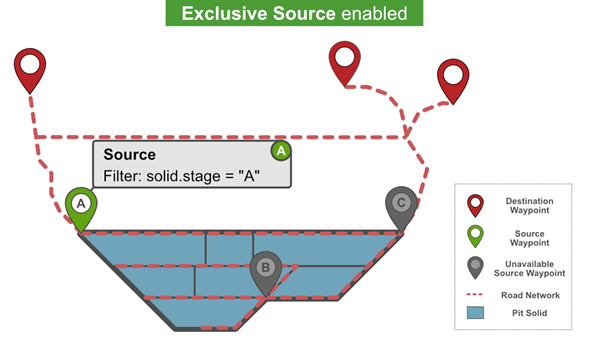
Exclusive Source: Flagging a source as Exclusive forces material passing this filter to be sent through this source point, even if other source points have open filters.
-
Filter: Allows you to define a script to specify the material that can be transferred through the source waypoint. Click Apply Filter to apply the script to the selected waypoint, or click Apply to All to apply the script to all existing source waypoints.
Note: If no filter is set, any material can pass through the waypoint.

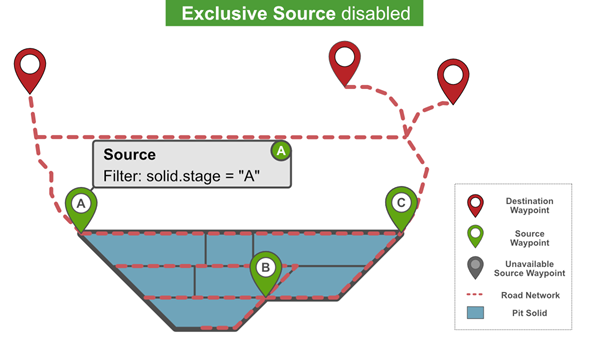
Exclusive Source disabled
(default setting)If you keep the Exclusive Source setting disabled, Evolution also allows the material to be sent through other waypoints (B, C). All solids transferred through a waypoint must pass the waypoint’s filter criteria (if specified). In the example below, all solids passing through waypoint A must be assigned to stage A, but any solids (including those assigned to stages other than A) may pass through waypoints B and C.
Exclusive Source enabled If you enable Exclusive Source on a waypoint, all material that satisfies the filter criteria (for example, solid.stage == A, as shown on the image below) must pass only through the source waypoint.
The ![]() Configuration tab contains the following waypoint controls:
Configuration tab contains the following waypoint controls:
|
Unlink current waypoint |
Unlinks all destinations or sources from the selected waypoint. Evolution will display a pop-up window for you to confirm your selection. Tip: You can also link and unlink the sources and destinations by dragging them between the Unlinked and Linked fields. |
|
Unlink all sources and destinations |
Unlinks all destinations and sources from all waypoints included within your network. Evolution will display a pop-up window for you to confirm your selection. |
|
Open waypoint linking workflow |
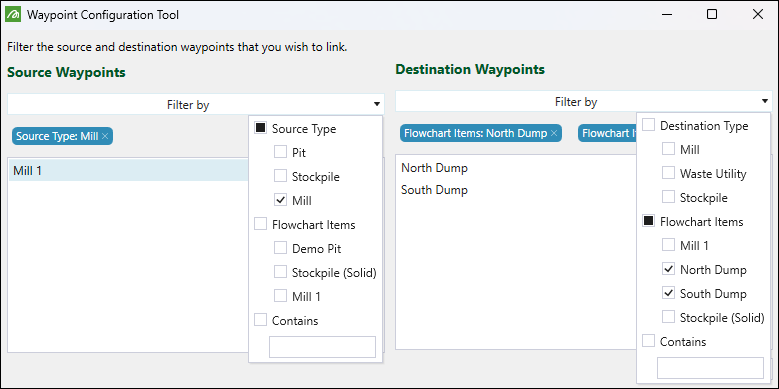
Opens the Waypoint Configuration Tool panel, where you can link the waypoints to their destinations or sources. Note: You must link the sources and destinations in the Tip: You can also link and unlink the sources and destinations by dragging them between the Unlinked and Linked fields. |
|
Open the automatic waypoint generation tool |
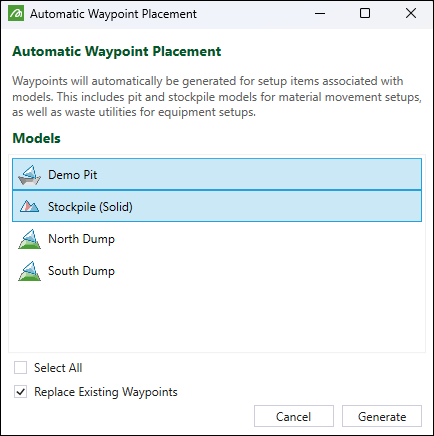
Opens the Automatic Waypoint Placement panel that allows you to automatically generate waypoints for setup items associated with imported models (pits, stockpiles, and waste utilities). You can select multiple models to generate waypoints for. To do so, click to select the required models while pressing the Ctrl key button.
|
 Calendar
The ![]() Calendar allows you to flag the availability of source and destination waypoints in each period. A green field indicates that the given waypoint is available in the corresponding period, whereas a red field indicates that the waypoint is unavailable. To change this setting, double-click on the cell and select either Available or Unavailable. To copy your calendar data to the clipboard (so it can be later pasted into another document), click the
Calendar allows you to flag the availability of source and destination waypoints in each period. A green field indicates that the given waypoint is available in the corresponding period, whereas a red field indicates that the waypoint is unavailable. To change this setting, double-click on the cell and select either Available or Unavailable. To copy your calendar data to the clipboard (so it can be later pasted into another document), click the ![]() (Copy calendar to clipboard) button.
(Copy calendar to clipboard) button.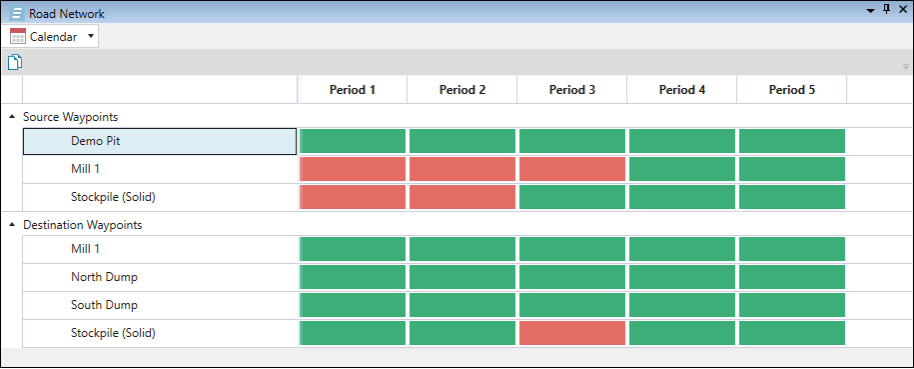
-
Click the
 button once to copy the properties of the current period to the next period.
 -
Double-click the
button to copy the properties of the current period to the subsequent periods until the end of the schedule. -
Alternatively, copy a cell's setting using Ctrl+C , then paste it into selected cells with Ctrl+V.
 Route
Route
Use the Route tab to calculate parameters associated with a particular pathway between the selected source and destination waypoints.
The information on the travelled route is presented in the following tabs:
-
 Summary: Features a summary of the path travelled between the specified source and destination.
 -
 Details: Provides detailed information on the path travelled between the specified points.
 -
 Charts: Shows the route data in a chart form.
Summary
The ![]() Summary subtab summarises the path travelled between the selected source and destination by providing the following information:
Summary subtab summarises the path travelled between the selected source and destination by providing the following information:
-
Total journey duration
-
Total fuel consumption
-
Total distance travelled
-
Average velocity achieved
-
Average fuel consumption
Evolution calculates the data for the total journey travelled, and breaks down the data into the forward and reverse path. The route that you have specified will also be marked in the Viewer.
Tip: To change the colour of the route displayed in the Viewer, click the ![]() button to open the Route Colour editor. Choose the colour on the colour picker, or enter the code for the specific colour in the RGB, CMYK, HLS, or HSV format.
button to open the Route Colour editor. Choose the colour on the colour picker, or enter the code for the specific colour in the RGB, CMYK, HLS, or HSV format.
Route between waypoints
You can obtain information on the path between the selected waypoints.
To do so, select the source and destination waypoints, the truck, and the period from the corresponding drop-down menus. Evolution will automatically calculate the summary for total, forward and reverse paths, and mark the travelled route in the viewer.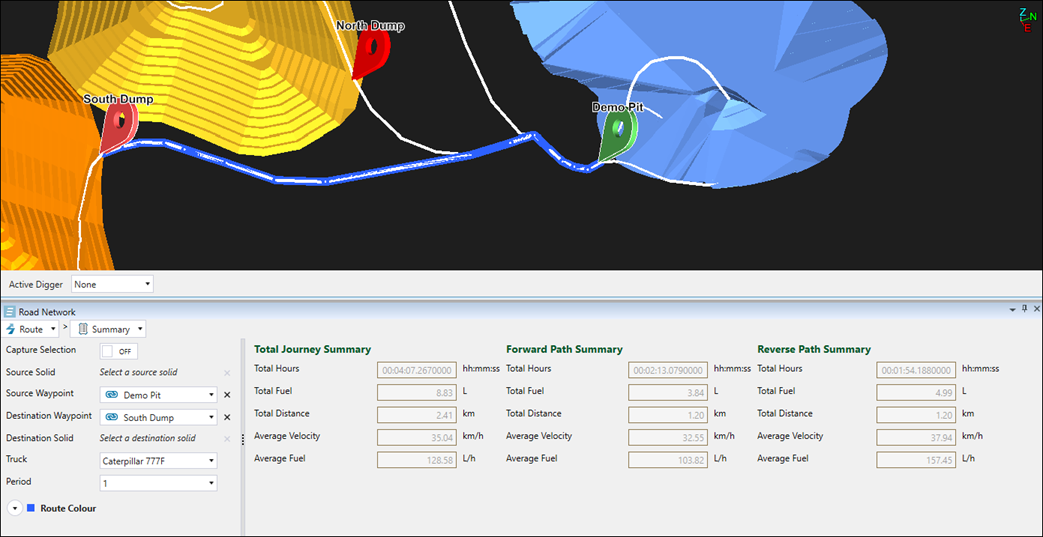
Route between solids
To obtain information on the path between a source and destination solid, enable the Capture Selection by clicking the toggle button. Select the Source Waypoint from the drop-down, and specify the Source Solid by clicking on the required solid on the source model. Next, select the destination waypoint and solid the same way, and specify the truck and the period using the corresponding drop-downs. Evolution will automatically calculate the summary for total, forward and reverse paths, and mark the travelled route in the viewer.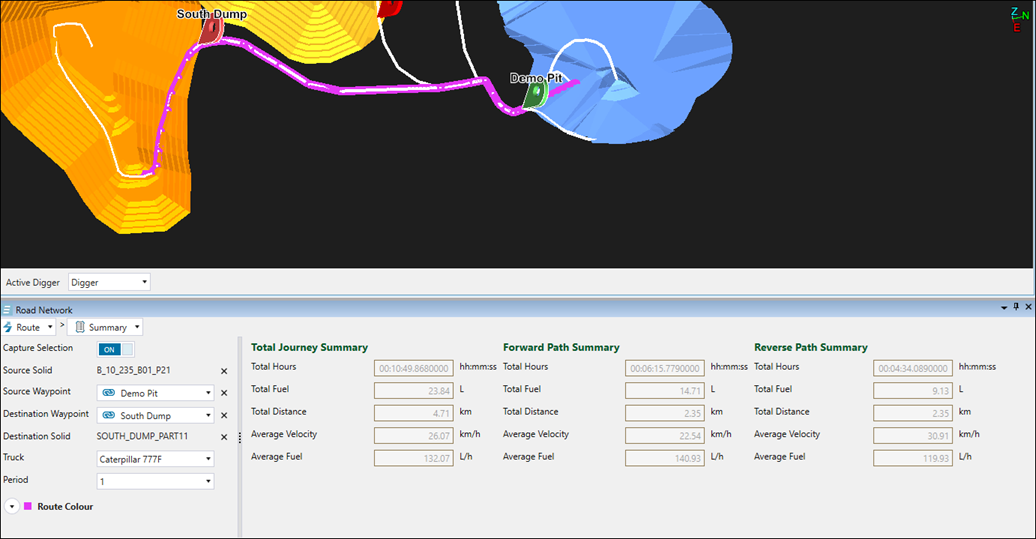
Details
The ![]() Details subtab provides detailed information on the path travelled between the specified points. If you have specified the source and destination point in the
Details subtab provides detailed information on the path travelled between the specified points. If you have specified the source and destination point in the ![]() Summary subtab, they will be automatically applied when you enter the
Summary subtab, they will be automatically applied when you enter the ![]() Details subtab. You can also assign new points along the route to be analysed. See Summary for more information on specifying the source and destination on the road network.
Details subtab. You can also assign new points along the route to be analysed. See Summary for more information on specifying the source and destination on the road network.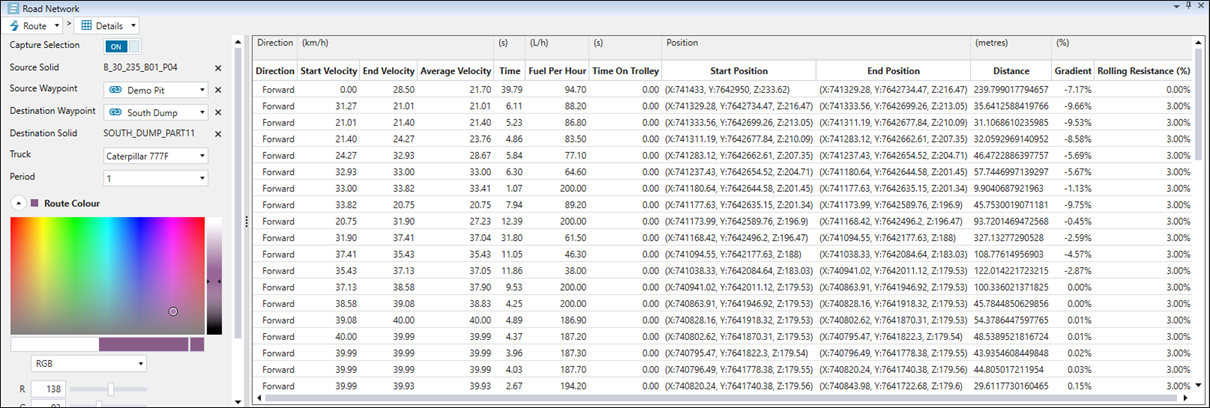
Charts
The ![]() Charts subtab shows information on the path travelled between the specified points in a chart form.
Charts subtab shows information on the path travelled between the specified points in a chart form.
To generate a road network chart, go to the ![]() Route >
Route > ![]() Charts in the Road Network tab in the Viewer and select the required chart type.
Charts in the Road Network tab in the Viewer and select the required chart type.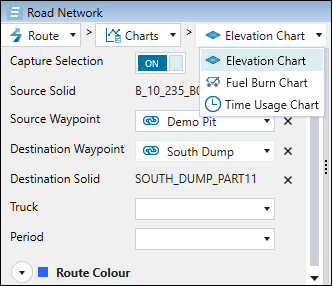
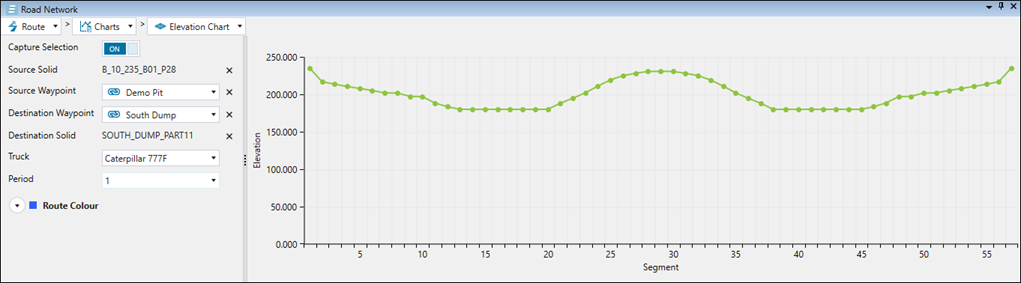
Note: The ![]() Elevation Chart will be shown by default when you enter the
Elevation Chart will be shown by default when you enter the ![]() Charts subtab.
Charts subtab.
The chart will be generated based on the source and destination point, truck, and period that you have selected. If you have specified these fields in the ![]() Summary or
Summary or ![]() Details subtab, the previously selected data will be automatically applied when you enter the
Details subtab, the previously selected data will be automatically applied when you enter the ![]() Charts subtab.
Charts subtab.
Evolution can generate the following chart types for your road network:
|
|
Shows how the site elevation changes over a haul route.
|
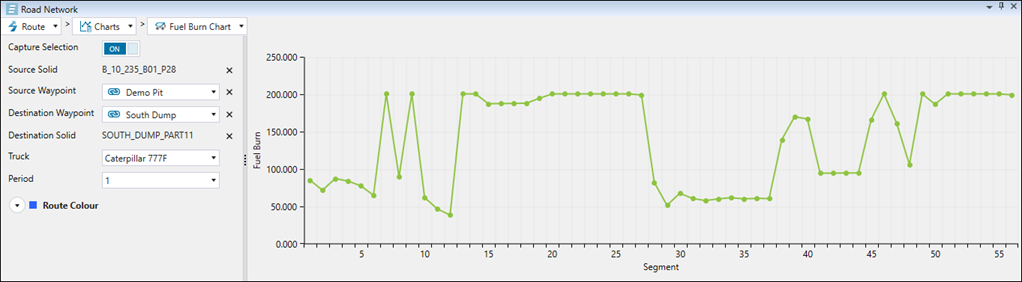
|
|
Shows fuel consumption in each segment of the path.
|
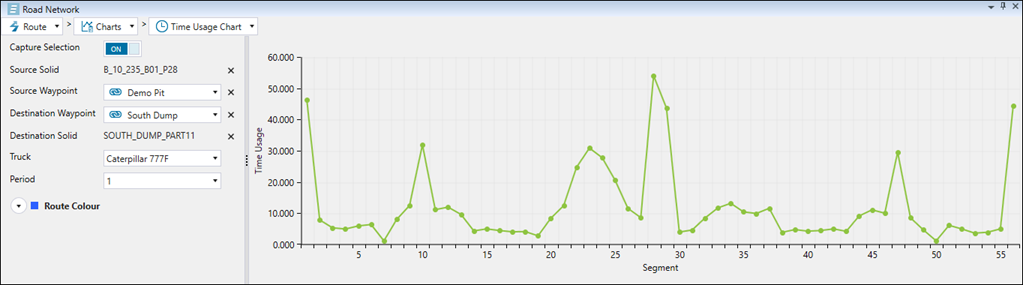
|
|
Shows how long it takes to pass through each segment of the path.
|