Project Explorer
Source file: project-explorer.htm
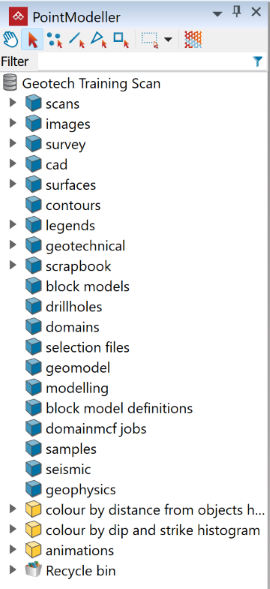
The project explorer displays a hierarchical view of objects in a project, stored in containers, and also hosts the selection toolbar (see Selection toolbar).
Note: Objects and containers appear in the project explorer in the order in which they are created. You can arrange container contents alphabetically by selecting Sort from the project explorer context menu. See Context Menus.
By default, the project explorer appears as a panel docked on the left-hand side of the user interface.
If the project explorer takes up too much viewing area, you can do any of the following:
-
Resize the project explorer in situ by dragging the boundary with the view window.
-
Undock and reposition the project explorer by dragging it by the title bar away from the Workbench window.
-
Set the project explorer to auto-hide when not in use by clicking
 (Auto Hide). Click again to restore.
Objects
All data in PointModeller are represented by objects, which can be either spatial or non-spatial. Spatial objects can be made up of points, lines, triangles and cells, and can be moved between containers, into view windows, between view windows and into panels. Some examples of non-spatial objects are legends, animations and images.
An icon next to on object name indicates the object type. The following table lists the most common object types you will see in PointModeller:
| Icon | Object |
|---|---|
|
|
Scans with photographic images |
|
|
Scans without photographic images |
|
|
Surfaces with photographic images |
|
|
Surfaces without photographic images |
|
|
Sparse point clouds |
|
|
Point sets |
|
|
Lines |
|
|
Polygons, including circles and rectangles |
|
|
Edge networks |
|
|
Rock bolts |
|
|
3D Text |
|
|
2D Text |
|
|
Markers and scale bars |
|
|
Numeric legends |
|
|
Text legends |
|
|
Discontinuities |
|
|
Stereonet planes and poles |
|
|
Kinematic analysis |
|
|
Blind zone |
|
|
Set windows |
|
|
Contours |
|
|
Animations |
Containers
A container is a storage location for objects. There are three kinds of container in PointModeller, as follows:
-
Standard containers are created with each new project by default. These are displayed with a blue container icon
 .
. -
Custom containers can be created by right-clicking on the project or a container and selecting New container from the context menu. These will be displayed with a yellow container icon
 . Rename custom containers appropriately when you create them.
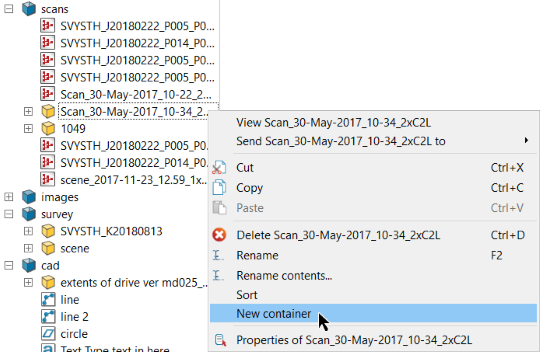
Tip: It is good practice to sort scans and other objects as you go into sub-containers named for their related scan stations.
Tip-
If you delete a standard container, only its contents will be deleted. The container will remain.
-
If you delete a custom container, the container and its contents will be deleted.
-
-
Special containers are identified by different icons and have special properties, such as being linked to other objects.
There are several types of special containers, as follows:
Icon Container 
Stereonet 
Conformance scene 
Discontinuity set 
Cell
Note: Deleted objects and containers are placed in the Recycle bin. Emptying the recycle bin will delete its contents permanently.
Many tool panels allow you to choose a destination container for the objects to be stored. You can choose any of the following actions:
-
Leave the destination field as is.
-
Drag a container from the project explorer into the destination field.
-
Enter the container's path into the destination field.
-
Click
 to navigate up one container level.
Object Filter
The project explorer includes a filter feature to enable you to find objects in the project according to criteria that you specify.
Expand each heading below for more detail.
You can enter search criteria in the Filter field, ranging from part of an object name to complex expressions (see Filter expressions, below).
-
To perform a simple search by name, click in the Filter field and start typing any part of an object’s name. As soon as you start typing, the project explorer’s background will turn green to indicate that a filter is being used, and names of valid search candidates and their containers will appear darker than the rest.
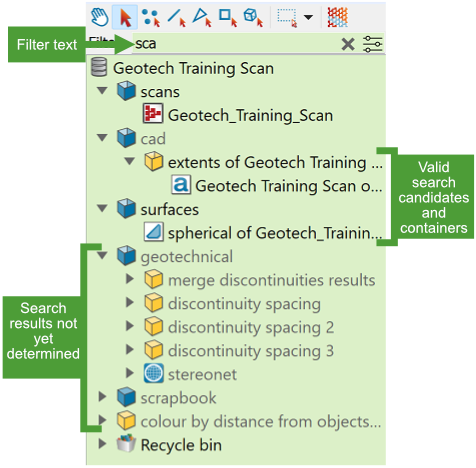
-
While a filter is active, if you click on a container’s expand arrow
 , and that container does not contain either a sub-container or a valid search candidate, it will be hidden from view.
 -
When you clear the filter, hidden containers will be restored to view.
-
Filters are not applied to the recycle bin.
A new filter can be created by parsing expression to build up a syntax, which is then used in the matches below, to determine which attributes to filter.
The filter expression is firstly split into tokens by spaces, open brackets, and closed brackets, with brackets intact and empty/space tokens ignored. A leading hyphen (-) is considered a separate token. The tokens are then examined accordingly:
-
If it is an opening bracket
(, it is the start of an expression. -
If it is a closing bracket
), it is the end of an expressionNote: Brackets must exist in pairs in a filter string. Neither bracket can stand alone.
-
If it is a hyphen
-, it inverts the operation of the following expression or leaf filter. -
If it is
ANDand there is a previous node, the previous and the next nodes both must match for theANDnode to return a match. If there is no previous node, then theANDis a no-op. -
If it is
ORand there is a previous node, either the previous node or the next node must match for theORnode to return a match. If there is no previous node, then theORis a no-op. -
If it starts with
createdorchanged, this token is the system creation date or modification date filter. To be a valid filter, it must be followed by either<or>and then either a date (in YYYY-MM-DD or DD-MM-YYYY format) or a duration (number followed by s, m, h, d, w, mon or y). This filter will then match objects whose creation or modification date is before or after the specified date, or when the duration between current time and its creation or modification date is less or greater than the specified duration. -
If it starts with
has:(or the translation to the primary language), this token is a system 'object attribute filter', and the string after the colon is examined, as follow:-
If it contains
=, the object must have an attribute whose name (case insensitive) matches the substring before the=and whose value equals the substring after=. -
If it contains
!=, it's 'not equal to' i.e. it acts like=except that the match result is inverted. -
If it contains
<,<=,>or>=, the object must have an attribute whose name (case insensitive) matches the substring before the=and whose value is less than, less than or equal to, greater than, or greater than or equal to the substring after=, using a natural string comparison. For example, one which determines46to be less than55.
-
-
If it starts with
in:(or the translation to the primary language), this token is a system container filter, and to match, an object must have a parent whose name exactly matches the string after the colon. -
If it starts with
is:(or the translation to the primary language), this token is a system type filter, and the string after the colon is assumed to be a system type name, or a common alias. Valid system types are:annotation
marker
string
blockmodel
plane
surface
drillhole
points
tangent
grid
pointset
tangentplane
line
polygon
text
lines
ribbonscan
triangulation
-
The expression
in:cad AND created<1wwill search for data in thecadcontainer that was created in the last week. -
The expression
is:surface AND has:filteredwill search for all surface
 objects that have an attribute called
 filtered.
-
Any text in the filter string that has spaces must be enclosed in quotes.
-
Tokens may be entered in either the current primary language or in English. For example, if the primary language is German, you can enter either has: or hat:
-
All other tokens are considered to match part of the item's primary name (case insensitive).
-
If the filter expression is not valid, the filter field background turns red. The filter field tooltip will provide the reason that the expression is invalid.
The object filter also includes an advanced search panel for building complex filters more easily.
-
To access the search panel, click the
 (Show filter options) button to the right of the Filter text box. The advanced filter panel will appear.
Note: Any criteria in the filter text box will also appear in the panel. However, if the cursor is inside a bracketed region of the filter text box when the panel is opened, only the text within brackets will be read into the panel.
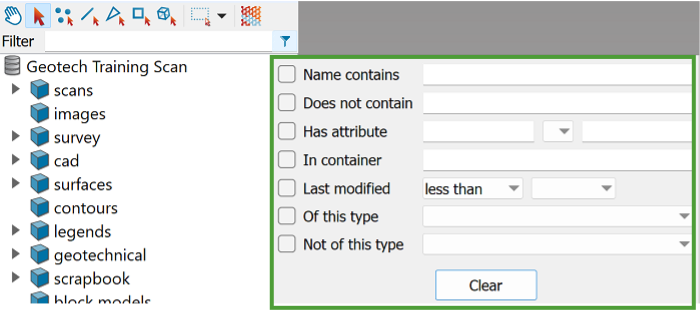
In the panel, enter any relevant search criteria from the available options:
-
Name contains: Any required part of an object name. This is the same as the Filter field.
-
Does not contain: Any part of an object name to exclude.
-
Has attribute: Enter an attribute name in the left field. You may also include a search value in the right field and whether to search for objects with attribute values less than, greater than or equal to the search value.
-
In container: A container in which to search for objects
-
Last modified: Search for objects last modified before or after a given date.
-
Of this type: Select an object type from the drop-down list.
-
Not of this type: Select an object type from the drop-down list to exclude from the search.
Note: As with the simple search, as soon as any criterion is provided, the project explorer’s background turns green, and valid search candidates and their containers will be darker than the rest. The filter criteria will also appear as a string in the text box.
If you need to reset the criteria, click Clear.
-
Click anywhere away from the filter panel to hide it. The filter criteria will be retained and the filter applied.
-
It is not necessary to complete all fields. You can use as many or as few search criteria as you need.
-
It is not necessary to select the check boxes. These will be selected automatically when you run the search. You can re-open the filter panel and uncheck these to broaden the search without deleting the criteria.
