Archiving
Source file: archive-files.htm
Sentry can generate archive files containing portions of the project’s scene history. Archives have the following uses:
-
Transferring scene data between computers running Sentry.
Consider a Sentry Field setup monitoring a scene continuously. The scene data needs to be transferred back to the office for analysis in Sentry Office. Instead of copying the whole project, we can generate archives of the scene, transfer them using a network or external drive, and then recreate the scene in Sentry Office. Because Sentry Field is continuously acquiring new data, it will become necessary to update the scene in Office with the most recent information from Field. Instead of transferring the whole project again, we can simply create archives covering the period since the last archive export and transfer that. Archives can be generated in Sentry Field while it is still running, reducing downtime.
-
Backups and recovery.
Backup archives can be used to recover a scene in the event of the loss or corruption of a Sentry project. Sentry Field monitoring a scene continuously can be configured to automatically generate incremental backup archives at regular intervals.
-
Rebuilding a specific time period of the scene.
Sentry projects can grow to be very large over time. A very large Sentry Field project can be archived and then restarted from the last few archives as a new project. This preserves scene settings and provides continuity between the old and new scenes.
Rebuilding can also help when you want to revisit a specific period of interest within a scene that no longer exists. In Sentry Office, you can create a scene from a subset of archives, instead of the whole set. This reduces the time taken to rebuild the scene, and the space required on your hard drive.
Each archive file is a snapshot of the scene for the period of time it covers, typically 12 or 24 hours. It contains all the information required to reconstruct or update the scene for that period of time, including:
-
The scene settings (such as positioning information and extent)
-
Scan data (including the full source scan files for the time period covered, as well as the processed scan data)
-
Sensor data (e.g. weather)
-
Zones
-
Alarms and events
Because every archive is a self-contained independent snapshot of the scene, a scene can either be fully reconstructed from a complete set of archives, or partially reconstructed from a subset of archives.
Scene archives can be created in either Sentry Field or Sentry Office, and then imported into another instance of Sentry. Archives can be applied to an existing compatible scene, or can be used to create a new scene.
See also: The
Creating archives
A scene, or part of a scene, can be exported to archive at any time.
To export the scene to archive:
-
 Export to Archive.
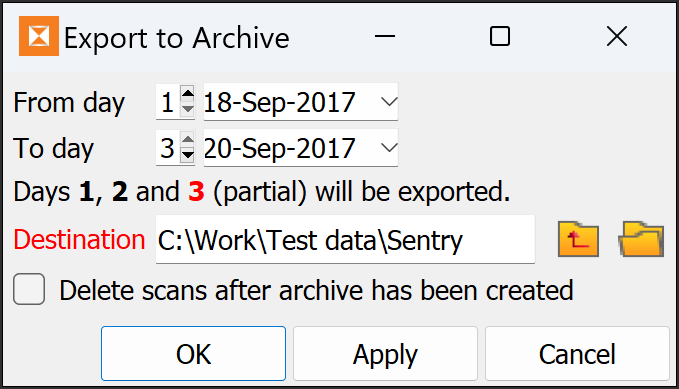
The Export to Archive panel appears:
-
Enter the time period you want the archive to cover.
Sentry will create a series of archives covering all the data between the nominated From day and To day, inclusive.
Note: Day 1 starts from the beginning of the scan data.
-
Enter a location next to Destination to save the archive files to.
-
Optionally, select Delete scans after archive has been created to instruct Sentry to delete scan files from the project after the archive has been created. If you select this option, only scan files that are archived within the project folder will be removed; no data from the scene will be removed, nor will scene visualisation be affected in any way.
-
Click OK or Apply to perform the export. A separate archive file will be created for each full day in the nominated time period, while a final archive file representing a period of time less than 24 hours will include
-partialappended to its name.
Importing scans or archives
To add scans or archives to a scene manually, you must import
-
To add scans or archives to the scene, on the Home ribbon tab, from the Data group, click
 Import Scans or Archives. The Add to Scene panel will appear:
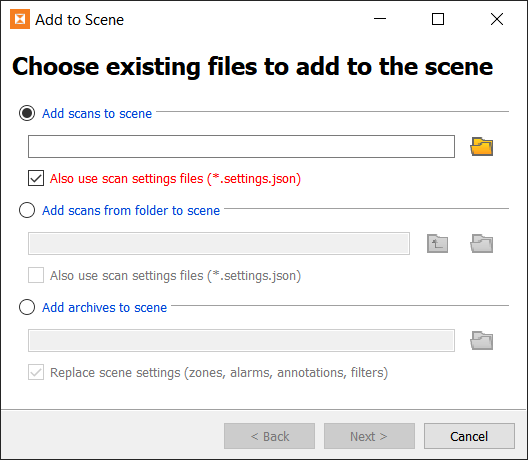
Adding scans to a scene
To add scans to the scene:
-
Choose either of the following options:
-
Add scans to scene. Use this when you want to select a specific subset of scan files. Click the
 button to open a file browser. Select the scans you want to import and click Open.
Or
-
Add scans from folder to scene. Use this when you want to import an entire folder of scans. Click the
button to open a file browser. Select the folder containing the scans you want to import and click Select Folder.
Note: You can only add scans that are more recent than the latest scan in the scene.
-
-
Select the Also use scan settings files (*.settings.json) checkbox to also use the settings files connected to each scan (if present).
-
Click Next >.
Sentry will verify and sort the scans by their acquisition date.
-
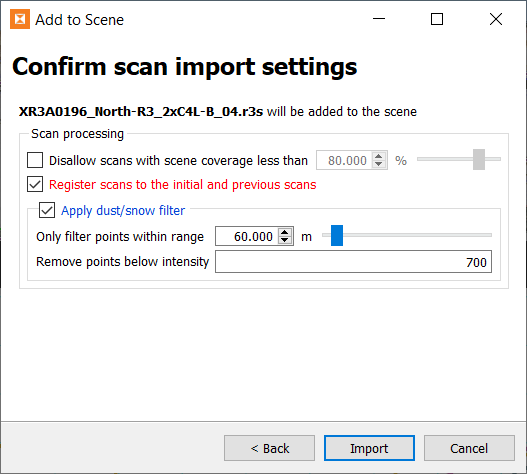
Configure settings to apply when processing each scan into the scene:
-
Select Disallow scans with scene coverage less than to tell Sentry to ignore scans that do not overlap the scene by the specified percentage. This is useful when you have scans with some data missing, which is a common problem associated with fog, mist, or rain. Specify the percentage of valid scan data (coverage area) below which to exclude a scan. The first scan in the scene will be used as the reference scan; ensure it consists entirely of valid data.
-
Select Register scans to the initial and previous scans to tell Sentry to register each successive scan to both the scan preceding it and the initial scan (recommended). If not selected, scans will not be registered before being added to the scene.
-
Select Apply dust/snow filter to apply a filter to each scan before it is added to the scene (recommended, except for scans of underground environments).
Note: If you are creating a scene from a single scan, the first two scan processing options are not available.
-
-
Click Import to import the scans and add them to the scene.
Importing a scan is also possible using a workflow. See Importing scans using workflows for more information.
Adding archives to a scene
To add archives to a scene:
-
Choose Add archives to scene.
-
Click the
button to open a file browser. Select the ZIP archives (.zip) you want to import and click Open.Note: You can only add archives that are compatible with the scene. They must have the same origin, extent, and so on.
-
Select the Replace scene settings (zones, alarms, annotations, filters) checkbox to tell Sentry to replace any scene settings for a given time with the newer information from the archive.
-
Click Next >.
Sentry verifies that the selected archive files are compatible with the scene.
-
Click Import to import the archives and add them to the scene.
