Reserves to Attributes
Use this option for both generating and reporting reserves, and preparing data for use in Evolution.
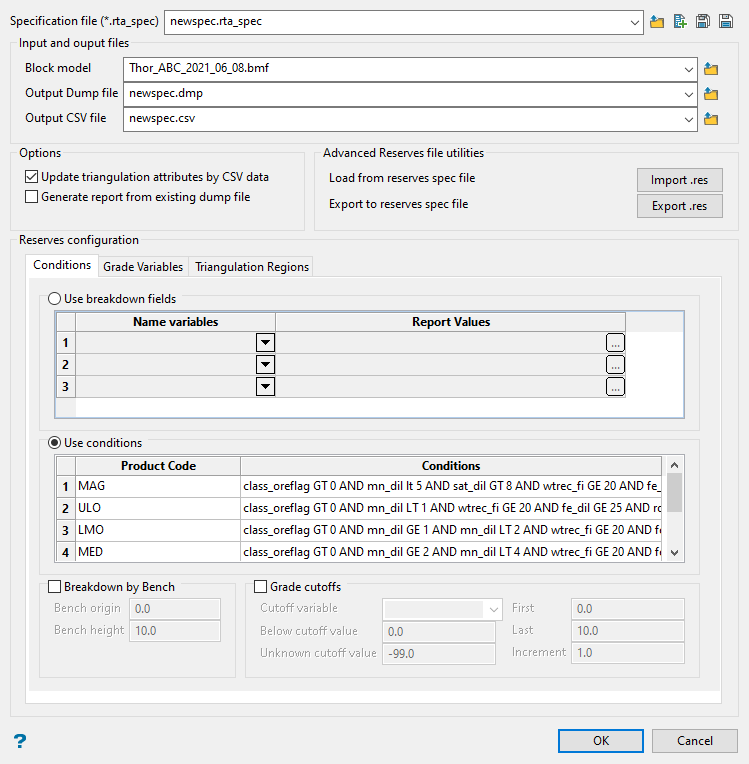
On the Block menu, point to Reserves, then click Reserves to Attributes.
Follow these steps:
-
Use the drop-down list to select the specification file if it is in the current working directory, or browse for it in another location by clicking the Browse button. A new file may also be created by typing the name of the new file in the textbox and clicking the New button.
-
 Browse
 -
 New
New -
 Save
Save -
 Save as
-
-
Select the block model with which to calculate reserves.
-
Enter a name into Output Dump file. By default, this will be automatically filled in using the same name as the specification file. However, you can edit the name if you want.
Note: The dump file could be input or output. If Generate report from existing dump file is not selected, the dump file will be calculated in the reserve step. Otherwise, it is used to calculate the report.
-
Enter a name in Output CSV file for the final report, or select from the drop-down list.
-
As an option, you can enable Update triangulation attributes by CSV data if you want to update the attributes of the triangulations selected in Triangulation Regions tab using the CSV. This is also checked by default.
-
Another option is to enable Generate report from existing dump file if you want to skip the reserve step.
Running reserve calculations could be a very long process, but making a report based on the dump file could take less time. Therefore, if reserves for the current specification file have been run at least once and the dump file has been created successfully and you just wish to change some of the breakdown field report values, you can skip the reserve step with this option.
-
Advance Reserves file utilities allows you to import or export files to and from the Advanced Reserves Editor.
Use the Import .res button to import the specifications from the selected Advanced Reserves specification file to populate the panel.
Use the Export .res button to export the panel settings to an Advanced Reserves specification file.
-
On the Conditions tab, you have the choice of using breakdown field variables or writing customised conditions to generate and report the reserves.
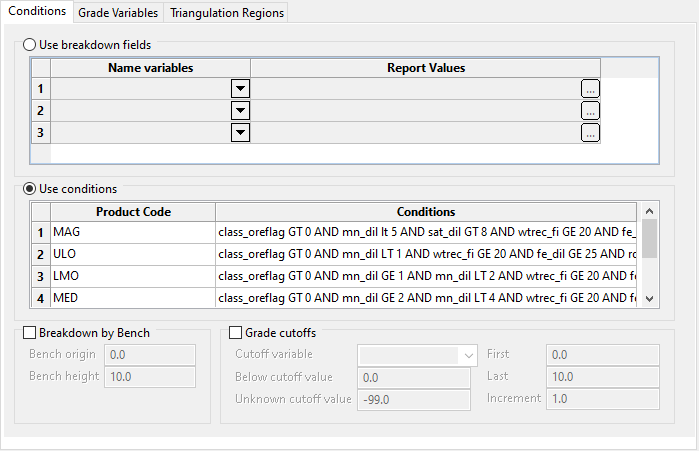
Selecting Use breakdown fields allows you to set breakdown variables so that reserves can be broken down according to fields such as GEOLOGY or ORE_TYPE. The variable must be name type in the translation table.
Note: If Report Values is empty, all the values for the variable will be used in calculation, otherwise just the selected values are used.
Selecting Use conditions allows you to treat each block in the model as classified based on whether it satisfies the condition for that particular product. Each product must have an associated condition and the first condition satisfied will determine the product for each block. Blocks that don't meet the conditions for any of the products specified contains unknown product in the product column of the dump file. An example of the use of product codes may be in determining broad copper grade categories.
-
You have the option of selecting Breakdown by Bench to breakdown a reserve by bench levels. You will be required to specify the bench origin and the bench height.
-
You also have the option to use a grade cut-off variable to breakdown the reserves. You will need to specify the cut-off variable. Grade cut-off values are specified as a range (first and last values), increment or explicitly by value.
Note: The values entered through the First, Last, and Cutoff fields can contain up to 4 decimal places.
-
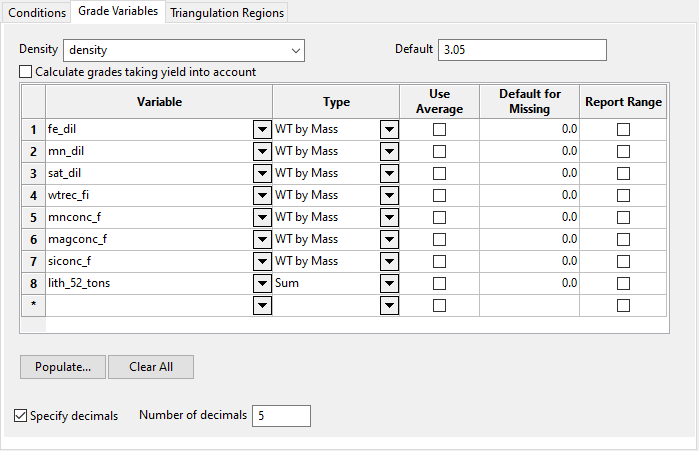
Click the Grade Variables tab to enter the variable names and types.
-
Select the density variable used in the block model and enter a default value.
-
Enable the Calculate grades taking yields into account option if you want to add a Yield column to the table.
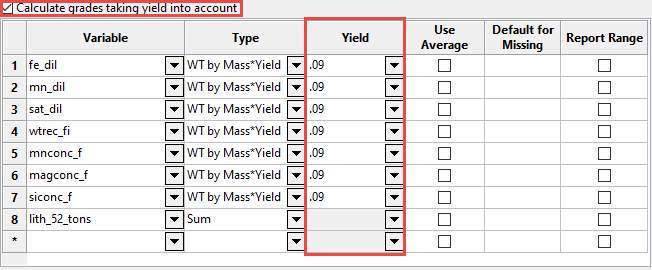
Table values
 Variable
A variable selected from the block model.
Type
Each variable can be specified as wt by
mass,wt by vol,sum, orwt by mass*yield.Type Definition Sum Used for variables containing units (for example, grams of gold) that should be cumulated rather than averaged. Wt by Vol Used for grade variables containing values based on volume weighted average (for example, grams of gold per cubic metre). Wt by Mass Used for grade variables that should be treated as a weighted average based on mass (for example, grams per tonne of gold). Wt by Mass*Yield Used to calculate the percentage of mass. Yield
The yield of a wash fraction refers to the percentage of mass in that specific category.
Example: A yield of 9% on a 1.35 wash, means that for every ton washed, 0.09t is separated and categorized as 1.35.
Use Average
This is useful if you don't know the value of a block. You can either use the average, or specify a default.
Select the Use Average check box if you want the average grade value of the selected blocks to be used for the reserve calculation.
Default for Missing
Supply a Default value if you want to replace the construction default of the selected blocks during the reserve calculation. The construction default value is reported in a block model header. It can also be named the Missing value.
Report range
Select this option to report the range between lowest and highest values.
Populate...
Click this button to auto-populate the table with the variables taken from the block model.
Clear All
Click this to clear the entries in the table.
Specify decimals
Use this option to specify the number of decimal places that will be displayed in the report.
Note: This will limit the display only. It will not effect the calculations.
-
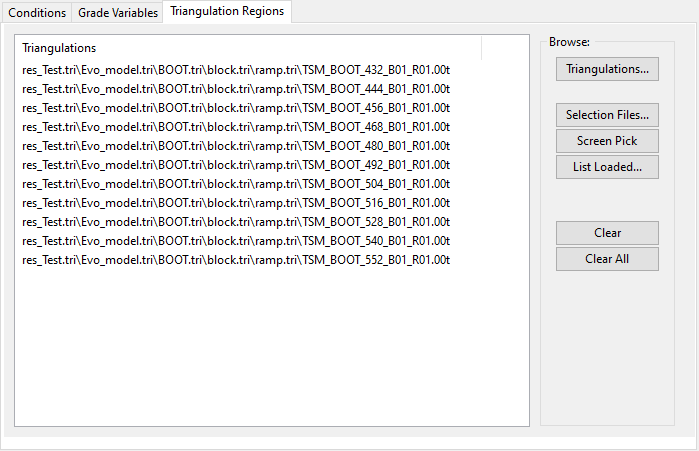
Click the Triangulation Regions tab to designate the regions for reserve calculations.
-
Start by selecting the triangulations that will define the regions for which you want to calculate reserves. You can do this by using several different methods:
Buttons Triangulation Select from the available list of triangulations. You do not need to have these already loaded onto the screen. Selection Files Use a selection file that contains the names of the triangulations. Screen Pick Select the triangulations from those already loaded onto the screen. List Loaded Captures all triangulations loaded into Envisage and adds them to the list. If you decide you do not want to use one or more of the listed triangulations, just highlight the unwanted triangulation and click the Clear button to remove it from the list. To select more than one triangulation, press and hold the CTRL key while selecting.
You can clear the entire list by clicking Clear All at any time.
Click OK to run.
Results
-
Creates a dump file from the specification file.
-
Creates a (.evo.tab) file, and generates a CSV file.
-
Imports CSV data to selected triangulation attributes.
-
Outputs a report to the Vulcan Console.
You can open the (.evo.tab) file to see the structure of the CSV file by following these steps:
-
Open the Advanced Reserves Editor
-
Click the Report tab
-
Select the (.evo.tab) for Report template file
-
then go to Columns tab to view.

