Advanced Reserves Editor
Use this option to define reporting parameters for more complex or repeating reserve runs.
At a minimum, complete the Design, Grade Variables, and Save and Run panels to create a (.res) file.
For advanced report configuration, complete the Report section, which creates a (.tab) file. Advanced reporting utilises a (.dmp) file generated when the Output DMP file option is checked in the Save and Run panel.
Instructions
On the Block menu, point to Reserves, then click Advanced Reserves Editor.
Design

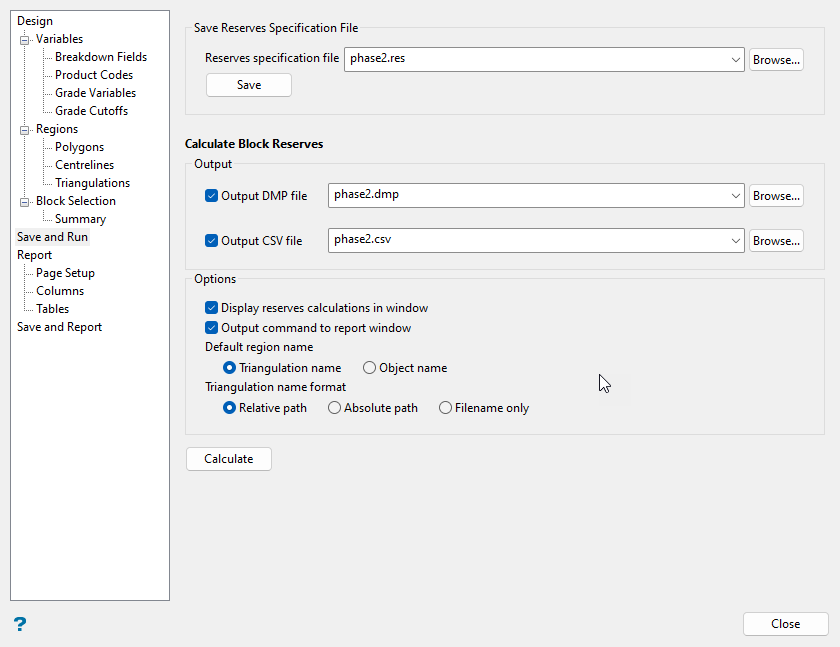
Figure 1 : The Advanced Reserves Editor panel.
In this subpanel, you can pick an existing Reserves specification file from the drop down list or create a new file by entering a new name. This creates a file with the extension (.res), which contains all the reserve parameters. Use Current block model to select the block model on which the reserves are run.
Follow these steps:
-
If you are starting a new project or creating a new Reserves specification file, simply type a name for the file into the textbox. A new specification file will be created and used to store all the parameters selected throughout the panels of the editor, making it possible to reuse existing specification files in the future after you have closed the application.
If you want to edit or reuse an existing reserves specification file, select the file using the drop-down list. All existing files found within the current working directory will be listed. You can also browse for a file stored somewhere else by clicking the Browse button, using the Windows Explorer to locate the file.
TipYou can reuse a specification file on any block model as long as the variables and parameters settings are appropriate for that model. This makes it easier to run reserves on multiple block models without having to set up a new specification file for each run. Just save the edited specification file under a new name to avoid overwriting an existing file.
-
Select the Current block model. This is the model on which all the reserve estimations will be based. The drop-down list contains all block models found within the current working directory. Click Browse to select a file from another location.
Note: All variables used to set the parameters of the Advanced Reserves Editor must already exist in the current block model. The editor will not create new variables. However, if a variable is missing, a message will be displayed letting you know that a problem has occurred. If needed, you can add a new variable to the block model by using the Manipulation > Add Variable feature, and then continue your work.
-
Continue by advancing to the Breakdown Fields panel of the editor.
Breakdown Fields
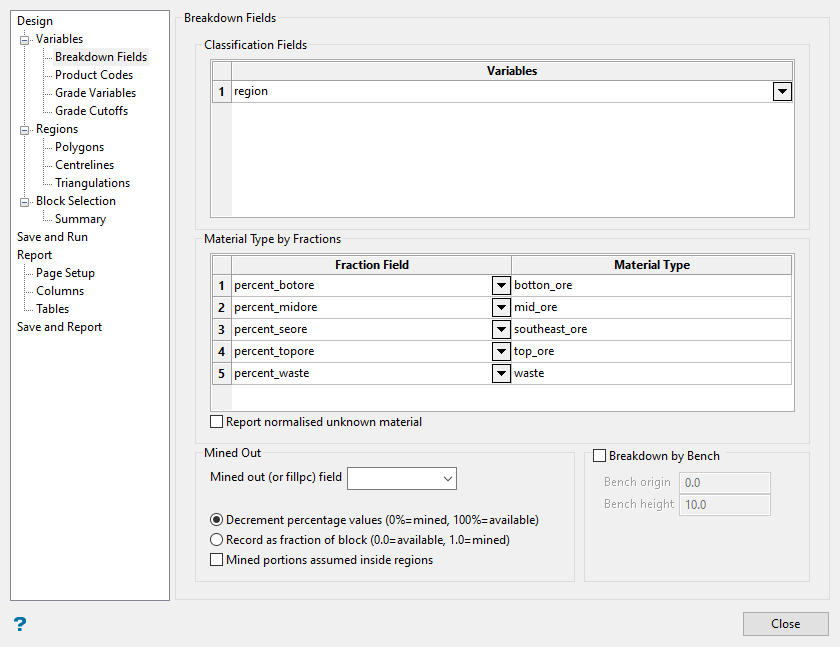
In the Breakdown Fields panel, you can report reserves in more detail. Classification Fields are the variables in the block model where the reserves are broken down. Common variables used are geology, rock types, or ore zones. Furthermore, Material Type by Fractions reports the total ore or waste contained in each block if variables exist in the block model that contain this information. This section is usually used when reserving a partial model imported into Vulcan from other software.
The Mined out (or fillpc) field lets you select a variable in the block model that stores information regarding whether a block has been mined or not. This is used in conjunction with the option Block > Manipulation > Mine.
Follow these steps:
-
Begin by selecting the variables you want to use as Classification Fields to categorise your reserves. Up to 20 classification fields can be specified.
When defining breakdown fields, the block model variable type must be a name, byte, short, or integer. It may not be of type float or double.
In the panel above, the variable region has been selected from the drop-down list, which is a name type variable.
In the block model, each block was classified as belonging to one of six different regions: none, waste, fresh, volcanic, leach, or oxide. When the Advanced Reserves report is produced, it will produce reserve estimations for each of these regions separately.
-
Select block model variables from the Fraction Field and Material Type drop-down lists to breakdown the reserves further and identify what percent of a block is made up of a particular material type.
In the panel above, the selected variables were set up in the block model to determine the percentage of ore found in various locations within the pit.
In the Fraction Field column, the drop-down lists will display all available variables from the block model. The Material Type column is required, and is used to provide a meaningful name that will be displayed in the output report.
-
The Mined out (or fillpc) field is populated from the variable in the block model that stores mined results as a fractional percent, such as 0.25 or 0.75. Select Block > Manipulation > Mine to populate a mined out variable.
Note: Classifying reserves according to material type will also be affected by the use of the Mined out (or fillpc) field. If a block has been mined out, then the volume is adjusted correspondingly before the fraction field value is applied to the volume. Blocks with unknown (missing) values for the fraction field contain "unknown material" in the material column of the dump file.
The format of the Mined out (or fillpc) field in the report can be set to display either a percentage or a fraction by selecting from the two choices Decrement percentage values or Record as fraction of block.
-
Select whether or not to enable the option for Mined protions assumed inside regions. When a block is evaluated against a region (triangulation), the proportion of the block inside the region is determined. If the block has been partially mined, as indicated by a mined fraction or available percentage field, then the treatment of the mined part has two cases, as described in the example below.
Case 1 – Incremental Pits
Mined portions assumed inside regions is enabled.
If a previous pit has been used to set a mined field, then the mined part of a block can reasonably be assumed to lie inside the new pit. In this case, the proportion inside region volume is determined and then the mined out volume of the block subtracted. This method can be used to obtain accurate incremental pit volumes without the need to reblock the model. Figure 2 shows a block inside a reserves region that has been mined a proportion of 0.3 (70% available).
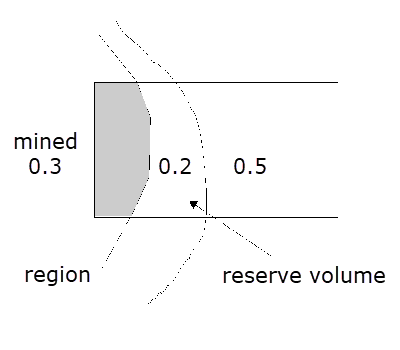
Figure 2 : Incremental Pits
Reserve volume = Volume in region - volume mined
               = (Total Volume * 0.5) - (Total Volume * 0.3)
               = Total Volume * 0.2
Case 2 – Underground Stope with Development
Mined portions assumed inside regions is not enabled.
Triangulations of development may be used to set a mined field in a block model. When evaluating a stope region in this case, it is necessary to assume that the mined portion of a block partly inside the region is equally distributed. Here, the reserve volume is the product of the proportion in region volume and the percentage not mined. Figure 3 shows a block 50% inside a reserves region that has been mined a proportion of 0.3 (70% available).
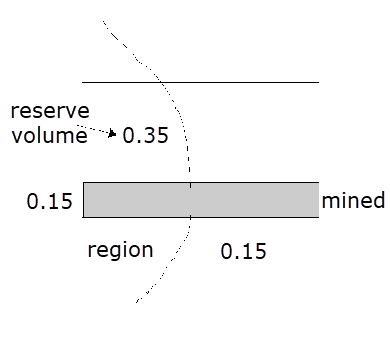
Figure 3 : Underground Stope with Development
Reserve volume = Volume in region * fraction not mined = (Total Volume * 0.5) * (1 - 0.3) = Total Volume * 0.35 -
Select whether or not to enable the to Breakdown by Bench levels. You will be required to specify the bench origin, i.e. the starting RL, as well as the bench height.
Note: This option cannot be used with dipping block models.
-
Continue by advancing to the Product Codes panel of the editor.
Product Codes
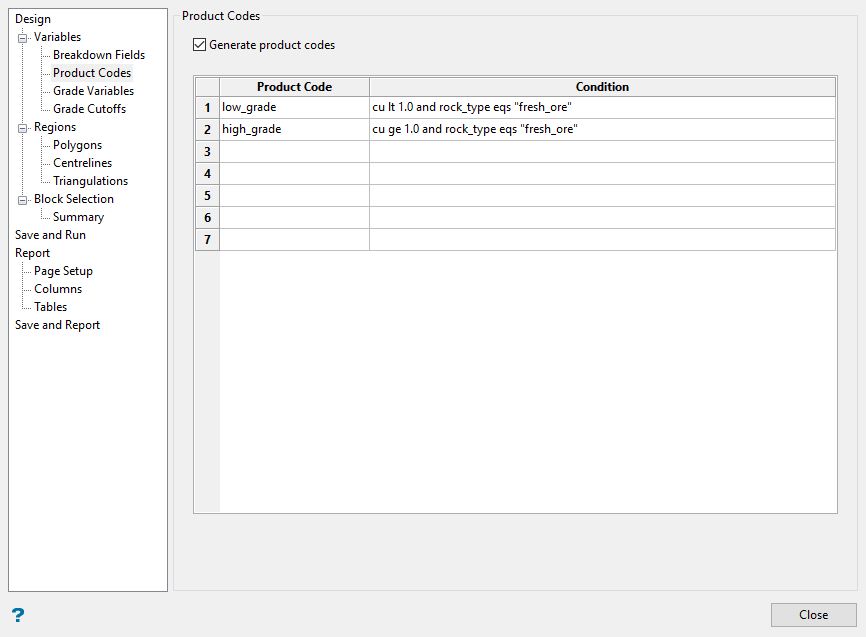
Use the Product Codes panel to create temporary variables based on conditions created for reporting purposes. These temporary variables are not added to the block model but only exist in the Advanced Reserves report.
Each block in the model can be classified according to product, based on whether it satisfies the condition for that particular product. Each product must have an associated condition and the first condition satisfied will determine the product for each block.
Follow these steps:
-
Begin by enabling the option to Generate product codes. This will allow access to the input table.
-
Enter the name of the variable (a maximum of 30 alphanumeric characters is allowed) in the Product Code column. This will be displayed in the output report.
The variable, which can only be entered using lowercase characters, must start with a letter and can only contain alphanumeric characters and underscores, for example,
variable_1.Important: There is no limit regarding the number of variables that can be added to a block model. However, the memory capacity of your computer and the overall size of the block model will determine what the maximum number will be.
-
Define the conditions for the variable in the Condition column.
For low grade blocks with a copper grade less than 0.25 g/t and a rock type of fresh ore, the condition would be written as:
cu lt 0.25 and rock_type eqs "fresh_ore"For high grade blocks with a copper grade greater than or equal to 0.35 g/t and a rock type of fresh ore, the condition would be written as:
cu ge 0.35 and rock_type eqs "fresh_ore"Conditions for text variables include quotes and utilises the
eqssyntax. For example,rock_type eqs "fresh_ore"Conditions are case sensitive; therefore,
"Fresh_Ore"differs from"fresh_ore".A single condition can contain up to 256 alphanumeric characters.
Blocks that don't meet the conditions for any of the products specified will contain "unknown product" in the product column of the dump file.
Refer to Appendix B of the Core Appendices for a full list of available operators and functions.
ImportantWhen using multiple conditions, Vulcan will evaluate all the conditions in the list from top to bottom. Once a block has met a condition, it will not be considered for subsequent conditions.
Suppose you want to write a series of conditions to determine whether the class of a block should be measured, indicated, or inferred.
Variables in the block model might include
number_samplesandsample_distance.Class definitions include:
measured = 10 or more samples within 25 feet
indicated = 7 or more samples within 50 feet
inferred = 5 or more samples within 150 feet
The conditions would need be listed in the order that we want to evaluate each block.

Suppose a block has 12 samples that are all within 20 feet. Since measured is the first condition on the list, that condition will be evaluated first. Since the block satisfies all the criteria for the measured class, it will be flagged as a measured block. It will not be evaluated by any other condition.
However, if the definition of inferred were listed as the first condition (as shown below), the block would be evaluated to see if it met the criteria of the inferred class first.

Even though this block satisfies the criteria for all conditions on list, it would be flagged as inferred—the first condition—since it met that criteria. Therefore, it will not be considered for any other condition.
-
Continue by advancing to the Grade Variables panel of the editor.
Grade Variables
This section allows you to select the grade variables to reserve. You can select up to 50 variables at once.
Follow these steps:
-
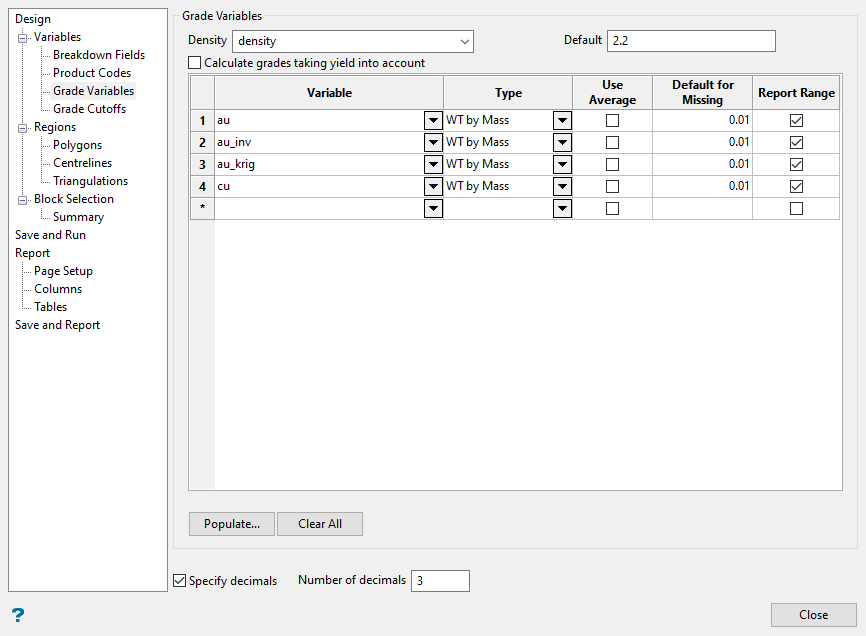
Select the Density variable used in the block model at the top of the panel. You can also apply a Default density that will be used if a density value is missing from a block.
NoteThe Default density will be used if the value found in the Density variable is less than or equal to zero. It will also be used if it is equal to the value found in the Density variable.
For example:
Density variable value Default (set to 2.2) -99.0Default used: value is less than zero. 0.0Default used: value equal to zero. 1.0Density variable used: value is greater than zero and does not match Default value. 2.2Default used: values of Density variable and Default match. -
Decide if you want to Calculate grades taking yield into account. If this option is selected, a Yield column will be added the input table, allowing you to select the block model variable containing the fraction of yield for a block. To enable the Yield column, the Type must be set to
WT by Mass*Yield. -
Specify the following in the table to report any numeric variable, including dollar or sum type variables:
Variable – The required variables from the block model.
Type – Whether the variable is a sum, weighted by mass, weighted by volume, or weighted by mass*yield.
Use Average – Populates a block that still has its default value with the average value of all other blocks in the region.
Note: Using an average usually tends to overestimate the data.
Default for Missing – Entering a default for missing value prevents any construction default values from being used in the reserve calculation. Always consider defaults carefully as 0 is a worst-case scenario value since it usually tends to underestimate the data.
Example: The construction default for grade variables in the block model we are using was initially set at -99.0. In the panel shown above, that value will be replaced with a value of 0.01 whenever a block records the construction default value.
Note: If Use Average or Default for Missing is not used, Advanced Reserves reports an extra Volume and Mass column for each variable. The columns will report the grade and tonnage values for all blocks that do not contain the construction default values.
Report Range – This option reports the range of grades within the reserve run (minimum and maximum) and is very useful to check for anomalies.
TipYou can automatically populate the table by clicking the Populate button. This will display a secondary panel that will allow you to select and set up multiple variables at the same time.
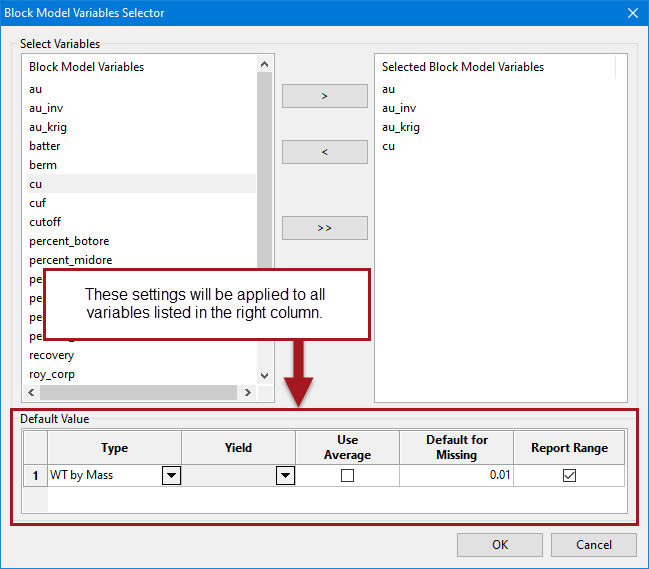
Figure 4 : Use this panel to set the parameters for multiple variables at once.
-
Enter the required Number of decimals to include in the report.
Note: Prior to reporting, set the number of decimals (through the Columns section) to be the same value as entered here. If this is not done, there may be slight differences in the calculated reserves.
-
Continue by advancing to the Grade Cutoffs panel of the editor.
Grade Cutoffs
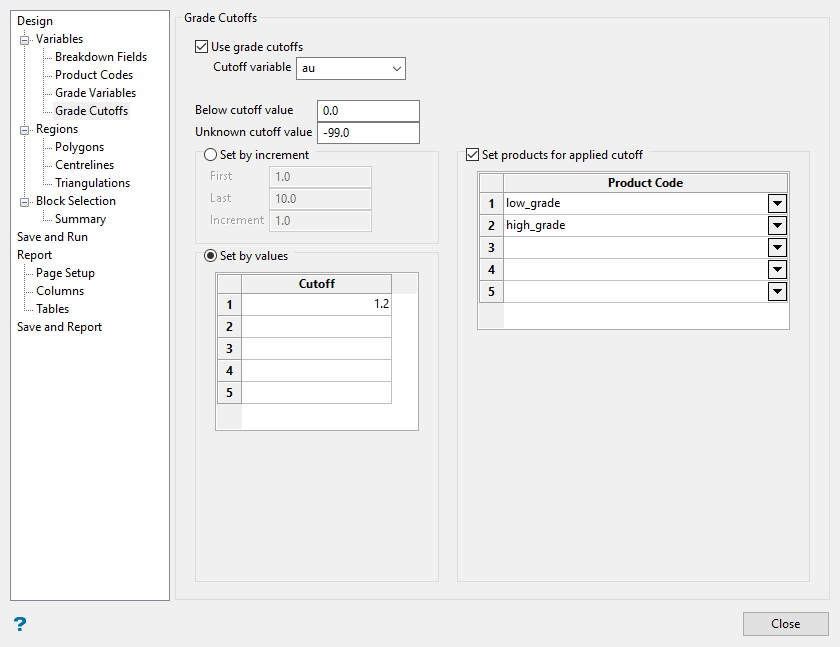
This panel allows you to select any grade cutoffs to be used in the reserving procedure. Any block in which the Cutoff variable has a value that is equal to or greater than the cutoff will be used in the calculation.
Follow these steps:
-
Select the checkbox next to Use grade cutoffs. This will allow access to the controls for this panel.
-
Define the selected Cutoff variable. Any variable listed in the Grade Variables panel will be available for selection. Only the values that satisfy the cutoff threshold for a variable will be evaluated in the calculations.
-
Enter the lowest allowable grade value to be used in Below cutoff value. Any block in which the grade value is lower than this value will not be used in the calculation.
-
Enter a value for Unknown cutoff value to replace the grade value for all blocks that still have the construction default value.
-
Set your cutoff value(s). Cutoffs may be defined by uniform increments or by typing in irregularly spaced cutoff values.
To Set by increment, you will need to specify the range by providing the first and last cutoff, as well as the increment value.
To Set by values, specify the values that you want to report (a maximum of 20 values).
-
Select Set products for applied cutoffs if you want to report the reserves by any of the product codes that were set up in the Product Codes panel. Select desired product codes from the drop-down lists.
-
Continue by advancing to the Regions section of the editor.
Regions
Regions allow reserves to be run on specific areas of the block model. Define these areas using polygons, centrelines, or triangulations.
Polygons
Note: Polygons are projected to create simple triangulations. This method does not work well for more complex shapes like arched backs or irregular stopes.
Note: To select an existing polygon, it must already be displayed on the screen. However, you can digitise new polygons or make edits to the existing ones dynamically if needed.
Follow these steps:
-
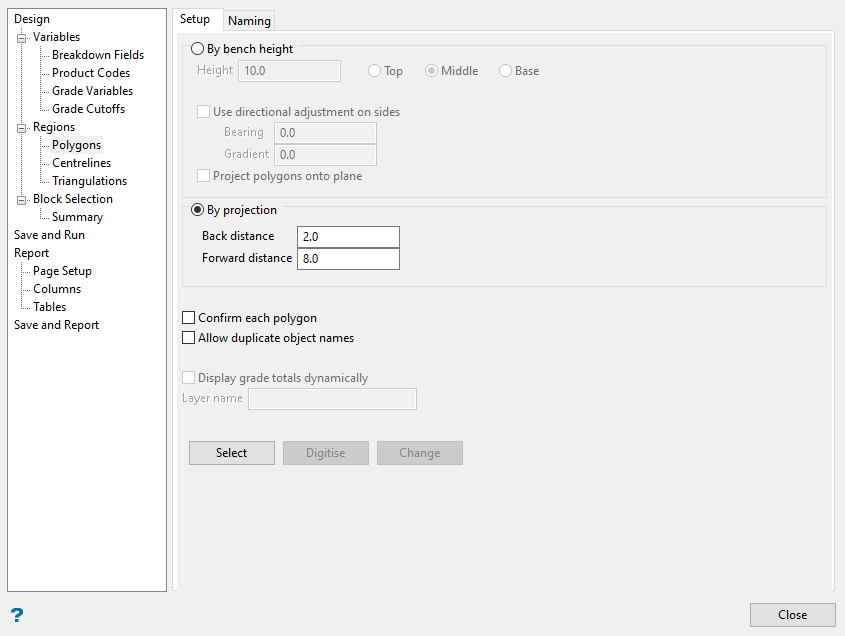
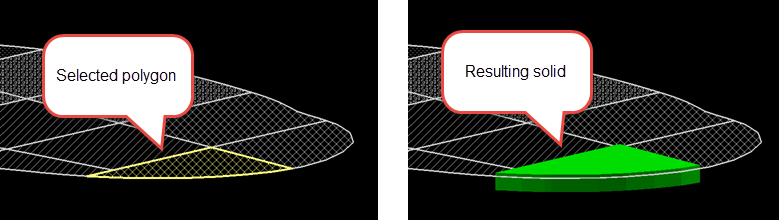
Use the Setup tab to select the polygons that will create the solids used in the reserve calculations.
You can select from polygons already loaded onto the screen, or create new ones by clicking the Digitise button.
-
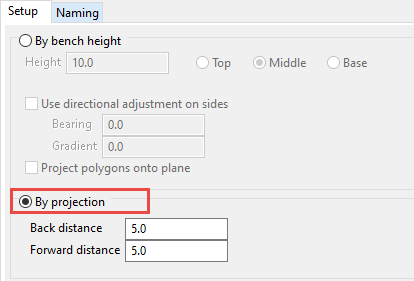
Begin by selecting the option By bench height or By projection.
The By bench height option is a good choice if you have polygon strings representing pit benches, such as those created using Automated Pit Designer.
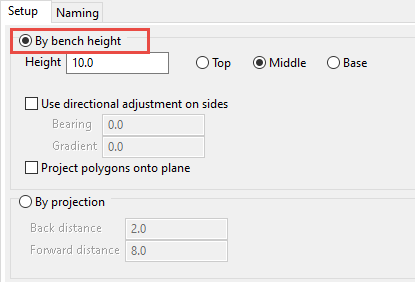
Enter the height of each bench, then indicate whether the polygon represents the top, middle, or base of the bench.
If the benches have non-vertical sides, you can adjust the orientation of the solids by entering the bearing (degrees) and gradient (percent) into the Use directional adjustment on sides option.
You can alter the projection of the polygons by selecting Project polygons onto plane. You will be able to select the desired orientation plane when you select or create the polygons.
To use the By projection option, enter the distance you want the triangulation to be projected on either side of the polygon.
-
Select Confirm each polygon to confirm each selection as it is picked. A confirmation dialog will be displayed after the selection of each polygon. This can be useful if you have many polygons that are closely spaced and you want to avoid accidentally selecting the wrong polygon(s).
-
Select Allow duplicate object names to use multiple polygons that have the same name. If this option is not enabled and there are polygons that have duplicate names, you will be asked to identify each polygon with a unique name at the time of selection.
-
Select Display grade totals dynamically to display a report window showing the grade totals dynamically on the screen, and then enter a name for the layer.
To create a new layer, enter the layer name. The layer name:
- may contain up to 40 characters.
- must begin with an alphanumeric character [0-9] or [a-z].
- cannot include spaces.
- can include hyphens [ - ], plus signs [ + ], underscores [ _ ], periods/dots [ . ].
- can include the special characters of ÁÂÃÀÇÉÊÍÓÔÕÚÜÑ that are used in the Spanish and Portuguese languages.
If you specify a layer that already exists, but is not currently loaded, then you will be asked whether or not you want to replace the existing layer.
-
Select the polygon(s). You can select one or more polygons that have already been loaded onto the screen by clicking the Select button. You will be prompted to select the polygon that defines the region. The chosen polygon will then be converted to a triangulation and you will be asked whether or not the conversion resulted in the correct region.
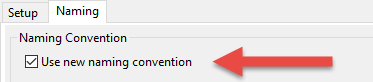
Upon confirmation, you will be prompted to select another polygon. Cancel twice to return to the Advanced Reserves Editor. The selected polygons will be renamed according to the naming conventions specified through the Naming tab.
If you want to create new polygons, click the Digitise button.
NoteTo enable the Digitise and Change buttons, you must first select Use new naming convention located on the Naming tab.
A list of the resulting triangulations will be shown in the table located on the Triangulations panel.
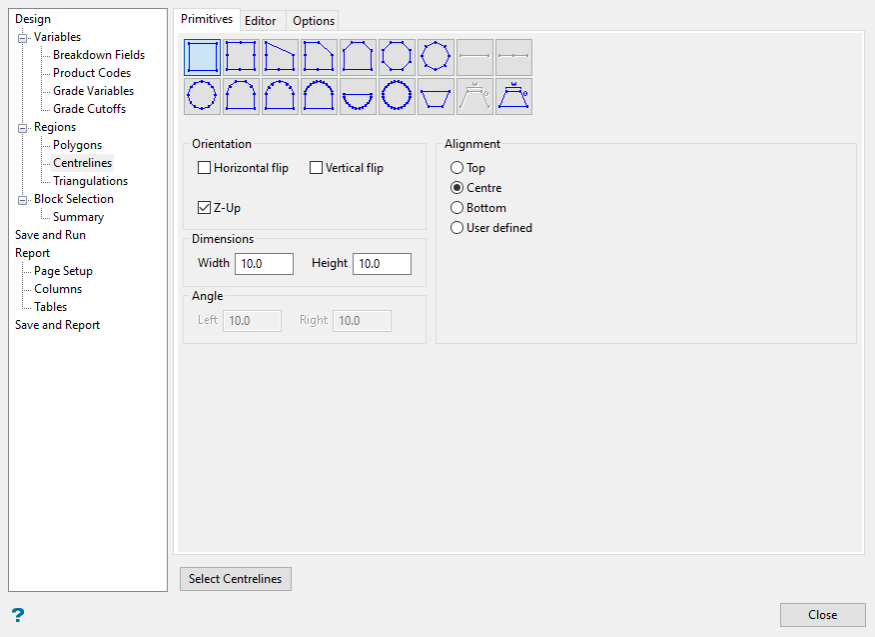
Centrelines
Use the Centrelines method to create primitives. Primitives enable you to apply cross-sectional shapes along a line. This method works well when the regions have the same cross-sectional shape. The centreline method will allow for some intricate shapes, such as arched backs. Others with varying cross-sections, such as irregular stopes, will not be possible.
The Centrelines method will output the region length whereas the Polygon and Triangulation methods will not. This can be useful in an underground application where you measure the advance rate in distance per day. There are three tabs on this panel, which are the standard primitives panels. The Primitives tab lets you select the shape, the Editor tab lets you create or load your own primitive shape, and the Options tab controls triangulation naming.
Note: Detailed instructions for creating primitives can be found by navigating to Model > Primitives > Create/Edit Primitives.
Follow these steps:
-
Begin by loading any layers onto the screen that will be used as a centrelines for creating the primitives.
Note: All polylines must be loaded onto the screen prior to creating primitives.
-
In the Centrelines panel, assign the parameters that will define the primitives.
-
Click the Select Centrelines button to select the lines that you want to use as centrelines for the primitives.
The primitives will be created and converted to triangulations, which will then be listed in the table on the Triangulations panel.
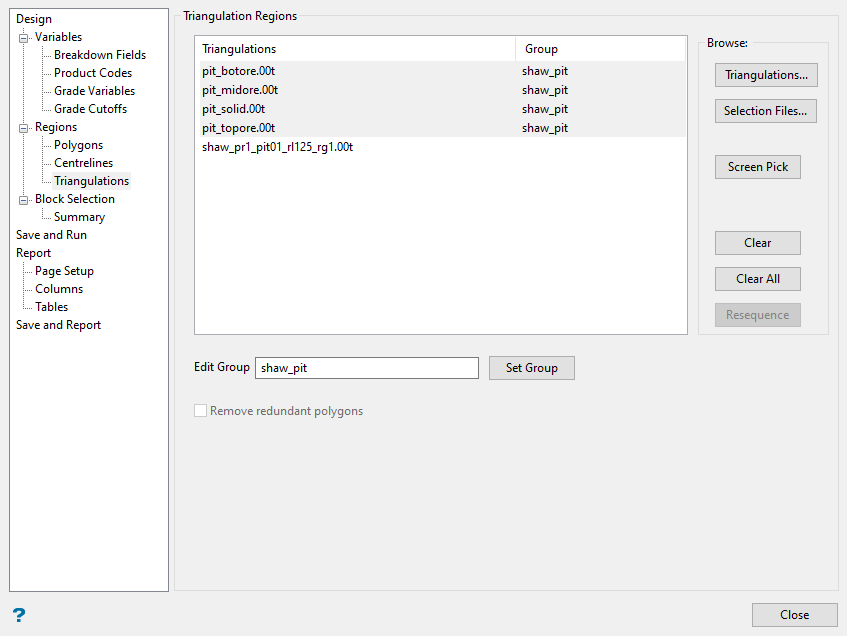
Triangulations
The Triangulations method allows you to run reserves on one or more existing triangulations. The triangulations can be selected using a graphical screen pick or selected by name from a list. The Browse options will allow selection of multiple triangulations at once.
Important: Any triangulation you use to calculate reserves must pass the validity checks for closure, consistency, crossing, and coincident points. A triangulation can still be used if the checks for small surface area and small angles do not pass.
Note: You can use a surface triangulation even though it will not pass the closure test, but only if the errors are limited to the border of the surface triangulation.
If you define your solid using the Triangulations settings instead of Block Selection, your report will include a Regions column listing the names of triangulation solids.
Follow these steps:
-
Select triangulations that will define the regions for which you want to calculate reserves. You can do this by using several different methods:
Buttons Description Triangulation Select from the available list of triangulations. You do not need to have these already loaded onto the screen. Selection Files Use a selection file that contains the names of the triangulations. Screen Pick Select the triangulations from those already loaded onto the screen. -
Enter a name in the Edit Group field then click Set Group to group triangulations, if desired.
Note: To remove one or more triangulations from a group, highlight the triangulations and click Set Group while the Edit Group field is empty.
-
Click the Resequence button to change the order in which triangulations are listed, as needed. Reserves for each region are calculated in the order in which they appear in the list. Once a region has been evaluated, it will not be used again in the reserve calculations. This means that if you have triangulations that overlap one another and cover the same region, the sequence in which triangulations are used in the calculation can affect the reserves for that region.
Note: If there are no overlapping triangulations, the Resequence button will not be enabled.
If you decide you do not want to use one or more of the listed triangulations, just highlight the unwanted triangulation and click the Clear button to remove it from the list. To select more than one triangulation, press and hold the CTRL key while selecting.
You can clear the entire list by clicking Clear All at any time.
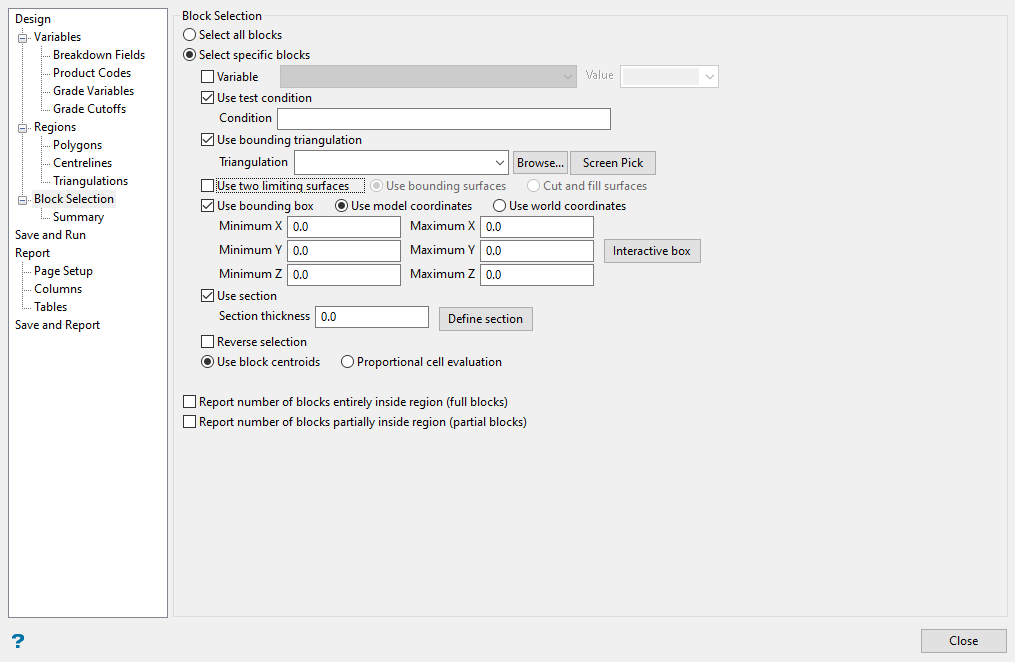
Block Selection
The Block Selection panel allows you to determine which blocks of the model to use during the reserve calculation. Here you can use various options to limit the blocks used in the reserve run, such as by variable, triangulations, or condition.
Follow these steps:
-
By default, Select all blocks will be automatically selected for the reserve calculations. If you wish to leave the default setting as it is, then you do not need to do anything with this panel. However, if you want to limit which blocks are used, enable the option to Select specific blocks. This will make all the other options available.
-
Set the criteria for which blocks will be used by selecting one or more of the following options:
Important: Block selection is cumulative. Therefore, all arguments defined on this panel must be satisfied for a block to be included.
Restrict the blocks by a block model Variable.
You will need to specify the variable, as well as a particular value.
Example: If you have a variable called
Materialin your block model and want to restrict blocks to those where the material equals ore, selectMaterialas the variable and enteroreas the value. However, if you require all blocks that do not have this specified value, then enable the Reverse selection check box towards the bottom of the panel.You can also limit the blocks by adding a condition on a numeric block model variable.
Example: To select blocks where iron has a value greater than 10.0, the condition would be
Fe GT 10.0The maximum size of the condition is 256 alphanumeric characters. Refer to Appendix B of the Core Appendices for a full list of available operators and functions.
This is useful when you want to evaluate reserves in a particular solid triangulation, such as a stope.
To restrict blocks to those that lie between two bounding surfaces, select Use two limiting surfaces.
Note: The options displayed on the panel will change depending on the selection made.

Select the Upper triangulation and Lower triangulation from the drop-down lists, or click Browse to select a triangulation from a location other than your current working directory. Only blocks that lie in the overlapping sections of the surfaces, as viewed in plan view, are selected.
It is also possible to limit the blocks by selecting Cut and fill surfaces.

Begin by selecting the name of the old triangulation surface, then selecting the name of the newest triangulation surface.
Next, enter the material codes for the cut and fill.
Example: In the screenshot above, areas where cuts have occurred will be flagged as CUT, and areas where fill has occurred with be flagged as FILL. These designations will be labelled in the output report.
Select a density value, and finally decide whether or not you want to use the grade values from the chosen block model when calculating the grade values for the fill material.
If you select this option, you must enter the minimum and maximum coordinates for X, Y, and Z in the block model coordinates (X, Y, Z CENTRE). If the block model origin is set at 0,0,0, then real world coordinates should be entered in the X, Y, and Z minimum and maximum coordinates. If the block model origin is set at real world coordinates, then enter coordinates for the bounding box that are offset a certain distance from the origin. The distance of offset will be determined by the dimensions of your bounding box. It will be the distance to the minimum and the distance to the maximum X, Y, and Z from the origin of the block model.
This will restrict the blocks by a projection plane. You will need to enter its associated thickness. The blocks that are within that thickness will be selected.
The section plane can be selected by line, points, or grid coordinates. This information is entered through the Projection Plane panel, which displays upon clicking Define section.
-
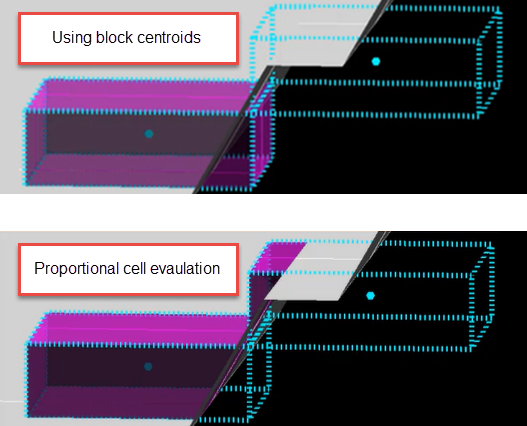
Decide whether you want to use the entire block in the calculations or only the portion that is within the regional boundaries. By default, the evaluation method is set to Proportional cell evaluation; however, you can select between Proportional cell evaluation and Use block centroids. This is especially important when using options such as Bounding triangulation, Bounding box, Section thickness, or Bounding surfaces.
Save and Run
Follow these steps:
-
Once you have completed the required options in the editor, define a Reserves specification file and click the Save button. This creates your reserves specification file, which has the file extension of (
.res).Tip: It is often helpful to save each iteration of parameter settings as a separate specification file. This makes it easy to reproduce reserve estimations and note any differences between selections.
-
Next, select an output format for the reserves report. You have the option of selecting a DMP file, a CSV file, or both.
To create either an Output DMP file an Output CSV file, enter the name of the file that will be used to store the calculation results. The name of the currently open specifications file will be used by default.
Example: If the reserves specification file is named
myreserves.res, then the value within this field will bemyreserves.dmpormyreserves.csv.The drop-down list will contain all available DMP or CSV files found within your current working directory. Use the Browse button to select a file from another location.
To create a new file, simply enter the file name and file extension. By default, the resulting file will be stored in the current working directory. Use the Browse button to nominate a different storage location.
NoteDMP files are Vulcan dump files. The dump file is an ASCII data file with field names and information defined in the start of the file, before the actual data.
CSV (Comma Separated Values) files are commonly used data files in Windows applications. You can manipulate CSV files using Microsoft Excel.
Important: A DMP file will be needed if you want to generate an output report. The tables and columns of the report are read from the DMP files.
-
Select any Options you want to include before calculating the reserves.
Note: The options here will not have any effect on the reserve calculations. They only provide additional options for the way in which the results are displayed.
If you want to view the calculations in a window as they are being run, click Display reserve calculations in window.
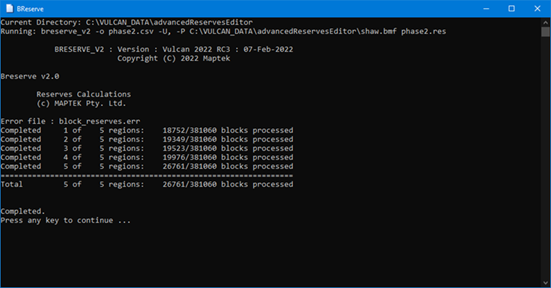
If you want to display the command-line prompt that would be used to run
BRESERVE_V2from the Native TCSH or Integrated Shell, select the option Output command to report window. This can be very useful when writing scripts to repeat the process using the same parameters.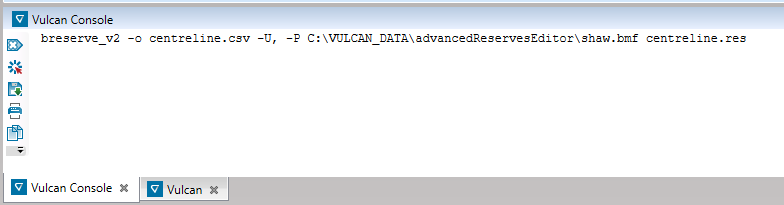
You can set the Default region name to either the triangulation or object name for outputting to a file. Also select the preferred Triangulation name format to show as either the relative or absolute path in the output file, or the file name only.
-
Finally, click Calculate to run the reserves. Depending on your output settings, you may see a report window display the calculation results as they are being done. A DMP file and/or CSV file will be generated and stored in your working directory when the calculations have completed.
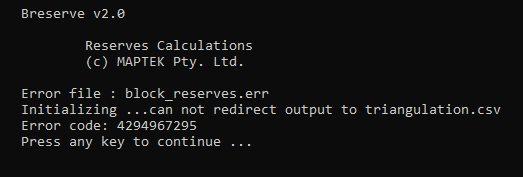
TipAfter viewing the CSV file, you must make sure it is closed before attempting to run the calculations again. If the file remains open, the following error message will be displayed.
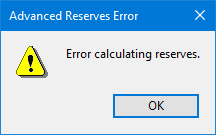
The same error message will be presented in the report window, but there will be an explanation giving the reason for the error. If you are running the calculations without viewing the report window you may not realise the reason for the error.
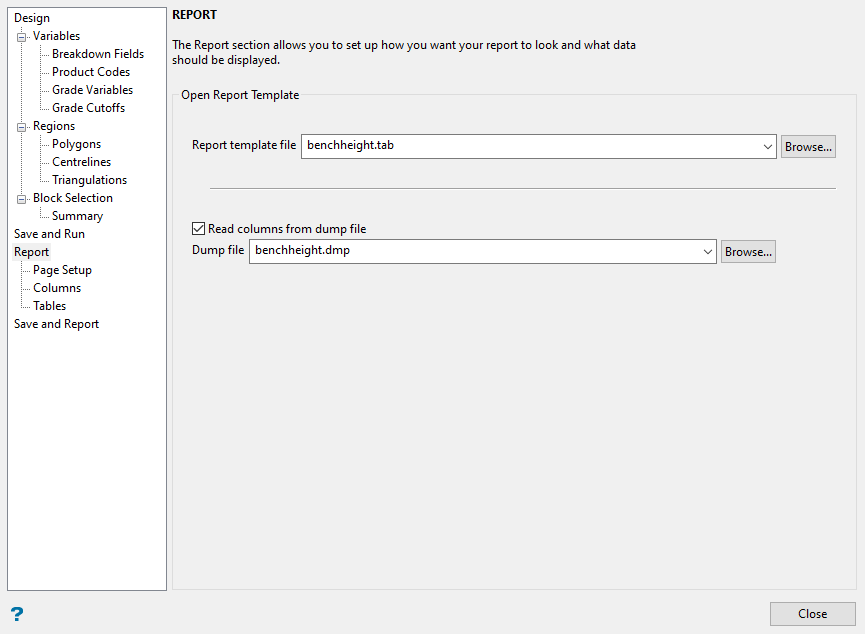
Report
This section of the panel allows you to open or create a report template file. Templates provide an easy way of formatting a report to present the data just the way you want. You can save multiple templates to use for different reporting situations.
There are three panels used to set up a report template:
Note: If you have already run reserves and are returning to the Advanced Reserves Editor to generate a report, you do not need to open a Reserve specification file as long as access to the dump file still exists. If the dump file has been deleted or access no longer exists, you will need to run reserve calculations again.
Follow these steps:
-
Begin by selecting the Report template file that you want to open. The name of the currently open specifications file will be used by default, for example if the reserves specification file is named
myreserves.res, then the value within this field will bemyreserves.tab.The drop-down list contains all (.tab) files found within your current working directory. Click Browse to select a file from another location.To create a new file, enter the file name and file extension. By default, the resulting file will be stored in the current working directory. You can store it in a different location by using the Browse button.
-
Next, select the option Read columns from dump file, and then select the dump file. This brings in all the data and creates the necessary links between the report template and the Advanced Reserves Editor.
-
On the Page Setup panel, you can make adjustments to the general layout parameters. If the default settings suit your needs, you will not need to edit anything on this panel.
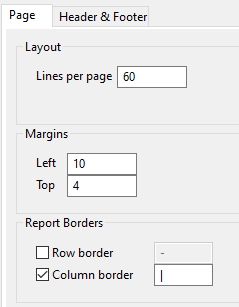
Tip: Keep in mind that adding report borders can affect the look of the spreadsheet in ways that may not be useful. For example, adding a row border will add a row of cells filled with the selected character in between each row of data, making it somewhat difficult to read.
You can also add a header and/or footer to your report to provide your readers with useful information. You can add up to five rows for both headers and footers if needed.

-
Next, the Columns panel will determine what information will be available to show in your report. If you enabled the option to read from the dump file on the Report panel, then this table should already be filled in. The report file reads column headings from the dump file to populate all columns in the Column panel.
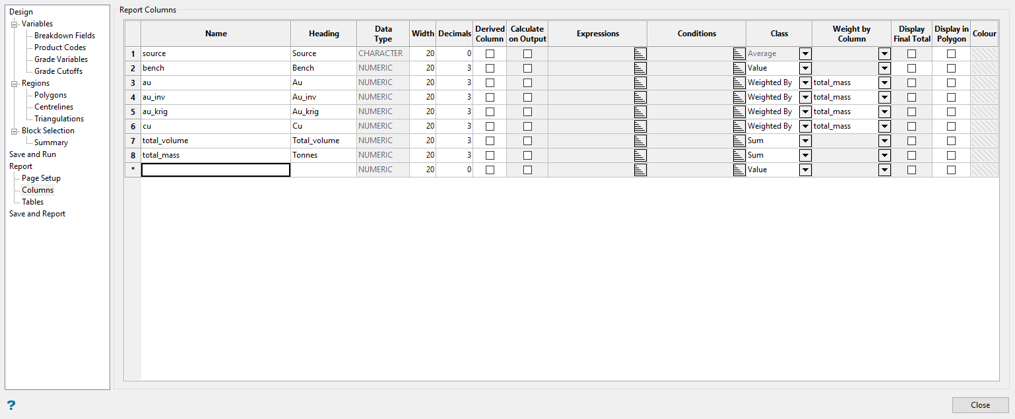
Below is a brief explanation of each column.
Name
Important: Although you can change the name in the column, you should not do so. If you do, Vulcan will no longer be able to read the data from the dump file.
The name must be unique in the list of columns. The maximum size is 256 alphanumeric characters (spaces are not allowed). The maximum number of columns per (
.tab) file is 500.Note: Do not use operators or function names in the column name. Up to 500 columns can be specified.
The list of names contains all data you may call on when you generate your report.
Heading
The text in the Heading column is what will be displayed in the report. It is sometimes a good idea to change the headings to something more understandable.
Example: In the image above,
total_massin the Name column was changed to readTonnesin the Heading column.The heading appears at the top of each column. The maximum size is 256 alphanumeric characters (spaces are allowed). The heading is centred in the width specified below. It may not be wider than the column width.
Data Type
Specify the data type of the column. The column type can be either a string (Character) or a value (Numeric).
Width
Enter the width, in characters, of the column. If a character column value exceeds the width of the column, then the value is truncated to fit. If a numeric column value exceeds the column width, then the column is expanded for that row to accommodate the value. This is to avoid undefined numeric values in reports. Numeric column values are right justified, and character column values are left justified.
Decimals
Enter the number of decimal places for numeric columns. If the decimal value is negative, then no decimal places are displayed and the column values are rounded.
Example: A decimal value of -1 rounds to the nearest 10, -2 to the nearest 100, etc. The rounding of numeric columns does not affect the original column values used in calculations; only the displayed values are rounded.
Derived Column
Select this check box to calculate a value by using information from other columns. If this check box is not checked, then the column must be from the dump file. The basic steps to set up a derived expression are provided below.
Calculate on Output
Select this check box to calculate the derived column on output. Calculations are based on the actual dump file column values for each row, except for columns that are to be calculated on output. Columns that are calculated on output use the column values displayed for that row.
Expressions/Conditions
Enter the expression and condition. Expressions are only used (in the calculation of the column) if a condition is associated with the expression and that condition is met. The first condition to be met determines the expression to use and an expression without a condition always evaluates to TRUE.
To avoid undefined column values, it is very important that there is always an expression that can be used, especially in the case when none of the conditions are met. Take care also to avoid division by zero, numeric underflow, and numeric overflow errors in expressions.
Expressions for derived columns may include:
- Arithmetic operators
- Logical operators
- String operators
- Numeric functions
- Logical functions
- String functions
-
Column names
- Column internal function names
Note: Three types of column internal functions are available for use in deriving columns. This is done by prefixing the name of a numeric column with Sum_, Max_ or Min_. These are the cumulative sum, maximum, and minimum column internal functions, respectively.
Important: Never use operators in column names or give columns the same name as any of the functions.
Refer to Appendix B of the Core Appendices for a full list of available operators and functions.
Class
Select a class type (Value, Average, Sum, Maximum, Minimum, Weighted By) from the drop-down list. Only one of these options can be selected for the specified column (not applicable to character columns). This determines how the column values are to be calculated and displayed.
Each variable column is generally treated as a sum, average, maximum, minimum, or weighted average based on another column's value (for example, grade based on tonnage).
The Value option is used for columns that are not being subtotalled, but rather have their actual values reported. For example, columns using the column internal functions Cumulative Sum, Maximum, and Minimum.
Weighted By Column
Specify the column to use to get the value for weighting. This is only applicable when using the Weighted By option in the Class field.
Note: Variables used in this field are limited to 30 characters.
Display Final Total
Select this option to display the final total. This is only applicable when using the Value option in the Class field.
Display in Polygon
Select this check box to display the report information in a label. The label will be placed in the centre of the polygons used to make the regions. You will need to select the colour that will be used when displaying the labels.
Setting up derived expressions
You can perform calculations based on dump file data to generate new data columns. Using the example seen in the image above, here is how you would set up a column to show grams of gold.
Calculating grams of gold from the
auvariable and thetotal_massvariable.-
Begin by typing
au_gramsinto the Name column, then provide a heading name. In this case, we will typeGrams of Auinto the Heading column. -
Click the Derived Column checkbox found in the new row. This will enable the expressions and conditions to be entered for the column that are needed to make the calculation.
-
Click the icon to open the Expressions panel. The drop-down list shows the names of all available variables. For our case, we will need to select
au. If additional variables were needed, we could select those as well.To calculate the number of grams, we will need to multiply the grade by tonnes.
Important: The expression must use the name of the variable, not the name used as the header.
We will edit the expression to
au * total_mass, then click OK. -
Since we want to know the total number of grams, we will change the Class to Sum.
-
Change the decimal places to 3.
-
Next, we need to include the new column in our output report by opening the Tables panel, then selecting the new column in the Selected Columns list.
-
Finally, we can Save and Generate the report.
Note: The report (
.tab) file does not store a link to the dump file. Therefore, if the editor was opened without selecting a dump file, the Reserves dump file will need to be selected on the Save and Run panel before generating a new report.
-
The Tables panel allows you to store parameters for one or more tables that will be displayed in your report.
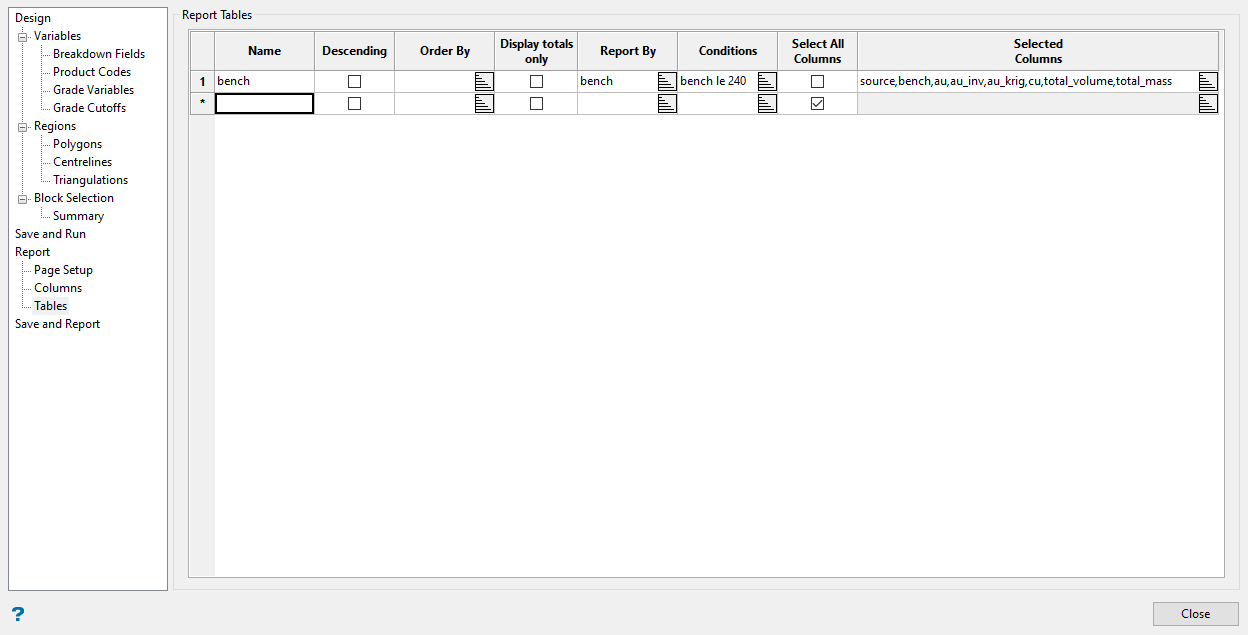
Below is a brief explanation of each column.
Name
Enter the table name. The name must be unique in the list of tables. This name will be displayed in your report.
Descending
Select this check box to sort the values in descending order. If this check box is not checked, then the values are sorted in ascending order.
Order By
Specify the column(s) by which to order. Once selected, the Order By panel displays.
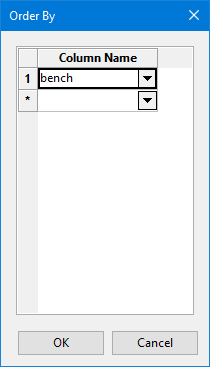
Select the desired columns from the drop-down list.
If no columns are specified, then the rows remain unsorted, that is, in the same order as the dump file. If a chosen column is also to be used for subtotalling (see the Report By option), then ensure that the column is the last one specified in this field.
Note: Columns based on column internal functions, or columns calculated on output, cannot be used as sorting is performed before column subtotalling.
Report By
Specify the column(s) for which subtotals will be reported. Once selected, the Report By panel displays.

Select the desired columns from the available drop-down lists. Every time the column value changes, a subtotal row displays in the table.
If you are also ordering by this column, then make sure that this column is the last one specified in the Order By field.
Note: As subtotalling is performed before reporting column values, columns calculated on output cannot be used.
Display totals only
Character columns are excluded from the report if they are not used for ordering or subtotalling. Numeric columns are always included, except when the Display totals only box is not checked.
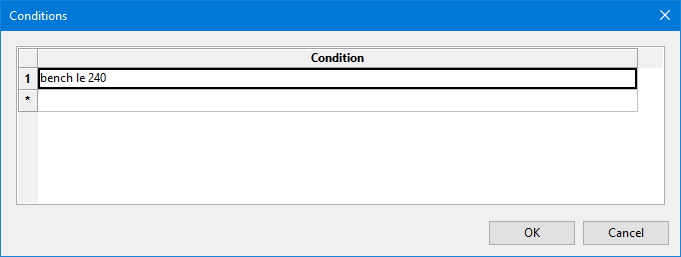
Conditions
The condition fields allow you to select which rows to include in the table based on whether certain column conditions are met. All columns with data can be used when defining a condition.
To report on all benches above the 240 level, the condition would be 'bench less than or equal to 240':
bench le 240Up to five conditions may be entered, with each condition containing a maximum of 1024 alphanumeric characters. All conditions must be true before a row is included in the table.
Refer to Appendix B of the Core Appendices for a full list of available operators and functions.
Note: The Derived Column and Calculate on Output options, available from the Columns panel, are selectable options that are also used to calculate additional columns in the Advanced Reserves report. As such, they are not eligible for use when defining a condition.
Either all columns can be used in the table or a subset of selected columns.
Select All Columns
Select this check box to select all of the columns. If this option is selected, then the columns appear in the table as in the columns list.
Selected Columns
If the Select All Columns check box is not selected, then the Select Columns field will be enabled. Once selected, the Selected Columns panel is displayed.
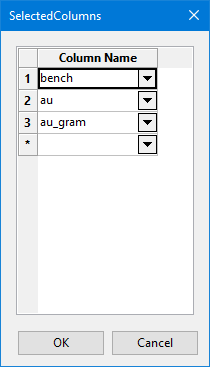
Select the columns from the drop-down lists.
Note: The columns appear in the table in the order that they are selected.
If subsets of columns are selected, then the columns used to order and report by must be included in the subset. Selecting a column does not necessarily mean that it displays in the table.
Save and Report
This panel allows you to save the current report template file as well as generate a report file.
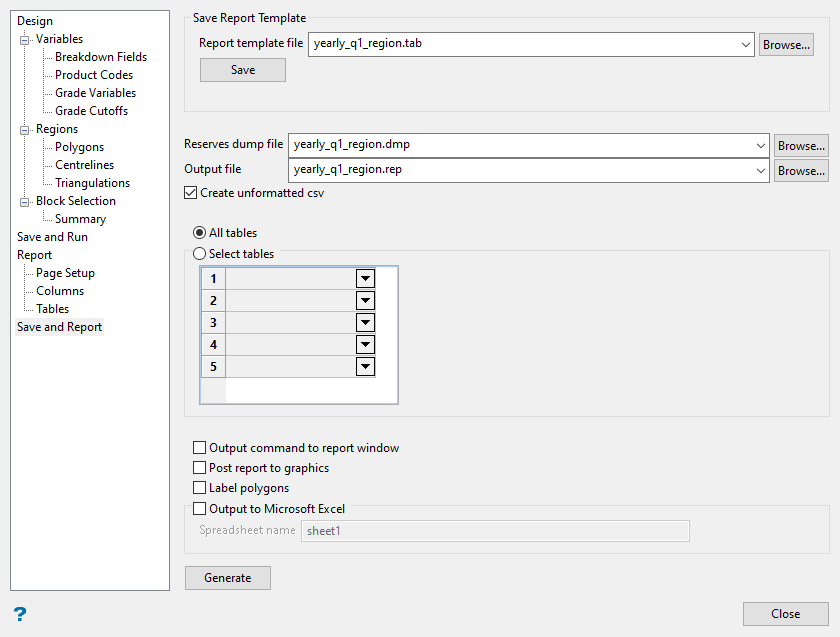
Follow these steps:
-
Select the Report template file you want to use. The name of the currently open report template file will be displayed. The drop-down list will contain all (
.tab) files found within your current working directory. Click Browse to select a file from another location.To create a new file, enter the file name and file extension. By default, the resulting file will be stored in the current working directory. Use the Browse option to select a different file location.
Click Save to save the report template.
-
Select the Reserves dump file containing the required calculation results. The drop-down list will contain all (
.dmp) files found in your current working directory. Click Browse to select a file from another location.Note: If the dump file has been deleted or access no longer exists, you will need to run reserve calculations again.
-
Enter the file name and file extension for the Output file to create a new report (
.rep) file. An output file is created each time a report is generated. By default, the resulting file will be stored in your current working directory.Tip: By default, the report file will be called
report.rep. To prevent the information in a previous run from being overwritten, be sure to provide a unique name. -
Enable Create unformatted cvs if you want to output the report file to CSV file format where there are no page headers, footers, or page breaks.
-
Use the Select tables option to select tables to be used in the report from the drop-down lists. Alternatively, select the All tables option to use all available tables in the report.
-
Select the option Output command to report window if you want to display the command-line prompt that would be used to run
BRESERVE_V2from the Native TCSH or Integrated Shell. This can be very useful when writing scripts to repeat the process using the same parameters.
-
Select the option Post report to graphics if you want to view the results of the report in a layer that will be displayed on the screen. You will be asked to position the location where the layer will display.
-
Select Label polygons if you want to display the report information in a label. The label will be placed in the centre of the polygons used to make the regions.
Note: To use this option, you will need to enable the Display in Polygon option in the Columns panel, and select the colour that will be used when displaying the labels.
-
Select Output to Microsoft Excel to export the results to an Excel file for easy viewing. The Excel file will be named the same as the (
.res) file. Enter a name for the spreadsheet tab in the Excel file in the space provided. If an Excel file is already opened, then the new spreadsheet tab will automatically be added to the existing file. -
Click Generate to run the reserves.

