Tutorial - Downhole Geophysics
Downhole Geophysics is a visual editing tool for drillholes to display geophysical trace information to aid in the interpretation process. You can modify geological information in borehole databases in an intuitive and easy to use environment.
The dynamic interface allows:
-
-
On-the-fly resizing,
-
Adding and removing traces,
-
Comparing different drillholes to develop a correlation of coal seams,
-
Comparing the geophysics before assigning a seam name,
-
Picking splits within the coal seams, enabling you to change the positions of splits in coal seams dynamically for a more useful correlation.
-
The dataset for this tutorial is in the DownholeGeophysicsData folder. (click the link to download the dataset).
View Geophysical Data
- Select Geology > Downhole Geophysics > Interactive Editor.
- Click Data Source and select D1010.las.
- Click Trace Selection, select traces and adjust colours.
- Click Lithology and select Isis File, then drillhole.las.isis.
- Click Window settings and define a window size and adjust colours.
- Click OK.
Try the Tools
Try the tools
Once you are in the borehole graphics view, you will have access to various options to change the appearance of traces and the overall display. Scroll over the icons on the toolbar for a brief description of each option.
The Delete and the Shift Lithology options work from the Lithology field. All other options work from the interval lines.
Viewing tools
 Toggle between Adjacent and Overlay.
![]() Scroll up and down. You can also use the middle wheel on the mouse to scroll.
Scroll up and down. You can also use the middle wheel on the mouse to scroll.
 Zoom. The Zoom tool prompts you to select two points on the hole and the view will zoom in on that area. You can also use CTRL + mouse wheel to zoom.
![]() Reset. The Reset tool will reset the view so that you see the entire hole length. This is useful if you have been resizing the window and the view is out of synchronisation.
Reset. The Reset tool will reset the view so that you see the entire hole length. This is useful if you have been resizing the window and the view is out of synchronisation.
 Tile Windows. The Tile Windows tool will stretch and align all geophysical display windows across the current monitor. This is useful if you want to open multiple windows simultaneously and move them around on the screen to see a comparison between different holes.
![]() Adjust Trace Offset. The Adjust Trace Offset tool moves the entire geophysical trace up or down while leaving the borehole logging the same. This is useful if you want to align the traces.
Adjust Trace Offset. The Adjust Trace Offset tool moves the entire geophysical trace up or down while leaving the borehole logging the same. This is useful if you want to align the traces.
Editing tools
![]() Move Interval. Use the Move Interval tool to move both the roof and floor together so that no gaps are left in the logging. Click and drag from the Move Interval tool to display the Move Lithology toolbar.
Move Interval. Use the Move Interval tool to move both the roof and floor together so that no gaps are left in the logging. Click and drag from the Move Interval tool to display the Move Lithology toolbar.
![]() Move Roof. Use the Move Roof tool to move only the roof of an interval. This allows you to open gaps in the logging.
Move Roof. Use the Move Roof tool to move only the roof of an interval. This allows you to open gaps in the logging.
![]() Move Floor. Use the Move Floor tool to move only the floor of an interval. This allows you to open gaps in the logging.
Move Floor. Use the Move Floor tool to move only the floor of an interval. This allows you to open gaps in the logging.
![]() Shift Lithology. Use the Shift Lithology tool to move an entire interval without changing its length. This is useful for moving individual sample positions within the hole.
Shift Lithology. Use the Shift Lithology tool to move an entire interval without changing its length. This is useful for moving individual sample positions within the hole.
 Delete Interval. Use the Delete Interval tool to select an interval from the lithology display and delete it. This is useful when you want to create and visualise a gap in the drilling.
![]() Insert Interval. Use the Insert Interval tool to insert a new from-to interval into the borehole. Details associated with this interval can then be edited or inserted.
Insert Interval. Use the Insert Interval tool to insert a new from-to interval into the borehole. Details associated with this interval can then be edited or inserted.
![]() Edit Interval. Click on the Edit Interval tool to open an editing window with an Isis view. Edits made in this window will be immediately visible in the borehole graphics view.
Edit Interval. Click on the Edit Interval tool to open an editing window with an Isis view. Edits made in this window will be immediately visible in the borehole graphics view.
![]() Save. Use the Save tool to save your changes.
Save. Use the Save tool to save your changes.
Trace tools
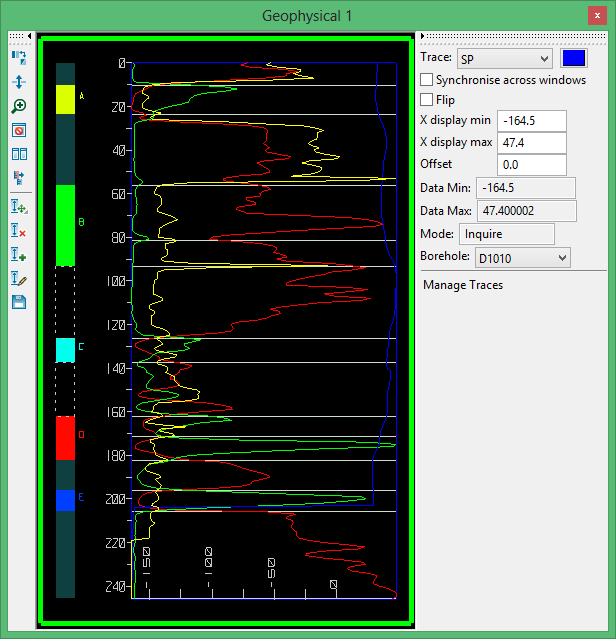
The right hand side of the Geophysics window provides options for changing the appearance of traces already loaded into the window.
![]() The Trace drop-down box shows the trace you are currently viewing. Click on the colour box to change the trace colour.
The Trace drop-down box shows the trace you are currently viewing. Click on the colour box to change the trace colour.
Select the Synchronise across windows check box to perform simultaneous actions across all open windows.
Select the Flip check box to reverse the maximum and minimum to aid in visualisation for interpretations.
The Borehole drop-down changes the borehole you are viewing while keeping the geophysical traces the same.
The Manage Traces button returns you to the set up panel, where you can change which traces are displayed and add/remove breaklines.
Also note that when hovering over the geophysical trace, the depth and values are displayed in the lower left corner of the window.
Create Boreholes on the Fly
-
Geo logy > Downhole Geophysics > Interactive Editor.
-
Data Source
-
Enter a non-existent hole in Lithology -- in this case, 1267R to create it from scratch click OK to show a window with no lithology
-
Click to insert intervals
-
Edit intervals
-
Enter names into the Unit column in the edit window. Notice that the graphical display changes as information is entered
-
Save
- Clic k on User Databases in Vulcan Explorer to view it in Isis and you will see that 1267R has been added and is defined
Synchronise Windows
-
Geology > Downhole Geophysics > Interactive Editor.
-
Click OK.
-
Open a second Geophysics panel by repeating steps 1-2.
-
Click the Synchronise window on each panel.
-
Scroll in either window and notice that the ranges both line up.
-
Zoom in and out and notice that both synchronise.
Related topics

