Customising Applications
Workbench supports customising your installed applications and Workbench itself to make access to tools more convenient. Customisation involves adding items to areas of the user interface such as ribbons, toolbars, and menus. You can also modify keyboard shortcuts to tools and commands. Examples of customisations include the following:
-
Grouping frequently accessed tools onto a custom ribbon menu
-
Hiding unused tools from the Quick Launch toolbar
-
Adding a Python script to a view window context menu so that the script can be run on the object that is clicked on
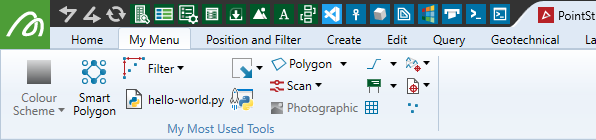
The animation below demonstrates how to create a new ribbon menu tab with custom items in PointStudio.
Application customisation tool
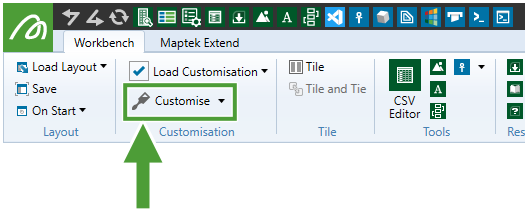
To customise your application, start the application customisation tool. On the Workbench ribbon, in the Customisation group, click ![]() Customise....
Customise....
Alternatively, if your application user interface uses menus and toolbars, navigate to Workbench > Customise > ![]() Application....
Application....
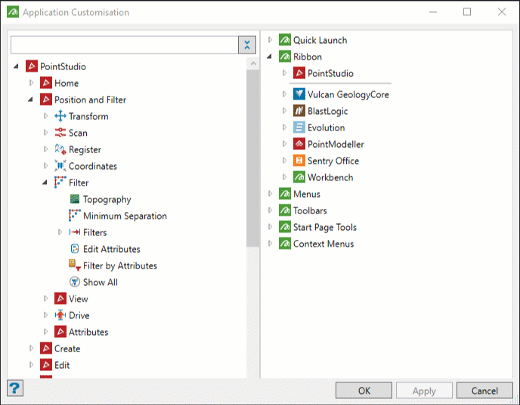
The Application Customisation panel will open. The image below shows the basic organisation of the tool.
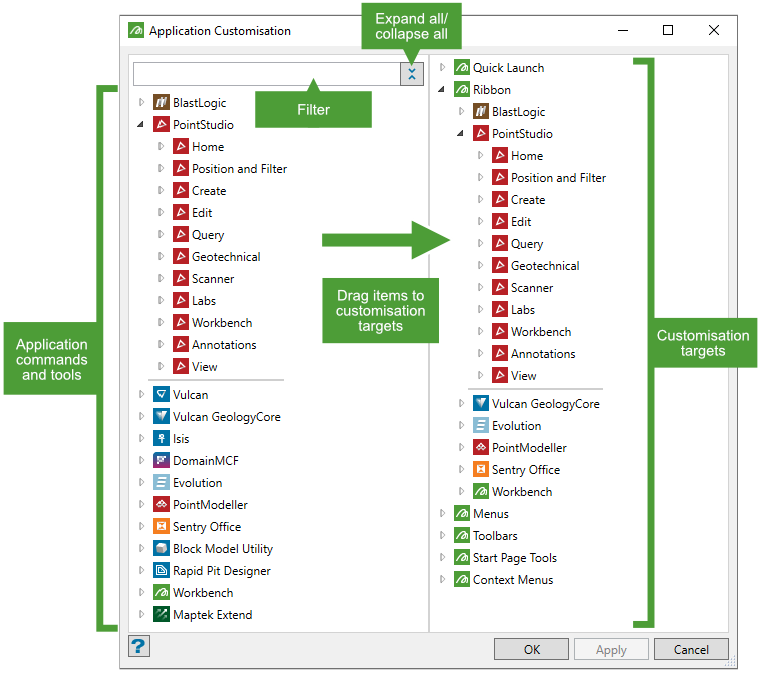
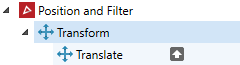
The left pane is a hierarchical representation of every tool and command for each application. Open applications are placed at the top of the list. The right pane lists customisation targets. You can add a tool, command, or a group of tools and commands to a custom location by dragging it from the left pane to a location in the right pane.
Note: The hierarchical listing on the left shows tools and commands according to the current user interface preference. That is, if the application is set to use a ribbon, the application’s ribbon menus will be listed. Otherwise, if menus and toolbars are used, the menus will be listed.
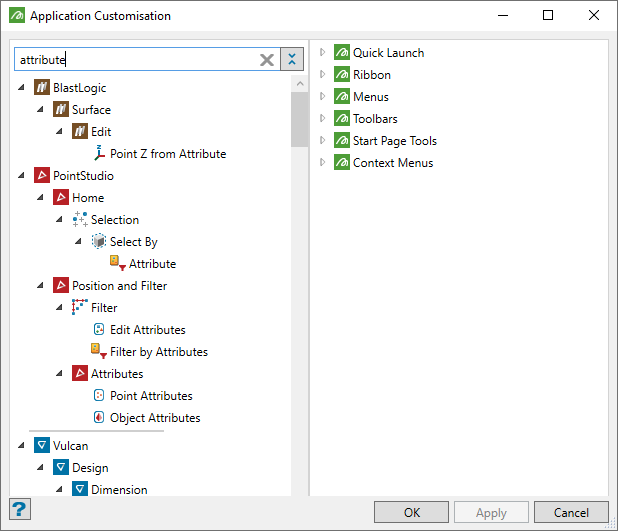
Type text into the filter field at the top of the tool list in the left pane to search for tools and commands that contain the specified text. In the example below, typing the word attribute into the filter field shows all commands and tools that contain the word “attribute”.
-
Use the
 button to the left of an item to expand the item and reveal its subitems.
 -
Drag an item or an entire group of items from the left pane to a target location in the right pane to add the item or group to a custom location. See individual tasks elsewhere on this page for more detail on specific operations.
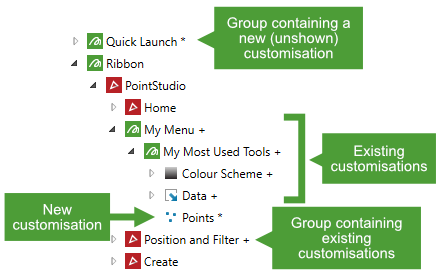
TipNewly created items are marked with a * symbol in the right pane until they are saved by clicking OK or Apply. Existing customisations are marked with a + symbol. Groups (e.g. applications or menus) that contain an unshown customisation are also marked with a + or * symbol to help you see quickly where customisation items are located.
Can I remove predefined items from application ribbons, menus, and toolbars?
No. You can add new items to application ribbons, menus, and toolbars, but the predefined tools and commands cannot be removed. You can, however, hide certain items from the Workbench Quick Launch toolbar and the Start Page tools. See Customising the Quick Launch toolbar and Start Page Tools area and Customising ribbons on this page for more information.
Adding a tool or command to a custom location
You can add any individual tool or command listed in the left pane to any target listed in the right pane. Groups of tools can also be added to ribbons, menus, toolbars, and context menus (but not the Quick Launch toolbar or the Start Page).
Individual tools or commands are “leaf” items in the list with no arrow next to them. Tool groups are items within an application that contain one or more subitems, indicated by having an arrow next to them. When added to a custom location, tool groups may be realised as ribbons, ribbon groups, menus, submenus, toolbars, or button groups, depending on the context.

To add a tool or command (or a group of tools and commands) to a custom user interface location, follow these steps:
-
If not already open, start the application customisation tool, as follows:
-
(Ribbon) Go to Workbench ribbon > Customisation group >
 Customise.
 -
(Menu) Go to Workbench > Customise >
Application....
-
-
Locate the item in the pane on the left by expanding to it. If you know the name of the item you want to add, use the filter field to show only matching items.
-
Find the target ribbon menu in the pane on the right by expanding to it.
-
Drag the item from the left pane to the target location on the right.
Note: The exact target location you drop the item onto in the right pane can have a different effect. For example, dropping an item onto an application name under Ribbon will create a new ribbon menu for that application and add the item to it, whereas dropping an item onto an existing ribbon menu under Ribbon will add the item to that ribbon. Dropping onto a location between two existing ribbons will create a new ribbon menu between those ribbons, and so on. The tool will give you an indication of the effect of dropping to a given location before you release the mouse button.
After adding the item, you can perform the following additional tasks:
-
To rename the item, double-click the item and enter a new name, then press Enter.
-
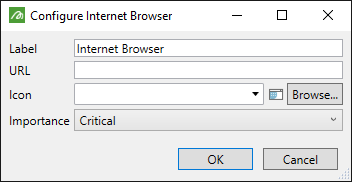
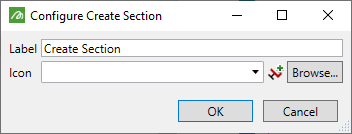
To configure the item, click the
 (Configure) button that appears when you hover over the item. From here you can configure the item, including its label and icon. Some other configuration options may also be available depending on the item type.
-
To set or modify the keyboard shortcut for the tool or command, click the
 (Edit key binding) button that appears when you hover over the item.
 -
To change the position of the item within its group, or to move it to another customisation target, drag it to any valid position in the right-hand pane.
Adding an executable, script, or web link to a custom location
You can add items that will launch an executable, run a script, or open a hyperlink to many custom locations, including menus, toolbars, and the Start Page.
To add one of these items, follow these steps:
-
If not already open, start the application customisation tool, as follows:
-
(Ribbon) Go to Workbench ribbon > Customisation group >
Customise. -
(Menu) Go to Workbench > Customise >
Application....
-
-
Hover over the target location in the right pane to reveal its tool buttons. The target location can be an application, a menu, a toolbar, the Start Page, or any group within these items.
-
Click the
 button, and choose the relevant item from the drop-down menu that appears.
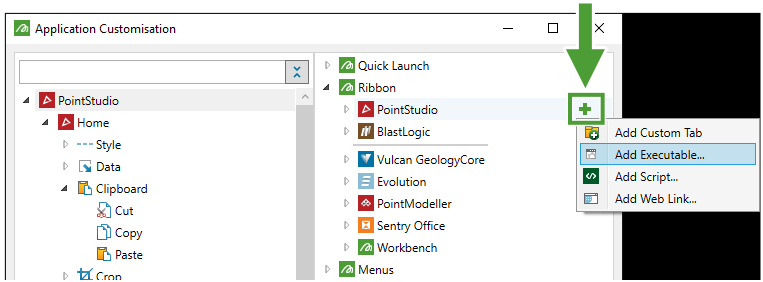
-
To add an executable or script, select Add Executable... or Add Script... as appropriate. After selecting the executable file or script, click the
(Configure) button that appears when you hover over the item to configure it further, including specifying arguments.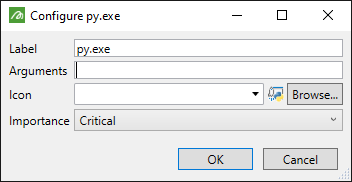
-
To add a hyperlink, select Add Web Link.... In the panel that appears, specify the URL in the URL field, and configure the other details as required.
-
Saving and loading customisations
Customisations are saved to Workbench customisation files (.wvc). When you first create a customisation using the application customisation tool, the customisation will be saved to Workbench.wvc in a local AppData folder. Subsequent customisations are saved to the currently loaded customisation file. If no customisation is loaded, the tool will prompt you to save to a new or existing file.
You can see which customisation file is loaded by inspecting the ![]() Load Customisation drop-down menu on the Workbench ribbon (or the
Load Customisation drop-down menu on the Workbench ribbon (or the ![]() Load Customisation submenu in the Workbench menu). In the screenshot below, the customisation
Load Customisation submenu in the Workbench menu). In the screenshot below, the customisation my-favourite-customisations is loaded.

You can perform the following tasks from the ![]() Load Customisation drop-down menu:
Load Customisation drop-down menu:
-
To load a previously loaded customisation file, select it in the drop-down menu.
-
To turn all customisations off, select None in the menu.
-
Select
 Clear History to remove customisations from the drop-down menu. This does not delete the customisation files, it just removes them from the list. The currently loaded customisation will not be cleared.
 -
Select
 Browse... to load a customisation from a Workbench customisation file (.wvc) that does not already appear in the list.
 -
Select
 New... to create and load a new, empty customisation file.
Exporting and importing customisations
You can export customisations to file so they can be imported into a different instance of Workbench, for example, on a different computer.
Tip: You can only export from or import to a customisation that is currently loaded. Make sure a customisation is loaded by selecting it in the ![]() Load Customisation drop-down menu.
Load Customisation drop-down menu.
-
To export a customisation, from the
Customise drop-down menu select  Export. You will be prompted to save to a new or existing file in a file browser. The currently loaded customisation will be exported as a Workbench customisation file (.wvc).
 -
To import a customisation, from the
Customise drop-down menu select  Import. Use the file browser to specify a Workbench customisation file (.wvc). The customisation file will be imported and merged with the currently loaded customisation.
Removing customisations
-
To remove an individual customisation from the currently loaded customisation file, locate the item in the right pane of the application customisation tool. Then do one of the following:
-
Hover over the item to show its tool buttons, then click the
 (Delete) button.
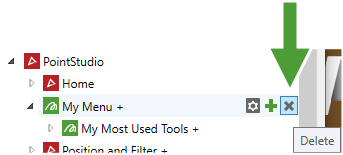
-
Select the item and press Delete.
-
-
To remove all currently loaded customisations, select None from the
 Load Customisation drop-down menu. To permanently delete a customisation you will need to delete the Windows customisation file (.wvc). Deleted customisations will still appear in the Load Customisation drop-down menu; select Clear History to clear items from the menu.
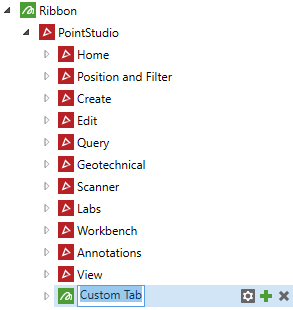
Customising ribbons
In an application that uses a ribbon interface, you can customise the ribbon by adding items to existing ribbon menus, or you can create your own custom ribbon menu tab.
|
|
|
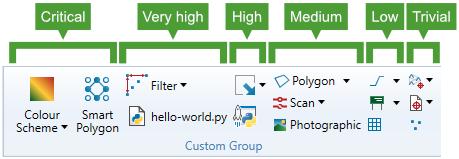
Example of a custom ribbon tab in PointStudio. |
Creating a custom ribbon menu tab
The application customisation tool will automatically create a new ribbon menu tab in the following situations:
-
When you drag an item from the left pane onto an application name under the Ribbon item in the right pane.
-
When you add an item such as a script via the
button that appears when you hover over an application name under Ribbon.
Otherwise, follow the steps below to explicitly create and configure a new ribbon menu tab.
To create a new ribbon menu tab:
-
If not already open, start the application customisation tool (Workbench ribbon > Customisation group >
Customise). -
In the right pane, expand the Ribbon item to show the list of applications with ribbon interfaces.
-
Hover over an application item to show its associated tool buttons.
-
Click the
button and select Add Custom Tab from the drop-down menu.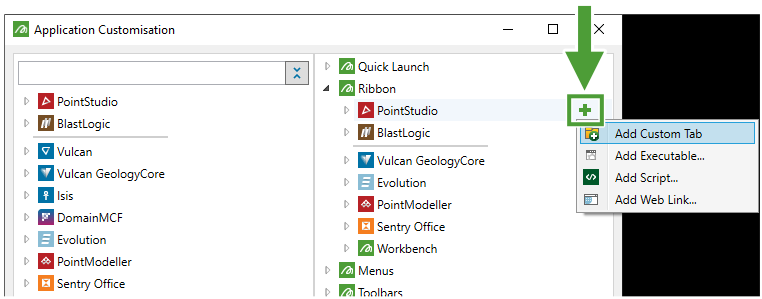
A new custom tab item appears under the application.
The new ribbon tab’s name will be immediately modifiable. Enter a name and press Enter.
-
Optionally perform additional operations by clicking one of the following buttons that appear when you hover over the new item:
Configure
Configure the ribbon tab’s label, icon, and importance.
Add item
Add a group, executable, script, or web link to the ribbon.
Delete
Delete the ribbon tab.
-
Add application tools and commands to the ribbon by dragging them from the left pane onto the new ribbon tab item in the right pane. If the ribbon does not have any groups, a default custom group will be added.
-
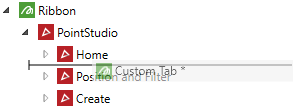
Optionally change the new tab’s position in the set of ribbon tabs by dragging it. For example, if you want the new tab to appear to the right of the Home tab, drag the item to the position immediately below Home in the list. Dragging a custom ribbon tab item onto or within an existing ribbon tab will insert the item as a drop-down menu within the existing ribbon tab.
-
Click OK or Apply to save the changes to the current customisation. If there is no current customisation, you may be prompted to save the customisation to file.
Adding a custom group to a ribbon menu tab
You can create custom ribbon groups on a custom ribbon menu tab or any existing application ribbon menu tab.
The application customisation tool will automatically create a new ribbon group in the following situations:
-
When you drag an item from the left pane onto an existing ribbon menu tab in the right pane.
-
When you add an item such as a script via the
button that appears when you hover over a ribbon tab item in the right pane.
Otherwise, follow the steps below to explicitly create and configure a new ribbon group.
To create a new ribbon menu group:
- If not already open, start the application customisation tool (Workbench ribbon > Customisation group > Customise).
-
In the right pane, expand the Ribbon item to show the list of applications with ribbon interfaces, and expand an application to show the list of ribbon menu tabs for that application.
-
Hover over an application item to show its associated tool buttons.
-
Click the
button and select Add Custom Group from the drop-down menu.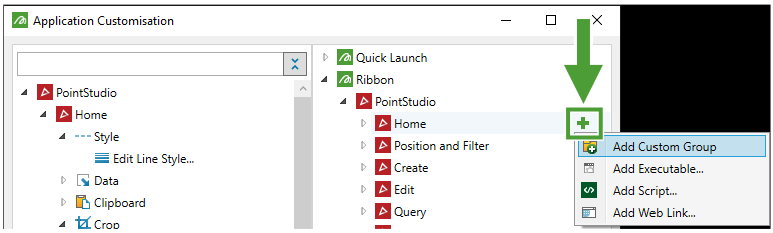
A new custom group item appears under the application.
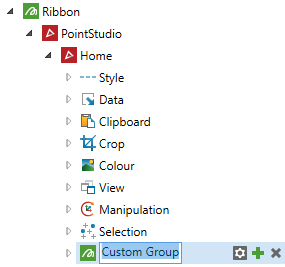
The new custom group’s name will be immediately modifiable. Enter a name and press Enter.
-
Optionally perform additional operations by clicking one of the following buttons that appear when you hover over the new item:
Configure
Configure the ribbon group’s label, icon, and importance.
Add item
Add a submenu, executable, script, or web link to the ribbon group.
Delete
Delete the ribbon group.
-
Optionally change the new group’s position by dragging to one of the following locations:
-
Next to an existing group
-
Onto an existing group to insert the group as a menu within that group
-
Onto or within a different ribbon tab to insert the group into that ribbon
-
Onto or within an application name to insert the group as a new custom ribbon menu tab
-
Onto or within Menus, Toolbars, or Context Menus.
-
-
Click OK or Apply to save the changes to the current customisation. If there is no current customisation, you will be prompted to save the customisation to file.
Configuring ribbon items
-
To add commands and tools to a ribbon, see Adding a tool or command to a custom location.
-
To add an executable, script, or web link to a ribbon, see Adding an executable, script, or web link to a custom location.
Configure ribbon items in the application customisation tool. If not already open, start the application customisation tool (Workbench ribbon > Customisation group > ![]() Customise).
Customise).
You can configure custom ribbon items using the tool buttons that appear when you hover over the item. You can also modify the key bindings for predefined items.
|
|
|
|
Tool buttons for a custom (left) and predefined (right) item. |
|
|
|
Edit Key Binding Set or modify the keyboard shortcut that will run the command or tool.
Note: You can set a custom key binding on predefined items or your own custom items. Setting a new key binding on a predefined or custom item does not remove the item’s original default keyboard shortcut (if set). However, if you set a custom key binding that is already in use by another predefined item, your custom key binding will take precedence. This can be helpful, for example, to set a single unifying keyboard shortcut for similar commands in different applications. |
|
|
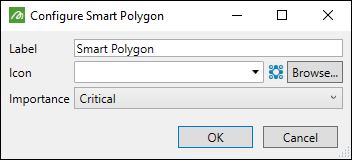
Configure Configure the ribbon item’s label, icon, and importance.
|
|
|
Delete Delete the ribbon group. |
Customising application menus, toolbars, and context menus
The process for customising application menus, toolbars, and context menus is similar.
Creating a custom application menu
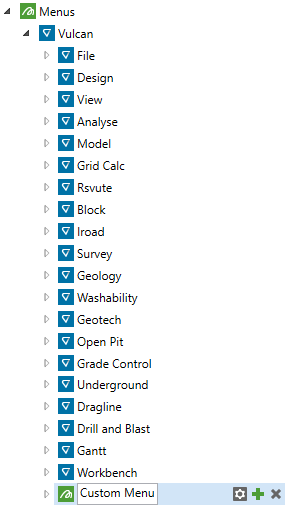
In an application that uses application menus, you can customise the application by adding items to existing application menus, or you can create your own custom application menu.
|
|
|
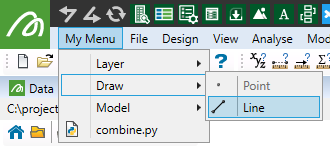
Example of a custom application menu in Vulcan. |
The application customisation tool will automatically create a new application menu in the following situations:
-
When you drag an item from the left pane onto an application name under the Menus item in the right pane.
-
When you add an item such as a script via the
button that appears when you hover over an application name under Menus.
Otherwise, follow the steps below to explicitly create and configure and configure a new application menu.
To create a new application menu:
-
If not already open, start the application customisation tool. (Workbench > Customise >
Application...). -
In the right pane, expand the Menus item to show the list of applications with menu interfaces.
-
Hover over an application item to show its associated tool buttons.
-
Click the
button and select Add Custom Menu from the drop-down menu.
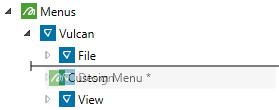
A new custom menu item appears under the application.
The new application menu’s name will be immediately modifiable. Enter a name and press Enter.
-
Optionally perform additional operations by clicking one of the following buttons that appear when you hover over the new item:
Configure
Configure the menu’s label and icon.
Add item
Add a submenu, executable, script, or web link to the menu.
Delete
Delete the menu.
-
Add application tools and commands to the ribbon by dragging them from the left pane onto the new application menu in the right pane.
-
Optionally change the new menu’s position in the set of application menus by dragging it. For example, if you want the new menu to appear to the right of the File menu, drag the item to the position immediately below File in the list. Dragging a custom menu onto or within an existing menu will insert the it as a submenu.
-
Click OK or Apply to save the changes to the current customisation. If there is no current customisation, you will be prompted to save the customisation to file.
Creating a custom application toolbar
In an application that uses application toolbars, you can customise the toolbar by adding tools and commands to it.

The application customisation tool will automatically create a new application toolbar in the following situations:
-
When you drag an item from the left pane onto an application name under the Toolbars item in the right pane.
-
When you add an item such as a script via the
button that appears when you hover over an application name under Toolbars.
Otherwise, follow the steps below to explicitly create and configure and configure a new application toolbar.
To create a new application toolbar:
-
If not already open, start the application customisation tool. (Workbench > Customise >
Application...). -
In the right pane, expand the Toolbar item to show the list of applications with menu interfaces.
-
Hover over an application item to show its associated tool buttons.
-
Click the
button and select Add Custom Toolbar from the drop-down menu. A new custom toolbar item appears under the application. The new toolbar’s name will be immediately modifiable. Enter a name and press Enter. -
Optionally perform additional operations by clicking one of the following buttons that appear when you hover over the new item:
Configure
Configure the toolbar’s label and icon.
Add item
Add a custom menu (realised as a drop-down menu), executable, script, or web link to the toolbar.
Delete
Delete the toolbar.
-
Add application tools and commands to the toolbar by dragging them from the left pane onto the new application menu in the right pane.
-
Click OK or Apply to save the changes to the current customisation. If there is no current customisation, you will be prompted to save the customisation to file.
When you create a custom application toolbar, it will initially display as a new toolbar separate from the application’s default toolbar. You can move the toolbar into the default toolbar by dragging the toolbar’s grabber ( ) and dropping the toolbar onto the desired location in the default toolbar.

Customising an application context menu
You can customise an application context menu by adding items to it, including submenus. These custom items will typically appear in the context menu that shows when you click the right mouse button in a 3D view window. The custom items will always appear in the context menu (the items cannot be context-dependent). Scripts and workflows placed into a context menu can obtain information about the location that was clicked on, such as the object or point that was clicked on, and use this information for context-dependent processing.
To add an item to an application context menu:
-
If not already open, start the application customisation tool, as follows:
-
(Ribbon) Go to Workbench ribbon > Customisation group >
Customise. -
(Menu) Go to Workbench > Customise >
Application....
-
-
In the right pane, expand the Context Menus item to show the list of applications that support context menus.
-
Optionally create submenus in the context menu by clicking the
button and selecting Add Custom Menu from the drop-down menu. -
Drag items from the left pane onto the desired application listed under Context Menus in the right pane.
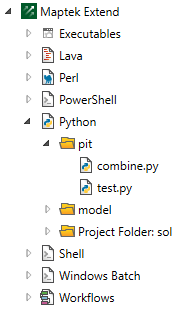
TipYou can find executables, scripts (including Lava, Perl, PowerShell, Python, shell, and Windows batch scripts), and Workflows in your current project or custom data paths under the Maptek Extend item in the left pane.
-
Optionally perform additional operations by clicking one of the following buttons that appear when you hover over the new item:
Edit Key Binding
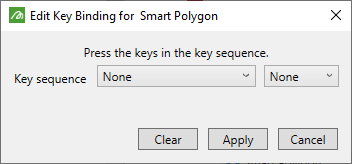
Set or modify the keyboard shortcut that will run the command or tool.
-
Press the key sequence you would like to set as the key binding for the command. The panel will detect and set the key sequence you enter.
-
Alternatively, set the key sequence using the drop-down lists.
Note: You can set a custom key binding on predefined items or your own custom items. Setting a new key binding on a predefined or custom item does not remove the item’s original default keyboard shortcut (if set). However, if you set a custom key binding that is already in use by another predefined item, your custom key binding will take precedence. This can be helpful, for example, to set a single unifying keyboard shortcut for similar commands in different applications.
Configure
Configure the context menu item’s label and icon.
-
Edit the context menu item’s label and icon as required.
Delete
Delete the item from the context menu.
-
-
Click OK or Apply to save the changes to the current customisation. If there is no current customisation, you will be prompted to save the customisation to file.
Adding a custom menu to an existing menu or toolbar
You can add custom menus to existing menus or toolbars. These are realised as submenus within menus, and as drop-down menus in toolbars.
To add a custom menu to an existing menu or toolbar:
-
If not already open, start the application customisation tool, as follows:
-
(Ribbon) Go to Workbench ribbon > Customisation group >
Customise. -
(Menu) Go to Workbench > Customise >
Application....
-
-
Locate the existing menu or toolbar in the right pane and hover over it to show its tool buttons.
-
Click the
button and select Add Custom Menu from the drop-down menu.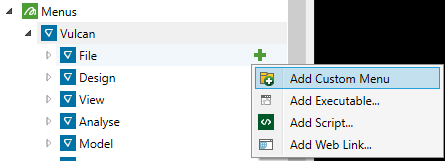
A new submenu item appears under the application.
-
The new application menu’s name will be immediately modifiable. Enter a name and press Enter.
Configuring items in a menu or toolbar
-
To add commands and tools to a menu or toolbar, see Adding a tool or command to a custom location.
-
To add an executable, script, or web link to a menu or toolbar, see Adding an executable, script, or web link to a custom location.
-
Configure items in menus or toolbars in the application customisation tool. If not already open, start the tool as follows:
-
(Ribbon) Go to Workbench ribbon > Customisation group >
Customise. -
(Menu) Go to Workbench > Customise >
Application....
-
You can configure custom menu or toolbar items using the tool buttons that appear when you hover over the item. You can also modify the key bindings for predefined menu items.
|
|
|
|
Tool buttons for a custom (left) and predefined (right) item. |
|
|
|
Edit Key Binding Set or modify the keyboard shortcut that will run the command or tool.
Note: You can set a custom key binding on predefined items or your own custom items. Setting a new key binding on a predefined or custom item does not remove the item’s original default keyboard shortcut (if set). However, if you set a custom key binding that is already in use by another predefined item, your custom key binding will take precedence. This can be helpful, for example, to set a single unifying keyboard shortcut for similar commands in different applications. |
|
|
Configure Configure the menu item’s label and icon.
|
|
|
Delete Delete the item from the menu. |
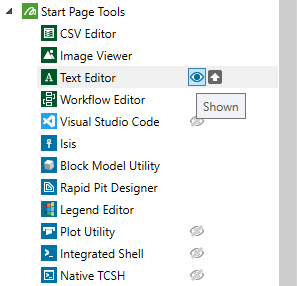
Customising the Quick Launch toolbar and Start Page Tools area
You can customise the Quick Launch toolbar and the Tools area of the Start Page by adding individual tools or commands, or by hiding default items that appear.
-
To add an application tool or command to the Quick Launch toolbar or the Start Page, follow the steps in Adding a tool or command to a custom location, dragging the item from the left pane onto or within the Quick Launch or Start Page Tools target in the right pane.
-
To add an executable, script, or web link to the Quick Launch toolbar, follow the steps in Adding an executable, script, or web link to a custom location, launching the required option from the Quick Launch or Start Page Tools target in the right pane.
Configure the Quick Launch toolbar and the Start Page Tools areas in the application customisation tool. If not already open, start the tool as follows:
-
(Ribbon) Go to Workbench ribbon > Customisation group >
Customise. -
(Menu) Go to Workbench > Customise >
Application....
-
To hide a default item from the Quick Launch toolbar or the Start Page Tools area, hover over the item under Quick Launch or Start Page Tools in the right pane to show its tool buttons, and click the
 (Shown) toggle button. When an item is hidden, the button’s icon will change to
  (Hidden).
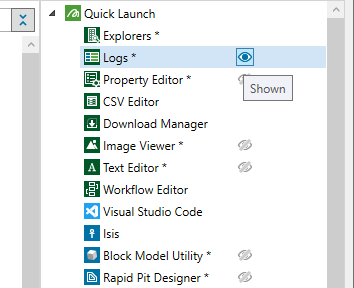
-
To reshow a hidden item in the Quick Launch toolbar, click the item’s
(Hidden) toggle button.
