Anchored Model Setup
On this page:
Creating Anchor Files
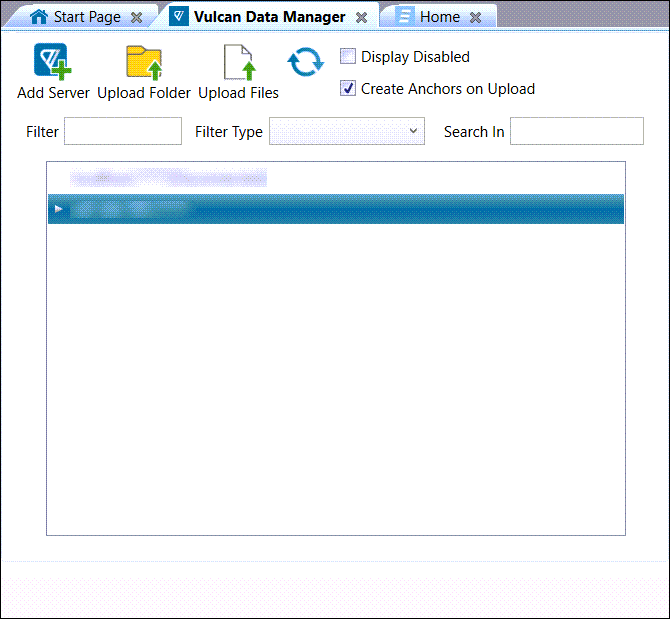
You can use the ![]() Vulcan Data Manager application to create anchor files. You can download this program from the Maptek Workbench via the Download Manager.
Vulcan Data Manager application to create anchor files. You can download this program from the Maptek Workbench via the Download Manager.
For a more detailed look at launching and using Vulcan Data Manager, please refer to the Vulcan Help on the Workbench (Help > ![]() Vulcan Help > Vulcan Data Server > Vulcan Data Manager Install and Setup).
Vulcan Help > Vulcan Data Server > Vulcan Data Manager Install and Setup).
There are two ways to produce anchor files.
Creating anchor files when you upload to the server
To create anchor files from files not yet uploaded to the server, follow these steps:
-
Open
 Vulcan Data Manager via the Maptek Workbench.
-
Select the server or folder you wish to upload to.
-
Ensure the Create Anchors on Upload checkbox is selected. By selecting this option, the files uploaded will be converted into anchor files and stored in your project folder. You will then be able to use these files in Evolution.
-
Click
 Upload Folder or
  Upload Files depending on your import needs.
 - Select the folders or files you wish to upload in the file explorer and click Select Folder (for folder uploads) or Open (for file uploads) when you have finished selecting. The anchor files will now be present in your project folder and the data will have been uploaded to the server.
Creating anchor files from existing server files
To create anchor files from existing files on the server, follow these steps:
-
Open
 Vulcan Data Manager via the Maptek Workbench.
-
Right-click on the folder or file you wish to make an anchor from.
-
From the context menu, select Create Anchor. The file explorer will open.
-
Select a destination for this anchor file and click Select Folder. If any data located on your computer also exists on the server, the created anchor file(s) will replace this local data.
Importing Anchor Files and Creating Anchored Models
Anchored models can be created directly in Evolution or by importing an anchor file. Follow the links below for instructions on creating anchored models for blocks or solids:
Creating anchored block models
To create an anchored block model of a pit or waste dump, follow these steps:
-
On the Home ribbon, from the Import Model group, select the block model type you wish to import. Evolution creates a transform for the anchor model, located in Block Models > Transforms.
-
Specify where you wish to import your data from. Either:
-
Locate an anchor file on your computer.
-
Click Browse in the Vulcan Block Model Input. The file explorer will open.
-
Select the desired anchor file (*.bmf) and click Open to import. Check the file location and anchor file links are correct.

-
-
Locate a file on Vulcan Data Manager.
-
Click Locate file on Vulcan Data Manager server.
-
Enter the server name, server port and server file location. The input data will appear in the view window when the file has been successfully located.

-
-
-
Configure the block model transform. You can add a column filter, row filter, reblocker or maths script by clicking
 in the viewer ribbon. For more details on these options, see Transforming a Block Model.
 -
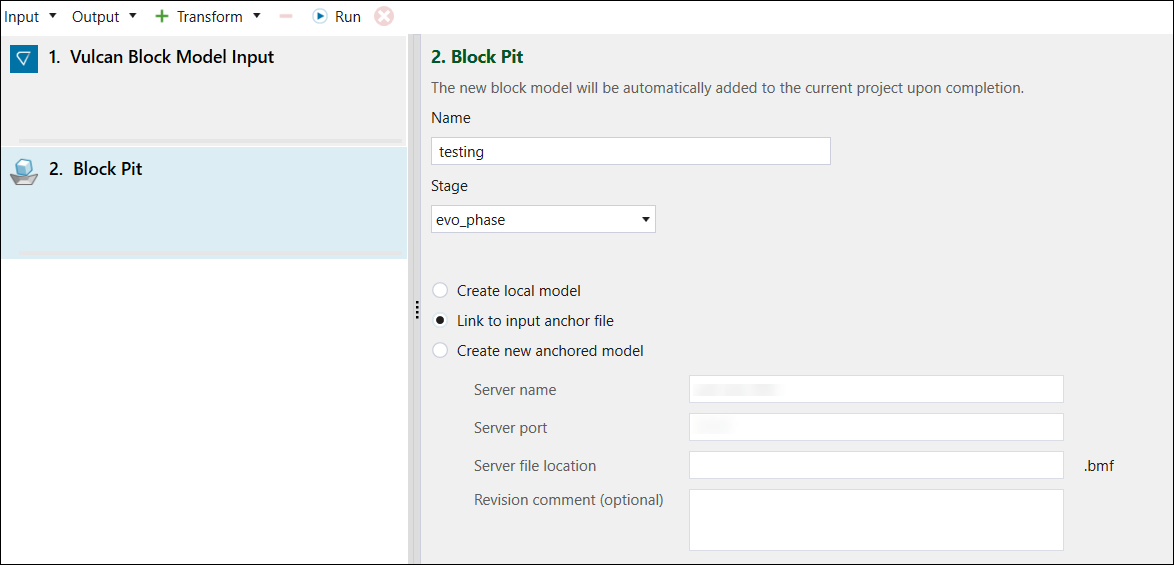
Switch to the Block Pit output transform and edit Name and Stage as desired. You may also select from the following options:
-
To store a local, non-anchored model in your project explorer, select Create local model. Revisions cannot be created from this local version.
-
If you imported a local anchor file, select Link to input anchor file.
-
Select Create new anchored model to duplicate an existing model. Refer to Duplicating an Anchored Model for details on anchored model duplication.

-
-
Click Run in the viewer ribbon to confirm the transform and generate the
 anchored block model.
Note: The output transform will be called Block Waste Utility when importing a waste dump.
Creating anchored solid models (pit, stockpile or waste dump)
-
Go to Home > Import Model in the control ribbon and select the solid model type you wish to import. You will be prompted to create a transform name and an input type.
-
Select Vulcan Reserve Model and click OK. Evolution creates a transform for the anchor model, located in Reserve Models > Transforms.
-
Specify where you wish to import your data from. Either:
-
Locate anchor files in a folder on your computer.
-
Click Browse in the Vulcan Triangulation Input. The file explorer will open.
-
Select the folder containing the anchor triangulation files (*.00t) and click Select Folder to import.
Note: Select Import anchor files only to import only the anchor triangulation files (*.00t). Leaving this option deselected will import all *.00t files from the folder location.

-
- Locate a folder on Vulcan Data Manager.
-
Click Locate folder on Vulcan Data Manager server.
-
Enter the server name, server port and file location.

-
-
-
Refer to the Importing and Configuring a Reserve Model page to configure the solid model.
-
Switch to the Evolution Solid Pit Output transform and edit Name, Stage and Bench as desired.

-
Click Run in the View Window ribbon to confirm the transform and generate the
 anchored solid model.