Step 2: Validate Drillhole Data
![]()
![]()
![]()
![]()
![]()
![]()
Before using drillhole data in any modelling task, you need to be confident that the data is consistent and free from errors. Use Vulcan GeologyCore’s drillhole visualisation and validation tools to quickly identify and correct consistency errors in your drillhole database.
The validation process is summarised with five main steps:
-
Change the drillhole visualisation.
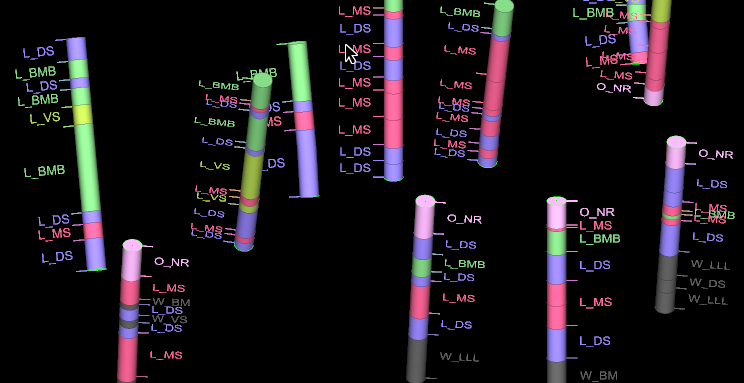
Changing the drillhole visualisation to display the fields in the database table you’re interested in will help you to make sense of the data, and give you visual clues about consistency problems. -
Run the validation tool.
Use an automated tool to check the drillhole database for consistency errors. -
Fix errors.
Fix any errors detected in Vulcan GeologyCore directly, or in the source database. -
Generate Charts.
Charts help you to quickly see and understand key statistics about your drillholes. Use them to check that your variables appear as expected, and get a sense for what domains could form part of your model, and what may need to be split or combined.
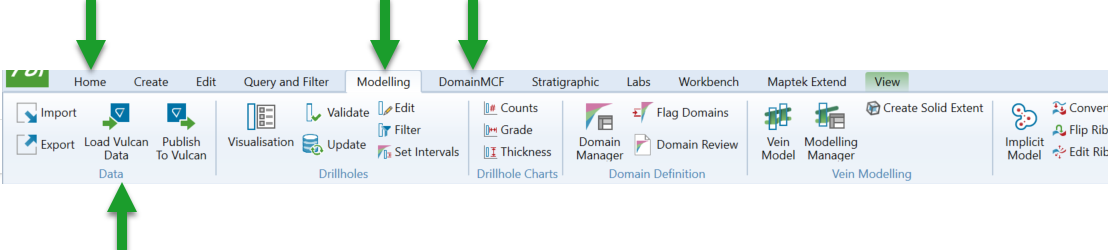
The drillhole visualisation, validation and charting tools are located on the Modelling, DomainMCF and Stratigraphic ribbon tabs in the Drillholes group.
Follow these steps to validate your drillhole database:
-
Select the drillholes you want to validate.

Selecting drillholes in the project explorer 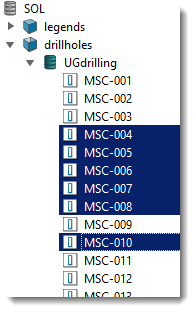
- Shift + Click defines a range
- Ctrl + Click adds/removes a single item
- Ctrl + Shift + Click adds a range
To select all drillholes in a database, click on the drillhole database
 . Hold Ctrl to select multiple databases. If multiple databases are selected, they must have the same schema.
To select a subset of drillholes, use the following controls:
-
Click on a drillhole item
 to start the subset selection.
 -
Hold Shift and click on a drillhole item
to select the range of items from the last clicked item. -
Hold Ctrl and click on a drillhole item
to add or remove that item from the selection. -
Hold Ctrl + Shift and click on a drillhole item to add the range of items from the last clicked item to the selection.
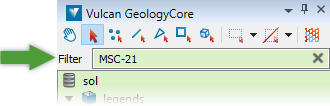
Tip: Type into the Filter field at the top of the project explorer to display only objects matching the given string.
Selecting drillholes in the view window 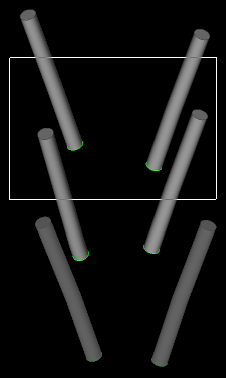
- Shift + Click adds drillholes
- Ctrl + Click removes drillholes
To select all drillholes in the view, press Ctrl + A.
To select a subset of drillholes, use the following controls:
-
In the selection toolbar located at the top of the project explorer, make sure the selection mode is set to objects
 . If selecting a region, choose Rectangle
  , Polygonal Lasso
 or Freehand
  Selection Mode.
 -
Hold Shift and draw a region to add multiple drillholes within a region.
-
Hold Ctrl and draw a region to remove multiple drillholes within a region.
-
Hold Shift and click on a drillhole to add a single drillhole.
-
Hold Ctrl and click on a drillhole to remove a single drillhole.
-
Change the drillhole visualisation.
To change the drillhole visualisation:
-
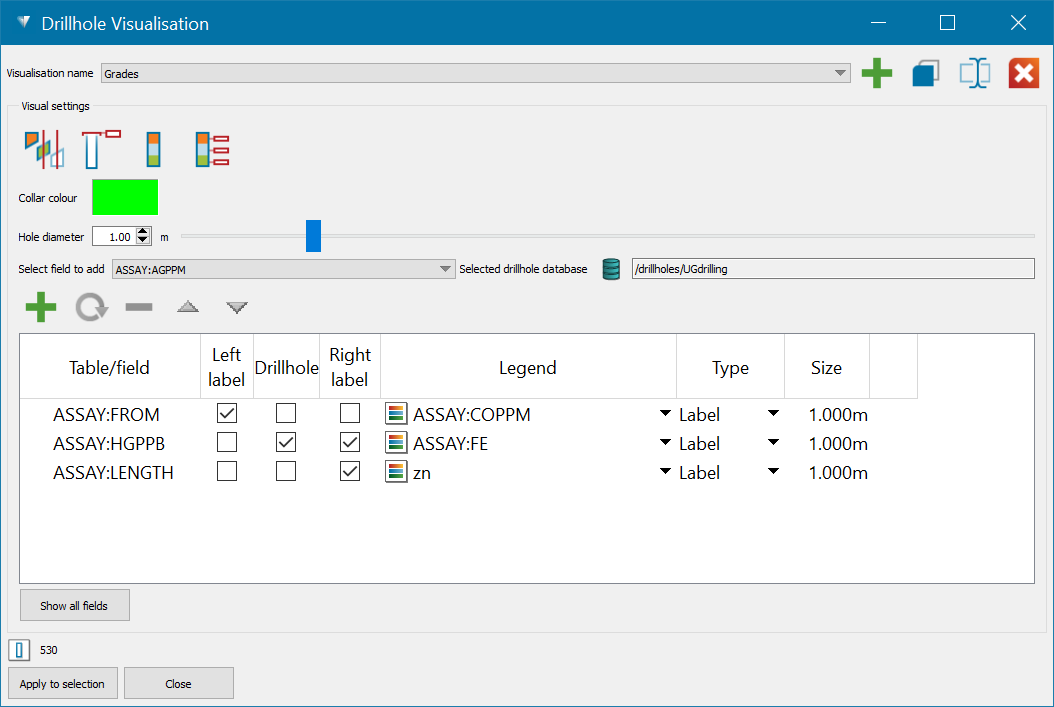
Click
 Visualisation on the ribbon.
A panel similar to the one below appears.
-
Find the field in the table you want to visualise as the drillhole and select the checkbox in the Drillhole column next to it.
-
Optionally select the checkbox in the Right label or Left label columns for any fields you want to display as labels.
-
Click Apply to selection to apply the current settings to the selected drillholes.
See Drillhole Visualisation for more detailed information about drillhole visualisation.
-
-
Run the validation tool.
Drillhole databases are automatically validated on import, but you can re-run the validation checks at any time.
To validate and fix errors in drillholes, follow these steps:
-
Click
 Validate on the ribbon.
The Validate panel appears.
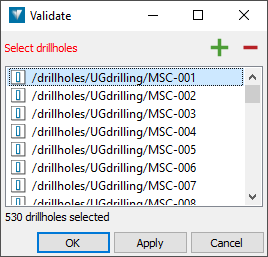
The list of drillholes is initially filled with your current drillhole selection. You can refine the list as follows:
- To insert drillholes into the list, select them in the project explorer or in the view window and click
 .
. - To remove drillholes from the list, select them in the list and click
 . Hold Shift and click to select a range, and hold Ctrl and click to select or deselect a single drillhole.
- To insert drillholes into the list, select them in the project explorer or in the view window and click
-
Click OK or Apply to run the validation checks on the drillholes in the list.
It is likely that you’ll want to run the Validate tool multiple times until all the errors are corrected, so it’s a good idea to keep the panel open and press Apply whenever you want to run the validation.
When validation is complete, a report is generated and saved to CSV file. A summary of the report is displayed in the report window.

The report mentions the checks that were performed, and lists all the drillholes that were found to have errors.
Additionally, drillholes with consistency errors are displayed with a warning icon
 in the project explorer.
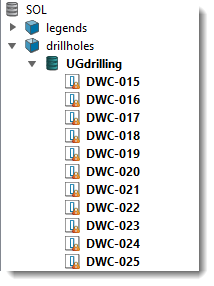
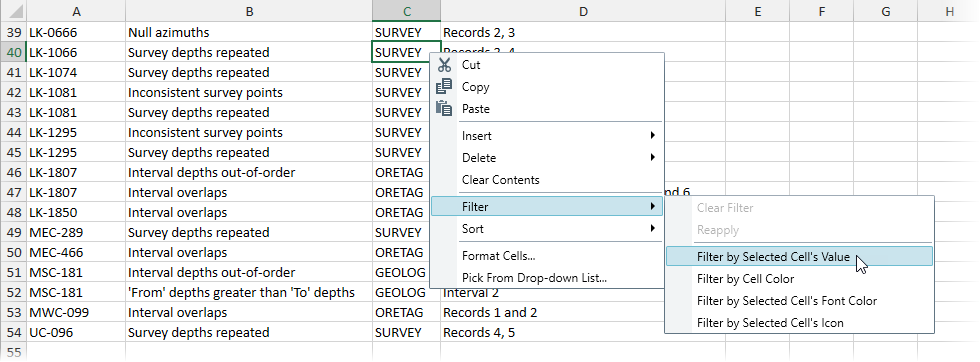
The CSV file is displayed in the Workbench CSV editor, which offers some useful features like filtering. To filter the table to show only rows where a field matches a given cell’s value, right-click on the cell, then navigate to Filter > Filter by Selected Cell’s Value in the context menu. In the example below, only rows where cell C has the value SURVEY will be shown.
-
-
Fix errors.
If drillhole errors are found, there are a couple of approaches to fixing them:
-
Make corrections directly in Vulcan GeologyCore.
Vulcan GeologyCore has all the tools you need to edit your drillhole database. If you imported your drillholes as an internal database (as recommended), your changes are made locally, which you can then publish later. -
Edit the database using an external program.
If you choose to edit the database outside of Vulcan GeologyCore, once you’re ready you can update the database in your Vulcan GeologyCore project using the Update Drillhole Database tool.
Fixing errors in Vulcan GeologyCore
We recommend the following approach to fixing validation errors in Vulcan GeologyCore. For every drillhole with consistency errors detected:
-
Select the drillhole.
The Drillhole Validation report displayed in the report window is interactive—click on a drillhole
to select it.
-
View the drillhole.
-
If the selected drillhole is difficult to find in the sea of drillholes in the view window, you can zoom to the selected drillhole(s) by clicking the
 View Selection button in the view window toolbar.
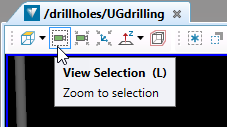
-
Alternatively, view the single drillhole in a new view by right-clicking on the drillhole
in the report or in the project explorer, then selecting View <drillhole> from the context menu.
-
-
Edit the drillhole to fix the errors.
-
Right-click on the drillhole in the view and select Edit... from the context menu.
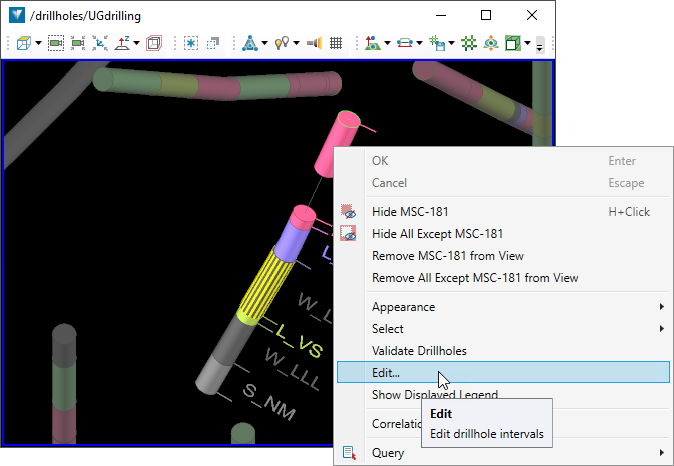
A panel appears displaying the drillhole’s collar table, and the table containing the field currently being visualised.
-
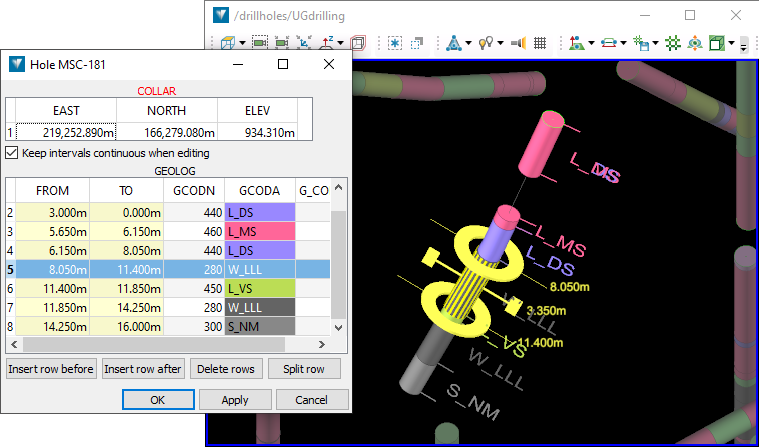
Fix drillhole errors by editing the fields in the table, or by interacting with the dynamic handles on the selected interval in the view.
-
Select an interval by clicking on a row in the table, or by clicking on the interval in the visualisation.
A selected interval is indicated by the yellow stripes on the drillhole visualisation. -
The toroid-shaped handles are located at the start and end of the interval and are labelled with the interval’s “from” and “to” depths.
Press and hold the middle mouse button on a toroid handle and drag to move the start or end of the interval to a new depth.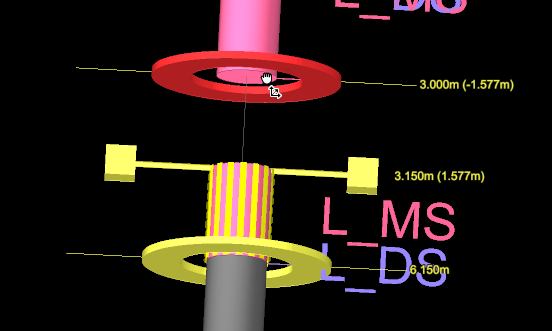
-
The hammer-shaped handles extending from the middle of the interval are labelled with the interval length.
Press and hold the middle mouse button on the handle and drag to move the entire interval to a new location without changing its length.
-
-
Click OK or Apply to apply the changes.
-
Continue to edit drillholes until you are satisfied with the outcome. Re-run the visualisation described in step 2 whenever necessary to make sure the drillholes are displaying data from the relevant table. Re-run the validation described in step 3 to confirm that you have fixed the errors.
Editing the drillhole database externally
If changes are made to the drillhole database externally, update the database in Vulcan GeologyCore at any time using the Update Drillhole Database tool.
To update an internal database, follow these steps:
-
In the project explorer, select the drillhole database
you want to update. -
On the Modelling, DomainMCF or Stratigraphic ribbon tab, navigate to Drillholes >
 Update.
The Update Drillhole Database panel appears.
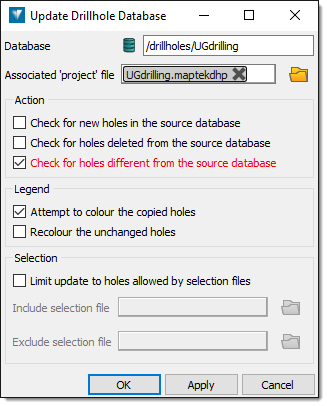
-
Make sure the Check for holes different from the source database checkbox is selected.
-
Click OK or Apply.
The tool will check for any updates in the source database that need to be applied. You will have an opportunity to review any changes before applying them.
-
-
Generate Charts.
Charts help you to understand key statistics about your drillholes.
To get started with charting, make sure the drillholes you want to generate statistics on are selected, and then click on one of the following chart type options in the ribbon:
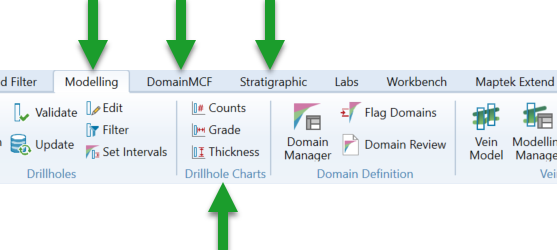
-
 Counts
Drillhole counts charts display the total number of intervals for each domain.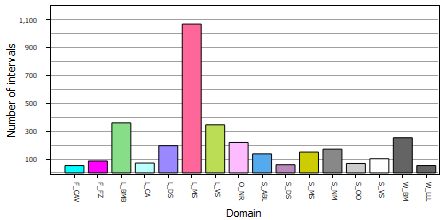 Expand for detailed instructions about drillhole counts charts.
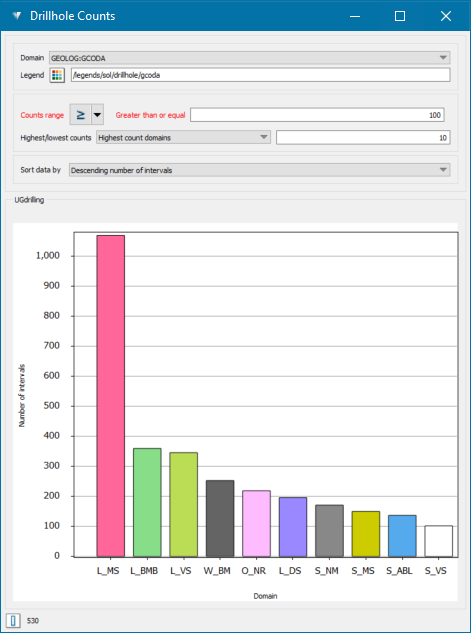
The drillhole counts chart updates dynamically whenever you change the drillhole selection, or any of the chart options.
-
Sort data by—change the way the bars in the graph are sorted. Choose one of the following:
-
Domain name (sorted alphabetically in descending order)
-
Ascending number of intervals
-
Descending number of intervals
-
-
Domain—choose the table and field representing the domain type you’d like to calculate the interval counts for.
-
Legend—specify a string legend
 to colour the bars by. If a legend exists with a name matching the domain field chosen above, it will be specified by default. Otherwise, drag a compatible legend into the field.
 -
Counts range—only display domains with interval counts within the specified range.
-
Highest/lowest counts—only include domains with the specified highest or lowest count, or display all counts.
-
-
 Grade
Grade
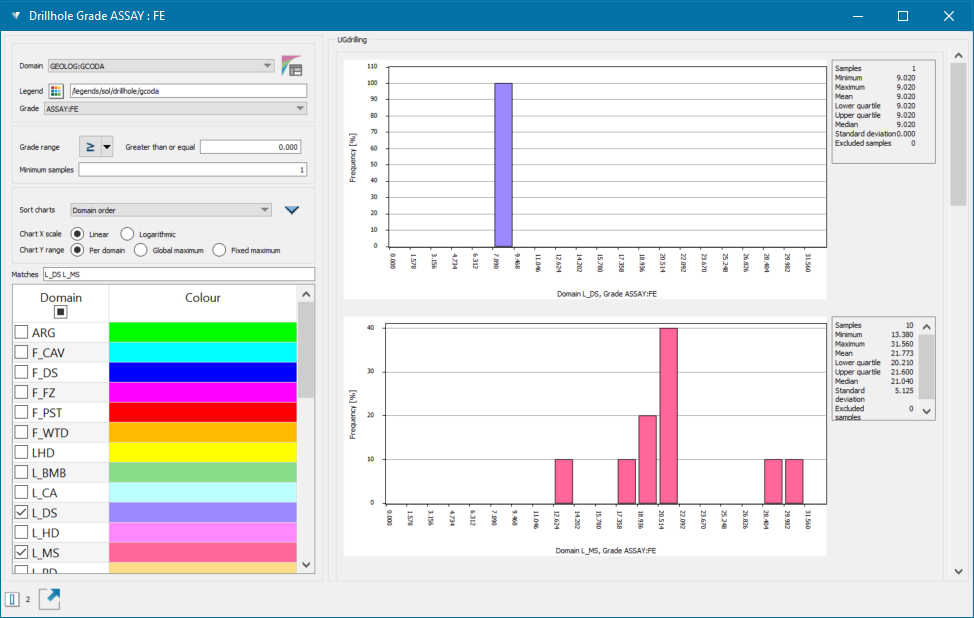
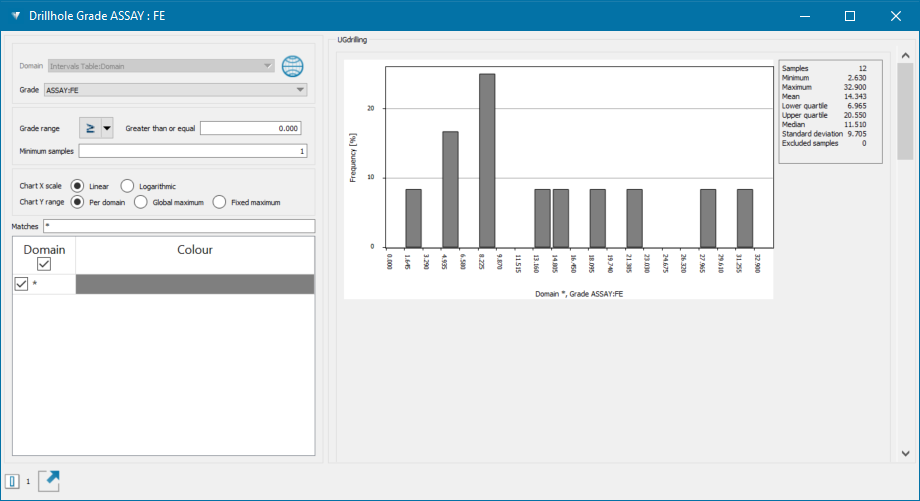
Drillhole grade charts display the sample distributions for a given grade within selected domains.
-
 Thickness
Drillhole thickness charts display the distributions for a given thickness range within selected domains. Expand for detailed instructions about grade and thickness charts.
-
Choose a domain type by selecting a table and field from the Domain drop-down list.
The grade and thickness statistics are displayed either by domain or in a single chart for global undomained data (only applicable to stand alone charts and not domain manager charts).


Note: The thickness charts for global statistics allow the selection of a domain table; this is to define the table that will be used for the length statistics.
-
The domain and global buttons can be toggled to display either domain charts or undomained global data. Global charts provide statistics on the grade or thickness of all drillholes, not broken down by domain and can be a useful validation tool prior to domaining.
-
Specify a string legend
to colour the bars by. If a legend exists with a name matching the domain field chosen above, it will be specified by default. Otherwise, drag a compatible legend into the field. -
(Grade charts only) Choose a grade type by selecting a table and field from the Grade drop-down list.
-
In the domain list, select the individual domains you’d like to chart.
-
Select the checkbox in the Domain column header to select or deselect all domains.
-
-
The charts are automatically updated.
The charts appear in the right-hand side of the panel. You can use the following settings to change the content and visualisation of the charts:
-
Grade range or Thickness range—only display grades or thicknesses within the specified range.
-
Minimum samples—filters out the charts with less than the minimum number of samples.
-
Sort charts—sorts the charts according to the order selected from the drop-down list.
-
Chart X scale (grade charts only)—define how grade bins are constructed, either:
-
Linear—no scaling; each bin represents the same sized grade range.
-
Logarithmic—apply a log scale such that bins at the lower end of the X axis represent smaller ranges, and bins at the higher end represent larger ranges.
-
-
Chart Y range—define the range for the Y axis, either:
-
Per domain—each chart’s Y range is determined by the maximum value for that chart.
-
Global maximum—each chart’s Y range is determine by the maximum value over all charts.
-
Fixed maximum—each chart’s Y range is set to a fixed maximum of 100%.
Note: The chart statistics can be seen in an enclosed box beside the charts on the right.
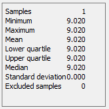
You can select the statistics using a mouse (highlighting), copy onto the clipboard by pressing Ctrl + C, and paste wherever you want by pressing Ctrl + V. -
-
-
|
Step 3: Define Geological Domains
|