Step 3: Define Geological Domains
![]()
![]()
![]()
![]()
![]()
![]()
Grouping your geological data into suitable domains for modelling is a key step in the modelling process. The domains you define may be influenced by the intended use of the geological model and may be more complex or simplified than what has been logged. It is important to have a non-destructive and repeatable workflow for defining the domains required for the modelling task, using tools that instill confidence or alert you to issues in the domaining decisions being made.
Vulcan GeologyCore’s Domain Manager is a tool that you can use to organise geological data into suitable domains. It is a central part of a repeatable process for defining the domains.
There are two ways in which domains can be defined:
Domain Rules
Use the Domain Manager tool to define rules to split or combine logged data, apply grade cutoffs, apply domain rules, and display charts to see changes in the domain statistics.
You can repeat the process of defining rules and inspecting charts until you are satisfied with the results.
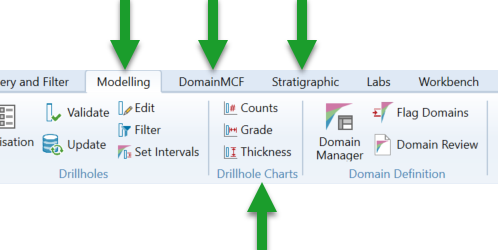
The domaining tools are located in the Domain Definition group on the Modelling, DomainMCF and Stratigraphic ribbon tabs.
The Domain Manager is divided mainly into five sections to define names and rules for generating drillhole and sample domains.
-
 Input data: Select drillholes for domaining
 -
 Preprocessing: Filters applied before the domain rules
 -
 Domains: Set domaining rules
 -
 Postprocessing: Modifiers applied after the domaining rules
 -
 Charts: Domain chart settings
The Domain Manager allows you to easily control how geological data is grouped into suitable domains for modelling.
To get started with domaining, follow these steps:
-
Click
 Domain Manager on the ribbon. The Domain Manager panel is displayed.
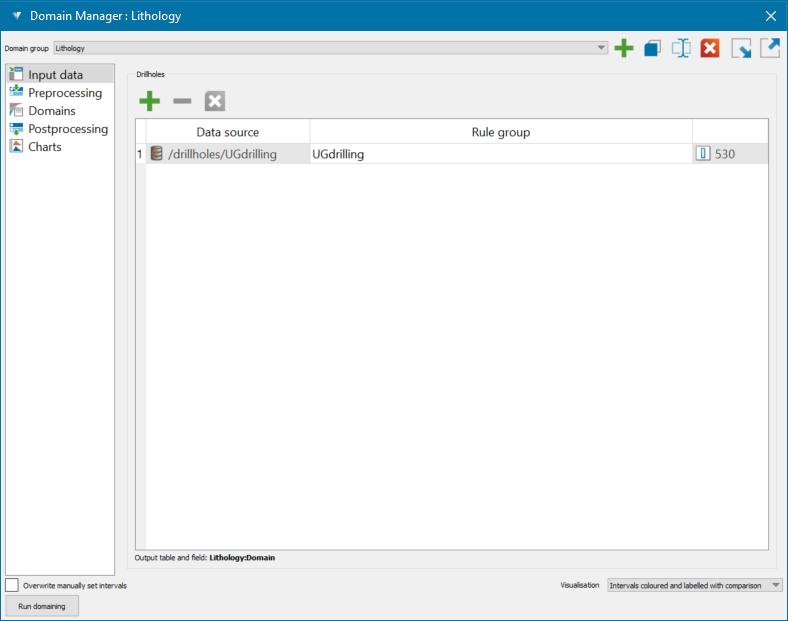
Note: The domain codes and drillholes are automatically populated if there are existing domain groups.
-
Select a Domain group name from the drop-down list if there are existing domains. However, you can create a new domain group, make a copy of or rename the existing domain groups, or import/export domain group rules.

Create a new domain group 
Make a copy of the selected domain group 
Rename the selected domain group 
Delete the selected domain group 
Import the domain group rules 
Export the domain group rules
Input data
Select the input data for domaining first. In the Drillholes list, specify the set of drillhole inputs you want to run domaining on.

You can specify multiple databases and set up rules on them individually. For example, if different logging codes have been used for the same units in historic databases, or if numeric cutoffs define domains in production holes, while resource drilling has explicit logging.
This field requires a drillhole selection, from either a single or multiple databases.
-
Add a drillhole database
 or drillhole
  subset to the list by making a selection in the project explorer and then clicking . Alternatively, drag and drop the drillhole database or selection from the project explorer into the drillhole list.
 -
Optionally define an alias and swap data at a later date. The icon at the right
shows the number of drillholes selected. -
Remove an item by selecting it in the list and clicking
 .
.
Preprocessing
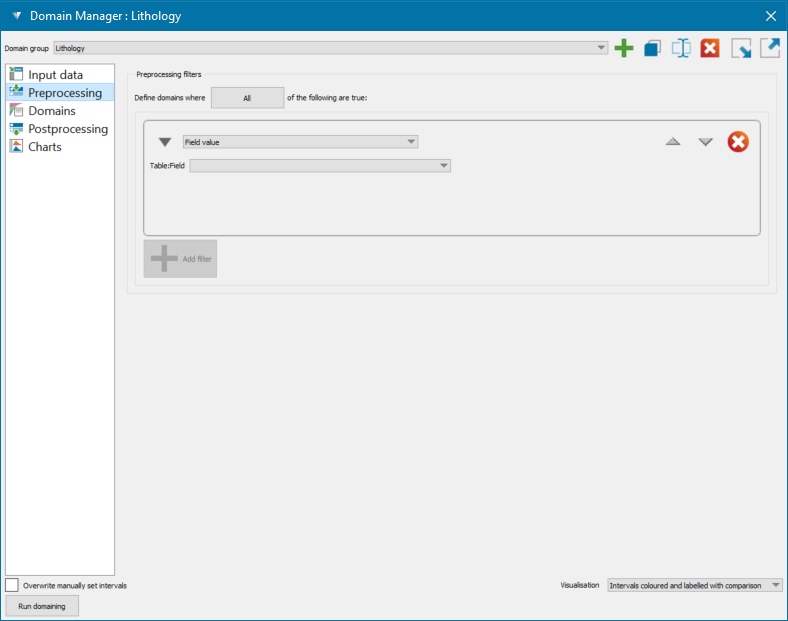
Configure and apply preprocessing filters before defining the domain rules. These data filters define what intervals the domaining is run on. These can be based on a field in the database or a region such as a blast solid in open pit models.
Set up the filter rules to determine whether this domain code is to be applied to an interval.
|
|
Domains
Configure the domain list.
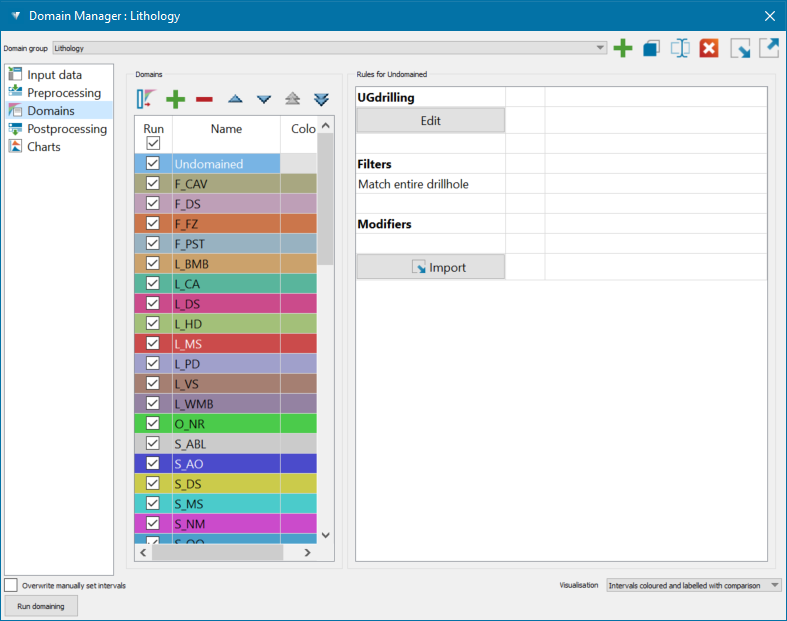
The Domains section of the Domain Manager displays a list of domains to include in domaining runs.
-
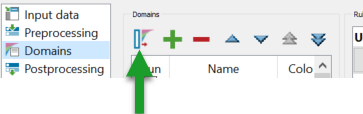
To manually add a new domain code to the list, click
. To delete a domain from the list, select it and click . -
Optionally, populate domain codes from drillholes.
Perform this step if you want to use domain codes defined in your database. Domain codes can be manually added later if you skip this step.

-
Click the option
 Populate domains from drillholes...
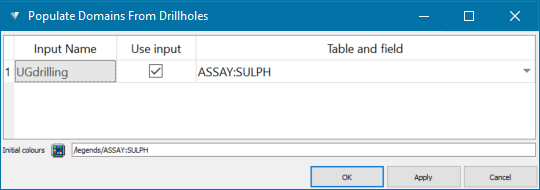
The Populate Domains From Drillholes panel appears.
-
For each input you want to use to generate the set of domain codes, make sure the Use input checkbox is selected in the list, and choose the table and field for the domain codes from the Table and field drop-down.
-
In Initial colours, specify a string or integer legend to colour the domains. If a legend exists with a name matching one of the domain fields chosen above, it will be specified by default. Otherwise, drag a compatible legend into the field.
-
Click OK.
The Domains section of the Domain Manager will be populated with the domain codes extracted from the drillholes.
-
-
Deselect a domain’s checkbox in the Run column to exclude it from the domaining process without deleting it from the list.
-
The ordering of domains in the list is important if any rules could apply to more than one domain. The Order column indicates the order in which the rules of each domain are applied. Increase or decrease the precedence of an individual domain’s rules by selecting it in the list and clicking the
 or
or  buttons.Expand for more instructions.
-
To rename a domain, double-click on its field in the Name column and enter a new name.
Note: While renaming a domain, the databases using this domain are also updated automatically without the need to rerun the domaining. This update is also reflected in the Modelling Manager chronology items associated with this domain. -
To change a domain’s colour, double-click on its field in the Colour column and select a new colour.
-
Move an individual domain to a different position in the list by double-clicking on its field in the Order column and entering a new position.
-
-
Configure individual domain rules.
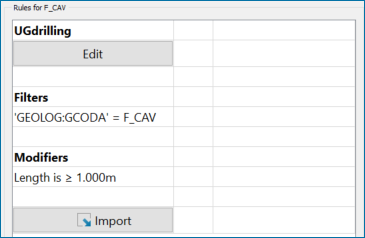
When you select a domain in domain list, the rules associated with that domain are displayed in the Rules for <domain> section on the right-hand pane of the Domain Manager.
-
Click Edit to edit the domain’s rules.
There are two kinds of rules that you can apply to intervals: filters and modifiers. Filters are rules that are applied to an interval to determine whether it should be included as part of a domain or not. Modifiers are rules that are applied to change interval boundaries according to some criterion. A domain’s filters are applied before modifiers are applied. If the Match entire drillhole filter option is selected, all intervals for a drillhole are passed on to the modifier.
-
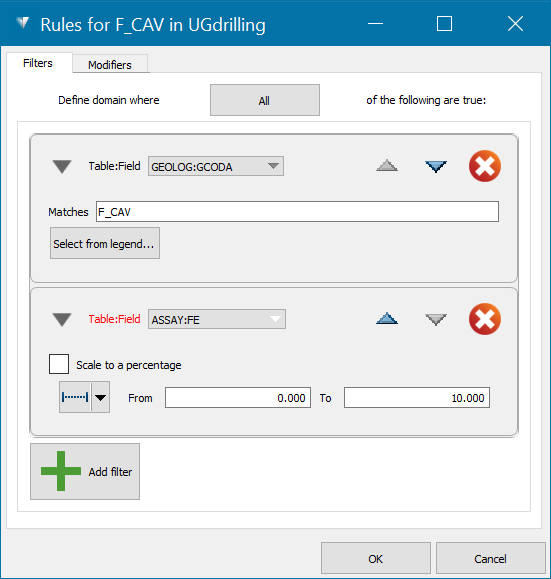
Configure the domain’s filters on the Filter tab.
Set up to filter rules to determine whether this domain code is to be applied to an interval.
-
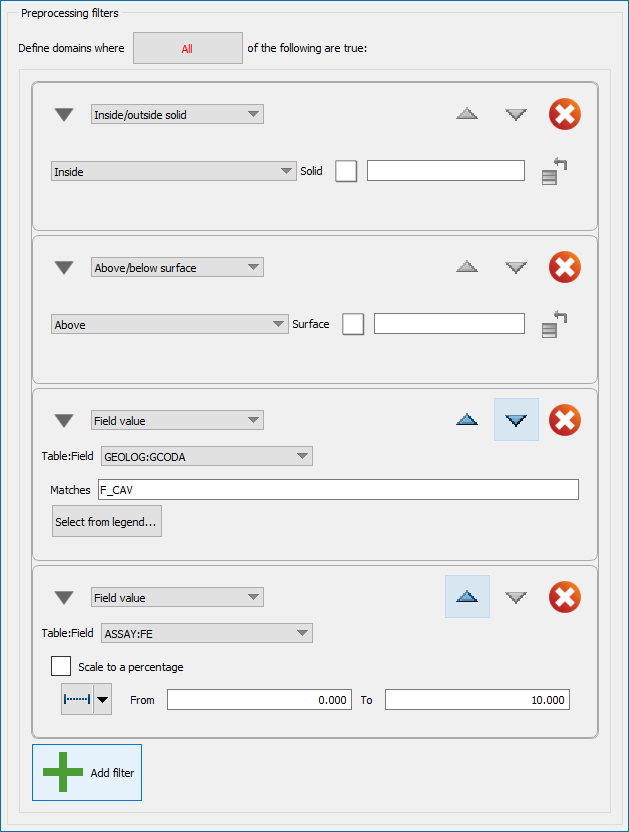
The All/Any toggle button determines how to combine multiple filters. Choose All if every filter’s criterion needs to met to define the domain, or Any if only one or more filter’s criterion needs to be met.
-
The default first filter for most domains will check that the domain code matches the interval’s domain code.
-
To add or edit a filter, select a table and field in the Table:Field drop-down, and then configure the criterion to be met:
-
String fields match a string exactly. In the example on the left, the first filter specifies that the value of the GEOLOG:GCODA field needs to match the string “F_CAV” exactly for the domain to be defined.
-
Numeric fields test whether the value falls in a specified range. Select the Scale to a percentage checkbox to perform the test on the value converted to a percentage rather than the raw value.
-
-
-
Configure the domain’s modifiers on the Modifiers tab.
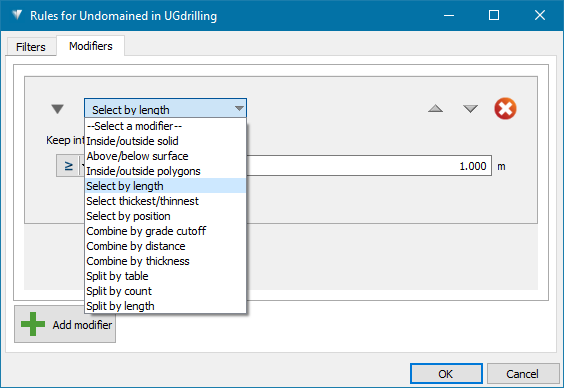
Configure modifiers as follows:
-
Choose a modifier type from the drop-down list. The following modifiers are available:
-
Inside/outside solid—keep only intervals or parts of intervals that lie wholly inside or outside of a specified solid. This is useful when logged domains must fall within a larger structure.
-
Above/below surface—keep only intervals or parts of intervals that lie wholly above or below a specified surface. This is useful when combined with vein or implicit models, to restrict any domains to above or below a known horizon.
-
Inside/outside polygons—keep only intervals or parts of intervals within the selected polygon(s). Polygons are projected vertically and inside polygons is inside any polygons, outside polygons is outside all polygons.
-
Select by length—keep only intervals that match a given length criterion, e.g. greater than or less than the specified length.
-
Select thickest/thinnest—keep only the n thickest or thinnest intervals .
-
Select by position—keep specific intervals based on their position and direction in the interval list.
-
Combine by grade cutoff—combine waste intervals into ore that meet a given average grade cutoff criterion.
-
Combine by distance—combine intervals that match a given distance criterion. For example, two domain intervals separated by another rock type can be classified as continuous when they are less than a specified distance apart.
-
Combine by thickness—combine adjacent intervals that match a given thickness criterion. For example, intervals below a certain thickness can be absorbed into a domain.
-
Split by table—split intervals using the depths from the selected downhole table, typically the assay table. A second table can be selected, which is only used to supply additional depths in the unlogged regions of the primary table.
-
Split by count—split intervals into a given number of smaller, equally-sized intervals. This can be useful to increase the density of modelling samples in a narrow unit.
-
Split by length—split intervals into a number of intervals of the same length. This can be useful to create an even data density when generating DomainMCF models.
-
-
Click
Add modifier to add extra modifiers.Important! Modifiers are applied in order. This is important, for example, when using both combining or splitting modifiers. Change the precedence of an individual modifier using the
and buttons. -
Click
 to delete a modifier.
-
-
-
Click Save to save the rule set as a template under a specified name.
-
Click Import to import a rule set from a previously saved template.
Postprocessing
Configure and apply postprocessing modifiers after defining the domaining rules.
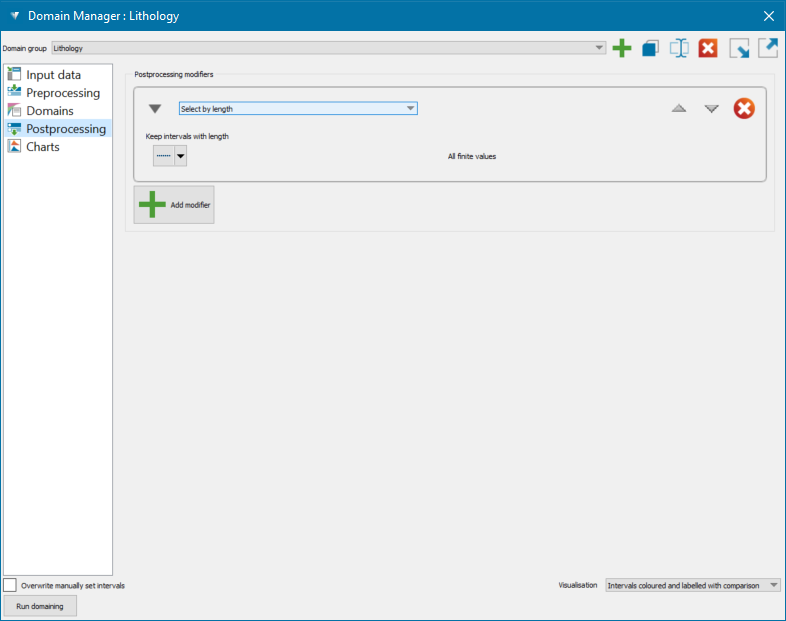
Modifiers change interval boundaries according to some criterion when domaining is run. For example, you can set up modifiers to split or combine intervals. Global modifiers created on this panel are applied to every domain—but you can configure modifiers for individual domains in a later step.
Configure modifiers as follows:
-
Choose a modifier type from the drop-down list. The following modifiers are available:
-
Inside/outside solid—keep only intervals or parts of intervals that lie wholly inside or outside of a specified solid. This is useful when logged domains must fall within a larger structure.
-
Above/below surface—keep only intervals or parts of intervals that lie wholly above or below a specified surface. This is useful when combined with vein or implicit models, to restrict any domains to above or below a known horizon.
-
Inside/outside polygons—keep only intervals or parts of intervals within the selected polygon(s). Polygons are projected vertically and inside polygons is inside any polygons, outside polygons is outside all polygons.
-
Select by length—keep only intervals that match a given length criterion, e.g. greater than or less than the specified length.
-
Select thickest/thinnest—keep only the n thickest or thinnest intervals .
-
Select by position—keep specific intervals based on their position and direction in the interval list.
-
Combine by grade cutoff—combine waste intervals into ore that meet a given average grade cutoff criterion.
-
Combine by distance—combine intervals that match a given distance criterion. For example, two domain intervals separated by another rock type can be classified as continuous when they are less than a specified distance apart.
-
Combine by thickness—combine adjacent intervals that match a given thickness criterion. For example, intervals below a certain thickness can be absorbed into a domain.
-
Split by table—split intervals using the depths from the selected downhole table, typically the assay table. A second table can be selected, which is only used to supply additional depths in the unlogged regions of the primary table.
-
Split by count—split intervals into a given number of smaller, equally-sized intervals. This can be useful to increase the density of modelling samples in a narrow unit.
-
Split by length—split intervals into a number of intervals of the same length. This can be useful to create an even data density when generating DomainMCF models.
-
-
Click
Add modifier to add extra modifiers.Important! Modifiers are applied in order. This is important, for example, when using both combining or splitting modifiers. Change the precedence of an individual modifier using the
and buttons. -
Click
to delete a modifier.
Charts
Run domaining and display domain charts.
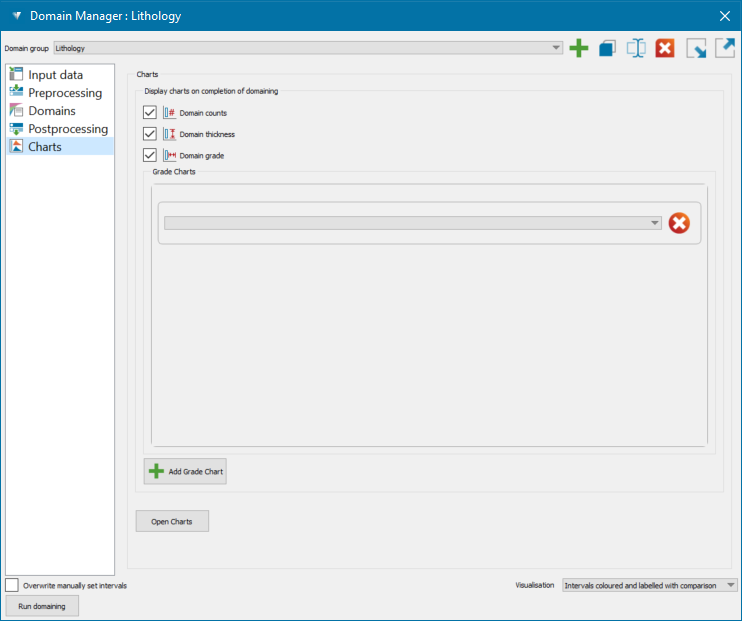
Whenever you run domaining with different rules, the statistics on your domains will change. Use domain charts to see the effect of the rules you’ve applied. You can tell the Domain Manager to automatically show charts on the domains you’ve selected each time you run domaining.
Follow these steps to run domaining with charts:
-
Select the charts you want to generate.
-
Optionally click Open Charts to generate the charts immediately. The charts will display the current statistics—i.e. before domaining is applied.
-
Multiple grade charts can be generated simultaneously by clicking on the Add Grade Chart button and adding grade variables to the charts.
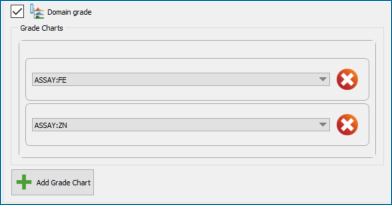
Note: Selecting domain grade charts but not selecting grade variables will still generate grade charts and you can select the grade variables once the charts are loaded.
-
-
Choose a visualisation option from the Visualisation drop-down.
-
Click Run domaining to apply the domain rules to the drillholes.
When you do this, three things happen:
-
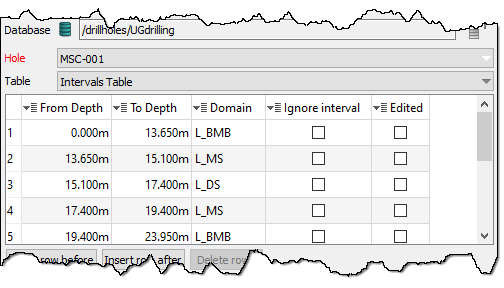
The domain codes are updated in the Intervals Table of the drillhole database(s). This table is created by Vulcan GeologyCore and means that the source tables for the intervals will not be modified by the domaining process.
-
Any charts you selected in the Charts tab are generated and displayed (or updated if they are already showing).
-
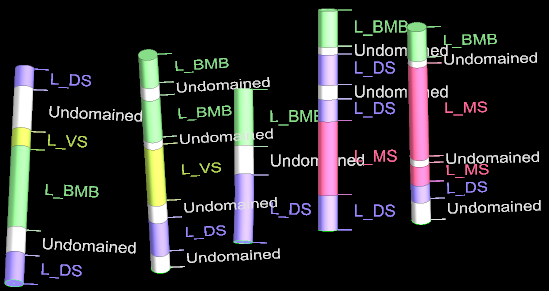
The drillhole visualisation updates based on the option you selected.
-
-
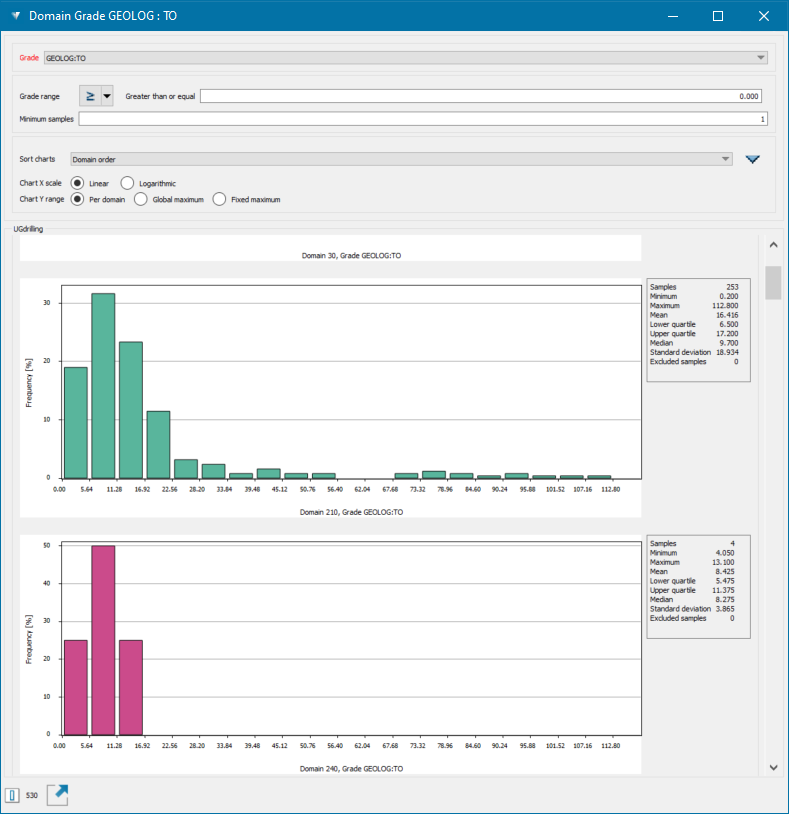
Inspect charts (if generated).
-
The charts only include data from domains included in the domain list (i.e. have their Run checkbox selected). Because these charts are related to the current domaining run, they will close when you close the Domain Manager.
-
If you chose to generate a Domain counts chart, you can modify the set of domains to run from the chart. To do this, use the chart options to display the domains you are interested in (e.g. the domains with the highest counts), then click Update Domain Manager.
The Run column of the domain list updates such that only domains in the chart are selected. This is useful when you want to quickly model the main units of a deposit.

-
Keep the Domain Manager open and re-run the steps above to refine your domain list and rule set until you are satisfied with the result.
Manual Flagging
For narrow vein workflows, where domain intervals are defined less by rules and more by manual interpretation, this can be achieved using the Flag Domains tool.
On the ribbon, navigate to Modelling > Domain Definition > Flag Domains. The Flag Domains panel is displayed.
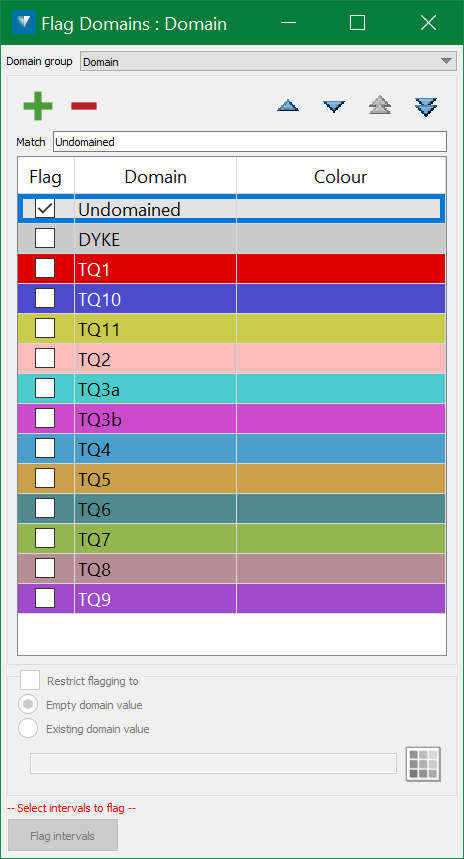
The panel is populated with a list of domains that can be flagged. Users can also add or delete domains, move the order of the domains, or search for a particular domain if the list is huge.
|
|
Add a new domain to the list |
|
|
Delete a domain from the list |
|
|
Move a domain up or down in the list |
|
|
Move a domain top or bottom of the list |
| Match | Search for a domain name in the list. Wildcards can be used. |
The Flag Domains tool should automatically engage edge selection, but the selection method can still be changed manually as and when required.

In the example above, only the Undomained rule has been run to set a baseline for domain flagging. This is a useful way to approach a new deposit, or an area in which a new interpretation may be desired. However, if it is desirable to use existing domain codes as a starting point, these can be flagged automatically using the rule based approach prior to manual interpretation.
Apply visualisation settings
The first step in the manual flagging process is to ensure that the drillholes have appropriate visualisation settings applied to enable efficient flagging.
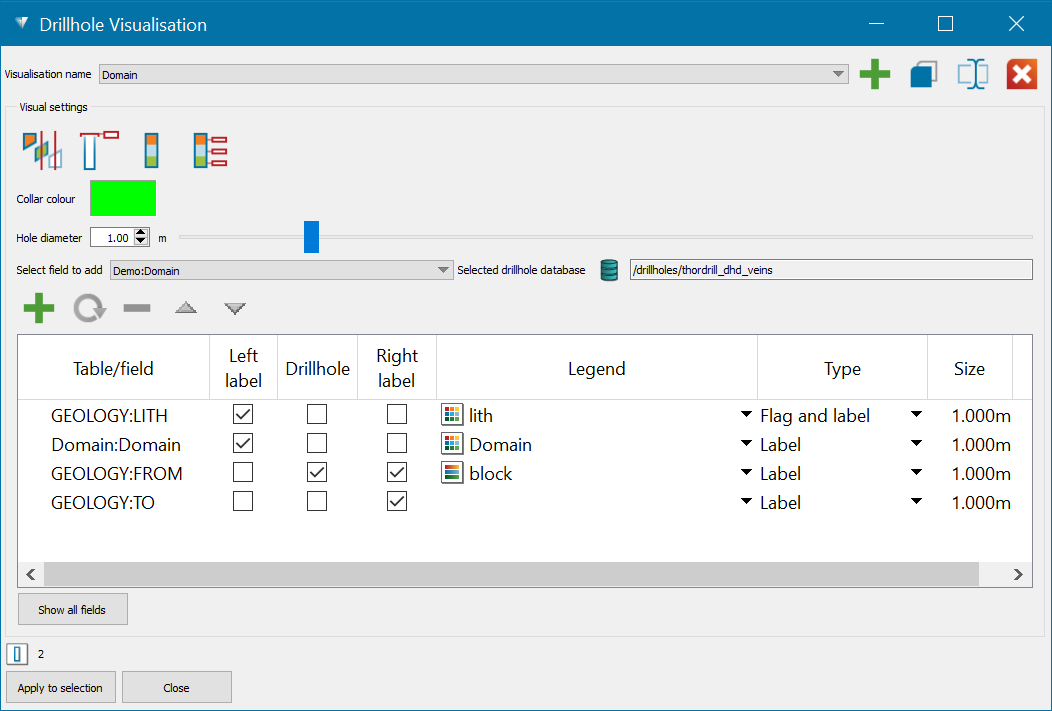
In this example, the drillhole trace has been displayed using the FROM geology grades and the FROM and TO geology grades have been displayed as labels on the right-hand side of the drill trace.
On the left-hand side of the drill trace, the lithology codes (LITH) have been displayed as a Label and the manual flagging field (Domain) has been displayed as a Flag and label, as this makes it easier to see the domain flagging as applied.
Click Apply to selection.
Flag domains
Once the visualisation settings is applied, it is time to flag the domains. Follow these steps to manually flag the domains:
-
Select the intervals on the drill trace to be flagged as a new domain.
-
Select the desired domain to apply from the row in the domains list grid.
-
Select the Flag intervals button at the bottom of the panel to flag the selected intervals with the domain.
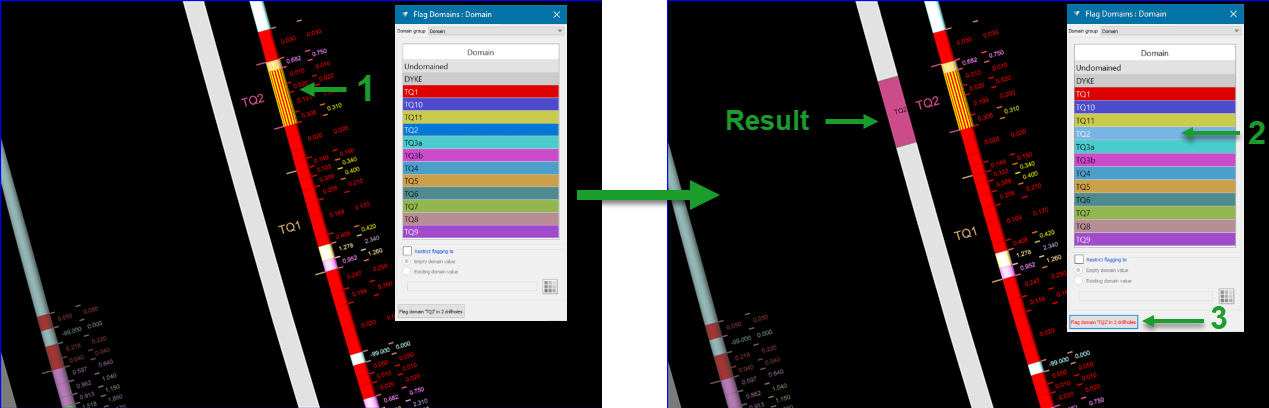
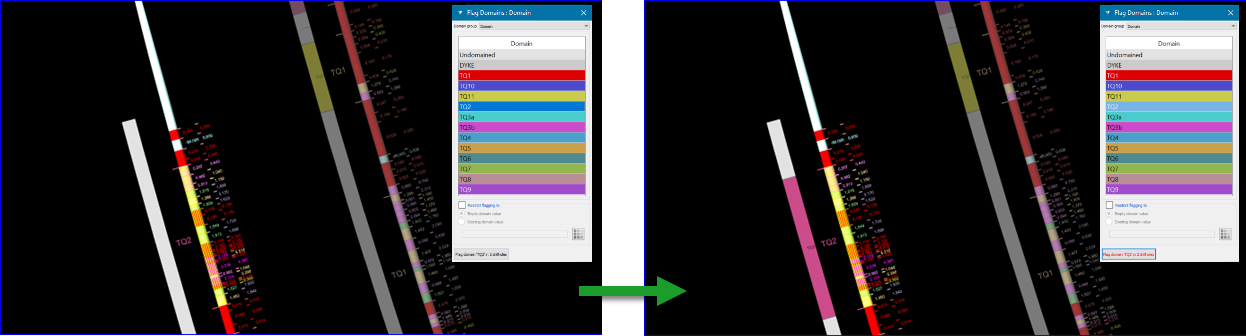
Example 1: Manual flagging with domain TQ2
Continue with other domains in the drillhole as desired. Here are some examples:
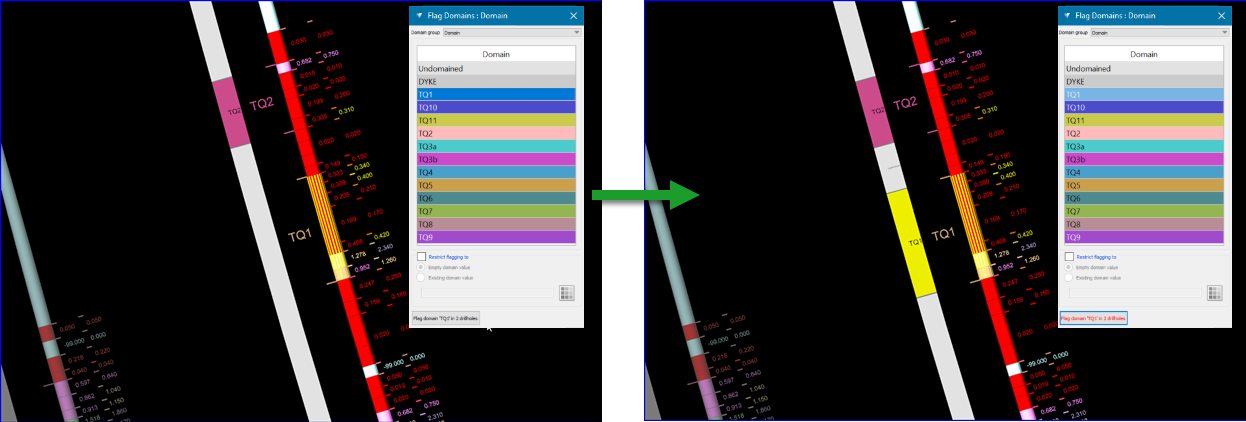
Example 2: Manual flagging with domain TQ1
Example 3: Manual flagging with domain TQ2
Tip: Pressing CTRL + Space will deselect any current selections made in the view/explorer, which can help in enabling the selection of the next intervals quickly.
|
Step 4: Generate a Model
|