Getting Started
This topic will help you get started using GeoSpatial Manager.
Logging In
GeoSpatial Manager is a web application that you access using a web browser. To get started, you’ll need the link to your organisation’s instance of GeoSpatial Manager. Contact your IT department if you don’t know what this is.
To access GeoSpatial Manager, you need to be logged in. This process can differ depending on whether your organisation is using Azure Active Directory (Azure AD) or Active Directory Domain Services (AD DS) for authentication.
Logging in with Active Directory Domain Services (AD DS)
If your organisation uses AD DS authentication, you should be logged in automatically when you try to access GeoSpatial Manager. The first time you log in, you will need to accept the End User License Agreement.
Logging in with Azure Active Directory (AD)
If your organisation uses Azure AD authentication, you will need to explicitly log in at least once.
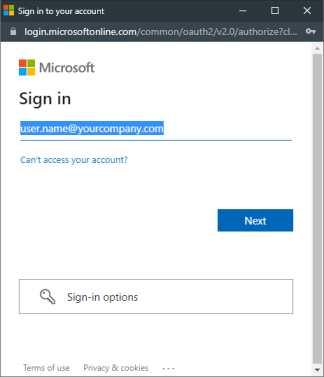
To log in, follow these steps:
-
Follow the link to your GeoSpatial Manager instance. A login page will appear.

-
Click Log in using Azure Active Directory. A window will appear prompting you to sign in to your Microsoft account.
-
Depending on the window that appears, pick the account you wish to sign in to, or enter your username and click Next. Your username should be the same as your regular username or email address for your organisation, but check with your IT department if you are unsure or have any trouble logging in.
-
If prompted, enter your password and click Sign in.
Once you have logged in successfully, the GeoSpatial Manager interface will appear. The first time you log in, you will need to accept the End User License Agreement.
Initial configuration and setup
Configuration of GeoSpatial Manager instances on the server side is discussed in another document. Please contact Maptek to obtain this document if required.
Once an instance has been created on the server side, there are a few recommended and required setup items that need to be completed through the client interface. Some functions will be disabled until required items have been completed.
To perform initial configuration of GeoSpatial Manager, open the site settings page by navigating to ![]() >
> ![]() Site Settings located in the top-right corner.
Site Settings located in the top-right corner.
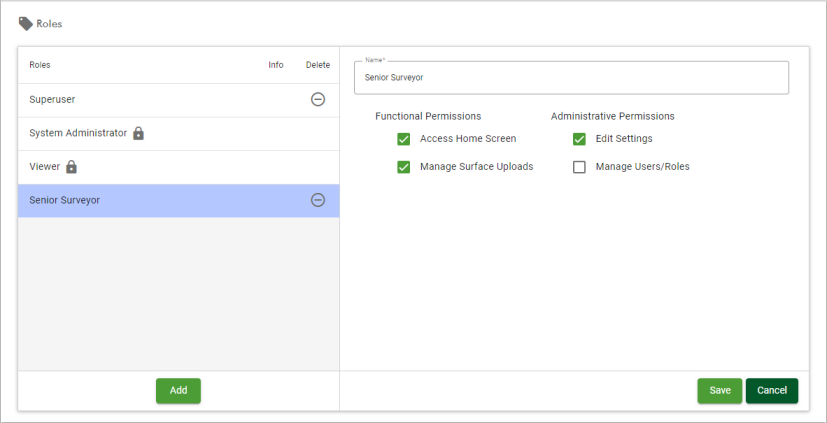
Note: You must be assigned a role that has the Edit Settings permission enabled to change most site settings. You must be assigned a role that has the Manage Users/Roles permission enabled to configure users and roles, such as granting the Edit Settings permission. The user who sets up the server-side instance is initially assigned the System Administrator role, who can in turn define other users with appropriate roles.
We recommend the following initial configuration items:
-
Define users and roles.
Individual users can have various roles assigned to them to restrict or enable access to various features. For example, to view and query the model you need to be assigned a role with the Access Home Screen permission, and to upload new source surfaces you need to have the Manage Surface Uploads permission. At least one user with a role that enables the Edit Settings permission must be defined to allow the other settings to be configured. You can either use the predefined Superuser role for this purpose, or define a new named role that enables this permission.
To define a new role:
-
Go to
 > Site Settings to open the site settings.
 -
Expand the
 Roles section.
 -
Click Add.
-
Name the role and select the Edit Settings permission and any other relevant permissions.
-
Click Save.
To assign a role to a user:
-
Expand the
 Users section.
 -
Select an existing user from the list, or click Add to create a new user1. Make sure Active option is enabled for the user.
-
Select a role for the user, such as Superuser, or a role you created previously.
-
Click Save.
Once a user has been assigned a role with the Edit Settings permission enabled, they will be able to see and edit other settings on the settings page.
See Site Settings > Users and Site Settings > Roles for detailed instructions on managing users and roles.
-
-
Configure site settings (required).
Site settings are settings that apply to all users, affecting how source surfaces combine spatially and temporally into a single source of truth surface and how certain information is presented. The following settings should be configured:
-
Surface Settings > Surface Resolution (needs to be set to allow data import)
-
Data Retention (required)
-
Time Zone > Site Timezone (recommended)
-
Default Units (recommended)
Important: Surface Resolution cannot be changed after surfaces have been uploaded. Take care to set it to a value appropriate to your requirements.
See Site Settings > Site Settings for detailed instructions.
-
-
Define the site coordinate system.
When importing a surface, GeoSpatial Manager needs to know the coordinate system the surface is in to ensure that it is correctly located. The Coordinate Systems settings allow you to define coordinate systems that users can apply when importing surfaces. Users can also manage coordinate systems at import, but it is recommended that you set up your site coordinate system now before importing surfaces.
See Site Settings > Coordinate Systems for detailed instructions on configuring coordinate systems.
-
Define file name parsers.
When users import surfaces, GeoSpatial Manager needs to know the point in time the surface represents. Often, this information is encoded in the surface filename. If your surfaces follow a systematic naming scheme that includes the date or date and time of the surface, you can define a filename parser to automatically determine the date and time at import.
See Site Settings > File Name Parsers for detailed instructions on configuring file name parsers. Users can also define file name parsers as required at import.
Importing source surfaces
Surfaces can be uploaded at any time by users with the Manage Surface Uploads permission. GeoSpatial Manager does not have tools to edit individual source surfaces; it is assumed that uploaded source surfaces are correct and have been modelled appropriately. During the import process, the user needs to correctly configure the coordinate system and acquisition date and time for every surface. This information is used by GeoSpatial Manager to locate the source surface correctly both temporally and spatially with respect to the combined model.
You can bulk-import multiple surfaces using the ![]() Import tool, which is helpful when setting up a new GeoSpatial Manager instance with historical data. GeoSpatial Manager will upload and merge each surface in time order.
Import tool, which is helpful when setting up a new GeoSpatial Manager instance with historical data. GeoSpatial Manager will upload and merge each surface in time order.
See Importing Data for detailed instructions on importing surfaces and other data.
View and analyse
Once the first surface has been uploaded, the combined model can be viewed and analysed by anyone. See Quick Start for an overview of the main features of GeoSpatial Manager. Otherwise, browse topics using the navigation pane on the left, or use the Search tool at the top of the page.
