Registering scans
FieldHHC features the following tools that can be used to register scans:
-
Fixed origin registration. This tool corrects orientation errors in fixed origin scans. See Registering scans for details.
-
Manual positioning tools. These can be used to move unregistered scans into roughly the correct position and orientation, and can be used before applying advanced registration. See Manually positioning scans for details.
-
Advanced registration. The advanced registration tools provide much greater control over the registration process and include auto-initial positioning and global registration. See Advanced registration for details.
Important: Advanced registration is a licensed feature. You need a licence tied to the scanner that acquired the scans to use it. See Licensing advanced tools for details.
Fixed origin registration
You can use the fixed origin registration tool to correct orientation errors in fixed origin scans that were positioned using survey-grade GPS. The fixed scanner location can be from the Bluetooth GPS device, Maptek Drive (for stationary scans only), or manually entered. Fixed origin registration corrects inaccurate compass and GPS track headings that cause adjoining scans to have misaligned orientations.
|
|
|
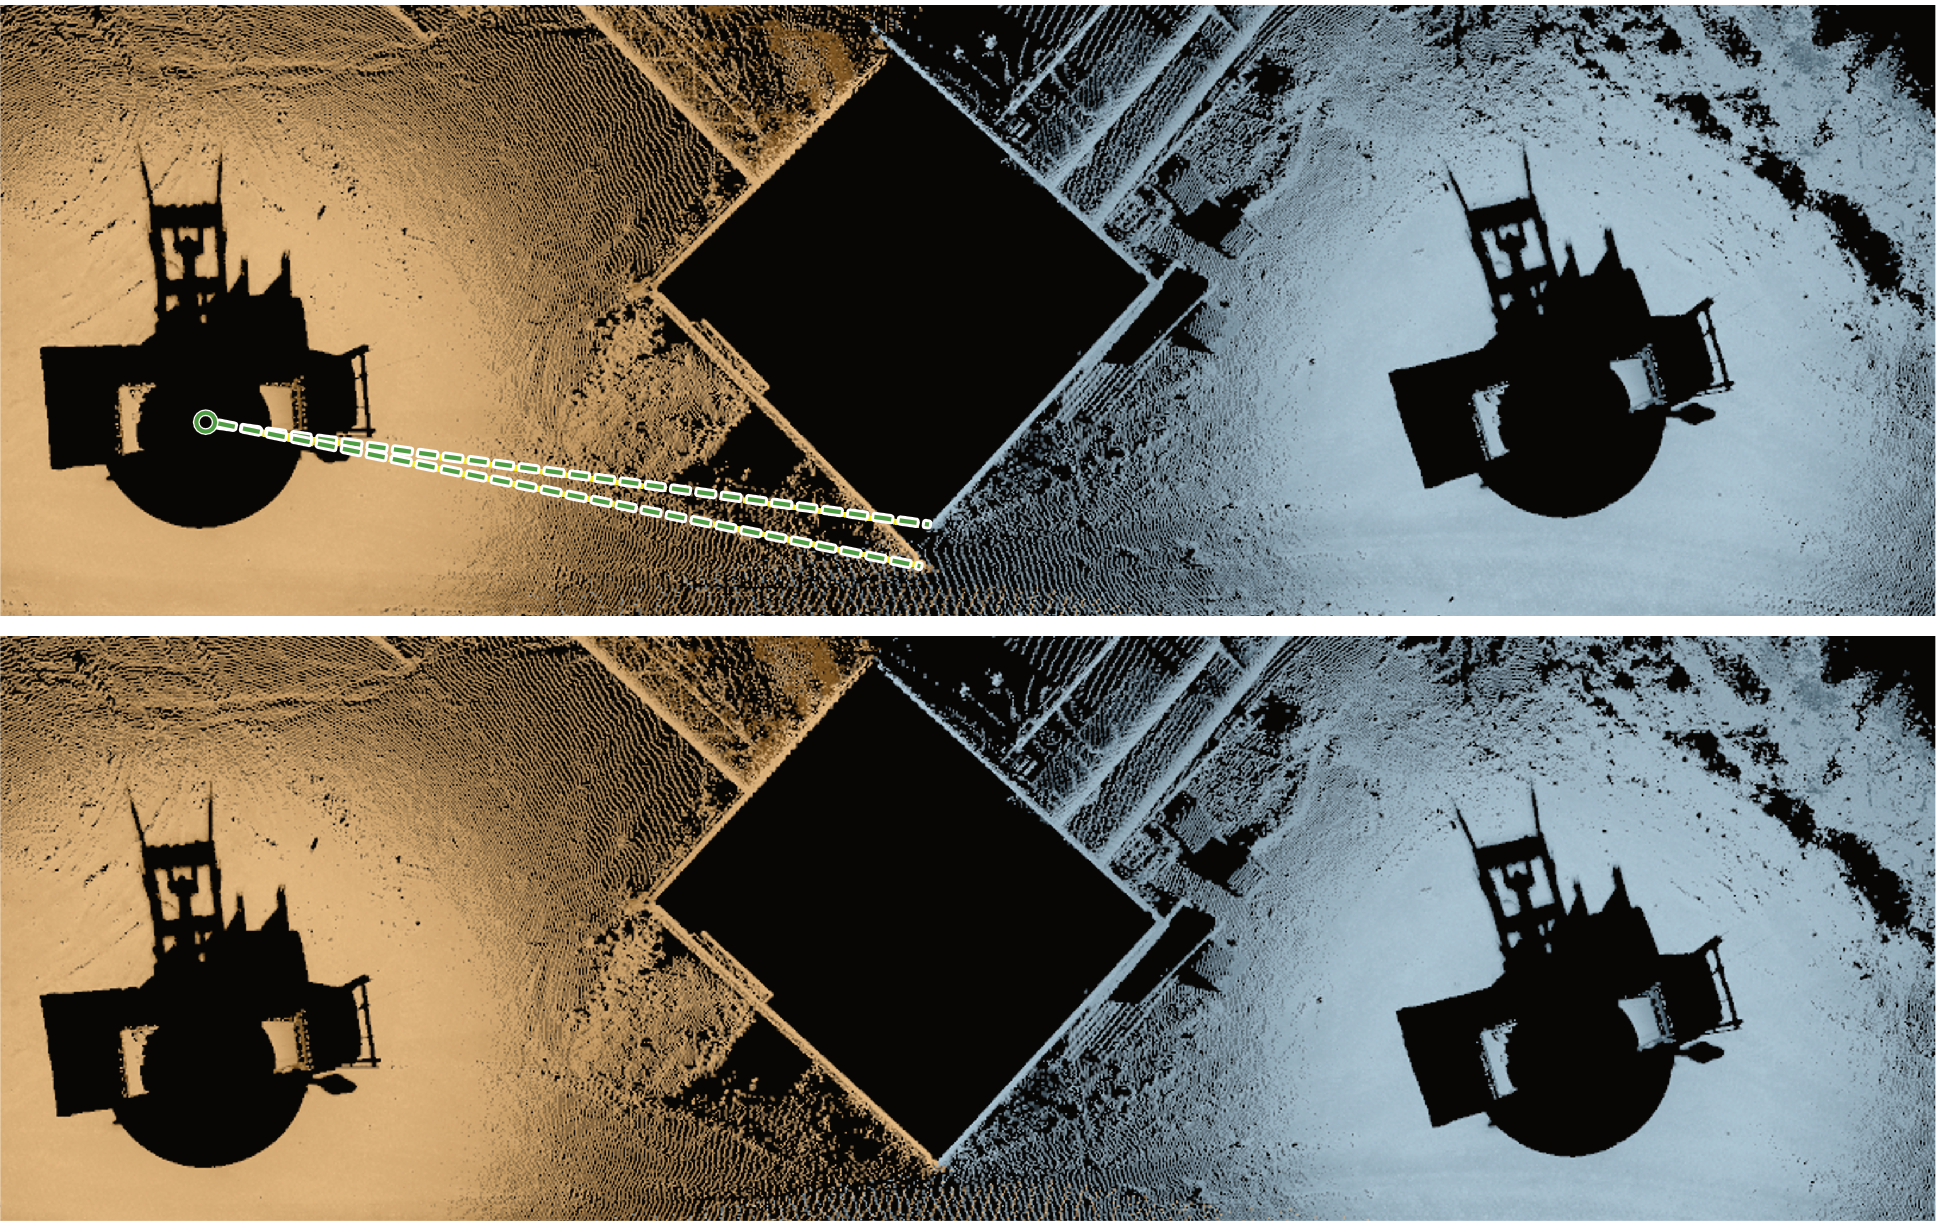
Figure 7-43 Example showing a scan registered using in-field registration. The top image shows a misalignment between the scans. The bottom image show the result after the tool rotates the left scan clockwise to align the scans. |
Note: Scans located using the internal GPS are not considered fixed and cannot be registered using this tool.
To perform fixed origin scan registration, follow these steps:
-
Make sure you are on the
 File Manager tab.
 -
Select at least two fixed origin scans from the Scans list. The scans must be from the same survey job.
Note: The tool can process a maximum of 64 million points across all scans in a single run.
-
Enter 3D view mode by tapping the
 (View in 3D) button located above the Scans list.
 -
Tap the
 (Fixed origin registration) button in the view to initiate the registration process.
If registration was successful, the scans should visually mesh together better. The registration information is stored in the scan file.
-
To undo the registration, tap
 .
. -
To reset registration to its original state, tap
 (Revert registration).
Tip: In-field registration can register multiple scans at once. However, in some cases, one or more scans may fail to correctly align. The best approach is to register a pair of adjacent overlapping scans and confirm the result before proceeding with another subset of scans. When all subsets have been registered, select all scans and apply a final registration, checking that all the scans are correctly aligned.
Manually positioning scans
You can adjust the position of unregistered scans in space using the manual positioning tools (see  in Figure 7-40). You can use these tools to move scans into roughly the correct position and orientation before using the advanced registration tools. There are two manual positioning tools, described below.
|
Rotate a scan about its origin.
|
|||
|
Translate a scan in the plane defined by the current viewing angle.
|

-
Tap the
 (Undo) button in the view to undo the translation or rotation and return the scan to its previous state.
Tip: To avoid accidentally moving scans, tap  to exit the manual translation or rotation modes.
Advanced registration
The advanced registration tools provide a great deal of control over the registration process. They are based on the automated initial position and global registration tools available in PointStudio. You can perform registration by manually setting parameters and applying registration passes, or you can run a registration sequence that has been previously defined in PointStudio.
Important: Advanced registration is a licensed feature. You need a licence tied to the scanner that acquired the scans to use it. See Licensing advanced tools for details.
Advanced registration uses 3D feature matching to align scans to fixed reference data. The following methods can be applied:
-
Auto Initial Position. Use auto initial position to place unregistered scans into roughly the right positions with respect to each other before applying global registration.
-
Registration. Apply global registration to accurately register scans.
For registration to work, scans must have sufficient overlap between them providing common features to match. Registration processing can be further refined by applying constraints to limit how scans are allowed to move. In addition, filtering, bounding, and sampling parameters can be adjusted for the best possible results.
|
|
|
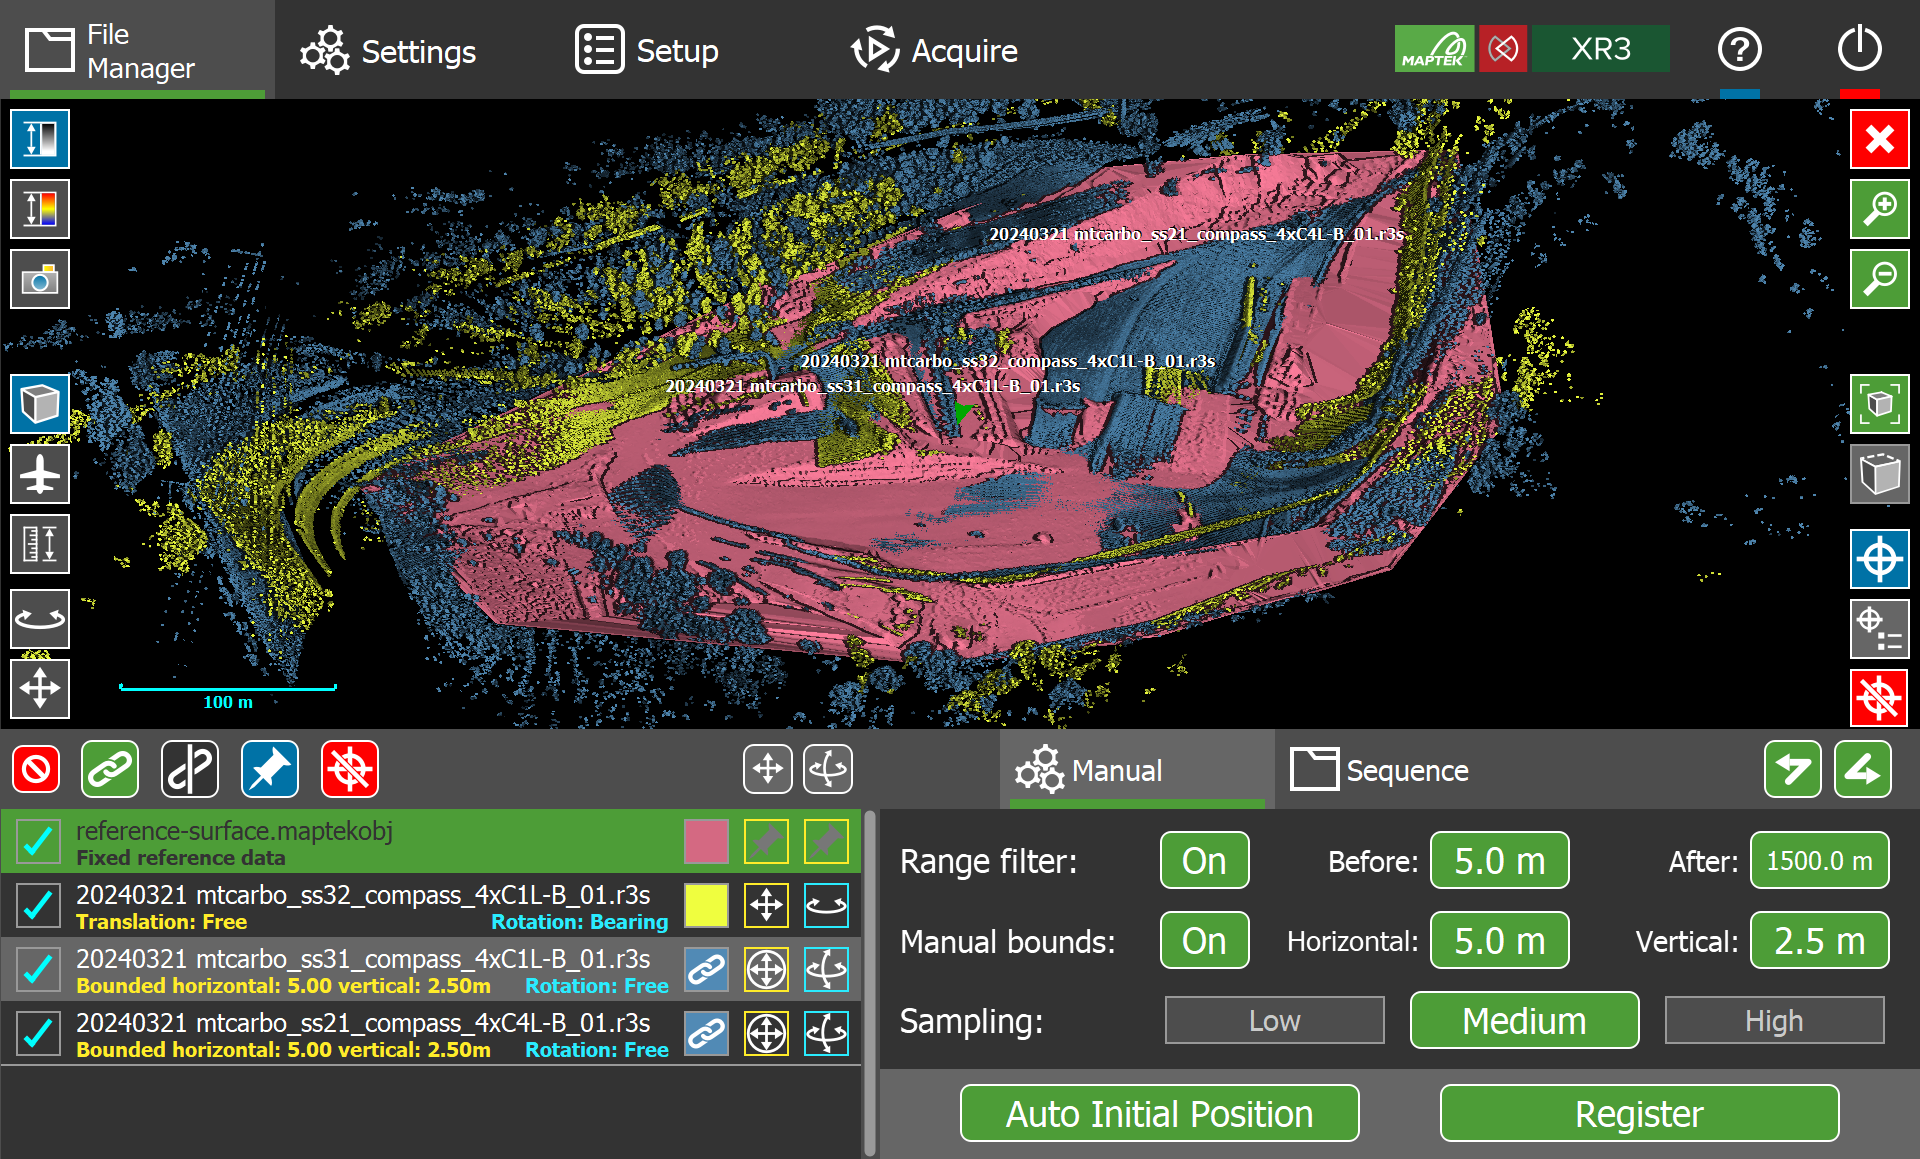
Figure 7-45 Advanced registration tools. |
Opening the advanced registration tools
To start the advanced registration tools:
-
Make sure you are on the
File Manager tab. -
Select the scans in the Scans list you want to register. If using other fixed reference data such as a surface or pointset, select these from the Files drawer.
Note: Surfaces or pointsets must be stored in Maptek object files (.maptekobj). See Managing non-scan file types for more information.
-
Enter 3D view mode by tapping the
(View in 3D) button located above the Scans list. -
Tap the
 (Advanced registration) button located on the right side of the view. The scans are each assigned a unique colour and the advanced registration controls appear.
Managing registration data in the file list
The file list shows the scans and reference data files that were selected when you started the advanced registration tool. From here you can select scans to register and configure scan registration constraints.
|
|
|
|
|
|
|
|
|
|
|
|
|
|
|
|
|
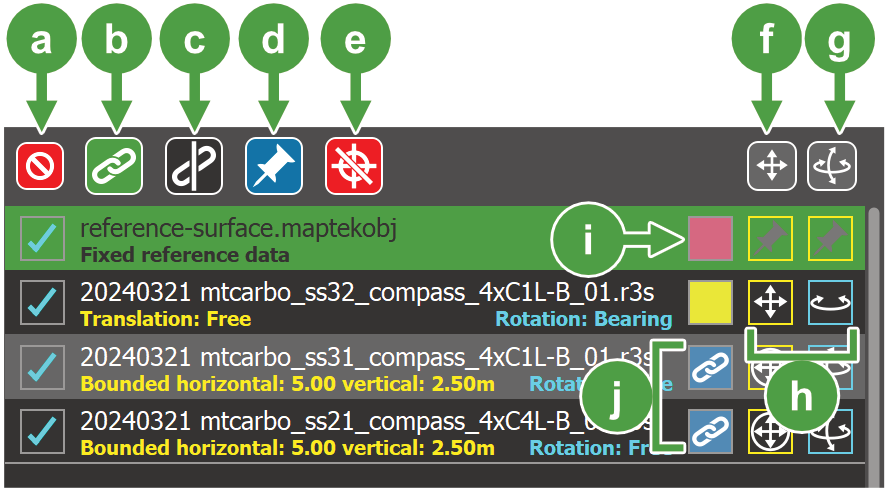
Cycle translation constraints on selected scans |
|
|
Cycle rotation constraints on selected scans |
|
|
Translation and rotation constraints for an individual scan |
|
|
Scan colour |
|
|
Linked scans |

 Select all /
  Deselect all


Linking scans
Scans can be linked to other scans to form a single group. Groups of linked scans are treated as a single object in the view or when moved by a registration tool. This is useful where subsets of scans are already registered correctly with respect to each other and would not benefit from any further registration.
-
To link two or more scans, select them in the file list and tap the
 (Link) button. Linked scans are given a single uniform colour and are indicated by a link icon in their row in the file list (see
  in Figure 7-46).
 -
To unlink scans from a group, select the scans you want to unlink in the file list and tap the
 (Unlink) button.
Setting translation and rotation constraints
Registration is essentially a process of translating and rotating scans until they are correctly aligned in space with as little error as possible. However, excess freedom of movement can lead to false matches and incorrect registration results. You can set constraints on the type and extent of movement allowed on scans during registration to improve results.
The following translation constraints can be applied to scans:
|
|
Free translation Horizontal and vertical translation by any distance are both allowed. |
|
|
Bounded translation Horizontal and vertical translation are both allowed, but limited to set distance bounds. The bounds are set in the Manual bounds setting (see Running registration manually). |
|
|
Fixed The scan’s location is fixed; translation is not allowed. |
The following rotation constraints can be applied to scans:
|
|
Free rotation Rotation is unrestricted. A scan can be both rotated around its vertical axis, and also have the tilt of its vertical axis adjusted. |
|
|
Bearing-only rotation Rotation is only allowed around a scan’s vertical axis; tilting of the vertical axis is not allowed. |
|
|
Fixed The scan’s rotation is fixed; rotation is not allowed. |


-
To change the translation or rotation constraints of a single scan or linked scan group, tap the constraint button in a single row in the file list (see
 in Figure 7-46). The constraint will change to the next setting in the cycle. Tap the button until the desired constraint is set. The text beneath each scan in the list indicates the constraints that are currently set on it.
Note: Some translation and rotation constraints are mutually exclusive. FieldHHC will change both constraints to avoid incompatible combinations.
-
To change the translation or rotation constraints of multiple scans, select them in the list and tap the translation or rotation buttons located above the list (see
 and
and  in Figure 7-46). The relevant constraint of selected scans will be set to the next constraint indicated by the button’s icon.
Fixed reference data
Fixed reference data is data that does not move during registration. Instead, it serves as the fixed reference to which the unregistered scans can be aligned to. Fixed reference data has both translation and rotation constraints set to  (Fixed). Providing fixed reference data is optional, but it can aid in providing a better registration result.
-
To set one or more scans as fixed reference data, select them in the file list and tap the
 (Set as fixed reference data) button located above the file list.
Note: Pointsets and surfaces can only be included as fixed reference data for registration.
Scan colour
Each scan or linked scan group is given a unique uniform colour to help differentiate objects in the view. The uniform colour is only applied when the greyscale intensity colour scheme ( ) is selected in the view.
-
To change the uniform colour of a scan or linked scan group, tap the colour button in a scan’s row in the file list.
Running registration manually
You can run registration passes manually on the  Manual tab of the advanced registration tool.

Configure the parameters as follows:
| Range filter | This setting can be used to define the range of point samples to use in the registration algorithm. When enabled, points outside the range defined by the Before and After fields are filtered (ignored). |
| Manual bounds | When enabled, this setting limits the degree of horizontal and vertical translation allowed for scans with a bounded translation constraint set (see Setting translation and rotation constraints). |
| Sampling |
This setting determines how many points are used to register the scans. Choose from the following options:
|
After configuring parameters, you can proceed with registration by tapping the Auto Initial Position or Register buttons.
Note: Only scans selected in the file list are registered. Be sure to select all scans you want included in the registration pass (including fixed reference data) before proceeding.

-
Tap the
(Undo) button to undo the last registration action. -
Tap the
 (Redo) button to redo a registration action that was undone. By alternating between undo and redo, you can observe the performance of the registration in the view.
 -
Tap the
 (Remove registration) button to remove all registration information from selected scans and revert them to their original state.
Running a registration sequence
Achieving a good registration result often involves iteratively applying auto initial positioning and registration using different constraints and settings. A registration sequence is a predefined configuration of such registration passes. You can define customised registration sequences in PointStudio and run them in FieldHHC.
Creating a registration sequence
To create a registration sequence, open the Create FieldHHC Registration Sequence tool in PointStudio. You can access the tool by going to the Position and Filter tab and then selecting Create FieldHHC Registration Sequence from the Register drop-down.
The tool allows you define a sequence of registration passes with different constraints and settings and then export this sequence as a JSON (.json) file.
See the PointStudio help for more information.
Running a registration sequence
To run a registration sequence in FieldHHC:
-
Copy the registration sequence JSON file created in PointStudio to the FieldHHC internal drive. See Managing non-scan file types for detailed instructions.
-
In the
File Manager tab, select the scans you want to register from the Scans list. If using other fixed reference data such as a surface or pointset, select these from the Files drawer. -
Enter 3D view mode by tapping the
(View in 3D) button located above the Scans list. -
Tap the
(Advanced registration) button located on the right side of the view. -
Optionally set one or more scans to be fixed reference data by selecting them in the files list and tapping the
button above the list. -
Select all the scans you wish to register.
-
Switch to the
 Sequence tab located in the bottom-right.
 -
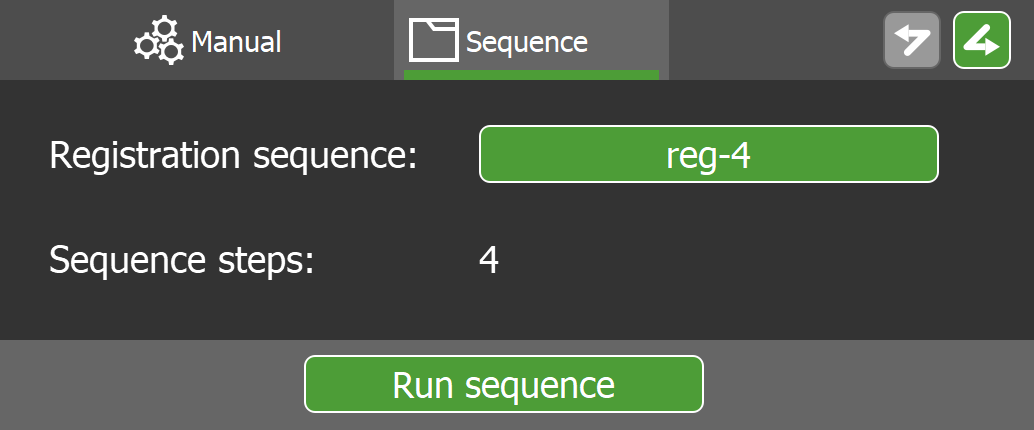
Tap the button next to Registration sequence. A list of available registration sequences in FieldHHC displays.
-
Select a sequence and tap OK. Sequence steps identifies the number of steps in the sequence.
-
Tap Run Sequence to run the registration sequence.
-
Tap the
(Undo) button to undo the last registration action. -
Tap the
(Redo) button to redo a registration action that was undone. By alternating between undo and redo, you can observe the performance of the registration in the view. -
Tap the
(Remove registration) button to remove all registration information from selected scans and revert them to their original state.
