Stockpiles
Source file: stockpiles.htm
The stockpiles page is a table containing stockpiles and related information. To open this page, click on the  button on the page selection bar. The left-hand pane is a table of stockpiles with general statistics. Click on a listed item to display more details and options in the stockpile editor pane. In this page, you can do the following:
-
Filter your query by categories and zones. To learn more, see Using the stockpiles table.
-
Export a query to a Microsoft Excel (
XLSX) file. To learn more, see Exporting a stockpiles query. -
Perform keyword searches for items in the stockpiles table. To learn more, see Search by keyword in Using the stockpiles table.
-
Control which columns to display in the Stockpiles table. To learn more, see Include or hide columns in the stockpiles table in Using the stockpiles table.
-
View the basic statistics and properties of that stockpile in the details pane. To learn more, see General statistics in Using the details pane.
-
Adjust stockpile volume or clear that stockpile from the details pane. To learn more, see Stockpile modifier buttons in Using the details pane.
Using the stockpiles table
The stockpiles table displays all available information at a glance. However, you can customise how you view the stockpiles page in different ways, as follows:
-
Resize the list and information panels: Use your mouse to drag the border between the two panels to the left or right.
-
Include or hide columns in the stockpiles table: To control which columns are displayed with the stockpile, open the drop-down (
 ), and use the checkboxes to select specific columns. Note that the drop-down also indicates the current number of columns being displayed.
 -
Search by keyword: Begin typing to narrow your results. Search checks Name, Key, Zone, and Zone Categories for matches.
-
Filter by category: Open the Categories drop-down and use the checkboxes to make your selection.
-
Filter by zones: Open the Zones drop-down and use the checkboxes to make your selection
Tip: Click on any column header to change the sort order by A-Z - 0-9 and vice-versa.
Exporting a stockpiles query
To export a query as a Microsoft Excel (XLSX) file, follow these steps:
-
Decide which columns to include in your table using the display columns drop-down at the top-right of the page. You can select any of the following:
-
Key: The unique identifier used by MaterialMRT.
-
Zone: The name of the zone.
-
Zone Category: The category, such as stockpile, pit, or any other type defined in MaterialMRT.
-
Status: A simple indication of the process being undertaken, such as empty, building, reclaiming, etc.
-
Age: The age of the stockpile, measured in seconds.
-
Last Activity: The date and time that the last activity occurred.
-
Mass: The mass of the stockpile.
-
-
Decide which Categories and Zones to include, using their drop-down lists.
-
Use Search to filter your table using a keyword.
-
Click on the
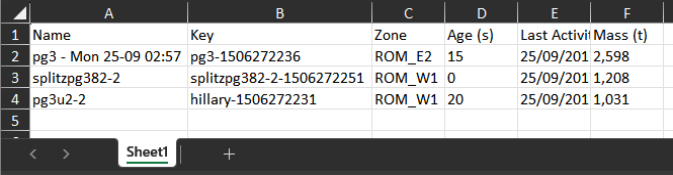
 (export to Excel) button at the top-right of the page. The report is saved as ExcelSheet.xlsx to the default download folder on your computer. If previous reports were created, a suffix with an increment number is appended to the file name. For example, a fourth report would be named ExcelSheet(3).xlsx.Example
In this example the key filter (using search) was pg and the columns Key, Zone, Age (s), Last Activity, and Mass were selected to be displayed. The resulting output is shown below:
Using the Details pane
The details pane expands the information by providing specific details about a selected stockpile. This pane is organised into three sections, as follows:
-
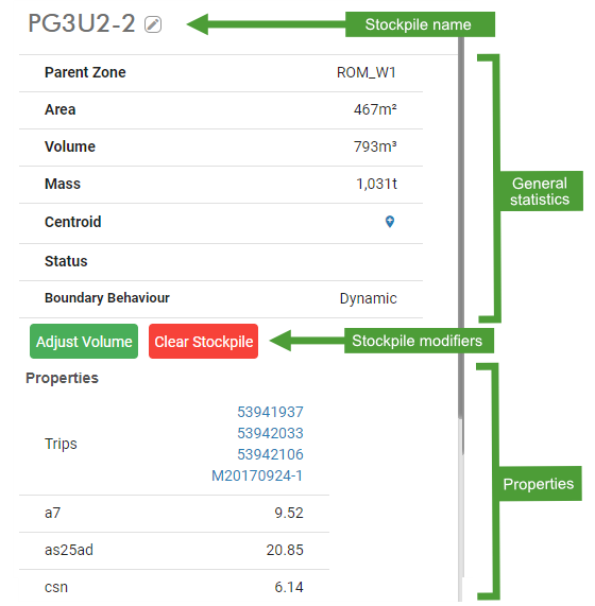
General statistics: This section contains an overall summary of the stockpile that include the following headings:
- Stockpile Name: The stockpile name is given to the stockpile when it is created. The naming convention follows the practices employed at the site. You can rename the stockpile. Simply click on its label to enable the text field, type your new name, then click
 to save it, or
  to cancel.
 - Parent Zone: The specific zone in which the stockpile is located, referencing the Zones column.
- Area: The area of the stockpile is defined by the boundary around the stockpile.
- Mass: This is the tonnage of all material in the stockpile.
- Centroid: This is the centre-most point of the stockpile and its corresponding coordinates. Click on the blue pin (
 ) to open a viewer in a new page displaying the parent zone and pin marking the exact location.
 - Boundary Behaviour: Indicates if the stockpile is static or dynamic.
- Stockpile Name: The stockpile name is given to the stockpile when it is created. The naming convention follows the practices employed at the site. You can rename the stockpile. Simply click on its label to enable the text field, type your new name, then click
-
Stockpile modifier buttons: Below the general statistics section are the two stockpile modifier buttons, as follows:

Adjusting the volume of a stockpile has the following effects:
- Properties remain the same.
- Mass and cuboid height are scaled but the base area remains the same.
- Time properties remain the same.
To adjust the volume of a stockpile, do the following:
-
Select the stockpile from the stockpiles table.
-
In the information pane, click the
 button to open the Adjust stockpile volume dialog.
 -
Enter the new value for volume in the New volume field.
-
Select when to effect the change using either of the following radio buttons:
If the change is to be immediate, select Now. If the change is retrospective, select In the past, then enter a date and time directly in the As of field, or use the calendar picker (
 ).
). -
Click the
 button to accept the change or
  to close the dialog without proceeding.

Clearing a stockpile removes it and all properties from MaterialMRT.
To clear a stockpile, do the following:
-
Select the stockpile from the stockpiles table.
-
In the information pane, click the
 button to open the Clear stockpile dialog.
 -
Select when to effect the change using either of the following radio buttons:
If the change is to be immediate, select Now. If the change is retrospective, select In the past, then enter a date and time directly in the As of field, or use the calendar picker (
). -
Click the
button to accept the change or to close the dialog without proceeding.
Note: The
and buttons are only displayed if you have a role with AdjustStockpileVolume and ClearStockpile permissions respectively allocated.Note: It is possible to undo transactions such as changing the volume or clearing a stockpile using the event manager. To learn more, see Event Manager. in User and System Management > System Preferences.
-
Properties: Below the stockpile modifier buttons are the properties associated with the stockpile. Each property has a name and a value. Depending on the property type, you can do the following:
-
Hover over a property to show a histogram or pie chart. Histograms show numeric properties and pie charts show text properties.
-
Click on a link for trips, if present. The link opens that trip in the trip editor.
See also: To learn more about the trip editor, see Trip Editor. in Main Pages and Tools.
-
