Filter by Attributes
Filter by attributes allows you to change point visibility based on the value of an attribute. For example, when you run colour distance from objects, each point receives an attribute recording its distance from the base object. You could use Filter by Attributes to hide all points more than 3m from the base surface.
Filter by attribute allows you to apply filtering based on parameters available to that particular object.
To set up an attribute and attribute types:
-
On the Position and Filter ribbon tab navigate to the Filter group and select
 Filter by Attributes.
The Filter by Attributes panel will appear.
-
Select the object from the project explorer.
-
Choose an Attribute type from:
- Primitive properties: Different objects will have different properties that can be used as attributes. For example a scan will inherit the following attributes to select from:
- Intensity
- Range
- Z coordinate
- Primitive tags: Objects can be given a tag that can then be used as an attribute.
- Primitive properties: Different objects will have different properties that can be used as attributes. For example a scan will inherit the following attributes to select from:
-
Choose the range required from the drop-down list.
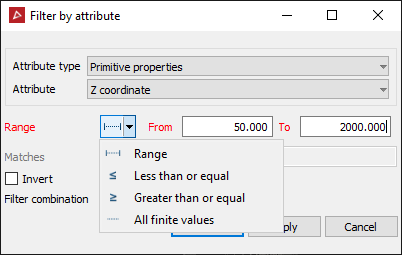
Range— enter from and to values. Less than or equal— enter the upper range limit required. Greater than or equal— enter the lower range limit required. All finite values: Filter out attributes that have a NaN or any other error values.
Note: The typical intensity range using a Maptek Gen3 mkI or mkII scanner varies between 350-1400.
Note: The typical range captured by a Maptek Gen3 mkI or mkII scanner is from 2.5 to 2400 metres.
-
Select the Invert checkbox for the Filter Combination if the opposite to the settings is to be filtered.
-
Click OK or Apply.
Filtering to the object will be applied based on the parameter settings.