Global
Source file: global-registration.htm
Global
registration aligns scans ![]()
![]() , surfaces
, surfaces ![]()
![]() , and other objects by matching surface
features and strategic point sets in overlapping regions.
, and other objects by matching surface
features and strategic point sets in overlapping regions.
Note: Initial registration, using By name or By time and/or manual translational and rotational adjustments, is recommended before attempting final registration with global registration. See By Name and By Time.
-
To perform global registration, follow these steps:
-
On the Position and Filter tab, in the Register group, click
 Global to open the Global Registration tool panel.
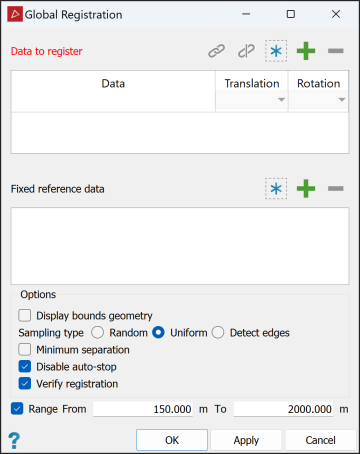 Note
NoteThe tool panel includes the following buttons, most of which are only activated when there are applicable objects available and/or selected:
-
 (Add selected objects)
-
 (Remove selected objects)
-
 (Select all objects)
-
 (Group selected objects)
-
 (Ungroup selected objects)
-
-
Add the objects to be registered to the Data to register field, either by dragging from the project explorer, or by selecting them, then clicking
.The global registration tool will align all added objects as closely as possible and as accurately as possible in the relevant coordinate system, and group them accordingly. Factors such as the tolerances of the individual objects and starting locations will affect the efficiency of the registration process.
-
Group and ungroup objects as appropriate using the
and buttons.Grouping objects ensures they are treated as one larger object in the surface matching process. The first object in a group is the primary object; the group will use its origin and tolerances during registration. Use this tool for objects that already form a well defined entity, for which it is not worth risking further separation and misalignment.
-
Select Associated for any objects to be registered but not used in the surface matching process. These objects can be any that are positioned relative to the scans you are registering. For example, a limited-extents scan at a different resolution.
Note: The Associated option only appears if you have grouped objects.
Note: At least one object in a group must remain as not associated data.
-
Choose the appropriate transformation options from the following:
- Translation
options are:
- Free: Allows any movement of the origin.
- Fixed: Restricts any movement of the origin during registration.
- Bounded: Restricts movement to within an ellipsoid whose main dimensions are the horizontal and vertical scan tolerances. Bound columns appear, displaying any applicable Horizontal and Vertical scan tolerances associated with the object.
- Rotation options are:
- Free: Allows rotation in all directions.
- Bearing: Allows rotation in the horizontal plane only.
- Translation
options are:
-
Add any previously corrected or be correctly positioned data to the Fixed reference data field.
Fixed reference data must have areas of overlap with the data to be registered. Fixed reference data objects aid in the registration process and will not be transformed in any way. Leave this field empty if there are no appropriate reference objects available.
-
Select the required options from the following:
- Display bounds geometry: This option
will display a 3D representation of the ellipsoid defining the tolerance
bounds around the origin.

A 3D image displaying a scan tolerance ellipsoid around the origin of a scan data source.
- Sampling type:
- Random: PointStudio will pick random points to compare between objects during registration. This typically produces the quickest registration.
- Uniform: Points will be chosen uniformly across the objects for registration.
- Detect edges: Edges, such as along walls and buildings, will be used to register scans to each other.
- Minimum Separation: This option is able to reduce the number of points close to the scanner whilst retaining points further away.
- Disable auto-stop: PointStudio will keep trying to register all the objects to each other until stopped by the user.
Note: The ellipsoid may not be visible until zooming in, particularly for small tolerance values. Depending on the situation, tolerance values can be imported with scan data and/or set in PointStudio Preferences
 Registration Settings or
  Scan Tolerance
 - Display bounds geometry: This option
will display a 3D representation of the ellipsoid defining the tolerance
bounds around the origin.
-
Select the required reporting options from the following:
- Verify registration: PointStudio will run the Verify Registration command to verify the registration and give feedback about its accuracy and precision. See Register.
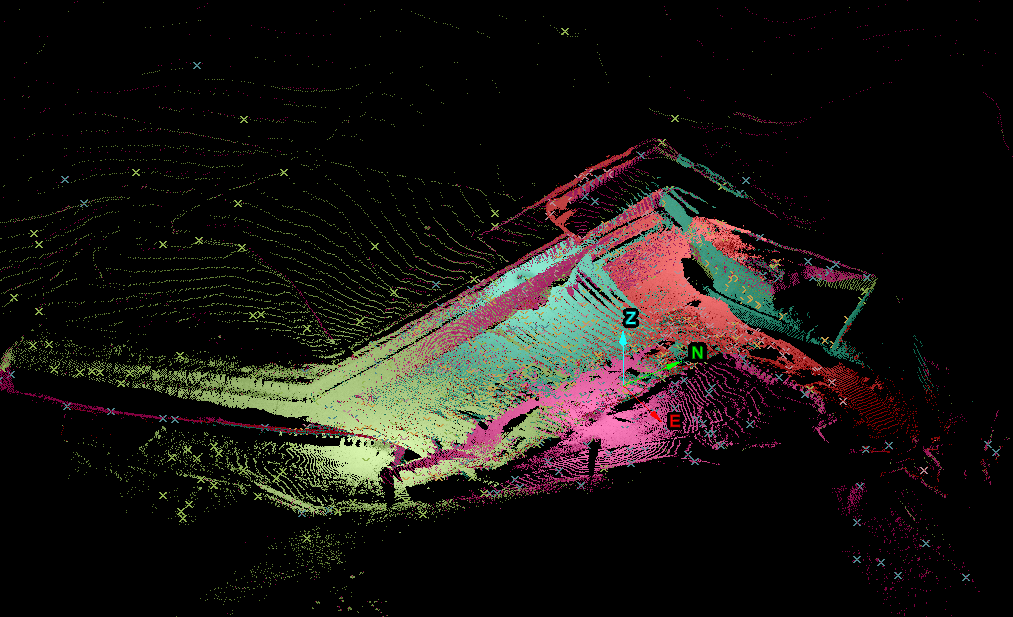
- Display sampled points: The view window will display coloured crosses at the locations of sample points in the 3D scene.
-
Click OK or Apply.
The registration process will run, during which a progress message is displayed. If you selected Disable auto-stop, click Stop when you are satisfied that no further improvement can be made.
Upon completion, and if Verify registration was selected, verification will commence. The results will be presented in a report detailing the success or otherwise of the registration procedure.
|
|
|
A 3D scene displaying numerous scan files (in different colours) registered using Global registration. The crosses indicate points used in the Global registration process. |