Intersect Triangulation
Use this option to intersect a block model with a triangulation and draw the result as an underlay on the screen. The intersections are coloured from a scheme file and one block variable.
Instructions
On the Block menu, point to Viewing, then click Intersect Triangulation.
Follow these steps:
-
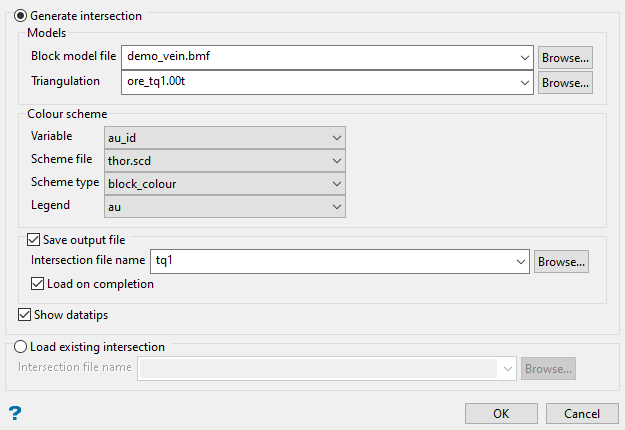
Select Generate Intersection to create a new intersection. If you want to use an intersection that has already been created, enable the option Load an existing intersection located at the bottom of the panel instead.
-
Select the block model from the drop-down list. Click Browse to use the explorer to locate a block model not stored in the current working directory.
-
Select the triangulation you want to use. All triangulations stored in the current working directory will be displayed in the drop-down list. Click Browse to use the explorer to locate a triangulations not stored in the current working directory.
-
Select the Variable you want to use.
-
Set the colours by selecting an existing colour legend scheme.
-
Check Save output file to save the output as a (.cpf) file (optional). Enter the file name in the space provided.
-
Check Load on completion if you want the results to be displayed.
-
Enter a unique name for the panel settings in the space labelled Identfier. The list can then be recalled at a later time by simply selecting the identifier from the drop-down list.
-
Select the variables that you want to display in the datatips. Up to 30 variables can be selected.
-
Select an Octant variable (optional) to hold the information regarding which octants were used in the in the estimation.
ImportantThe variable containing the octant information must be included in the Variables list and be selected as the Octant variable if you want to see it in the datatips. -
Set the number of decimal places you want to view. The number of decimal places enter here will not effect the actual number stored in the model. It is for display purposes only.
-
Click OK.
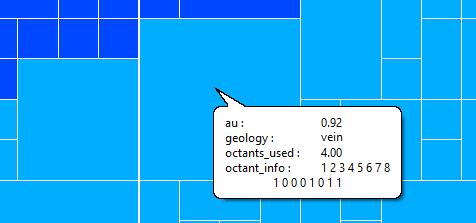
Select Show datatips if you want to view the block model variable information in the resulting triangulation. When you hover the cursor over the triangulation, the appropriate variable information displays.
Important: The Display Datatips check box (under the Graphics section of Vulcan Preferences) needs to be enabled in order to display datatips.
If this check box is selected, the Block Model Datatip Variables panel will be displayed once the main panel has been completed.
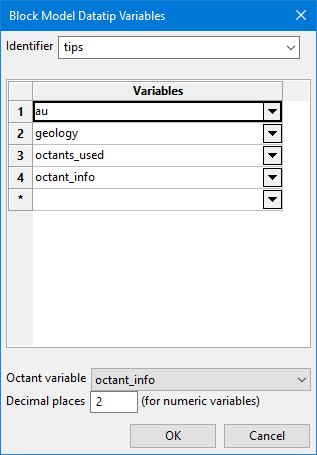
This panel allows you to create and define the template that contains the block model variables that you want to display. The template will be saved to a Block Identifier file (.bif). This file is named after the name of the project, that is <project_name>.bif.
Setting up the option to view octant information
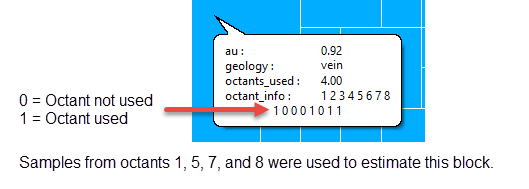
Vulcan stores information regarding whether or not samples from a particular octant were used during estimation. The octants are labelled 1 through 8. If samples from an octant are used during estimation, then the octant is flagged with a 1. If samples from an octant are not used, the octant is flagged with a 0. The variables used to record the number of octants used to estimate a block and record the flag information are stored in variables selected while setting up the estimation parameters.
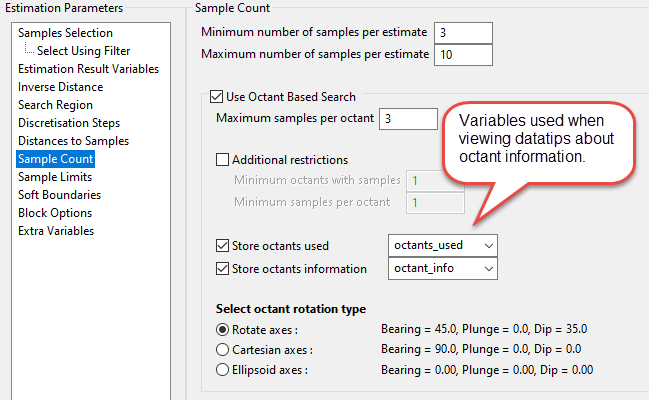
Figure 1 : Screenshot showing panel from the Estimation Editor. For information about setting up the estimation variables, see setting up Sample Count .
In the datatips, the octant information is displayed as a small table with the octant number on top and the flag on the bottom.