Location
Use the Location option to create and edit channel sample locations and orientations. Adding and editing additional information, such as assays, is done using the Attributes option.
Note: This option to link the channels to a survey station if you have set up a survey station library (<name>.stations). If you don't want to link channels to a station, then rename the library file. For example, rename survey.stations to survery.stations bak.
Instructions
On the Geology menu, point to Channel Sampling, and then click Location to display the Survey library name panel.

Survey station library name
Enter, or select from the drop-down list, the station library name. This is only applicable when calculating the coordinates of the channel sample, based on measurements taken by the geologist from a known survey point in the mine. This allows the linking of the channel sample to a survey station.
Click OK.
Tip If you don't want to link channels to survey stations, then select the Cancel button. This will not exit the option, but take you directly to the Channel to Edit panel.
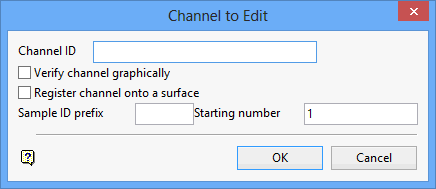
The following panel is then displayed.

Channel ID
Enter the name of the channel to be added or, if applicable, edited. The maximum size of the name is 20 alphanumeric characters.
Verify channel graphically
Select this check box to confirm each channel before it gets stored in the database. If a survey station applies, then the link between the channel and survey station is shown by a temporary white dashed line.
Register channel onto a surface
Select this check box to be prompted to pick a 2D triangulated surface onto which each point will be automatically registered as you digitise. The surface must already be loaded. Registering onto a surface is useful to mix topographies and field maps of trenches.
Sample ID prefix
Enter the sample ID prefix. The prefix allows you to control how the samples are identified. The maximum size of the prefix is 4 alphabetic characters. The prefix precedes each sample identifier.
Starting number
Enter the starting number. The starting number is appended to the end of each sample identifier, and is incremented by one for each successive sample. For example, RS1, RS2, RS3, etc.
Click OK.
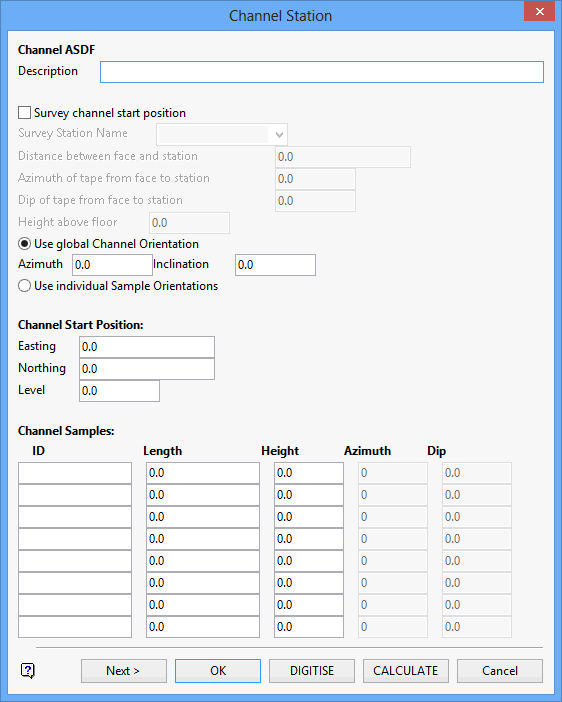
The following panel is then displayed. If you chose to register the channel onto a surface, then you will first be prompted to pick the surface if more than one surface is loaded. Otherwise, it will be automatically picked.

Description
Enter a description to further describe the channel. This is an optional alphanumeric field of 40 alphanumeric characters.
Survey station start position
Select this check box to reference the channel from a survey station.
The following options will only be enabled when the Survey station start position check box has been ticked. If this check box is left unselected, then these options will be greyed out, i.e. disabled.
Survey Station Name
Enter the name of the survey station to which the channel will be referenced (several channels can all reference the same survey station). Measurements are made from the channel face location to the specified survey station. The maximum size of the name is 10 alphanumeric characters.
Distance between face and station/Azimuth of tape from face to station/Dip of tape from face to station
These measurements are used to determine the X, Y, Z location of the channel face.
Height above floor
This field is optional and allows for the distance between the channel face and the sill or floor of the underground workings. This may be useful if the point from which the measurements is made is vertically above, or below the channel face.
Use global Channel Orientation
Select this option if you want the same azimuth and inclination to apply to all samples in the channel. The azimuth and inclination values define the orientation of the channel. These values can be manually entered, or picked from the screen using the DIGITISE button.
Use individual Sample Orientations
Select this option if you want a different azimuth and dip for each sample in the channel. These values can be manually entered, or picked from the screen using the DIGITISE button.
Channel Start Position
Easting/Northing/Level
Enter the X, Y, Z location for the start of the channel. All samples in the channel will be drawn from this point.
Note: Vulcan assumes that samples in the channel move from left to right (looking at a channel sample in Plan View whose origin is on the left side of the screen). Therefore, the channel face is the X, Y, Z location of the start of the first sample in the channel.
The coordinates of the channel position can be specified through one of the following three methods:
- Manual entry.
- Calculated by the system from the measurements between the channel face and the survey station (only if a survey station applies).
- Digitised. If snap mode is used, then the elevation is also obtained.
Channel Samples
These are the individual samples in the channel. A maximum of 100 samples can be entered (minimum is one). Use the Next button to access the other sample fields.
The length of each sample is automatically inserted as a result of digitising the orientations. This information can be overwritten. If you are using individual orientations, then the azimuth and dip values are also automatically inserted.
Click OK.
If the channel is new, then the Channel Colouring panel displays. Refer to the Load Channel option for details on this panel. Once the Channel Colouring panel is completed, the channel is loaded as per selected colour legend (scheme), and you are returned to the Channel to Edit panel.
If the channel already exists, then you will be prompted as to whether or not you want to append samples or create a new channel. In you choose the latter, then the "old" samples will be overwritten. The Channel Colouring panel will not be displayed as it will use the original specified colour legend (scheme).
If the Verify channel graphically check box on the Channel to Edit panel has been selected, then you will be asked to confirm the changes before the channel is stored in the database.

