Underground Ring Design Tutorial
A fast and flexible design tool that creates rings in a stand-up or slash-holes format.
Opening Your Data File in Vulcan
The dataset for this tutorial is in the Underground Ring Design.zip folder. (Click the link to download the dataset).
The blasting and drafting specification files must be copied to the ENVIS_RESO location prior to using the Underground Ring Design options.
Copy the Blasting.spc, drafting.dgd.isis, and drafting.dgd.isix files from the Underground Ring Design folder to the ENVIS_RESO location.
The location of the ENVIS_RESO folder can be found in the Windows environment variables or in the Resources tab of the Vulcan Explorer window.
If the ENVIS_RESO environment variable is not set, copy the files to C:\ProgramFiles\Maptek\Vulcan\etc\resources folder.
Stand-up Design
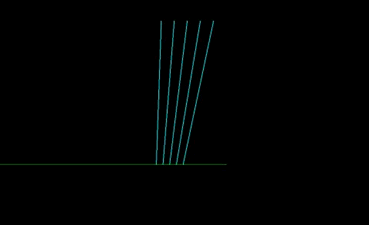
A stand-up design can be created according to a series of design parameters, such as a ring burden or a pull-height, as well as initial and final ring dump angles.
- Open Vulcan with the dataset from the Underground Ring Design folder.
- Load the BACKLINE layer. This line will be used as the reference line when the rings are created.
- Select Underground > Ring Design > Create Rings to display the Create Rings panel, and set the following parameters:
- Enter STANDUP_RING_SECT in the Layer field.
- Enter 1.8 in the Default ring burden field.
- Select Stand up design.
- Select ugcourse_stope04_stage1.00t from the Initial void triangulation drop-down list.
- Enter 20.0 in the Height of toes above reference line field.
- Enter 78 in the Dip angle at ring burden from void field.
- Select Non-parallel in the Initial standup pattern section.
- Enter 88 in the Target dip angle field.
- Select Specify number of rings.
- Enter 5 in the Number of standup rings field.
- Enter 9.0 in the Ring left extent field.
- Enter 9.0 in the Ring right extent field.
- Enter RING_%.2D in the Ring name template field.
- Enter 1 in the Starting sequence number field.
- Enter 1 in the Ring number increment field.
- Select the Keep intermediary standup design lines check box.
- Click OK.
- Click on the reference line in the BACKLINE layer to display the Modify Standup menu.
- Select Finish to produce the rings. The designed dump angles are stored in the object value.
Slash Design
Slash designs are typically used for the recovery of a failed initial primary slot design. With these designs, operational factor dictate the slash design, such as maximum allowable dump angle, minimum allowable distance to the brow, ring burden and designed pull-height, and minimum collar separation between rings.
-
Open Vulcan with the dataset from the Underground Ring Design folder.
-
Load the BACKLINE layer. This line will be used as the reference line when the rings are created.
-
Select Underground > Ring Design > Create Rings to display the Create Rings panel, and set the following parameters:
-
Enter SLASH_RING_SECT in the Layer field.
-
Enter 1.8 in the Default ring burden field.
-
Select Stand up design.
-
Select ugcourse_stope04_stage1.00t from the Initial void triangulation drop-down list.
-
Enter 20.0 in the Height of toes above reference line field.
-
Enter 78 in the Dip angle at ring burden from void field.
-
Select Non-parallel in the Initial standup pattern section.
-
Enter 88 in the Target dip angle field.
-
Select Specify number of rings.
-
Enter 5 in the Number of standup rings field.
-
Enter 9.0 in the Ring left extent field.
-
Enter 9.0 in the Ring right extent field.
-
Enter RING_%.2D in the Ring name template field.
-
Enter 1 in the Starting sequence number field.
-
Enter 1 in the Ring number increment field.
-
Select the Keep intermediary standup design lines check box.
-
Click OK.
-
Click on the reference line in the BACKLINE layer to display the Modify Standup menu.
-
Select Finish to produce the rings. The resulting slash ring design is similar to the stand-up ring design, but the sequence of the slash design rings is in reverse.

Rename Rings
This example demonstrates how to rename the rings to include a primary slot design around the slot cut.
- Open Vulcan with the dataset from the Underground Ring Design folder.
- Load the BACKLINE, RING_SECT, and SLOT_CUT layers.
- To rename the rings by selecting the rings from the screen:
- Select Underground > Ring Design > Rename Rings. The Ring Naming panel displays.
- Select Pick the rings from the screen.
- Enter RING_A in the Initial ID field.
- Enter 1 In the Increment by field.
- Enter 2 in the Min ID width field.
- Click OK.
- Click on the rings labelled RING01, RING02, and RING03. The label names change to RING_A, RING_B, and RING_C as specified on the Ring Naming panel. The rings are labeled in the order that they were selected.
- When finished, right-click twice to exit selection mode.

- To rename the rings by digitising a line to intersect the rings:
- Select Underground > Ring Design > Rename Rings. The Ring Naming panel displays.
- Select Digitise a line to intersect the rings.
- Enter RING_1 in the Initial ID field.
- Enter 1 In the Increment by field.
- Enter 2 in the Min ID width field.
- Click OK.
- Click just to the right of RING04 to digitise a point, and then click to the left of RING18 to digitise a second point.
- Right-click to exit selection mode. The label names intersecting with the line are renamed RING_1 to RING_15 as specified on the Ring Naming panel. The rings are labeled in the order that the line was digitised.

Create Ring Profiles
The Underground > Ring Design > Create Ring Profiles option introduced in Vulcan 9, streamlines the ring design workflow. The option adds functionality to all the creation of profiled design objects in the same plane angle as each ring's stored object value. The new objects can be named in line with naming conventions and scheduling.
The ring profile created in this example is used in the Ring Profiles Option of the Calculate Ring Reserves example that follows.
- Open Vulcan with the dataset from the Underground Ring Design folder.
- Load the RING_SECT layer.
- Select Underground > Ring Design > Create Ring Profiles and set the following parameters:
- Enter SECT_PROFILE in the Section layer field.
- Select Irregular sections.
- Select Use cross section lines (profile parllel to line).
- Select Get the dip angle from the object value.
- Select the Include the object name when naming the sections check box.
- Select Apply object name as prefix.
- Select Select triangulations by name.
- Click OK, and then select Layer when the Select By menu displays.
- Select the RING_SECT layer and confirm. A message displays that some objects in the layer are invalid for sectioning, referring to the ring labels. Click OK to continue. The Open displays.
- Select ugcourse_stope04_stage1.00t and click OK. The Confirm menu displays.
- Select Replace SECT_PROFILE on the Confirm menu. The ring profile is then created. Once the process is complete, the 3D Section Profiles panel displays again.
- When finished, click Cancel to exit the option.
- Select File > Save to save the new ring profile for use in the next example for calculating ring reserves using the Ring Profiles method.
Calculate Ring Reserves (Ring Profiles)
There are three methods of calculating ring reserves using a block model:
- shelling the design stope using rings,
- creating solids using ring profiles,
- and using Pre-ex.
For the following example, the grade cutoffs panel is not used and may be left blank.
Prior to using the Calculate Ring Reserves - Ring Profiles option, any duplicate points must be removed from the ring profile strings. This may be achieved using the Design > Point Edit > Delete Duplicate Points, Design > Object Edit > Remove End Point, or Design > Object Edit > Filter options or by checking the labelled point sequences and adjusting points accordingly. This example uses the Design > Point Edit > Delete Duplicate Points method.
For best results, delete and triangulations from the sub-folder named temp_shells.tri in the working directory prior to running this option, as triangulations may have been generated from other examples.
-
Open Vulcan with the dataset from the Underground Ring Design folder.
-
Load the SECT_PROFILE layer that was created in the Create Ring Profiles example.
-
Select Design > Point Edit > Delete Duplicate. The Select By menu displays.
-
Select All and confirm.
-
Right-click when finished selecting. Any duplicate points will be removed and the Select By menu is displayed again. Right-click again to exit selection mode.
-
Select Underground > Ring Design > Calculate Ring Reserves.
-
Select the General tab.
-
Select V9_beta.rr_spec from the Specification file drop-down list.
-
Select demomodel.bmf from the Block model drop-down list.
-
Select the Report to CSV file check box and enter V9_profile as the file name.
-
Select the Report to DMP file check box and enter V9_profile as the file name.
-
Select the Ring Shells tab.
- Select Create from existing ring profile strings.
- Select demov9_dataset.dgd.isis from the Design database drop-down list.
- Select SECT_PROFILE from the Layer name drop-down list.
- Click Populate. The ring profile string information is populated automatically from the information in the SECT_PROFILE layer.
- Click Apply and Run.
A command window will run the BReserve function and create a series of closed, valid solid shells for reserving and scheduling. These shells are stored in the working directory in a sub-folder named temp_shells.tri. If necessary, right-click on the Triangulations folder in the Vulcan Explorer window and select Refresh to view the new triangulations in the folder.
Calculate Ring Reserves (Ring Shells)
-
Open Vulcan with the dataset from the Underground Ring Design folder.
-
Load the ST02_RING_SECT layer.
-
Select Underground > Ring Design > Calculate Ring Reserves. The Ring Reserves panel displays
-
Select the General tab.
-
Select V9_beta.rr_spec from the Specification file drop-down list.
-
Select demomodel.bmf from the Block model drop-down list.
-
Clear the Report to CSV file and Report to DMP file check boxes.
-
Select the Ring Shells tab, then select Create from stopes, ring section lines and dips.
-
Select the Stopes tab, then select ugcourse_stope04_stage1.00t as the stope solid. If there are other stope solids listed in the Stopes tab, select the stope solid names in the list and click Clear to remove them from the list.
-
Select the Rings tab, then select the following:
- Select demov9_dataset.dgd.isis from the Design database drop-down list.
- Select ST02_RING_SECT from the Layer name drop-down list.
- Select the Get the dip angle from the object value when populating check box.
- Select the Ignore objects having a zero dip value check box.
- Select the When naming the shells, prefix the ring name to the stope name (else suffix it) check box.
- Click Populate.
The ring profile string inform - Click Populate.
The ring profile string information is populated automatically from the information in the ST02_RING)SECT layer.
- Click Apply and Run.
A command window will run the BReserve function and create a series of closed, valid solid shells for reserving and scheduling. These shells are stored in the working directory in a sub-folder named temp_shells.tri. If necessary, right-click on the Triangulations folder in the Vulcan Explorer window and select Refresh to view the new triangulations in the folder.
Calculate Ring Reserves (Navigate Rings)
-
Open Vulcan with the dataset from the Underground Ring Design folder.
-
Load the RING_SECT layer.
-
Select Underground > Ring Design > Navigate Rings. The Navigate Rings menu displays.
-
If you do not have a blast database open already, the Open Blast Database panel displays. Select demounisa.ugb.isis from the Isis File drop-down list in the Specify Blasthole Databse section and select RING_SECT from the Layer drop-down list. Click OK.
-
Click Edit Settings. The Edit Navigation Settings panel displays.
-
Enter 0.5 in the Ring width field. The ring width specified on this panel will be saved between Vulcan sessions.
-
Select the Reverse View check box and click OK. The reverse view of the ring is displayed.
Report on Rings (CSV Output)
Ring information can now be exported to a CSV file using the Report on Rings option.
-
Open Vulcan with the dataset from the Underground Ring Design folder and load the BACKLINE and RING_SECT layers.
-
S elect Underground > Ring Design > Report on Rings. The Select reporting style panel displays.
-
If you do not have a blast database open already, the Open Blast Database panel displays. Select demounisa.ugb.isis from the Isis File drop-down list in the Specify Blasthole Database section and select RING_SECT from the Layer drop-down list. Click OK.
-
If you do not have a current ring specified, the Set Current Ring panel displays. Select Set current ring by name and select RING01 from the Layout drop-down list.
-
Select drilling from the Report style drop-down list.
-
Click OK. The Edit Ring Report Format panel displays.
-
Click Save to accept defaults.
-
Select the reference line from the BACKLINE layer and confirm. If the reference line is not visible, click the Reset View button on the Graphics toolbar twice to view and select the correct reference line. Confirm the selection. The Report on Rings panel displays.
-
Select the Report on drilling check box.
-
Select the Report on explosives check box.
-
Select CSV and enter V9.0Release_Features as the CSV file name.
-
Click OK. The Ring Report panel displays.
-
Select Select ring by name.
-
Enter an asterisk (*) in the Ring name field. This will select all rings for reporting.
-
Click OK. The CSV file is generated and saved to your working directory. The Ring Report panel is displayed again.
-
Click Cancel on the Ring Report panel to exit the option.
Related topics
Underground tutorials

