Check
Use this option to check the validity and stability of triangulations. If a triangulation does not pass a selected check, the problem area is highlighted in a custom colour. The results can be displayed as an underlay or saved to a specified layer, and a list of the failed triangulations can be saved to a selection file. The selection file can then be used with the Model > Triangle Utility > Repair... tool for triangulations.
Instructions
On the Model menu, point to Triangle Utility, then click Check.
Follow these steps:
-
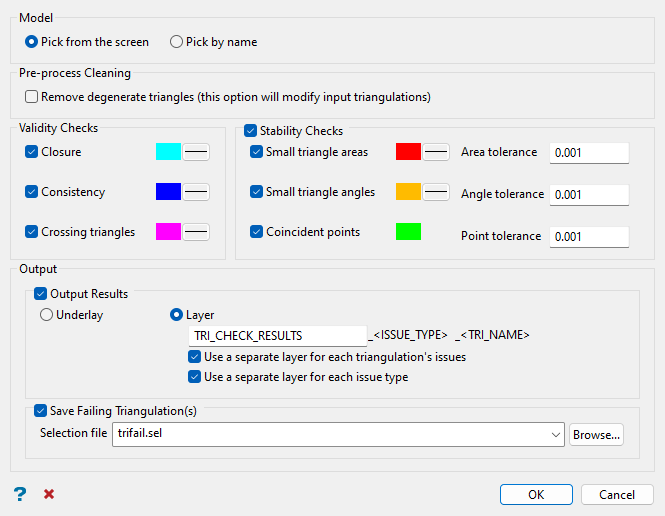
Specify how you will nominate triangulations to run the checks on by selecting either Pick from the screen to select from triangulations currently loaded in the Vulcan workspace, or Pick by name to pick triangulations using the selection panel.
NoteIf you selected Pick from the screen and you only have one triangulation loaded, the triangulation will be selected automatically upon running the option.
Unlike the Pick from the screen option, which only allows you to select from loaded triangulations, the Pick by name option allows you to browse through your available data directories as well as use triangulations listed in a nominated selection file.
-
Select the Remove degenerate triangles checkbox if you want to modify input triangulation(s) that may contain degenerate triangles to remove these features.
NoteDegenerate triangles are those with three points along a straight line (i.e. three collinear points). They may be reported as boundaries in operations; therefore, a potentially closed triangulation will be reported as open. The pre-process cleaning step in this option removes the false boundaries.
There are two possible configurations of degenerate triangles:
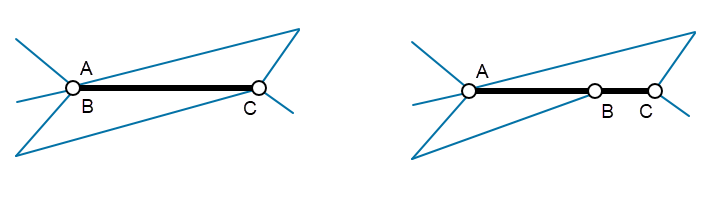
(Left) two coincident points and (Right) three points on a single line (otherwise known as a T-junction). In the diagram, the thick black lines show degenerate triangles while the thin blue ones show the other lines of the triangulation.
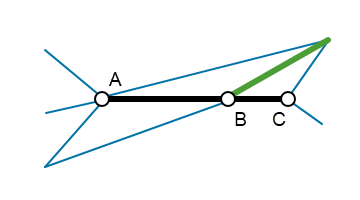
Removal of degenerate triangles may require adding triangles to the triangulation as shown in the diagram below. The green line shows the split line added to create new triangle segments.
Vulcan does not produce degenerate triangles but they may be present in triangulations imported from other packages. There are no advantages in having degenerate triangles in a triangulation; therefore, modification of the input triangulation(s) to remove degenerate triangles is justified.
-
Specify which Validity Checks to run for the selected triangulation(s). You will have the ability to display and save the areas where the tests have failed, as well as set the colour and line type of these areas. Validity checks are primary checks that are important for many algorithms in Vulcan. Crossing triangles (i.e. self-intersection), for example, distort the calculations of the triangulation volumes as overlapping parts make some volumes counted many times.
While consistency and crossing triangles are fundamental properties that, if failed, may cause failure of some algorithms, closure is another case where check failure is meaningful only for closed triangulations (e.g. mining blocks, ore bodies, stopes). For the triangulations clearly defined as surfaces (e.g. topographies, bench definition surfaces), closure failure at the boundary is expected and in fact not a failure at all.
NoteA valid surface triangulation has a consistent topology and the triangles (facets) intersect properly. Closure is not applicable to surface triangulations which by definition are open.
A valid solid triangulation has a consistent topology and the triangles intersect properly. A valid solid triangulation can be viewed as a valid surface triangulation that is closed.
 Closure
Select this checkbox to test the solid triangulation for openings (holes) and select preferred output display settings from the associated colour and line style tables for this check. If the closure test fails, then a boundary string is produced. Hence, you can also use this option to create a boundary string around the edges of a surface triangulation. Holes in a solid may be closed using the Model > Triangle Solid > Close Solid option, although this often results in inconsistencies or crossing triangles where very complex boundary string shapes are used.
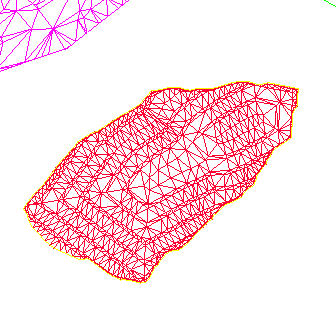
Figure 1 : Validity Test - Test for Closure
Consistency
Select this checkbox to test the solid or surface triangulation(s) for triangle edges shared between more than two triangles and select preferred output display settings from the associated colour and line style tables for this check. If the consistency test fails, then an inconsistent string is produced. This may occur where internal walls have been produced after performing a Boolean operation or appending. The Model > Triangle Solid > Split option will highlight these areas and allow for the deletion of individual wall segments using the same methods as the Boolean option.
The definition of consistency in Vulcan is different for solid and surface triangulations. A solid triangulation is consistent if every edge is shared by an even number of triangles (e.g. 2, 4, 6). A surface triangulation is consistent if every non-boundary edge is shared by exactly two triangles. Boundary edges belong to a single triangle.
Crossing triangles
Select this checkbox to test the solid or surface triangulation(s) for self-intersecting triangles and select preferred output display settings from the associated colour and line style tables for this check. If the test fails, then the outline of every triangle that intersects another triangle displays.
-
Select the Stability Checks checkbox if you want to select some or all of the following checks to run for the selected triangulation(s). You will have the ability to display and save the areas where the tests have failed, as well as set the colour and line type of these areas. Stability check are of informational value and generally do not affect Vulcan algorithms. Triangles and edges that do not meet a required tolerance, such as area or length, can be identified. This information can be used to examine areas in the triangulation that may have been the cause of erroneous results in other applications. Before stabilising the triangulation, you should use the Model > Triangle Edit > Analyse Triangles option to analyse the model. This will provide you with an indication of good default tolerances.
Tip: Start with the minimum area and angle values obtained from the triangle analysis (via the Model > Triangle Edit > Analyse Triangles option) and increment them until all of the problems have been detected. Once the problem areas have been identified, they can be removed using the appropriate tool.
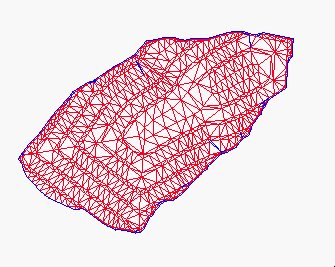
Figure 2 : Stability Test - Test for Small Area/Angle
Any invalid or unstable areas can be displayed on the screen, so the appropriate utility to correct the problem can be selected.
Unless a triangulation passes all of the appropriate validity tests (it is not necessary to test surface triangulations for closure) any operation on that triangulation is not guaranteed to be correct. This is particularly the case in grade estimation where volume and grade calculations are undertaken. A triangulation that passes the validation tests, but fails the stability tests may still provide accurate results when used in other applications.
Keep in mind, however, that limitations in the precision of some algorithms may produce errors when the triangulations being used contain small triangles.
Small triangle areas
Select this checkbox to test the solid or surface triangulation(s) for triangles that have a small surface area and select preferred output display settings from the associated colour and line style tables for this check. Set the area below which to check for in the Area tolerance field. If the small surface area test fails, then the outline of every triangle that has an area less than or equal to the specified area tolerance displays.
Small triangle angles
Select this checkbox to test the solid or surface triangulation(s) for triangles that contain a small internal angle and select preferred output display settings from the associated colour and line style tables for this check. Set the angle below which to check for in the Angle tolerance field. If the small angle test fails, then the outline of every triangle that contains an internal angle less than or equal to the specified angle tolerance displays.
Coincident points
Select this checkbox to test the solid or surface triangulation(s) for coincident points and select preferred output display settings from the associated colour table for this check. Set the distance between two points below which to check for in the Point tolerance field. If the test fails, then any points that are within the specified point tolerance are highlighted in the chosen colour.
-
Select the Output Results checkbox if you want to display the results of the performed checks as an underlay or save them to a specified layer.
-
Underlay: Select this option if you want to view the results of the performed checks as an underlay on the screen.
-
Layer: Select this option to nominate a layer to saved the results to. You may select an existing layer from the drop-down list, or enter the name of a new layer.
You have the option to break up the layers by triangulation and/or by issue type with the Use a separate layer for each triangulation's issues/issue type checkboxes. The layer names will be appended with the triangulation name and/or issue type, as applicable.
Note: The complete layer name can only contain up to 40 alphanumeric characters (spaces are not allowed), so keep in mind that the resulting names will be truncated if they exceed this limit.
-
-
Select the Save Failing Triangulation(s) checkbox to save the list of the resulting triangulation(s) failing the performed checks in a selection file (
.sel). Enter the name of the Selection file you wish to save to or select an existing file from the drop-down list, which contains all selection files in the current working directory. If you wish to save a new file or select an existing one in a different folder, click Browse... to navigate to another location. -
Click OK the run the selected checks.

