Page and Printer Settings
The page and printer settings are the default printer settings. It is possible to alter these settings in the current plotting session; however, the next time you open the plot file the settings will have reverted to the default printer settings. You can specify a default printer through Vulcan Preferences > Plot Utility. If a default printer has not been set, then the Windows default printer will be used instead.
Use the Printer Control toolbar to select the printer, paper size, and orientation.
Printing to non-standard paper sizes
It is possible to create custom forms to print to non-standard page sizes. These forms will appear with the standard page sizes in the page size drop-down lists. For information on how to create these forms, we recommend that you refer to the following Microsoft Support tutorial .
If you are planning on using the File > Plot > Plot All option to create the plot, then it is not necessary to create custom forms as custom page sizes can be created as part of the plot creation.
Note: If you want to create plots that are larger than A0, you will need to create a custom form. Some drivers, such as HP DesignJet, allow for the creation of custom sheets without creating forms. To create custom forms for a shared printer, create them on the printer server and not on your local computer.
Printable Area
It is not possible for printers or plotters to print right to the edge of a page, hence a margin will appear around the edge of your page (see Diagram 1). This is most noticeable when you are using a drafting sheet. You would expect the upper left corner of the external box to coincide with the upper left corner of the page; however, the printer places it at the origin of the printing area (see Diagram 2). This may mean that other parts of the plot now do not fit on the page.
To avoid this problem, click the Adjust Plot to Page Origin ![]() button on the Plot Utility Application toolbar. This option will ensure that the plot's origin and the page origin are the same.
button on the Plot Utility Application toolbar. This option will ensure that the plot's origin and the page origin are the same.
In Vulcan Preferences > Plot Utility, you can set whether the plot origin and the page origin coincide or the plot origin and printable area. Keep in mind, however, that regardless of your plot origin preference it is not possible to print to the very edges of the chosen page size. Thus if your plot contains data to the very edge of the page, then parts of the plot will be missing.
Since Vulcan now uses Windows printing methods, you may need to adjust the drafting sheets that were created through Version 3.5x.
The maximum printable area is dependent upon the driver and the capabilities of the printer.
Note: The non-printable margins are displayed as a transparent yellow border around the printable area in the Plot Utility Window. Any plot elements appearing in the margins will not be included in the plot. Some drivers provide 'Oversize' pages that do not have margins and are the size of a whole sheet.
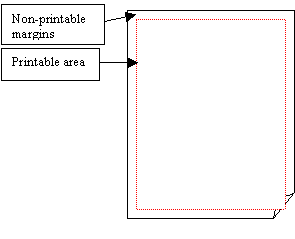
Figure 1 : Page showing printable area and non-printable margins.
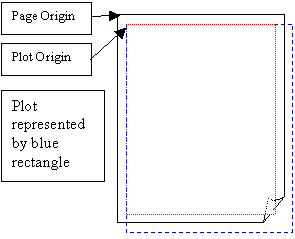
Figure 2 : Adjust Page to Plot option is selected. The printable area origin and the plot origin coincide.
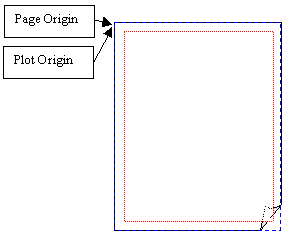
Figure 3 : Adjust page to plot origin option is selected. The plot origin and the page origin coincide.
Note: The printer still does not print in the printer margins. Any data in these areas will not be included in the resulting plot.

