Fault Surface Creator
This tool allows users to create a plane-like surface representing a fault plane. This creates a single surface for a single fault.
Input Data
The fault surface can be constructed from the following data:
-
Points or lines from a design database. Points of this type of data do not contain information about direction of the fault surface at the point.
-
Points from a design database that contain information of the fault surface direction at each point. This is similar to geotechnical structural object information where object’s position, dip, and dip direction are defined. It can be considered as stripped down geotechnical information with nothing but those three components.
-
Points from a drillhole database that may or may not contain information of the fault surface direction at each point.
-
Triangulation pieces representing parts of the fault surface.
Prerequisites
-
All points that have no directional information corresponding to a single fault should be placed in a single layer.
-
All points that have directional information corresponding to a single fault should be placed in a single layer. The dip in degrees should be placed into point name and dip direction into point W field.
-
If drillhole database is to be used, there should be a field in the database containing the name of the fault. If the directional information is to be used with the drillhole database, there should be fields in the database to define dip and dip direction. Those fields should be of data type Double or Float.
Instructions
On the Grid Calc menu, point to Integrated Stratigraphic Modelling, and then click Fault Surface Creator to display the following panel.
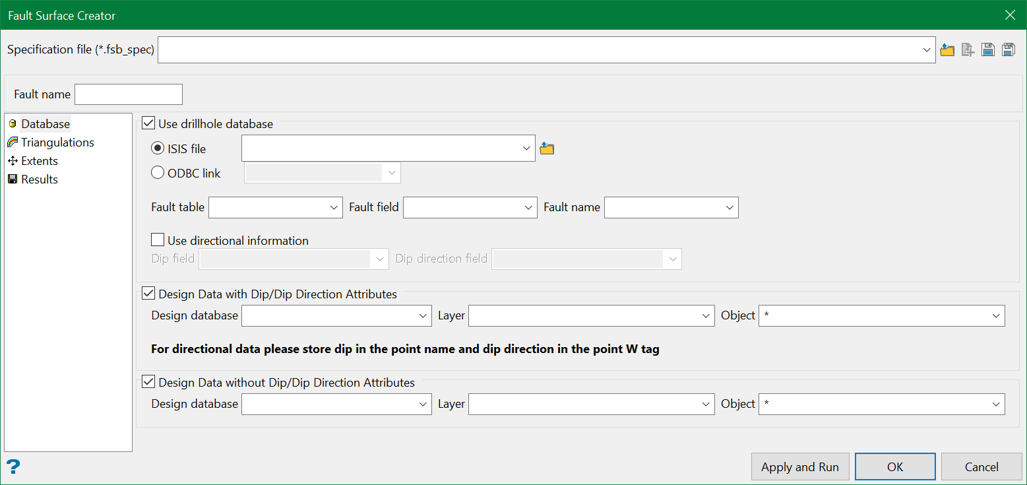
The panel is split mainly into 4 tabs:
Specification
Specification is a pre-saved file that contains the selections for the panel elements. The Fault Surface Builder specification files have extension .fsb_spec.
Specification file
Use the drop-down list to select the specification file if it is in the current working directory, or browse for it in another location by clicking the Browse button. A new file may also be created by typing the name of the new file in the textbox and clicking the New button.
-
 Browse
 -
 New
New -
 Save
Save -
 Save as
Apply and Run
This button executes the fault surface creating process and saves the settings to the specification file currently displayed in the specification file combo box.
OK
This button only saves the settings to the specification file for future use.
Related Topics

