Route Cycle Estimation

Estimate the route cycle
Use the Route Cycle Estimation option to calculate cycle times without the need of a block model.
Prerequisites
- You will need to define the equipment in the truck library (through using the Truck Library option).
- All routes need to be snapped to a topography or registered from the loader/shovel to the crusher/dump/stockpile. The point sequence is very important.
Tutorials
Haulage Profile Route Cycle Estimation
Open Pit Road Design Highwall Roads
Open Pit Road Design Multiple Roads
Instructions
On the Open Pit menu, point to Haulage Profile, and then click Route Cycle Estimation,
or,
Click the Route Estimation button
![]() from the
Haulage toolbar
to display the Route Cycle Estimation panel.
from the
Haulage toolbar
to display the Route Cycle Estimation panel.
The panel consists of the following six tabs. By default, the General tab is displayed.
- General
- Route Selection
- Pit Benches
- Dump Benches
- Output Settings
- Layer Creation
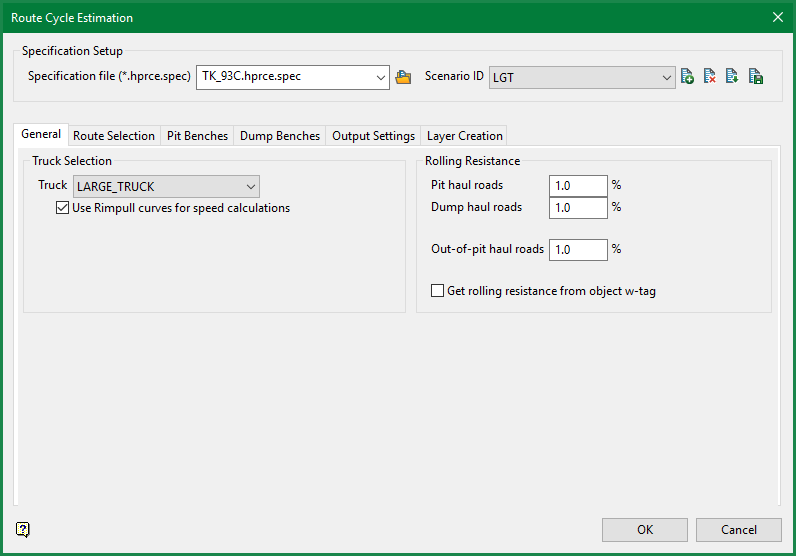
General
Truck
Select a truck from the drop-down list. The drop-down list displays all of the trucks that are contained in the
haulage_truck_library.spc
file. If the drop-down list does not contain any trucks, then you will need to define them using the
Truck Library
option.
Rolling Resistance
The resistance to truck motion due to road friction.
Pit haul roads
Enter the rolling resistance for roads to the pit.
Dump haul roads
Enter the rolling resistance to roads to the dump.
Out-of-pit roads
Enter the resistance for roads outside of the pit.
Get rolling resistance from object w-tag
The rolling resistance value will be based on the w-tag value contained by the block model.
- Route Selection
- Pit Benches
- Dump Benches
- Output Settings
- Layer Creation
Route Selection tab
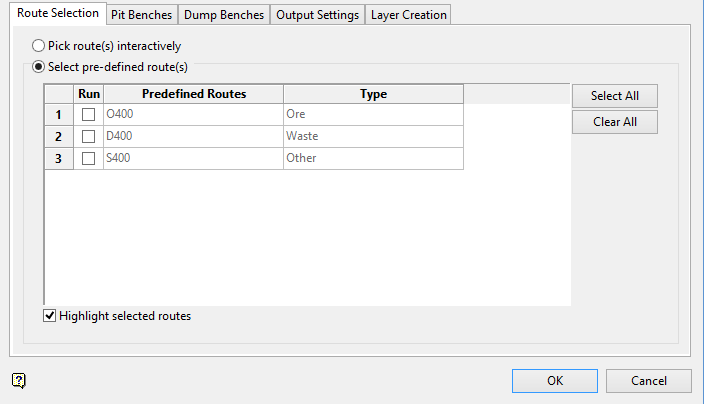
Pick route(s) interactively
If you select this option and click OK you will be prompted to pick polygons from the screen to use as routes.
Select pre-defined route(s)
Select this option to access a list of routes previously set up in Build Haulage Route Network > Create Haulage Route.
Run
Selecting one or more predefined routes and clicking OK executes a run.
Predefined Route
Lists routes predefined in Build Haulage Route Network > Create Haulage Route.
Type
Describes the type of material and its destination specified in Build Haulage Route Network > Create Haulage Route. Types are either Crusher (Ore), Dump (Waste) or Stockpile (Other).
Highlight selected routes
Selected routes are highlighted.
- General
- Pit Benches
- Dump Benches
- Output Settings
- Layer Creation
Pit Benches tab
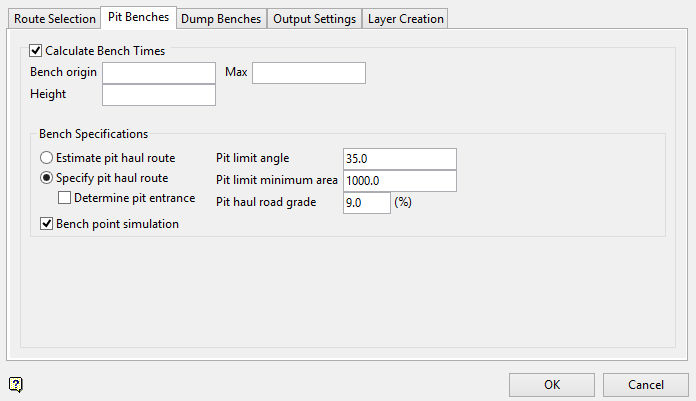
Calculate Bench Times
Select this check box to calculate the route cycle times (by bench) over a specified bench range.
The following options are available when calculating bench times:
Bench origin
Enter the bench origin. This value, which is usually the toe elevation of one of the pit benches, defines the minimum bench elevation for the calculation, that is, where the calculation will start. Bench elevations lower than the specified value will not be included in the calculation.
Max
Enter the maximum Z level. This value, which is usually the crest elevation of one of the pit benches, defines the maximum bench elevation for the calculation, that is, where the calculation will stop. Bench elevations greater than the specified value will not be included in the calculation.
Height
Enter the bench height. This value defines the height of the open pit bench.
Bench Specifications
Estimate pit haul route
Select this option to estimate the haul route rather than use an existing string.
Specify pit haul route
Select this option to use an existing string to define the pit haul route.
Determine pit entrance
We recommend that you check this check box if you have a pit where the exit is lower than the top benches and the pit string goes above the exit point. If this check box is not checked, then all trucks going downhill from the highest bench to the pit exit will be calculated using uphill loaded instead of downhill loaded.
Pit limit angle
Enter the pit limit angle. The specified value will be used to ensure that points are not created outside of the projected polygon when using the Bench point simulation option.
Pit limit minimum area
The specified value will be used to control the size of the projected polygon. The surface area of each polygon bench will not be smaller than the specified value.
Pit haul road grade
Enter the grade that will be used to estimate the haul from the entrance/exit of the pit. This value will need to be specified if a pit haul has not been defined.
Bench point simulation
Select this check box to take the average distance between the points in a polygon and average them out before adding it to the total route distance. If this check box is checked, then you will be required to digitise a polygon once the Route Cycle Estimation panel has been completed.
- General
- Route Selection
- Dump Benches
- Output Settings
- Layer Creation
Dump Benches tab
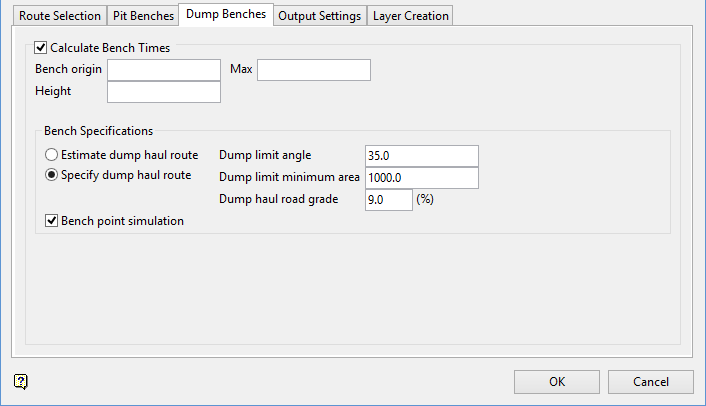
Note If you are running the Route Cycle Estimation for a route flagged as ‘Ore' the panel for Dump Benches will be disabled since these are no dump benches in an ore route.
Calculate Bench Times
Select this check box to calculate the route cycle times (by bench) over a specified bench range.
The following options are available when calculating bench times:
Bench origin
Enter the bench origin. This value, which is usually the toe elevation of one of the pit benches, defines the minimum bench elevation for the calculation, that is, where the calculation will start. Bench elevations lower than the specified value will not be included in the calculation.
Max
Enter the maximum Z level. This value, which is usually the crest elevation of one of the pit benches, defines the maximum bench elevation for the calculation, that is, where the calculation will stop. Bench elevations greater than the specified value will not be included in the calculation.
Height
Enter the bench height. This value defines the height of the open pit bench.
Bench Specifications
Estimate dump haul route
Select this option to estimate the dump haul route rather than use an existing string.
Specify dump haul route
Select this option to use an existing string to define the dump haul route.
Dump limit angle
Enter the dump limit angle. The specified value will be used to ensure that points are not created outside of the projected polygon when using the Bench point simulation option.
Dump limit minimum area
The specified value will be used to control the size of the projected polygon. The surface area of each polygon bench will not be smaller than the specified value.
Dump haul road grade
Enter the grade that will be used to estimate the haul from the entrance/exit of the pit. This value will need to be specified if a dump haul has not been defined.
Bench point simulation
Select this check box to take the average distance between the points in a polygon and average them out before adding it to the total route distance. If this check box is checked, then you will be required to digitise a polygon once the Route Cycle Estimation panel has been completed.
- General
- Route Selection
- Pit Benches
- Output Settings
- Layer Creation
Output Settings tab
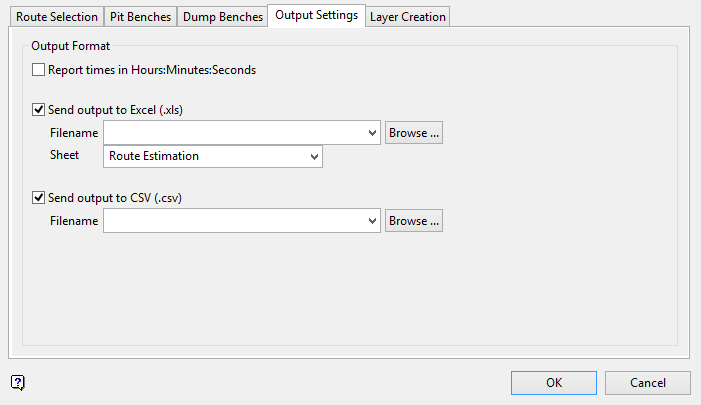
Output Format
Report times in Hours:Minutes:Seconds
Select this check box to report the times in hours, minutes and seconds (
HH:MM:SS
).
Send output to Excel(.xls)
Select this check box to send the report to an Excel spreadsheet.
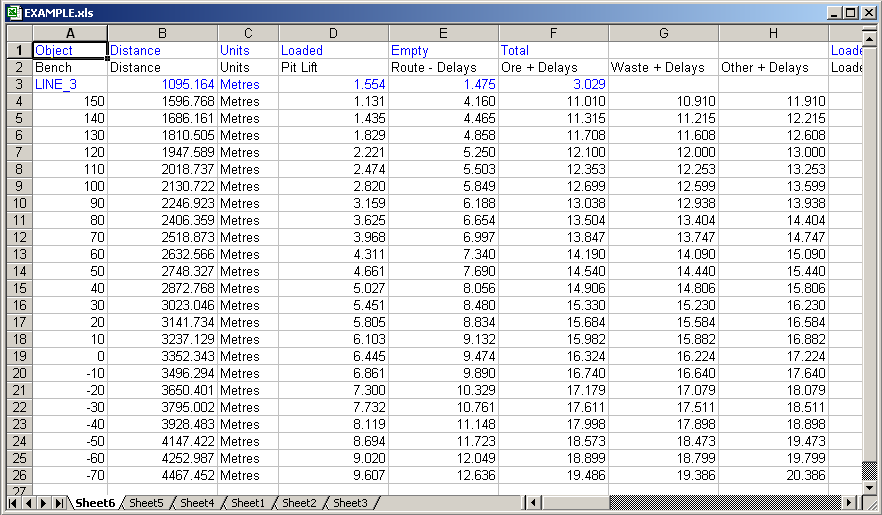
Diagram 1 - Route Estimation Report (as viewed through Microsoft Excel)
To create a new file, enter the file name and file extension.
To send the resulting report to a new worksheet in an existing spreadsheet, specify the name of the spreadsheet. The available drop-down list displays all of the Excel spreadsheets found in your current working directory. Click Browse to select a file from another location.
Note Ensure that the Microsoft Excel application is not running when sending the report to an existing spreadsheet.
Send output to CSV(.csv)
Select this check box to send the report to a CSV file.
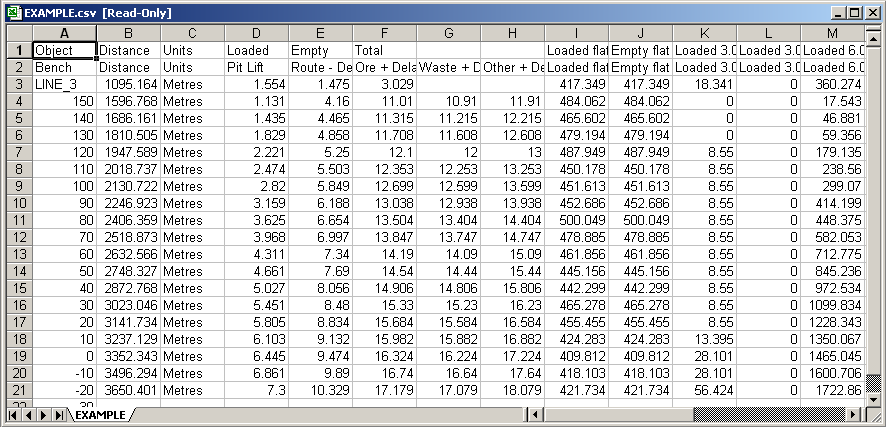
Diagram 2 - Route Estimation Report (as viewed through Microsoft Excel)
To create a new file, enter the file name and file extension.
To send the resulting report to an existing CSV file, specify the name of the file. The drop-down list displays all of the CSV files found in the current working directory. Click Browse to select a file from another location. Selecting an existing file will prompt you to confirm that you want to overwrite the file's original contents.
- General
- Route Selection
- Pit Benches
- Dump Benches
- Layer Creation
Layer Creation tab
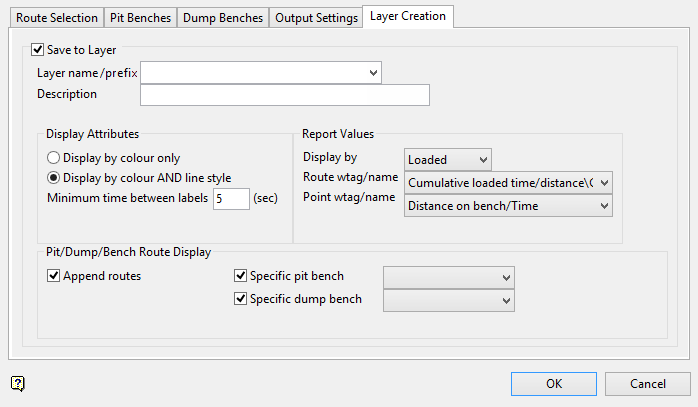
Save to Layer
Check this check box to activate the fields on this tab.
Layer
Enter, or select from the drop-down list, the name of the layer that will be used to store the outputs.
The drop-down list contains the names of all layers found within the currently open design database. If you select an existing layer, then the resulting data will be appended to the nominated layer. If you enter the name of an existing layer that is not currently loaded, then you will need to confirm whether you want to load the layer or replace it, i.e. overwrite its contents.
To create a new layer, enter the layer name. The layer name:
- may contain up to 40 characters.
- must begin with an alphanumeric character [0-9] or [a-z].
- cannot include spaces.
- can include hyphens [ - ], plus signs [ + ], underscores [ _ ], periods/dots [. ].
- can include the special characters of ÁÂÃÀÇÉÊÍÓÔÕÚÜÑ that are used in the Spanish and Portuguese languages.
Description
Enter a description to further describe the contents of this layer. The description can be up to 80 alphanumeric characters and may include spaces. If a description is not entered, then a default description will be used instead. If the chosen layer already has an assigned description, the description displays when the layer is selected. Existing layer descriptions can be overwritten.
Display Attributes
Display by colour only
Select this option if you only want to use the colours that were defined through the Truck Library option when displaying the pit, dump and haul routes.
Display by colour AND line style
Select this option to use both the colours and line styles that were defined through the Truck Library option when displaying the pit, dump and haul routes.
Minimum time between labels
Enter the minimum amount of time (in seconds) to wait when displaying labels. If you have a large collection of points, then we recommend that you specify a value of 10 seconds or greater. This will ensure that the labels do not overlap.
Report Values
Display by
Select whether to use loaded or empty times when storing the haul cycle times in the W tags and point names.
Route wtag/name
Specify what values are to be stored in the W tag and point name values of the points that are contained in the pit, dump and route strings.
The following values are contained in the drop-down list:
- Grade
- Cumulative loaded/time distance
- Cumulative empty time/distance
- Line segment loaded time
- Line segment empty time
Point wtag/name
Specify what values are to be stored in the W tag and point name values of the points.
The following values are contained in the drop-down list:
- Time/Distance on bench
- Time/Distance to dump/pit
Pit/Dump/Bench Route Display
Append routes
Select this check box to combine the pit, dump and haul routes.
Specific pit bench
Select this check box to the route to be calculated using a specific pit bench. Using this option will allow you to find out the haul cycle times and distances from the bottom of the pit to the dump. The results will be broken down by benches, as a result you won't be required to digitise a line from each bench to the dump. You do not need to check this check box if you only want to find out the distance from a digitised line.
Specific dump bench
Select this check box to calculate the distances and haul cycle times from a specific bench to multiple benches in the dump.
Click OK.
You are then prompted to select the pit haul road (route).
Vulcan will check the truck library for a version number. If this number does not match the latest version, you will be prompted to run validation.
If you chose to calculate bench times, then you will be required to nominate a pit limit polygon, the haul road (when using the Specify haul route option) and the pit haul road.
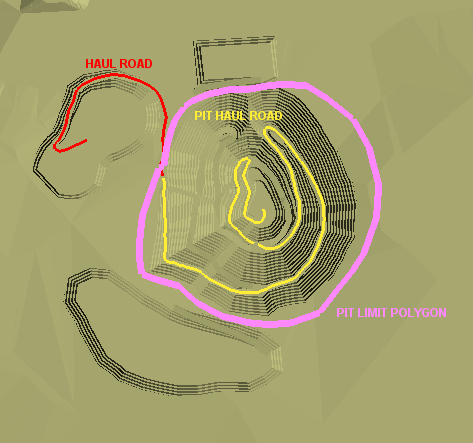
Diagram 3 - Pit Limit Polygon, Haul Road and Pit Haul Road
Once selected, the estimation results are displayed through the Vulcan Console of the Report Window. Cancel when you have finished calculating cycle times.
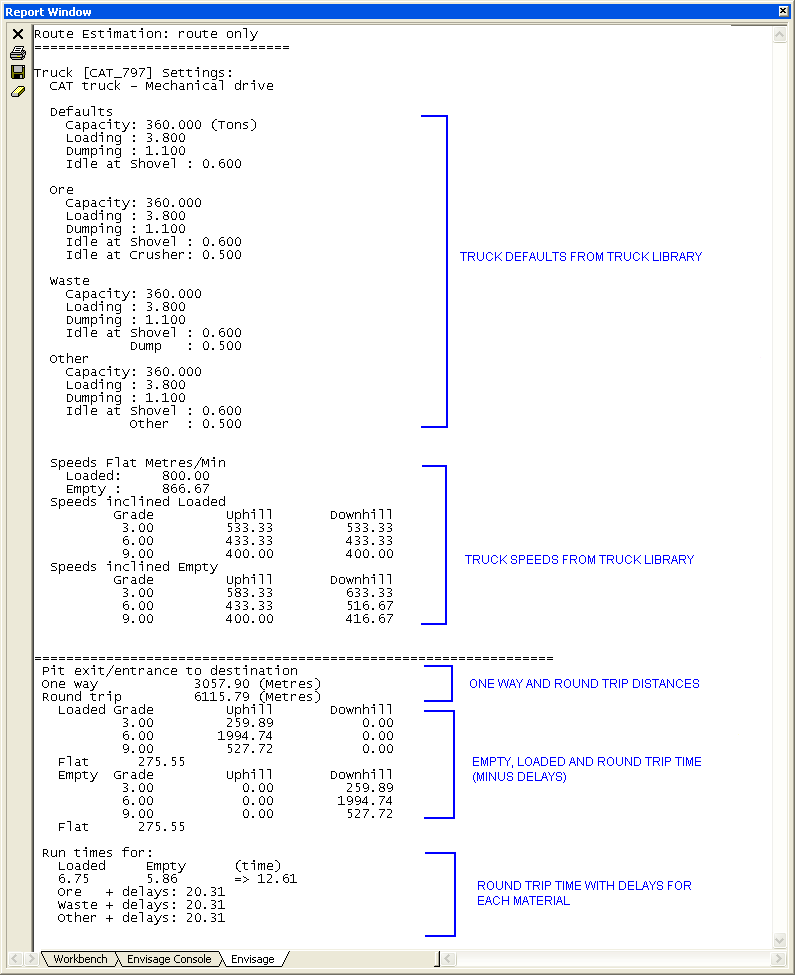
Diagram 4 - Route Estimation Report
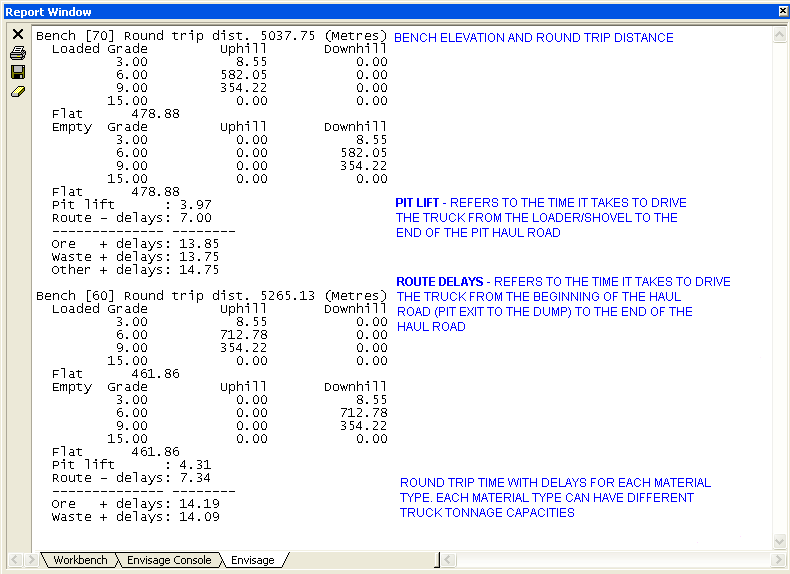
Diagram 5 - Route Estimation Report (Multiple Bench Calculations)
- General
- Route Selection
- Pit Benches
- Dump Benches
- Output Settings

