

Blastlogic Extend
BlastLogic Extend is an integration platform that enables external applications, systems, scripts, and tools to securely access data stored in BlastLogic Server.
BlastLogic Extend comprises two parts:
-
BlastLogic Extend API: A server-side integration interface that enables external systems to read and write data to and from BlastLogic Server. Extend API is the core component of BlastLogic Extend.
-
BlastLogic Python SDK: A Python client library that wraps the BlastLogic Extend API, enabling Python scripts to interact with BlastLogic Server.
Using BlastLogic Extend requires the following:
-
BlastLogic Server 2024 or later.
-
License for BlastLogic Extend.
Note: For licensing enquiries, please contact Maptek.
-
An API key.
API key generation
To use the BlastLogic Extend API, you must generate an API key for the BlastLogic Server that you want the script to connect to. The API key acts as a credential that authenticates your requests with the BlastLogic Server.
To generate an API key, proceed as follows:
-
Enter the BlastLogic Server Configuration website.
Note
The server URL is unique to each user and has the following form:<serverURI>/web/, where<serverURI>corresponds to the URI of the server that you connect to while using the BlastLogic Desktop application.
For more information, see the following separate documents:BlastLogic Server Installation Procedure
BlastLogic Server and BlastLogic Tablet Licensing Procedure
-
Enter the My API Keys page.
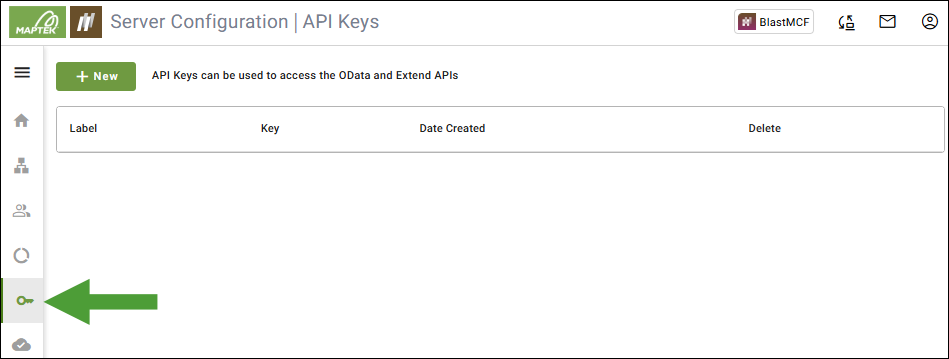
-
Click the
 button.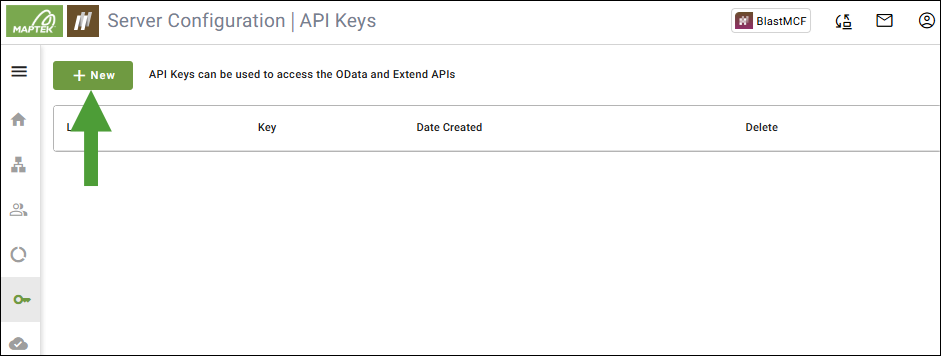
-
Enter the name for your API key to help you identify the key in future and click Add.

A secure, randomly generated password will be created and displayed.
Important: We recommend that you make a record of the generated key. The key will only be visible on the screen immediately after it is generated. When you click Done or leave the API Keys page and enter it again, only the last three characters will be shown as a hint. The key cannot be recovered; if you lose it, you will have to generate another.
Tip: When creating the key, provide a useful description so you know what the key is for, for example Blast Truck Integration. If you are not sure, consider using a generic description such as Experiment.
See also: BlastLogic Server Configuration Help Documentation.
BlastLogic Extend API
The BlastLogic Extend API is a server-side HTTP API based on the OpenAPI specification. It forms the core of BlastLogic Extend and provides a secure integration interface for reading and editing data stored in BlastLogic Server.
The API is documented using OpenAPI and can be explored through the Swagger interface available on BlastLogic Server.
You can access the Swagger page at the following address:
<address of your BlastLogic Server>/api/swagger
The page should look similar to the screenshot below.
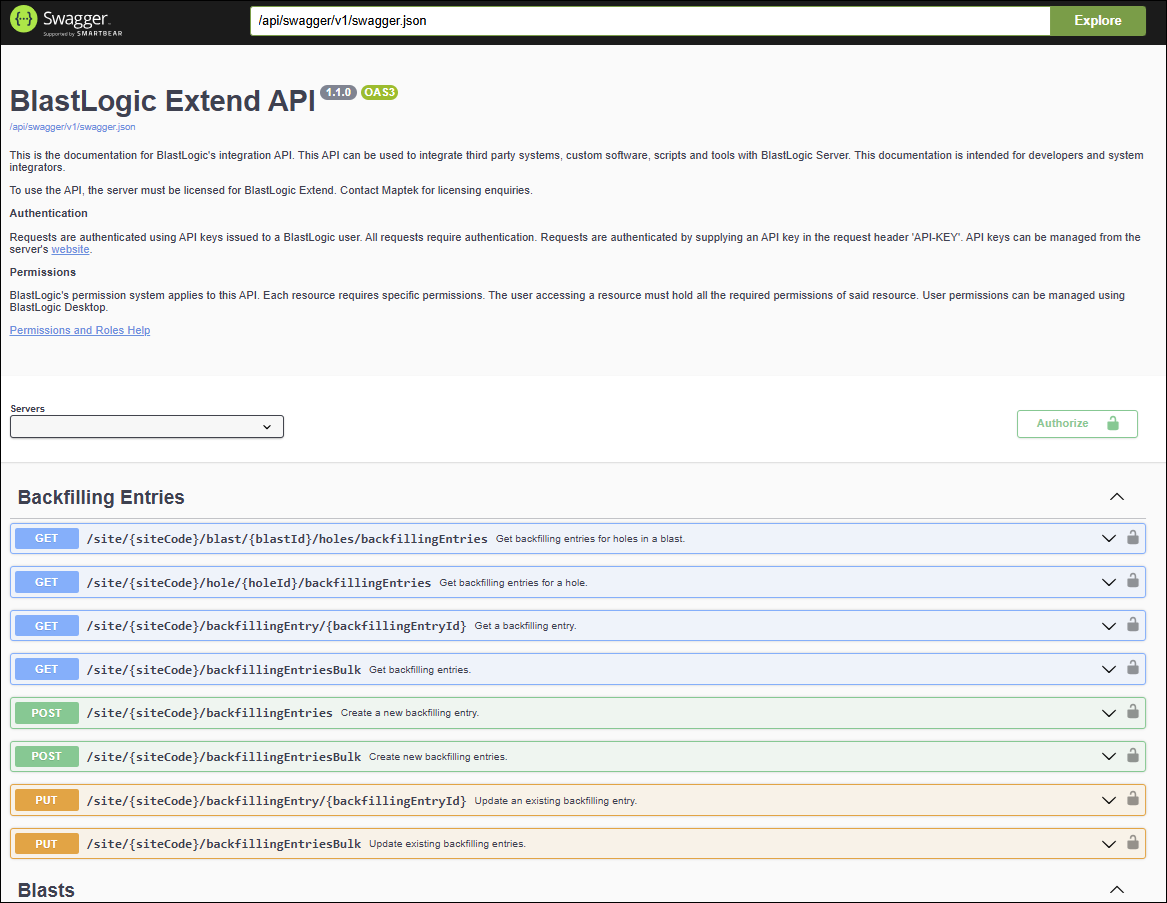
The Swagger page lists the different resources (backfilling and dipping entries) and the operations that can be performed on them (get, update, create). These resources map to packages in the Python SDK as sub‑packages.
BlastLogic Python SDK
The BlastLogic Python SDK is a Python client library that wraps the BlastLogic Extend API. It provides a Python interface for interacting with BlastLogic Server, allowing developers to integrate custom scripts, applications, and automation workflows without needing to work directly with HTTP requests or the OpenAPI specification.
Requirements
Using the Python SDK requires the following:
-
A Python interpreter.
-
The Wheel (package) for BlastLogic Extend.
Note: The package is available on the Python Package Index (PyPI) at
https://pypi.org/project/maptekblastlogic/. PyPI provides an online repository where users can search for and install Python packages. -
A code editor to edit Python scripts.
-
A basic understanding of Python functions, classes, and imports.
Important: Do not store the API key directly in your Python script. Doing so would allow anyone you share the script with to interact with the BlastLogic Server as you. Instead, read the API key from a separate file or a secure password‑storage service.
Virtual environment installation
We recommend creating a virtual environment for your BlastLogic Python project. A virtual environment provides complete dependency isolation, preventing this project from interfering with others or being affected by them. This is especially important on Linux systems, where distributions often manage their own Python packages, and a virtual environment helps avoid conflicts between system‑managed and project‑specific packages. For details, see Create and Use Virtual Environments in the Python Packaging User Guide.
When working inside a virtual environment, install the package by running the following command:
python -m pip install maptekblastlogic
maptekblastlogic API reference
For detailed documentation for the BlastLogic Python SDK, see the API reference. The main packages are as follows:
| maptekblastlogic | View the library for accessing BlastLogic Extend API. |
| maptekblastlogic.api.backfilling_entries | Create, retrieve, and update information for backfilling entries. |
| maptekblastlogic.api.blasts | Search and retrieve information about blasts. |
| maptekblastlogic.api.charge_plans | Retrieve information about charge plans. |
| maptekblastlogic.api.dipping_entries | Create, retrieve, and update information for dipping entries. |
| maptekblastlogic.api.holes | Retrieve hole information. |
| maptekblastlogic.api.loaded_decks | Create, retrieve, and update information for loaded decks. |
| maptekblastlogic.api.site_setup | Retrieve site setup information. |
| maptekblastlogic.api.sites | Retrieve information about all sites. |
| maptekblastlogic.models | View all the data models used in inputs and outputs. |
Navigating between OpenAPI and Python
The resources listed on the OpenAPI Swagger page each map to a sub-package of the maptekblastlogic.api package. Each operation maps to a module in the sub-package.
Resource examples
The table below shows examples of the available resources.
| Resource | Package |
|---|---|
| Backfilling Entries | maptekblastlogic.api.backfilling_entries |
| Blasts | maptekblastlogic.api.blasts |
| Dipping Entries | maptekblastlogic.api.dipping_entries |
| Charge Plans | maptekblastlogic.api.charge_plans |
| Loaded Decks | maptekblastlogic.api.loaded_decks |
Note: This is not a full list of all resources available.
Operation examples
The table below lists the examples of the operations for backfilling entries.
| Operation | Module |
|---|---|
| Get backfilling entries for a blast | maptekblastlogic.api.get_backfilling_entries_by_blast_id |
| Get backfilling entries for a hole | maptekblastlogic.api.get_backfilling_entries_by_hole_id |
| Get backfilling entry | maptekblastlogic.api.get_backfilling_entry_by_id |
| Update an existing backfilling entry | maptekblastlogic.api.update_backfilling_entry |
| Create backfilling entry | maptekblastlogic.api.backfilling_entries.create_backfilling_entry |
Performing operations
Within each module there are four following functions for performing the operation:
-
sync()
-
sync_detailed()
-
asyncio_detailed()
-
asyncio()
When getting started, we recommend using the sync() function.
sync()
Most simple scripts that use BlastLogic Extend will typically use the sync() function. This sends the request to the server, and the script then waits for the response to return.
The call will either return the API’s response type or an error model describing the issue reported by the server. It is up to the caller to handle the possibility of an error response. The most common approach is to convert the error model into an exception.
The example script below demonstrates how to use Python's SDK to retrieve a list of sites and handle any API errors returned by the service.
sites = get_sites.sync(client=client)
if isinstance(sites, ErrorModel):
	raise RuntimeError(
		"Error when reading sites:",
		sites.title,
		"\n",
		sites.details,
	)
sync_detailed()
The sync_detailed() function behaves almost identically to sync(), but it returns additional metadata about the HTTP request. This metadata includes:
-
The HTTP status code of the response
-
The raw response content in bytes
-
The response headers
-
The parsed response, if the request was successful
Note: For most scripts, this additional metadata is not required, so using the sync() function is generally preferred.
asyncio()
The asyncio() function behaves similarly to sync(), except the HTTP request is performed asynchronously. It sends the request to the BlastLogic Server, but the script does not wait for the response.
Because asyncio() does not block while waiting, the script can perform other work in the meantime. If a script makes multiple independent requests, sending them asynchronously can significantly improve overall performance.
Note: This functionality is built on Python’s built‑in asyncio library. We recommend avoiding this function unless you are familiar with that library and its programming model.
The example script below demonstrates how to use Python's asyncio framework to perform a non-blocking API request with get_sites.asyncio().
import asyncio
import getpass

from maptekblastlogic import AuthenticatedClient
from maptekblastlogic.api.sites import get_sites
from maptekblastlogic.models import ErrorModel

async def main():
	site_url = input("Enter server URL: ")
	site_pass_key = getpass.getpass("Enter Access Token: ")
	await async_get_sites(site_url, site_pass_key)

async def async_get_sites(url: str, pass_key: str):
	with AuthenticatedClient(
		base_url=url,
		raise_on_unexpected_status=True,
		token=pass_key,
	) as client:
		sites_coroutine = get_sites.asyncio(client=client)

		print("Do something else while waiting to query sites...")

		sites = await sites_coroutine
		if isinstance(sites, ErrorModel):
			raise RuntimeError(
				"Error when reading sites:",
				sites.title,
				"\n",
				sites.details,
			)
		if not sites:
			raise RuntimeError("No sites found on server.")

		for site in sites:
			print(site.name)
			print("Site Code:", site.site_code)
			print("Is active", site.is_active)
			print("=~" * 10)

if __name__ == "__main__":
	asyncio.run(main())
If multiple requests are sent at the same time, the following may occur:
The requests may reach the BlastLogic Server in a different order than they were sent.
The responses may reach the client (your script) in a different order than they were processed by the BlastLogic Server.
It is only safe to send multiple requests simultaneously if the script’s result will be correct regardless of the order in which the requests arrive at the server.
asyncio_detailed()
The asyncio_detailed() function returns additional metadata about the response, similar to sync_detailed(), but executes asynchronously like asyncio().
Note: For most scripts, this extra metadata is unnecessary, so using asyncio() is generally preferred.
Example script
The example below allows you to confirm that the package is installed and that your API key is configured. After generating the key, create an AuthenticatedClient object to connect your Python script to the BlastLogic Server. You can also use this example as a starting point for your own script.
The script uses Python’s built‑in getpass module to prompt for the token at runtime. For improved security, you may prefer the third‑party keyring package that stores credentials securely.
See also: getpass module, keyring library
"""Prints sites on a BlastLogic server."""
import getpass
from maptekblastlogic import AuthenticatedClient
from maptekblastlogic.models import ErrorModel

token = getpass.getpass("Token for BlastLogic server:")
with AuthenticatedClient(
	base_url="http://blastlogic/50/api",
	raise_on_unexpected_status=True,
	token=token,
) as client:
	sites = get_sites.sync(client=client)
	if isinstance(sites, ErrorModel):
		raise RuntimeError(
			"Error when reading sites:",
			sites.title,
			"\n",
			sites.details,
		)
	if not sites:
		raise RuntimeError("No sites found on server.")

	for site in sites or []:
		if not site.is_active:
			print(f"Skipping. Site '{site.name}' is not active.")
			continue
		print(site.name, site.site_code)
The script performs the following operations:
-
Imports packages (libraries) to be used in the script.
Note: This step is common for Python scripts.
-
Asks for an API token by using the getpass.getpass() function.
-
Sets up the client with the token and the URL to the BlastLogic Server to connect to.
Note: You must update the value of base_url= to match the URL of the BlastLogic Server you wish to connect to.
-
Requests the lists of sites.
Note: Any errors will be raised as a RuntimeError exception.
-
Prints out the name and site code for each active site.
Note: If there are no sites, the script will raise an error.
