Blasts
The Blasts group of the Create ribbon contains a tool that allows you to create and manage snapshots.
Snapshot
A snapshot contains information about the state of a blast at a specific point in time. You can create a snapshot of a blast to aid in future comparison and analysis between the current and design blast data. BlastLogic saves these snapshots to the server.
On this page:
Understanding snapshots
There are two types of snapshots in BlastLogic:
-
Reference design snapshot
You can set one snapshot of a blast as the reference design snapshot. This allows you to specify which snapshot you would like the OData service to use. You can use the reference design snapshot in the following areas:- When generating a blast summary report, you can view the reference design snapshot blast information in the report. To generate a blast summary report, see Blast summary report.
- When creating a surface, you can use the reference design snapshot data to specify the surface location. For more information on using reference design snapshot data when generating a surface, see Surfaces from holes.
BlastLogic automatically creates a snapshot named Initial Design snapshot when you publish a blast. This snapshot contains the data at the time of publishing and is automatically set as the reference design snapshot. This allows you to distinguish between the original design data and any other snapshots you create. Optionally, you can set another snapshot as the reference design snapshot.
Note:This initial design snapshot will not contain charging data, unless you applied a charge rule before you published the blast.
-
Other snapshots
You can create any other snapshots you wish to have of a blast. You can use any snapshot, including the reference design snapshot, in the following areas:- When using the tie-up editor or creating a tie-up, you can set a snapshot as the data source. For steps on this, see Selecting a blast data source.
- When using the hole tabular view, you can view snapshot data. For steps on viewing snapshot data in the hole tabular view, see Hole tabular view.
- You can export snapshot data using the export tool. For more information on this, see Exporting snapshots.
- You can create models with snapshot data using BlastLogic‘s modelling tools. For more information on modelling with snapshots, see Modelling.
By creating snapshots, you can understand and analyse the differences between the initial design state and any other snapshot state. In particular, you can use snapshots during tie-up and modelling as BlastLogic treats the snapshot as if it is the latest data.
Viewing snapshots
To view the snapshots of a blast, follow these steps:
-
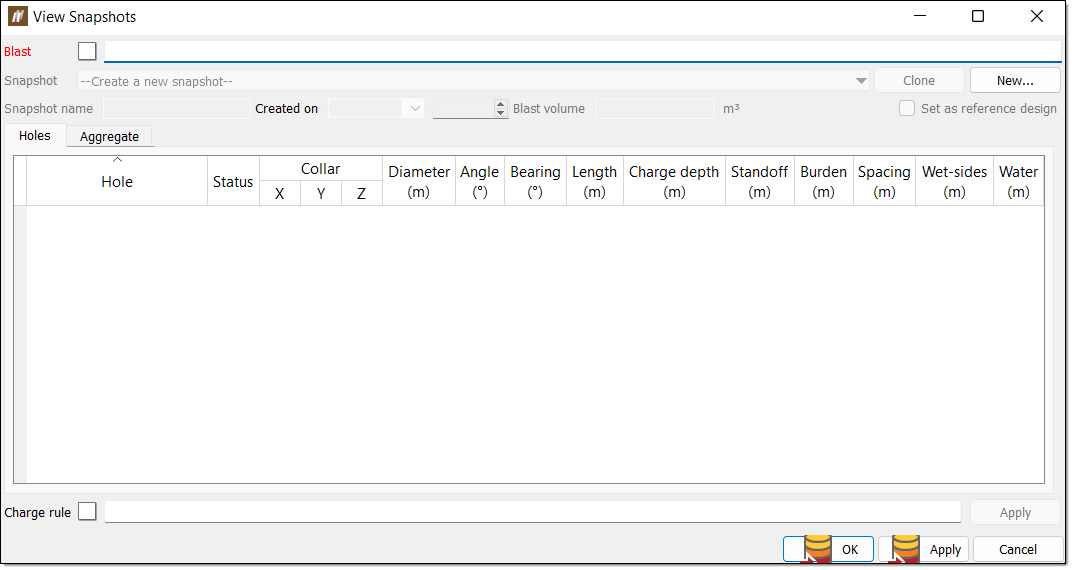
On the Create ribbon, in the Blasts group, select Snapshots. Alternatively, right-click on the desired blast in the blasts container in the data explorer and select Snapshot... from the context menu.
The View Snapshots panel will appear.
-
Specify a blast by dragging the desired blast from the blasts container in the data explorer into the Blasts field using the middle mouse button or by entering the location of the blast into the Blasts field, using the format /blasts/<blast name>.
-
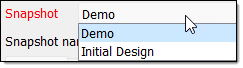
Click the Snapshot drop-down and select the snapshot you wish to view.
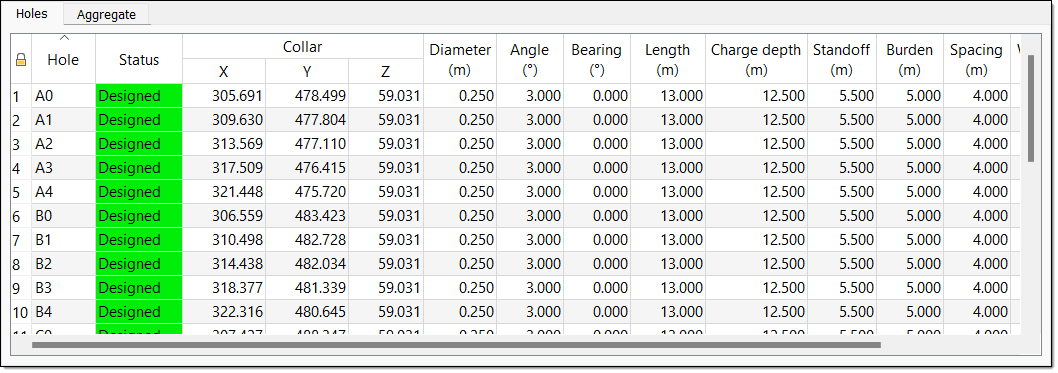
BlastLogic will display the data of the snapshot in the Holes tab table.
-
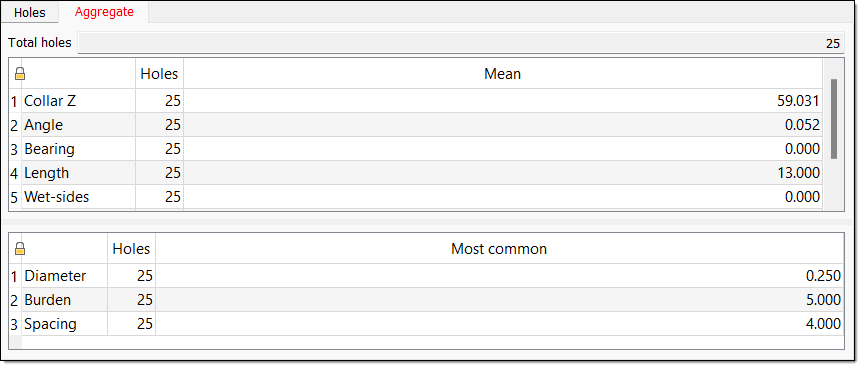
Optionally, select the Aggregate tab to view the aggregate values of the snapshot.
-
Optionally, click a row cell to view the 2D hole preview in the right side bar.
-
Click OK.
Creating a snapshot
To create a snapshot of a blast, follow these steps:
-
On the Create ribbon, in the Blasts group, select Snapshots. Alternatively, right-click on the desired blast in the blasts container in the data explorer and select Snapshot... from the context menu.
The View Snapshots panel will appear.
-
Specify a blast by dragging the desired blast from the blasts container in the data explorer into the Blasts field using the middle mouse button or by entering the location of the blast into the Blasts field using the format /blasts/<blast name>.
-
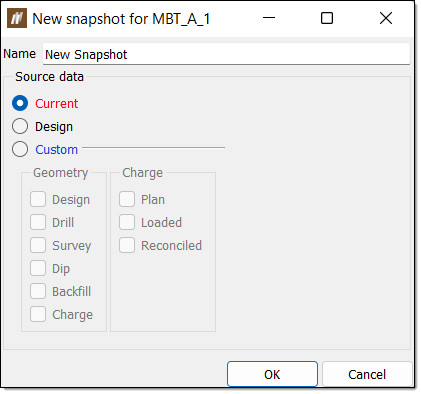
Select New.... The New snapshot for <blast name> panel will appear.
-
Enter a snapshot name in the Name field.
-
Define the source data for the snapshot by selecting the radio button of one of the following options in the Source data section:
-
Current
The current option uses only the blast’s last known data. -
Design
The design option uses only the blast’s design data. -
Custom
The custom option allows you to select the data sources in terms of geometry and charge. Expand for more information on using the Custom radio button.
This radio button area contains the following two columns:
-
The Geometry column allows you to select the checkboxes of the following data sources:
- Design
- Drill
- Survey
- Dip
- Backfill
- Charge
-
The Charge column allows you to select the checkboxes of the following data sources:
- Plan
- Loaded
- Reconciled
Each list has a general order from least to most recent data. If you select multiple sources, BlastLogic will use the latest data source first and fill in any data gaps using the other, older sources. If you select only one source and this source is missing certain data points then the snapshot may be lacking information.
-
-
-
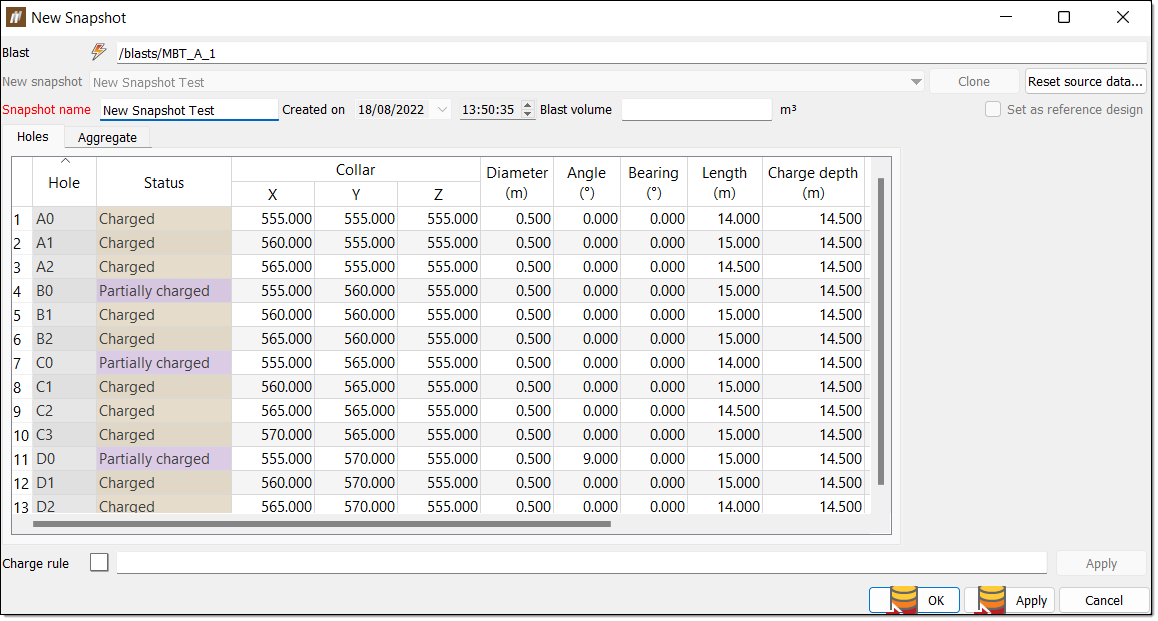
Click OK. BlastLogic will add the snapshot to the New Snapshot panel table.
-
Enter the blast volume into the Blast volume field.
-
Apply a charge rule to the snapshot by dragging the desired charge rule from the charge rules container in the data explorer to the Charge rule field using the middle mouse button or enter the charge rule location using the format /charge rules/<charge rule name>.
-
Optionally, select the Set as reference design checkbox.
Note:You cannot select this checkbox if another snapshot is set as the reference design.
-
Optionally, you can paste data into the table by right-clicking on the table and selecting Paste from the context menu.
-
Optionally, select the Aggregate tab to view the aggregate values of the snapshot.
-
Click OK or Apply.
Cloning a snapshot
To create a clone of a snapshot, follow these steps:
-
On the Create ribbon, in the Blasts group, select Snapshots. Alternatively, right-click on the desired blast in the blasts container in the data explorer and select Snapshot... from the context menu.
The View Snapshots panel will appear.
-
Specify a blast by dragging the desired blast from the blasts container in the data explorer into the Blasts field using the middle mouse button or by entering the location of the blast into the Blasts field using the format /blasts/<blast name>.
-
Select the Snapshot drop-down.
-
Select the snapshot you wish to clone from the drop-down menu.
-
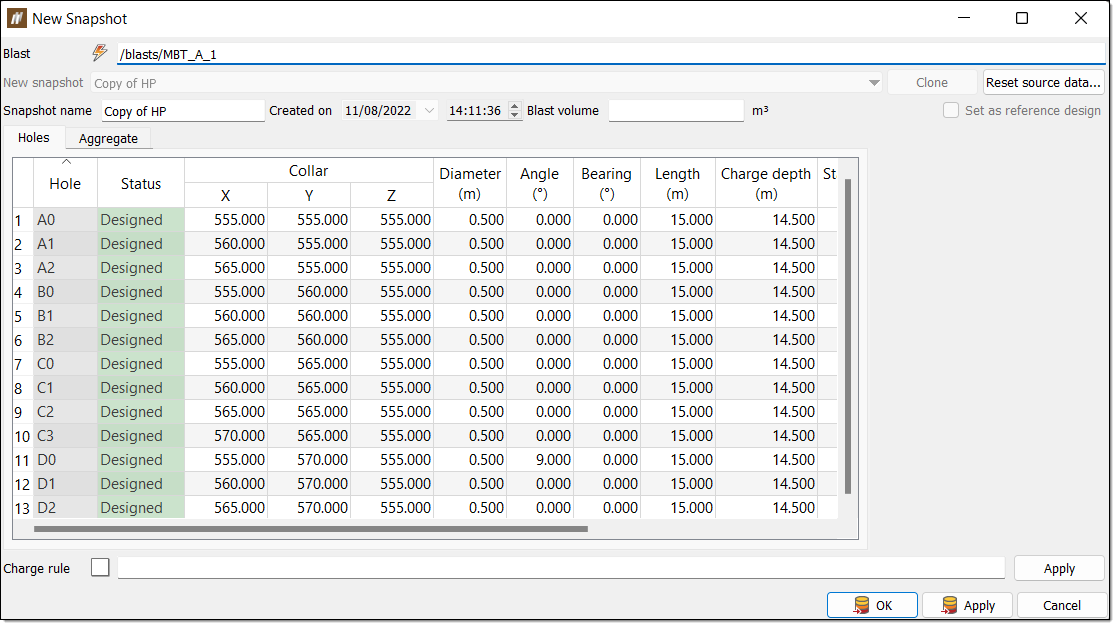
Click Clone. BlastLogic will open a new panel, New Snapshot, containing the cloned rule.
-
Optionally, edit the cloned rule using the following options:
-
Rename the cloned rule by entering a new name in the Snapshot name field.
-
Change the source data of the cloned rule by clicking Reset source data.... The Reset Source Data for <blast name> panel will appear, allowing you to reselect the source data of the snapshot. Click OK to save the selection.
-
Enter a blast volume into the Blast volume field.
-
Edit the data in the table by clicking in a cell and entering the desired values.
-
Apply a charge rule to the snapshot by dragging the desired charge rule from the charge rules container in the data explorer to the Charge rule field using the middle mouse button or enter the charge rule location using the format /charge rules/<charge rule name>.
-
-
Click OK or Apply.
Setting a snapshot as the reference design
To set a snapshot as the reference design, follow these steps:
-
On the Create ribbon, in the Blasts group, select Snapshots. Alternatively, right-click on the desired blast in the blasts container in the data explorer and select Snapshot... from the context menu.
The View Snapshots panel will appear.
-
Specify a blast by dragging the desired blast from the blasts container in the data explorer into the Blasts field using the middle mouse button or by entering the location of the blast into the Blasts field using the format /blasts/<blast name>.
-
Select the Snapshot drop-down to view the blast’s snapshots.
-
Assign the reference design snapshot by using one of the following options:
-
If no snapshots are set as the reference design then select the desired snapshot from the drop-down menu and select the Set as reference design checkbox in the panel.
-
If another snapshot is currently set as the reference design, follow these steps:
-
Select the reference design snapshot from the drop-down menu. BlastLogic will fill the panel with the details of the snapshot.
Note:The reference design snapshot name will be emboldened in this drop-down menu.
-
Clear the Set as reference design checkbox.
-
Select the Snapshot drop-down and select the snapshot you wish to set as the reference design.
-
Select the Set as reference design checkbox. BlastLogic will now recognise this snapshot as the reference design.
-
-
-
Click OK or Apply.
