

 Trip Editor
Source file: trip-editor.htm
The Trip Editor is a tool for managing, validating and correcting data on material moved from a specific source to its destination. It includes search and filtering options, as well as tools for modifying payloads and their properties before publishing In MaterialMRT, publishing refers to formally committing specific types of operational and tracking data into the system’s authoritative records so that all subsequent calculations, reports, and audit trails reflect the newly validated information. them to the system. The trip editor tracks all changes, which can be reverted if necessary—both before and after publishing.
To summarise, the Trip Editor is essential for audit, reconciliation, and assurance of material movement data in Maptek Material MRT, supporting both automation and manual interventions as part of operational reporting and compliance.
Filtering and searching for trips
You may need to sort or filter trips into manageable sets for review and processing, or to extract and exporting for reports. To start a query, first set a time period, with the Date Time Picker, then apply any of the following options:
-
Click
 combo button to filter the table to only show trips tagged with errors. The number inside the button indicates how many occurrences were found
 -
Click
 combo button to filter the table to show only trips tagged with warnings. The number inside the button indicates how many occurrences were found.
When either button is enabled, they appear as shown below.


-
Use the Displaying x/y Columns drop-down to choose which properties to include. Each appears in its own column.
Tip: Hover the mouse pointer over a property to open a tooltip displaying its details.
-
Enter keywords to filter trips by various criteria.
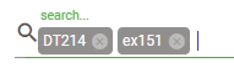
-
Select and sort rows in the table before exporting a report.
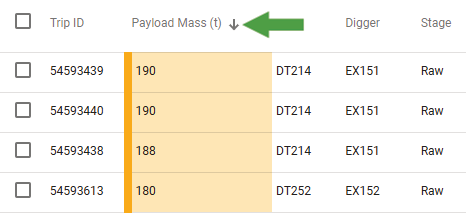
-
Use the checkboxes in the trips list to select specific trips.
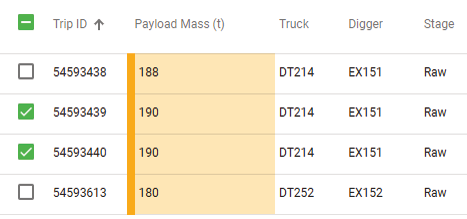
-
Enter a trip ID in the Load Trip field to only show that trip.

Reviewing, changing, and verifying trips
Once a single item or a selection is made, users can do the following within these tabs:
| Editor | Add numeric and text properties, apply corrections to trip data, and verify or approve changes as required for publishing. See Using the Editor tab. |
| Changes |
Review or undo unpublished changes, and revert published changes. See Using the Changes tab. |
| Import | Import the appropriate schema, truck loads, and truck dump files to add to the trip editor from another source or instance. See Using the Import tab. |
Using the Editor tab
The Editor tab is where trips are processed, corrected, verified, and approved. It is organised into the following sections:
- Workflow Stage: This is the highest stage in the processing workflow. Here, you can see the stage at which trips are flagged and, following review, modify, verify, or approve trips before they are published.
-
Select one or more validated trips, then click either
 or
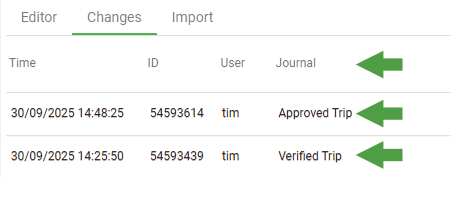
or  . Both actions add trips to the publishing queue in the Changes tab and and record the action in the trip’s journal.
 Click to view definitions of each workflow stage
|
Raw |
Trips received in their original state. |
|
Adjusted |
Trips that have been altered by the user running a system automation rule such as Auto Correct. |
|
Corrected |
Trips that have been manually altered by a user. |
| Verified |
Trips have been initially validated by a designated user, and can be approved by a second checker. |
| Approved |
Trips have passed secondary checks and may be published. |
-
Payload: This stage handles the trip’s payload values. Run the Auto Correct Payload automation to automatically assign scripted default payload mass, based on the prefix of the truck name. Alternatively, manually enter a value in the New Payload text field. Both methods can be applied singularly, or in batches.
Click to see instructions for processing an auto-correction script
To process a correction using the Payload Auto Correction rule, follow these steps:
-
Select your trips to process.
-
Click
 to open the Changes panel.
 -
In the Journal field, enter a brief description.
-
In the Stage drop-down select Corrected to indicate auto-correct rule was applied.
-
Click
 to complete the task and close the panel.
Click to see instructions for adjusting a payload manually
To adjust the payload, follow these steps:
-
Ensure the trips you want to apply for manual adjustment are selected in the list.
-
Enter the updated value into the New Payload field and click
 .
. -
When the Changes panel opens, enter the description of the task in the Journal field.
-
In the Stage drop-down, select Adjusted to indicate that a manual change was made.
-
Click
to complete the task and close the panel.
-
-
Numeric/Text Property: Modify the content of material one or more trips by adding numeric and text properties.
Click to see instructions for adding properties to trips
To add properties to selected trips, follow these steps:
-
Select one or more trips from the table.
-
Click
 or
or  as the property type. Add both types as needed.
 -
Click
 to create a new property, then select an available property and apply a value that is within the stated range shown under its field.
 -
Repeat step 3 to add additional properties, or step 2 to change the property type.
Tip: To remove a property, simply change its value field so that it is blank.
-
Click
to open the Change or Bulk Changes panel. -
In the Journal field, enter a reason for the changes.
-
In the Stage drop-down, select the appropriate action. Normally, this is Corrected.
-
Click
to save and close the panel.
-
When any change is made, the following occurs:
-
The changes are added to the list in the Changes tab.
-
The
 combo button becomes active or x increase by the number of changes added. Click the button to publish the updated data to the system
 -
The
 button turns red when unpublished trips are listed. Click
  to discard all changes currently in the changes list that have not been published.
Using the Changes tab
The Changes tab is a staging point where you review modified trips before they are published. Here, you can compare the current and previous values, undo unpublished changes, and revert published ones.
-
To see all of the modified trips you have made in the Changes tab, ensure that they have been selected in the Editor tab.
-
A trip ID may contain modified and unmodified trips. When selected, all trips are listed in the Changes tab.
-
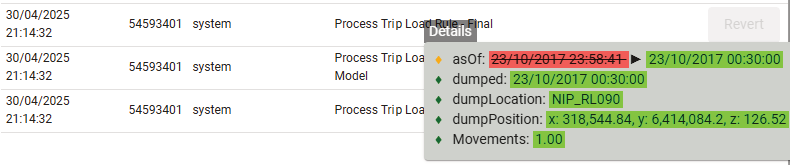
To see which trips are modified, hover over a row to view a Details tooltip.
-
To remove an unpublished changed trip, select it, then click
 .
. -
If a changed trip has been published and needs restoring to its previous state, select those trips then click
 . Performing this operations triggers a system replay that accounts for downstream effects from that point in time. Any replays will appear under Replay Management in the Notifications panel.
Note: Before you can revert any trips in Changes tab, resolve any unpublished changes first by either publishing or undoing them.
Using the Import tab
The Import tab allows you to add trips from external sources. It accepts SCHEMA (.json and .xlsx) files such as Trips.schema(.json), Truck_Loads(.xlsx), and Truck_Dumps(.xlsx) files. To import the files, use the drop zone to open a file explorer instance, or by simply drag the files in. The files appear as tiles in the drop zone.
-
Click
 to clear all files in the drop zone.
 -
Click
 to individually remove files in the drop zone.
 -
Click
 to upload and list the trips in the Editor tab
 -
Enable Auto-sync to allow changes published by other users to be dynamically applied to your instance of the Trip Editor page.
Exporting trip data
You can export trip data any time after arranging and filtering the trip data to suit your criteria in the Editor tab.
To export your data, click  to immediately create the file, structured as follows:
Trip_Editor_<start date>T<start time>-<end date>T<end time>.xlxs
where:
-
Trip_Editor_is the prefix for the output of the trip editor. -
<start date>and<end date>are the start and end dates respectively, and are expressed as the year, month, and day, separated by dashes (<YYYY>-<MM>-<DD>). -
T<start time>andT<end time>are the start and end times respectively, and are expressed as the hour and minutes, separated by a space (<HH> <mm>).T(time) prefixes the start and end times.ExampleTrip_Editor_2017-09-25T00 00-2017-09-26T00 00.xlsxThe data extends over the period of the 25th of September 2017 from 12 am; concluding at the same time of the following day.
Edit Rules
The  button opens the rules editor in a new browser tab. This function is intended for users with permission to edit the Trip Validation or Payload Auto Correction scripts.
See also: Site Configuration > Rules Editor.
Auto-sync
Auto-sync enables trips published by other users to be synchronised with your working instance. To enable Auto-sync click  , while enabled, the toggle appears as
  .
.
Publishing trips
Publishing commits any verified or approved changes to the system. This action triggers a system replay that integrates the effects of the new or updated trips, chronologically recalculating all affected material movements and downstream data from the date of those changes. Notifications about this replay and system updates are provided in the Replay Manager section of the Event Manager, ensuring traceability and allowing all changes to be audited or, if necessary, reverted.
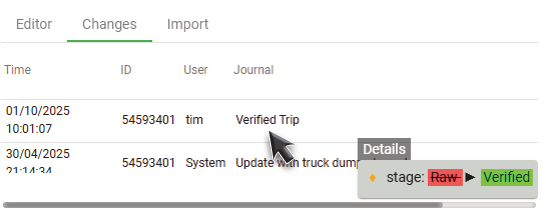
Final checks before publishing changes
The following summarises available actions you can take while reviewing unpublished changes, as covered in Using the Changes tab.
-
Click
to undo all unpublished changes, then click  to confirm.
 -
In the Changes tab, click
to restore a trip to its original state.
Running the publish
To publish trips, click to process selected the trips in the Changes tab. The replay calculates the effects of the changes along the affected timeline and notifications are sent.
Changes that have been published can be reverted if necessary. In the Changes tab, click to undo the effects of a replay triggered by publishing changes.
Note: To undo or revert any changes, you must first select the required trip IDs from the Editor tab.
