Configuring Vulcan
Once Vulcan is installed, you will need to configure several settings before running the software.
Set environment variables
If this is the first installation of Vulcan, set the following environment variables. Environment variables are dynamic name-value pairs. Windows has two types of environment variables: user environment variables (set for each user) and system environment variables (set for everyone). For details, please check How To Manage Environment Variables in Windows XP
If you have an existing version of Vulcan, you may need to copy the etc/resources directory from the existing Vulcan version prior to installing Vulcan. Refer to the information on the ENVIS_RESO environment variable. When you are finished, you can run Vulcan.
There are two levels of Vulcan environment variable settings:
1. COMPULSORY SETTINGS
TEMP and TMP
These environment variables and directories are used by Vulcan to create the temporary files needed during the program's execution and should be set as system variables.
There should always be a minimum of 4 GB free space in the Temp directory for swap files.
The value of these two variables should be the same, and it should be the full path to the directory.
We recommend using C:\Temp. This directory must already exist and the directory path must not contain any spaces.
HOME
This variable points to your home directory.
2. OPTIONAL ADVANCED SETTINGS
ENVIS_RESO
During installation, you have the option to accept default locations (for example $Vulcan), or specify locations for standardised Vulcan system files and templates. Therefore, the ENVIS_RESO variable does not need to be set. Vulcan will run properly using the defaults that are automatically set during installation. However, if required by site management, these environment variables can be set to point to specific areas on your hard drive or on a shared network drive where resource files (fonts, lines, symbols, plotting templates, etc.) can be located. This customised option is especially helpful to centrally locate files so that multiple users can easily access them.
Note: These resource files are not your working files nor are they resident in your working directory.
There are two main areas for the resource files: System Data and Client. Additionally, we recommend you create an area external to the Vulcan files where you can keep a copy of the external resource files for backup, and if desired, a site-wide directory for those systems using a network.
System Data files
This area houses the following system data items: symbols library (symbols.dgd.isis); line styles library (lines.dgd.isis); and drafting sheet library (drafting.dgd.isis). This location may be set to a specific location of your choice. If not customised, the system will give the directory the location $VULCAN/etc/resources/ by default.
Client area
The client area initially contains straight copies of default files, such as perif.setup, patterns, plot.setup, and standard.envis_hotkey files. These copies may be changed from the original, however necessary to suit your organisation's requirements. As with the system data files, the client area can be set to a specific location of your choice. If not customised, the initial default file copies will be put into $VULCAN/etc/resources/client.
External resource backup
Resource files can be lost when updating your version of Vulcan. Therefore, we recommend that you create a directory external to the Vulcan files where you can save a copy of your resource files as a backup.
Site-wide directory
Maptek also recommends creating a site-wide directory; as this requires the directory to be seen from all machines that will be running Vulcan.
Setting the ENVIS_RESO
If you are installing Vulcan for the first time; once the installation has finished, copy the Vulcan_<version>/etc/resources directory to the location where the resource files will be stored.
OR
If you have an existing version of Vulcan and have not already set up an ENVIS_RESO area, copy the etc/resources directory from the existing Vulcan directory—for example, Vulcan_<version>/etc/resources—to the location where the resource files will be stored.
If you are using the newly created resources folder as your ENVIS_RESO area, you must have “write” permissions to the folder and its sub-folders.
Set the value of the environment variable ENVIS_RESO to be the full path of the newly created resources folder.
Corporate standards
The Corporate Standards functionality allows you to maintain company standards for a large range of Vulcan specification files. This avoids the need for multiple copies of the same specification files and reduces the chances of more than one user doing the same task with different specification files.
The following file types are supported by Corporate Standards functionality:
| .SCD | Colour scheme definitions |
| .FTD | Feature definition file (contains the definition of properties of an object) |
| .GCS | Grade Control references |
| .BEF | Block estimation file |
| .BDF | Block definition file |
| .RES | Reserves parameters definition file |
| .TAB | Reserves formatting definition file |
In certain situations, some files may be used repeatedly by multiple users. If you have multiple copies of one file, for example a .RES file used for end of month calculations, and changes are made to one of the copies, the potential for incorrect or differing results from month to month can be substantial. Having company approved specification files accessible to users minimises the chances for error.
Corporate Standards functionality will not prevent you from accessing your own personal specification files, but it will direct you to the Corporate Standards files first and then allow you to browse elsewhere should you choose to do so.
Creating a corporate standards folder
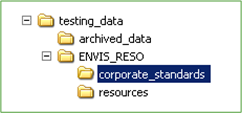
Large companies often have a resources folder that is centrally located and used to store standardised information and data. If you are planning to use Corporate Standards, it is recommended you create a corporate_standards folder in the same general location as the resources folder and allow multiple users to map to it via their ENVIS_RESO variable. An example is shown below.
We recommend that the Corporate Standards folder be set to "read-only" to protect company files from being overwritten by accident.
Activating corporate standards
You can enable Corporate Standards during installation. This will create VULCAN_CORPORATE, an environment variable that controls the functionality and location of the Corporate Standards folder. Vulcan looks for this environment variable when Vulcan starts; and if present, allows you to utilise Corporate Standards. The VULCAN_CORPORATE environment variable must include the correct path to the Corporate Standards folder to work properly.
Note: If you did not activate Corporate Standards during installation, but have decided to use it, you will need to manually define the VULCAN_CORPORATE variable.
Colour schemes and legends
Corporate Standards allows multiple users to use the same colour schemes when creating objects in Vulcan.
In a standard Vulcan system, the default colours are controlled by the DIG$COLOUR layer and colour scheme files (.SCD). With Corporate Standards enabled, the DIG$COLOUR layer in each design database will be ignored; and the default colour scheme will be read instead from the CORPSTD.SCD file stored in the Corporate Standards folder.
It is still possible to use alternate colour schemes by browsing to another .SCD file. However, the CORPSTD.SCD will be displayed by default at the beginning of each new Vulcan session. The colour scheme file (.SCD) stored in the Corporate Standards directory must be named CORPSTD.SCD and must contain a colour table named DEFAULT. Use the File > Colour Table > Save option to save a colour table to an existing colour schema file.
Changing the default file location
Corporate Standards can be enabled through the Preferences > Vulcan Preferences > Miscellaneous.
When the Corporate Standards functionality is enabled, the default working directory is set to the Corporate Standards folder for certain options, as indicated by the Corporate Standards button at the bottom of each applicable panel.
You can disable Corporate Standards as a menu option by clicking on that same button from the panel. It will change to the Home Directory button. Toggling to your home directory may help save excessive browsing if you are working with files stored in your current working directory. The Corporate Standards functionality for the disabled option will automatically be re-enabled the next time Vulcan is started.
Note: If the VULCAN_CORPORATE variable has not been set, then the Corporate Standards and Home Directory buttons will not be displayed on the Vulcan Preferences panel.
CLIENT_LAVA
This variable points to the location of a client directory where Lava scripts are stored.
Lava scripts can be stored in the $VULCAN/BIN/LAVA directory (pointed to by the $VULCAN_LAVA environment variable), a client directory, home directory or current (working) directory. The system looks for scripts in this order.
Scripts in the $VULCAN/BIN/LAVA directory are supplied by Maptek and should not be modified. We recommend you use the client directory for company/department wide scripts, the home directory for any personal scripts and the current directory for any project related scripts.
VULCAN_THREADING
This variable utilises multiple processors or multiple cores to accelerate the run time of grade estimation. This variable should be set to '2' for two threads on a dual core processor, or to '4' on a four quad core processor.
ISIS_ODBC_VERBOSE
This variable, if set to '1', provides feedback to the console window on the running of the ODBC interface.
D2000DEF
This variable allows you to define the location of your Dozer 2000 Project file (.PRJ).
MAPTEK_BORROW
This variable, if set to '1', will allow you to access Vulcan licence borrowing functionality.
VULCAN_LAVA
This variable points to the $VULCAN/bin/lava directory. This directory may contain Lava scripts supplied by Maptek. These scripts must not be modified.
Graphics card configuration
Maptek recommends using the latest driver for your graphics card. To get the latest version visit the computer or video card manufacturer's website or contact your IT department.
NVIDIA graphics cards
Vulcan is sensitive to some driver settings. The following instructions are primarily for the Quadro models. For optimal performance, please complete the setup described in this section.
Note: Quadro "Global Presets 3D App - Game Development" regularly becomes disabled/reset to the default "Base Profile" as a result of a Windows Update, a driver update or sometimes on installation of another software package. You may need to check and re-establish the "3D App - Game Development" setting.
If a panel or option is not available for your graphics card, disregard these instructions.
-
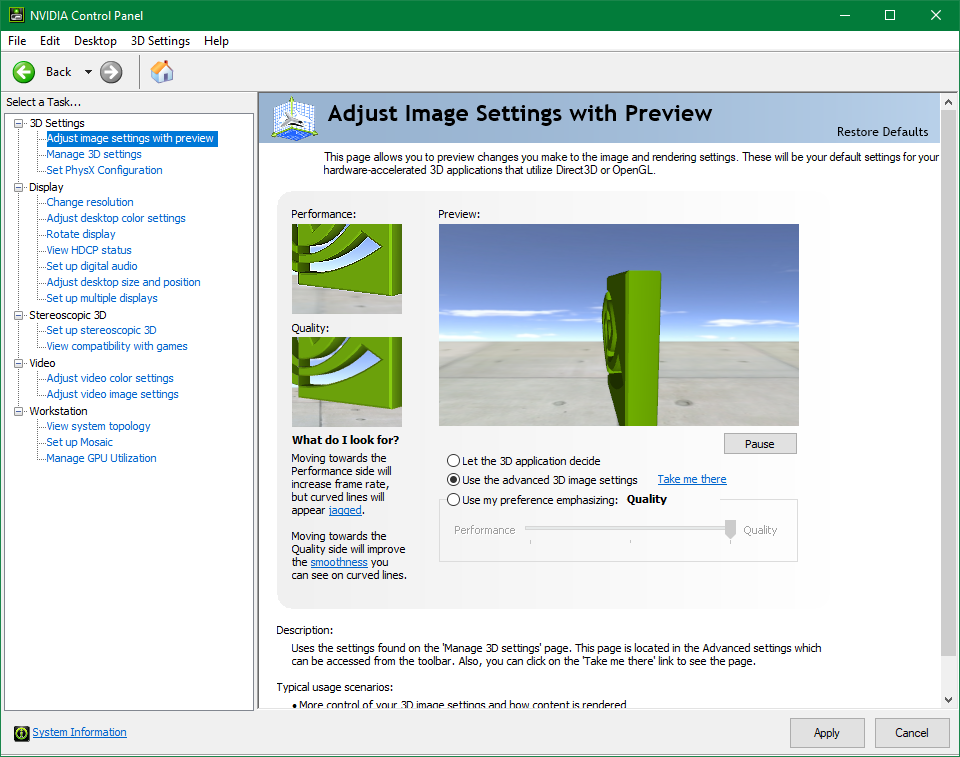
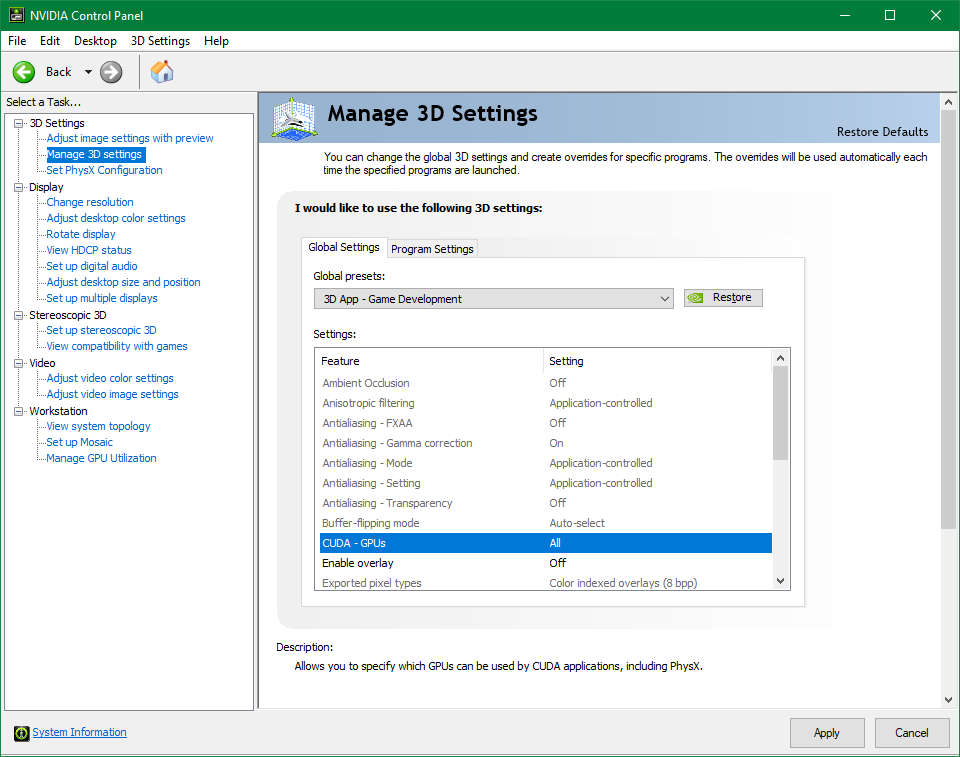
Right-click on your desktop and select NVIDIA Control Panel. Click Manage 3D Settings.
-
On the Global Settings tab, select the 3D App - Game Development.
-
On the Global Settings tab, select High-performance NVIDIA processor.
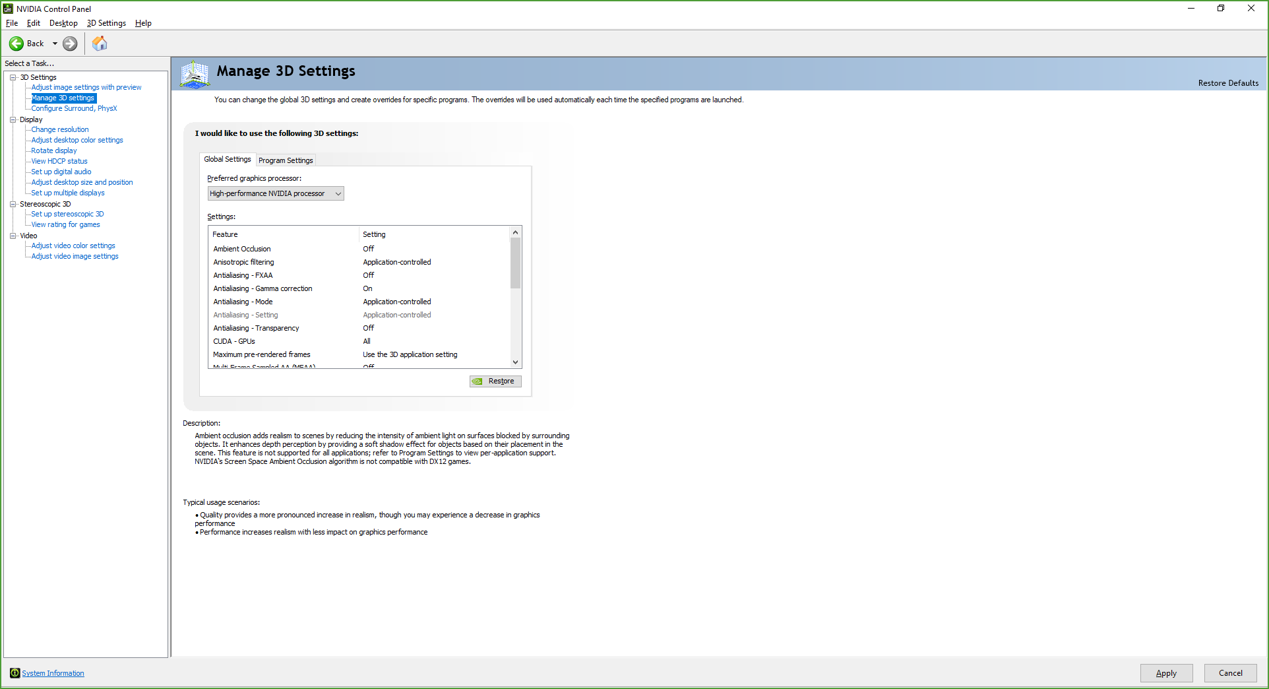
Hit Apply.
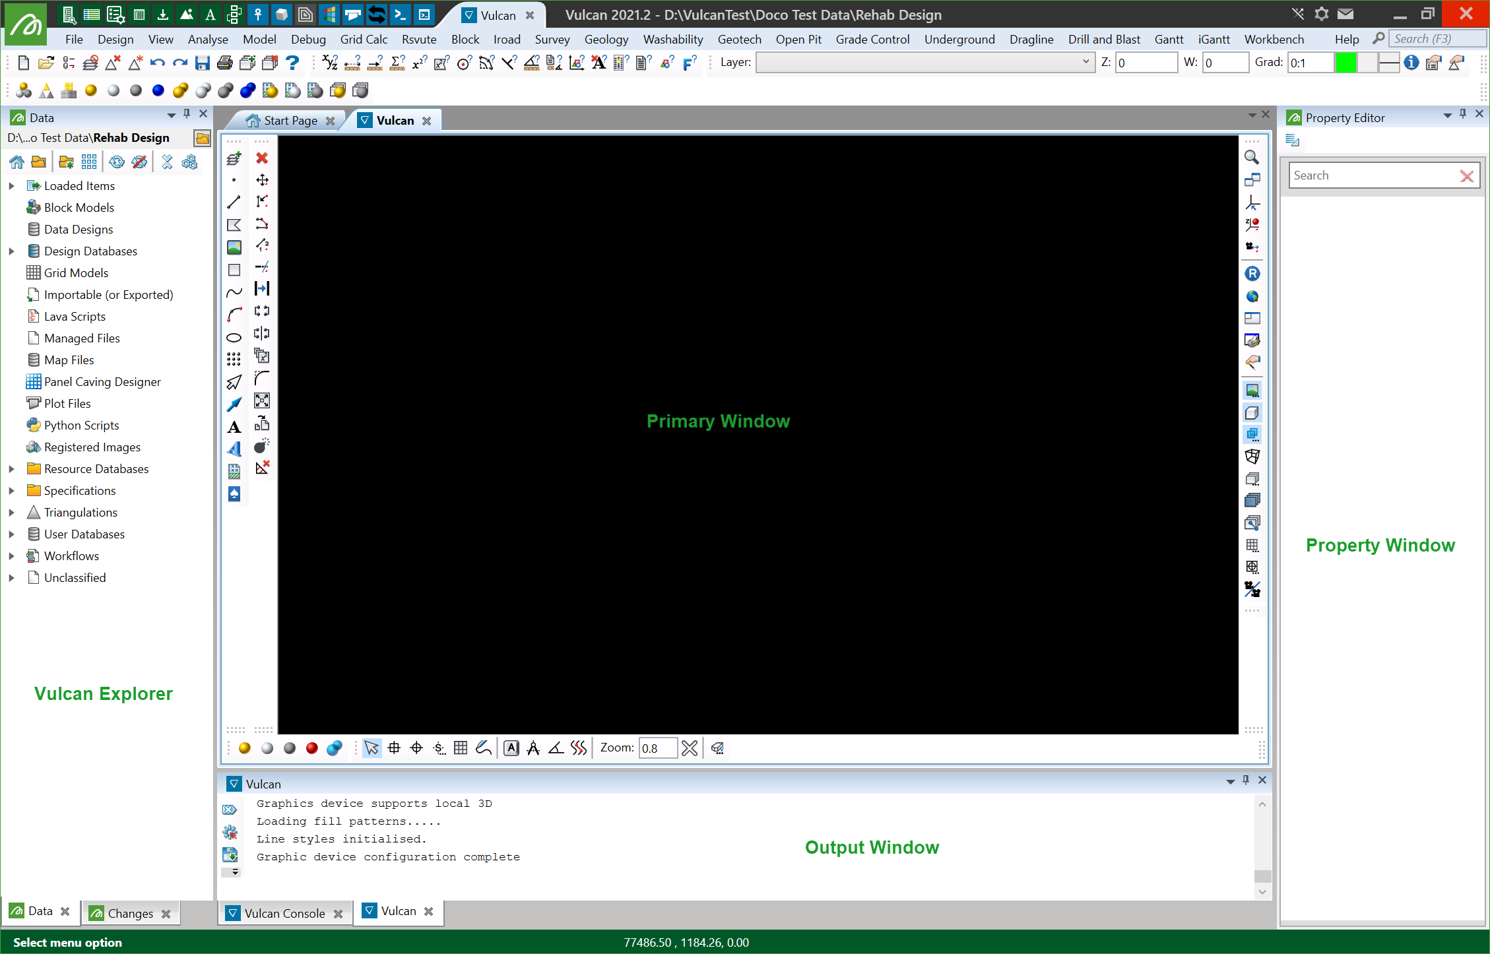
Interface
The Workbench consists of four core menu options: File, Window, Tools, and Help. These options are accessible from all applications (Vulcan, Isis, and Plot Utility); however, each application File menu contains unique options.
The following image shows the Vulcan work area with its various elements.
Vulcan Explorer
The Vulcan Explorer organises Vulcan files into virtual folders.
Related topics

