

 System Preferences
System preferences allows administrators, system specialists, and operations managers to configure and manage users and system event data.
Users
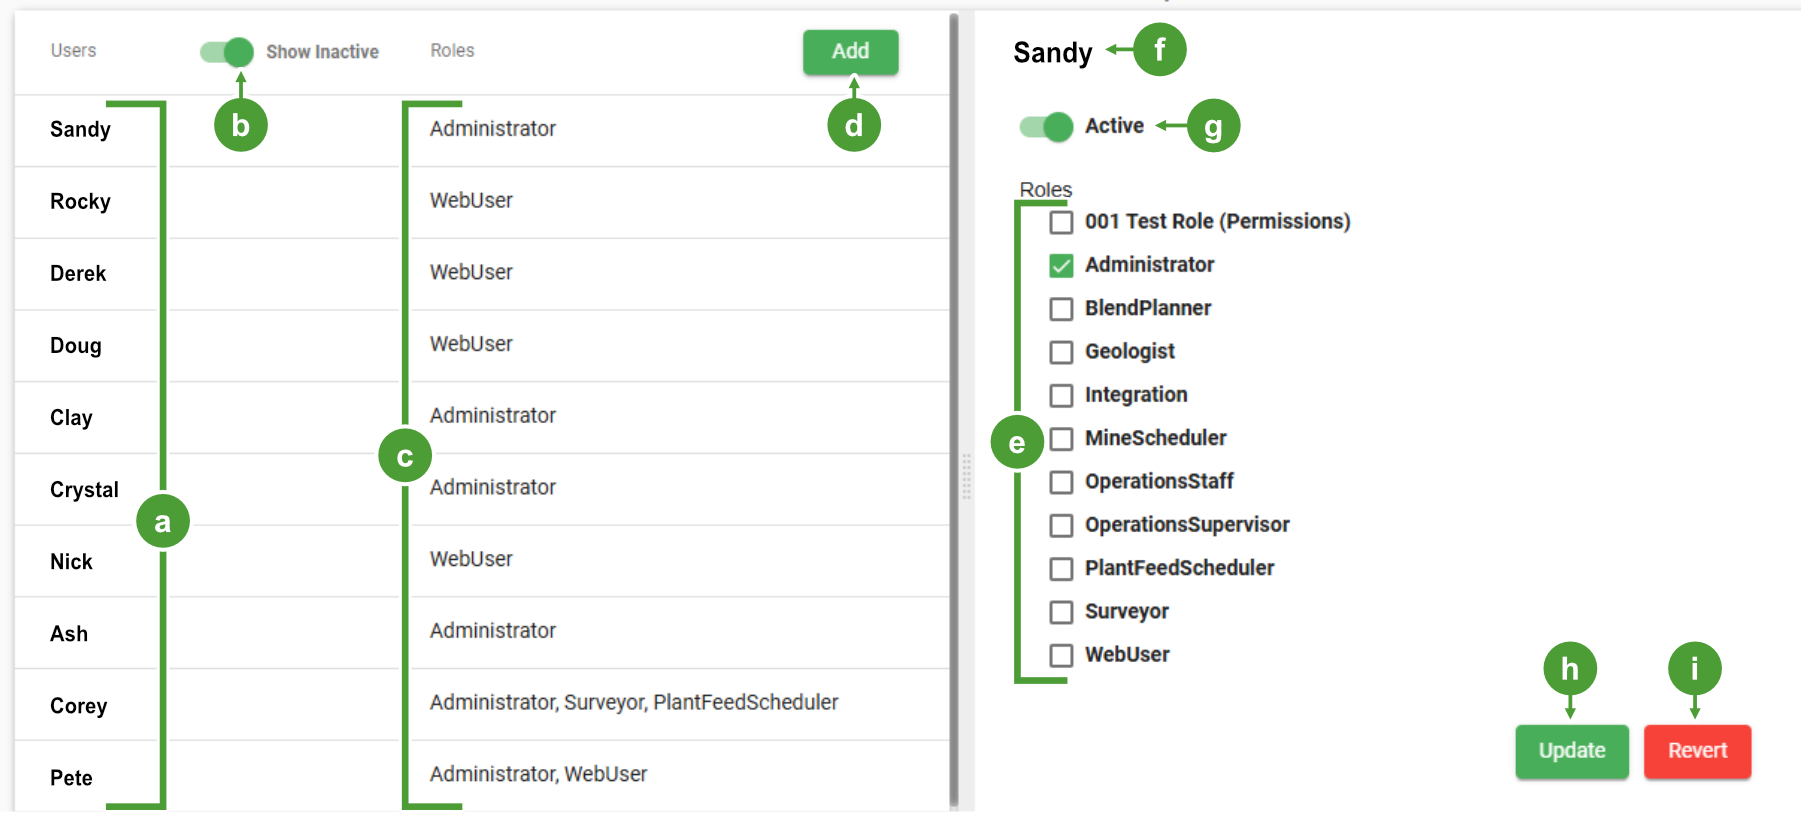
Users are anyone who accesses MaterialMRT, including administrators, mine planners, operations, and technical staff. The Users tool allows administrators to manage user accounts within the system. Users can be added or removed, and their operational status set to either active or inactive. Each user is also assigned one or more roles that define their permissions and access to MaterialMRT tools and capabilities.
|
|

|
Users list |

|
Current user (selected for editing) |

|
Show or hide inactive users toggle |

|
Activate or deactivate the selected user toggle |

|
Roles assigned to the user |

|
Update button to save user settings |

|
Add a new user button |

|
Revert button to undo unsaved changes |

|
Roles selection list |
Note: You may need specific permissions to access or use certain buttons or controls. Contact your system administrator if your role requires access to a perform a specific task discussed in any of these help topics.
The Users page controls
The individual settings are as follows:
|
Users |
The list of MaterialMRT users in the system.
|
|
Show Inactive (users) |
Set the toggle to enabled to include inactive users with active users. |
| Active |
This toggle changes the status of a selected user to either Active or Inactive. Inactive users have no access to MaterialMRT. |
|
Roles |
The list of roles that can be managed.
|
| Update | Click  confirm saving changes. confirm saving changes. |
|
Revert |
Click |
 to undo any changes that were made.
Roles
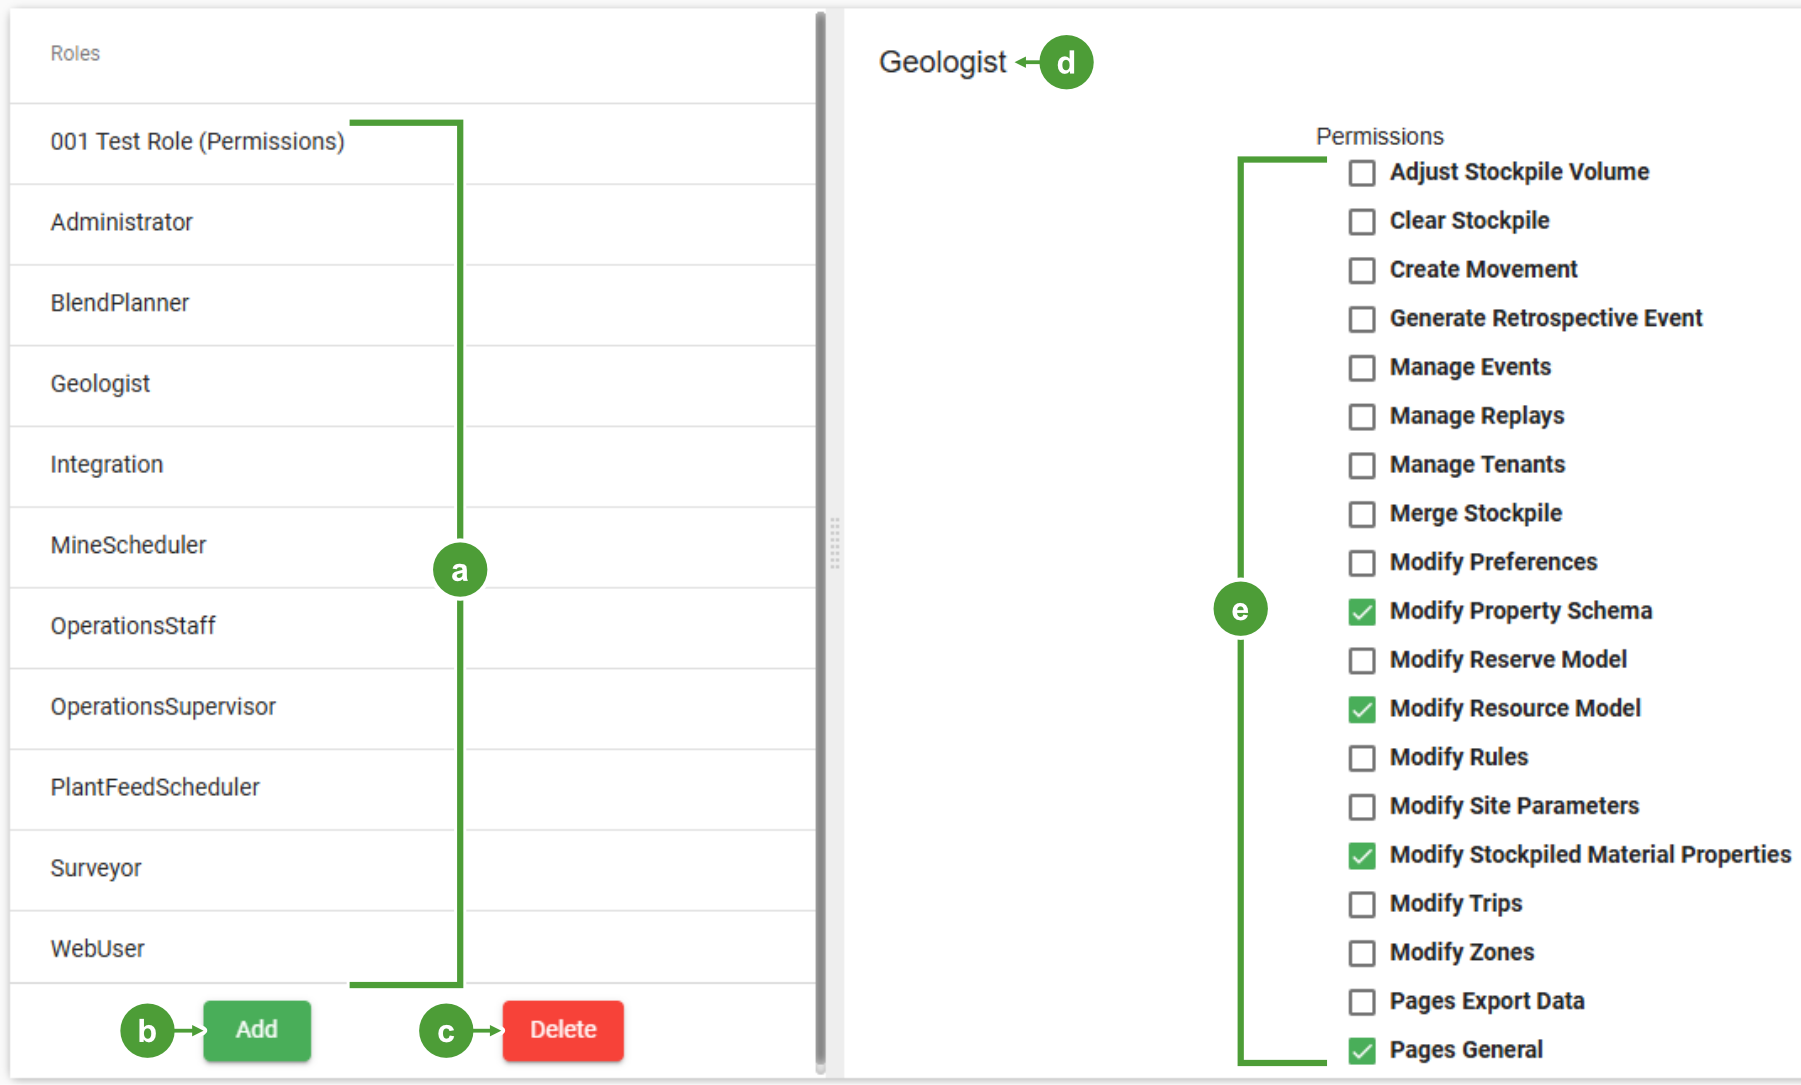
The Roles page contains a list of roles in one panel and a list of permissions in the other. Administrators can add or remove roles as needed to meet users’ operational requirements. Roles are assigned specific permissions, which users inherit when assigned those roles. By creating roles with tailored permissions and assigning one or more roles to a user, administrators can control the user’s level of access, allowing either a specific or broad range of capabilities within MaterialMRT.
|
|
|
|
Roles list |
|
Selected role |
|
|
Add a new role |
|
Permissions list |
|
|
Delete a selected role |
The Roles page controls
From this page, you can manage current roles or create and delete roles as required. The Roles page is organised into two panes; the left listing the available roles and the right containing all the available permissions that can be assigned using the checkboxes. To perform these tasks, refer to the following table:
|
Roles |
This list shows all current roles. Click a role to select it and view its assigned permissions. |
|
|
Allows you to create a new role.  Click to see instructions for adding a new role. Click to see instructions for adding a new role.
You can create custom roles and set the permissions that best fit specific users’ access to MaterialMRT tools. To create a new role, do the following:
|
|
|
Removes the role you that is currently selected.
|
|
Permissions |
This list contains a descriptive list of permissions which are available.
|
|
|
Saves changes made in the Roles panel. |
|
|
Reverts changes made in the Roles panel that haven’t been updated. |

 (at the bottom-right corner of the permissions pane) to save the new role. The new role is appears at the bottom of the roles list.
Tenants
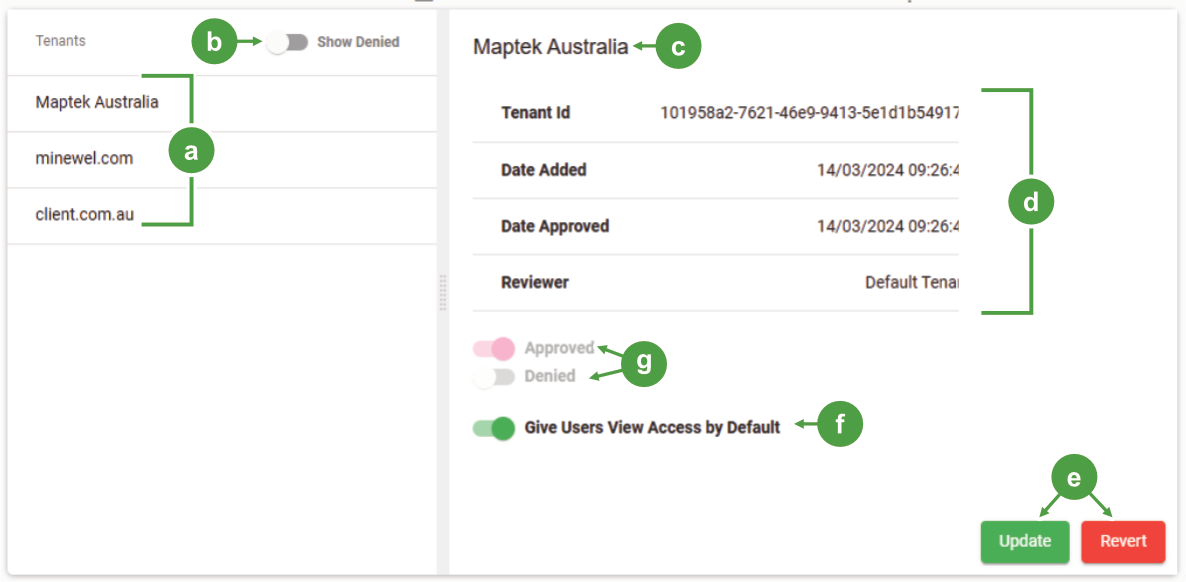
A tenant is a distinct organisational instance within Azure AD that manages users, groups, and access to resources, uniquely identified by a tenant ID, and used to isolate and secure identity and authentication services for that organisation or client. The tenants page allows the administrator to view tenants’ details—such as the Tenant ID, Dates added and approved, and the reviewer responsible. Toggle switches allow the tenant to be approved or denied and allow or deny view access to the system by default.
|
|
|||
|
An overview of the Tenants page |
|
|
List of (approved) tenants |
|
Buttons to update or cancel changes |
|
|
Show or hide denied tenants with the approved ones |
|
Toggle to allow or prevent users’ default view access |
|
|
Selected tenant’s name |
|
Toggles to approve or deny a tenant system access |
|
|
Selected tenant’s details |
Event Manager
The Event Manager is an administrative tool that logs comprehensive system and user activity, including user interactions, system-triggered events, and scheduled operations. It allows authorised users to review detailed event histories, publish events immediately, or schedule automated event replays to simulate or audit past system states. Events are organised and managed across three dedicated tabs, providing structured oversight and control over system behaviours and workflows.
The Events tab lists all events in a table that includes the Event ID, Event Name, Effective Time, Summary, and Processing Time. The Summary field describes system activity and user-entered journal notes. The adjacent panel displays detailed information for the event selected in the table.
-
Click a row in the table to select it and view its details.
-
Click
 to make the system replay events from the selected event.
Filtering Events
The Event Manager offers the following filtering options:
-
Search Events: Enter a keyword to instantly filter and display events matching your input as you type.
-
Latest Mode: Disable latest mode to enable the Date Time Picker, where you can limit events to a selectable period of time.
-
Show Reverted Events: Enable this toggle to include reverted events with those already listed.
-
Use the checkboxes to select specific events to process.
Reverting an event
Reverting restores an event to its previous state. When executed, MaterialMRT replays the original event and all subsequent events. Sequential events relating to the reverted event, such as trips, are not processed.
To revert one or more events, follow these steps:
-
Use the checkboxes to select one or more events.
- Click
 . The Revert Event(s) panel opens.
 -
In the Justification field, enter a reason, then click
 .
.Note: The time taken to rewind back to the date of reverted events and the reprocessing of subsequent events depend on the number of reverted entries and the elapsed time.
Additional Actions—exporting, importing, and resetting instance data
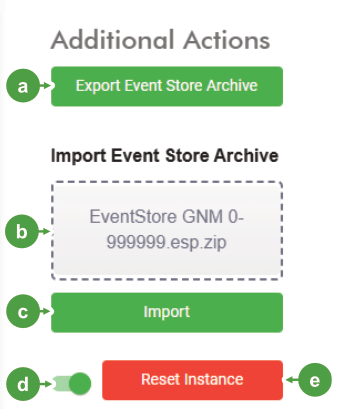
Click  to open its panel, as shown below.
|
|
|
|
Export all events to a .zip file. |
|
Enable or disable the Reset Instance button |
|
|
Drop zone for importing event store archives |
|
All data in the MaterialMRT instance is deleted |
|
|
Process import files added to the drop zone |
Under Additional Actions administrators can perform the following tasks:
-
Export events to an event store archive—a ZIP file containing up to 10,000 events per ESP file, along with backups of all models and blocks in the MaterialMRT instance, each stored in a folder by category. To start the export, click
 . A progress indicator appears during the process until the export is complete.
 An exported Event store file is save as:
EventStore Archive Site.code.zipwhere:
EventStore Archiveis the name given to the event store archive. Site codeis the code allocated to the site metadata in Preferences. See Site Configuration > Preferences. -
Import an event store archive to restore an instance or to add more to the existing events pool. To start the import, use the drop zone to open a file explorer instance, or drag an available ZIP or ESP file into it, then click
 .
. -
Reset the instance. To enable the
 button, you must enable its toggle.
Important: Resetting an instance will also delete stockpiles, zones, materials, and all other models from the system.
-
Click
to delete all data from the system.
-
Publishing Events
Publishing processes events before adding them to the pool. Since an event causes a change to the state of information in the time domain, the effects of these changes carry through to related events by performing a replay. A replay updates the system to reflect the current state. For an event to be published, update information by editing or performing tasks while the historical mode clock is active, as discussed in System Bar Overview > Historical mode system clock.
To publish an event, follow these steps:
-
Select the Unpublished Events tab.
Note: If the historical clock is active, click
 to close it and automatically open the Unpublished Events tab.
 -
Unpublished events are listed in a searchable table that includes columns for ID, Event Name Effective Time, and Summary. Select which events to process using the checkboxes. The buttons become active:

Selected events are published immediately, then the system performs a playback to update the effects.

Select a time in the future to publish the events in the Replay Manager tab.

Removes selected events from the Unpublished Events list.
-
Select one of the two publishing options to proceed:
-
Click
to process events immediately after being replayed. -
Click
to open the Schedule Replay panel, then enter the scheduled date using the Time and Date picker. Open the Replay Manager to review and confirm scheduled events. For more information, see Using the Replay Manager.
Using the Replay Manager
The Replay Manager lists unpublished events, where you can review them and perform the following tasks:
|
|
Click to immediately force a system replay. |
|
|
Click if you want to change to the replay time that was set in the Unpublished Events tab. |
 Delete Selected Delete Selected |
Remove selected items from the Unpublished Events tab. |
 Replay now
 Schedule a replay
Published events are removed from the unpublished list and are listed in the Events tab.
User Preferences
The User Preferences page allows users to apply the following options:
Telemetry:Decide what anonymous data is shared with Maptek as follows:
- Send usage data: Enable this toggle to allow MaterialMRT to send anonymous usage data to Maptek for the purpose of improving the user experience.
- Personalise usage data: Enable this toggle to allow personalised usage data to be sent to Maptek. For more information, click End User License Agreement and Privacy Notice to learn more.
-
Click
to save your changes.
Log Out
To log out of MaterialMRT, from the system bar, click  , then select
  . After logging out, you will be returned to the account log-in page.
