Getting Started
BlastLogic is a high performance data entry software package, which allows you to associate data with different processes within the drill and blast system.
Key Steps
To get started with BlastLogic, you can use the following steps as a general guide:
-
Design a blast
The first step when using BlastLogic is to design and import a blast. You must first create a blast pattern design in an external design software package, such as Maptek Vulcan. You can then import this design into BlastLogic using comma-separated values (CSV) files or Vulcan project (DGD ISIS) files.
Once you import the blast design, you can modify the original file and update the blast in BlastLogic, using the same source files.
See the following:
-
Perform drilling and validation
After finalising the blast pattern, drilling and validation can take place. In this step, you must first enter the actual drill data information into BlastLogic. BlastLogic is capable of syncing with the drill data navigation system, allowing for the live transfer of drilling data. Alternatively, you can enter drill data using the BlastLogic tablet, a CSV file import or manually in the drill entry panel.
You must then perform drill data validation in which you compare and review the actual drill data and the design parameters. This step is necessary to eliminate errors in recording information, such as:
- holes with missing data
- redrills
- ad hoc holes not included in the design
Validation also gives the engineer a quick overview of the drill progression along a pattern and accuracy in collar location and hole depth. If there are any issues, BlastLogic captures the information while the drill is still on the bench allowing you to rectify the problem.
You can also view a number of reports after performing drilling and validation.
See the following:
- For information on manual drill data entry, see Drill Data Entry
- For information on importing drill data using a CSV file, see Importing a CSV file.
- For information on drill validation, see Validation.
- For information on drilling reports, see Report.
-
Enter the dipping data
Similarly to drill data entry, BlastLogic allows you to enter dipping data in a number of ways:
- directly on the tablet
- manually on the desktop application
- by importing a CSV file
To allow the blast crew to enter data on the tablet, you can create a dip sheet which is sent to the tablet for users in the field. You can also print this sheet, allowing crews to enter information in the field.
Once the crews have entered the dip information, there are several reports you can use to review and adjust the explosive selection and placement.
See the following:
-
For information on manual dip data entry, see Dip Data Entry.
-
For information on importing drill data using a CSV file, see Importing a CSV file.
-
For information on dipping reports, see Report.
-
Execute charging
To execute charging, you must apply one or more charge rules to the holes to create each individual hole charge plan. Charge rules are highly customisable and you can adapt them to suit specific mining conditions and blast requirements. At each step, the engineer can choose to update charge plans to reflect the hole's latest data record (design, drilling or dipping).
Once you have finalised the charge plans, the engineer must create a charge sheet for the entire blast or section. Similarly to dip sheets, you enter information onto a charge sheet via the tablet or by printing the sheet and entering the information by hand. If the operators record the information on a physical sheet, the engineer must enter this information into BlastLogic on the desktop using the charge data entry tool.
After completing the charge data entry, you can generate and view several charging reports.
See the following:
-
For information on creating a charge rule, see Creating a charge rule.
-
For information on loading a charge rule, see Loading a charge rule.
-
For information on applying a charge rule, see Applying a charge rule.
-
For information on charge data entry, see Charge Data Entry.
-
-
Design the tie-up
To begin designing a tie-up, you will need to consider the type of tie-up you wish to create. BlastLogic provides you with the option to create either of the following:
- Pyrotechnic tie-up (pyro)
In a pyrotechnic tie-up, operators physically connect detonators and set the initiation timings manually. - Electronic tie-up (elec)
In an electronic tie-up, you can program the initiation timings.
BlastLogic will automatically detect if you create a pyrotechnic or electronic blast by the type of detonators you add to the tie-up design. If you use a mix of detonator types, BlastLogic will create a hybrid design.
You can also publish a tie-up at different stages as an actual, design or draft tie-up. This allows you to compare the design or draft tie-ups with the actual tie-up.
See the following:
-
For information on creating an electronic tie-up, see Creating an electronic tie-up.
-
For information on creating a pyrotechnic tie-up, see Creating a pyrotechnic tie-up.
-
For information on publishing tie-up, see Publishing a tie-up.
- Pyrotechnic tie-up (pyro)
-
Review the blast performance
To review the blast performance, BlastLogic provides you with several timing and modelling tools. On the tablet or via the desktop, you can enter blast observation parameters, such as wind and fragmentation.
Once a blast has been charged, there are a number of reports you can generate to compare the design and actual data. You can also create surfaces to visualise data, such as errors in charge placement and drill depth per hole.
In addition to creating surfaces from blast or hole geometry (e.g. charge depth error, blast volume or powder factor), you can also estimate fragmentation size visually with given geotechnical parameters, charge and initiation plans. You can attach the fragmentation surface you create to the blast which you can to later once digging has commenced to compare actual and estimated.
After completing a blast, you can also reconcile product usage, deplete stocks and compare design versus actual data. To do this, you can generate inventory and analysis reports to display the data in graphs or a tabular format.
See the following:
Blasts, Patterns, Sheets and Holes
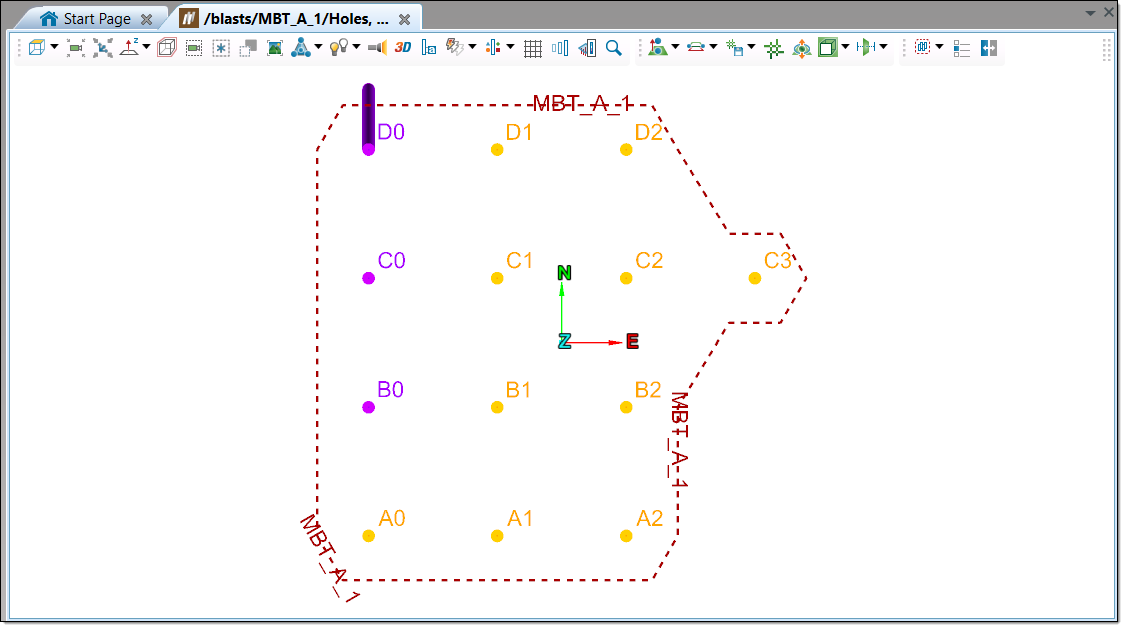
When you first import a drill pattern design, BlastLogic creates a new blast containing all of the holes from the original design file. You can find the blast in the blast container of the data explorer with the naming convention <blast name>. The following images display how blast MBT_A_1 appears in the data explorer and in the view window.
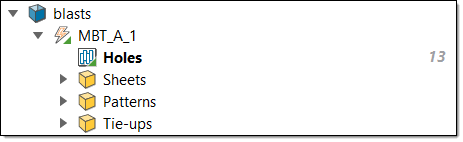
If you expand the blast folder, you can view the following:
-
Holes
The Holes file contains the holes in the blast. In the image below, the number 13 refers to the number of holes in the blast.
-
Sheets
The Sheets sub-folder contains any sheets related to the blast. Creating a sheet allows you to record and manage the dipping, backfilling and charging data entry. Crews can perform data entry by accessing sheets via the BlastLogic tablet or by printing the sheets and recording the information by hand.In the image below, the user has created a backfill sheet and a dip sheet. The related fractions, such as 4/12, refer to how many holes have data recorded for the sheet process. Data entry for all of the holes is complete when the number of holes that have data entered matches the total number of holes on the sheet, such as 2/2.

-
Patterns
The Patterns sub-folder contains the patterns of the blast. A pattern is a user-defined grouping of holes from one or more blasts. The images below display the patterns sub-folder and a pattern, named PatternsTest, in the view window.

-
Tie-ups
The Tie-ups sub-folder contains the tie-ups of a blast. A tie-up is a plan showing detonation times for each hole. You can publish tie-ups as draft, design or an actual tie-up. A design tie-up uses design and charge plan values. An actual tie-up uses the latest real-world data.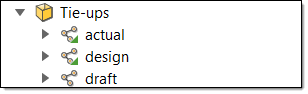
Drill and blast design
Currently, BlastLogic does not support drill/blast pattern design. You can create a blast pattern design in an external design software package, such as Maptek Pty Limited Vulcan. You can then import this design into BlastLogic using comma-separated values (CSV) files or Vulcan project (DGD ISIS) files. For more information on these processes, see Importing a CSV file and Importing blasts with a Vulcan project file.
Once you import the blast design, you can edit the design at any time by editing the original file and updating the blast. The process of updating the blast takes a few seconds and you can update it any time before firing the blast. You can also update a pattern when changing any of its design parameters (drill depth, angle, bearing), hole ID naming, or when adding additional holes.
You must first apply these changes in the original drill design editing software (i.e. Vulcan). After saving these files, you can then apply them in BlastLogic. You can match holes to the original file by Hole ID or by their collar coordinates (x, y, z). Use the latter option if you wish to rename any holes. For more information on this process, see Updating a Blast.
When updating the design parameters of a blast, you should cancel or reissue any sheets with pending entries (survey, dipping, backfilling or charging) to ensure they reflect the latest changes. You must also reapply any charge plans which contain changed design parameters. For more information on this process, see Update Charge Plans.
Drill standoffs in Vulcan translate as charge standoffs in BlastLogic. For newly added holes or to update charge standoffs for existing holes, use charge depths.
BlastLogic and Vulcan integration
BlastLogic and Vulcan allow you to transfer and share data for the purpose of simplifying the drill and blast design iteration process. More specifically, live data editing allows you to share data between Vulcan and BlastLogic and changes made in the former program are reflected in the latter while both applications are running.
See the following:
-
To share data between Vulcan and BlastLogic, see Sharing data between applications.
-
To make a live change to a blast shared between Vulcan and BlastLogic, see Editing a blast in Vulcan.
-
To make a live change to a geometry layer shared between Vulcan and BlastLogic, see Editing a layer in Vulcan.
Vulcan drill and blast file structure
Vulcan stores blast layers in the Design databases (*.dgd.isis) file structure. The design databases file is accompanied by an index file (*.dgd.isix). The layers stored in the dgd.isis database can contain multiple blasts.
You can import and export Vulcan blast data in the form of design database files. The Vulcan blast attributes, such as design depth and spacing, are transferred along with the design collar locations. You can also import the associated polygons in the layers and triangulation (*.00t) files into BlastLogic.
To store a blast on the BlastLogic database server, you must publish the blast. The Vulcan files are generally saved in a common network location. Although, the storage practices vary between different sites.
Blast specifications file
A specifications (*.specifications.dab) file stores the Vulcan blast specifications and is usually located in the Vulcan working directory. This file contains the design templates which are referenced when creating blast designs in Vulcan. BlastLogic needs this specifications file to be present in the same folder as the design database (*.dgd.isis) file, to import design hole diameters, hole Intervals and loading styles.
Loading Styles
You can assign holes different loading styles in Vulcan. Upon importing these holes to BlastLogic, you can map the loading styles to a published charge rule. This can streamline the process of applying the desired charge plans to the holes in BlastLogic.
Intervals
You can create multiple intervals for holes via the different rock types defined in Vulcan. You can then map these Vulcan intervals to intervals defined in BlastLogic.
Importing blasts with a Vulcan project file
To import a blast from Vulcan to BlastLogic, see Importing blasts with a Vulcan project file.
Updating blasts
To update design information for a published blast with new data from Vulcan, view the procedure in the section Context menus > Blast > Update blast.
