Interacting with Views
View windows are used to display your spatial data in Maptek applications. The SDK allows you to perform various operations related to view windows, including creating views, adding objects to views, setting the camera, and setting various view modes such as sectioning and manipulation modes.
Basic view operations
You can interact with view windows in the application using the SDK ViewController class. The mapteksdk.operations module defines helper functions to create new views or access the application’s currently active view.
Opening a new view
Your script can tell the connected application to open a new view with the open_new_view() function. The following script demonstrates how to open a new view containing a newly created object:
from mapteksdk.project import Project
from mapteksdk.data import Marker
from mapteksdk.pointstudio.operations import open_new_view

project = Project()

with project.new_or_edit("cad/marker_hello", Marker) as marker:
  marker.text = "Hello world"
  marker.shape = Marker.Shape.DIAMOND

open_new_view(marker)
You can create a new view containing multiple objects by passing a list of objects to open_new_view(). This is demonstrated in the example below, where different types of markers are created and added to the view:
from mapteksdk.project import Project
from mapteksdk.data import Marker
from mapteksdk.pointstudio.operations import open_new_view

project = Project()

markers = []

for i, shape in enumerate(Marker.Shape):
  if shape == Marker.Shape.CUSTOM:
    # Skip custom shape.
    continue

  with project.new_or_edit(f"cad/all_shapes/{shape.name}", Marker) as marker:
    col = i // 4
    row = i % 4
    marker.location = [row, col, 0]
    marker.text = f"{i}"
    marker.shape = shape
    markers.append(marker.id)

open_new_view(markers)
Accessing the active view
The active view in an application is the view that the user most recently interacted with, for example, by clicking on its document tab or by adding objects to it. If multiple views are open and the active view is closed, the application automatically designates another open view as the active one.
You can obtain access to the active view via the active_view() function. The next script uses this function to print the path to all of the objects in the active view.
from mapteksdk.project import Project
from mapteksdk.pointstudio.operations import active_view

project = Project()

view = active_view()

if view is None:
  print("There is no active view")
else:
  print("Objects in active view:")
  for oid in view.objects_in_view():
    print(oid.path)
If it is unknown whether an active view exists or not, the active_view_or_new_view() function is useful. It returns the active view if one exists or a new view if not. The following snippet demonstrates how to use this function:
from mapteksdk.project import Project
from mapteksdk.pointstudio.operations import active_or_new_view

project = Project()

view = active_or_new_view()

print("Objects in active view:")
for oid in view.objects_in_view():
    print(oid.path)
Adding objects to a view
Once you have a view, you can add objects to it using the ViewController.add_object() or ViewController.add_objects() methods.
The next script demonstrates adding several objects to a view. In each iteration of the loop, a marker with the next shape is created and added to the view. After three seconds, the marker is removed from the view and the next marker is added. This results in a view that cycles through all of the marker shapes.
import time

from mapteksdk.project import Project
from mapteksdk.data import Marker
from mapteksdk.pointstudio.operations import open_new_view

project = Project()

view = open_new_view(wait=True)

marker = None

for i, shape in enumerate(Marker.Shape):
  if shape == Marker.Shape.CUSTOM:
    # Skip custom shape.
    continue

  if marker:
    view.remove_objects([marker.id])

  with project.new_or_edit(f"cad/cycle_shapes/{shape.name}", Marker) as marker:
    marker.location = [0, 0, 0]
    marker.text = f"{shape.name}"
    marker.shape = shape

  view.add_objects([marker.id])
  time.sleep(3)
Controlling the camera
Your view of the data in a view window is determined by an imaginary camera located in the scene. To change the view of the data, you change the position of the camera in the view and the direction it is pointing. You can easily change the view to one of several predefined locations, or you can explicitly set or modify the camera using various methods on the ViewController object.
Using a predefined view
Predefined views allow you to quickly set the camera to one of several predefined views of the data, including front, back, top, bottom, left, and right. Call the ViewController.use_predefined_view() method to apply a predefined view. The following snippet instructs the view to display all of the data in the view “from above” (i.e. in plan, with the camera pointing along the negative Z axis):
view.use_predefined_view(PredefinedView.TOP)
Optionally, you can provide an extent, which will adjust the view to zoom in on that extent from the specified direction, rather than showing all objects. The following snippet defines a function that views the extent of a given object from above, even if the object isn’t part of the view (which could result in an empty view):
def view_extent_from_above(
    project: Project, oid: ObjectID[Topology], view: ViewController
):
    with project.read(oid) as read_object:
        view.use_predefined_view(PredefinedView.TOP, read_object.extent)
For a more practical example, the following script showcases all supported predefined views:
from mapteksdk.data import Text3D, HorizontalAlignment, ObjectID
from mapteksdk.operations import (
    coordinate_pick,
    open_new_view,
    show_message,
    Severity,
)
from mapteksdk.project import Project
from mapteksdk.view import PredefinedView

def main(project: Project):
    selection = project.get_selected()

    if len(selection) == 0:
        show_message("Error", "This operation requires a selection.", Severity.ERROR)
        return

    view = open_new_view(list(selection))
    extents = view.scene_extents()
    text_id = create_text(project, extents.centre)
    view.add_object(text_id)

    # Update the scene extents so that the label is included in the view each time.
    extents = view.scene_extents()
    for predefined_view in PredefinedView:
        view.use_predefined_view(predefined_view, extents)
        with project.edit(text_id) as edit_text:
            edit_text.text = predefined_view.name
        _ = coordinate_pick(label="Click anywhere to move onto the next view")

def create_text(
    project: Project, centre: tuple[float, float, float]
) -> ObjectID[Text3D]:
    """Create a text label to display the name of the predefined view.
    The text is placed 1m above centre to avoid it overlapping the data
    in the view.
    """
    with project.new(
        None,
        Text3D,
    ) as text:
        text.text = "N/A"
        text.location = centre
        text.location[2] += 1
        text.facing = Text3D.Facing.CAMERA_FACING
        text.horizontal_alignment = HorizontalAlignment.CENTRED
        text.always_visible = True
        text.colour = [255, 255, 255, 255]
    return text.id

if __name__ == "__main__":
    with Project() as main_project:
        main(main_project)
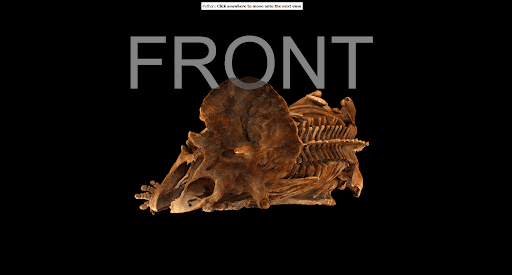
The following animation demonstrates the effect of running this script on a triceratops model (source: Smithsonian museam).
Look at point
Normally, the view’s imaginary camera can be thought of as being free to move around the scene. As you pan, zoom, and rotate your view of the data, the camera is changing its position and direction. You can explicitly set the camera position using the ViewController.look_at_point() method. This function accepts as arguments a point to look at and a camera position. For example, to look at the point (0.5, 0.5, 0.5) from the point (1.5, 1.5, 1.5), use the following call:
view.look_at_point([0.5, 0.5, 0.5], [1.5, 1.5, 1.5])
Note: Calling ViewController.look_at_point() sets the view manipulation mode to ManipulationMode.LOOK_FROM, which constrains view manipulation to maintain the camera’s position. See Manipulation modes on this page for more information.
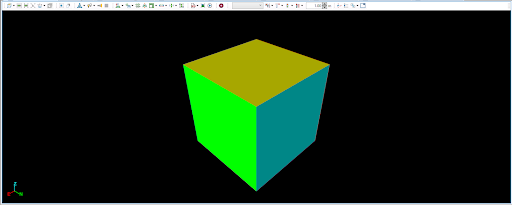
The following script demonstrates creating a 1 m cube centred on the origin, and then viewing on of its top corners (0.5, 0.5, 0.5) from the point (1.5, 1.5, 1.5):
from mapteksdk.project import Project, OverwriteMode
from mapteksdk.data import Surface
from mapteksdk.operations import open_new_view

def main(project: Project):
    with project.new(
        "look at point/cube", Surface, overwrite=OverwriteMode.UNIQUE_NAME
    ) as surface:
        surface.points = [
            [-0.5, -0.5, -0.5],
            [-0.5, -0.5, 0.5],
            [-0.5, 0.5, -0.5],
            [-0.5, 0.5, 0.5],
            [0.5, -0.5, -0.5],
            [0.5, -0.5, 0.5],
            [0.5, 0.5, -0.5],
            [0.5, 0.5, 0.5],
        ]
        surface.facets = [
            [0, 2, 1],
            [1, 2, 3],
            [4, 5, 6],
            [5, 7, 6],
            [0, 1, 5],
            [5, 4, 0],
            [1, 3, 5],
            [5, 3, 7],
            [2, 7, 3],
            [7, 2, 6],
            [0, 6, 2],
            [4, 6, 0],
        ]
        surface.facet_colours = [
            [200, 0, 0, 255],
            [200, 0, 0, 255],
            [0, 200, 0, 255],
            [0, 200, 0, 255],
            [0, 0, 200, 255],
            [0, 0, 200, 255],
            [200, 200, 0, 255],
            [200, 200, 0, 255],
            [0, 200, 200, 255],
            [0, 200, 200, 255],
            [200, 0, 200, 255],
            [200, 0, 200, 255],
        ]
    view = open_new_view([surface.id])
    view.look_at_point([0.5, 0.5, 0.5], [1.5, 1.5, 1.5])

if __name__ == "__main__":
    with Project() as main_project:
        main(main_project)
Running this script results in a view of the cube as shown below.
Rotating the camera
You can rotate the camera around an axis using the ViewController.rotate_camera() method. You need to supply an angle, the axis to rotate around, and optionally a centre of rotation. If no centre is specified, the view’s current centre of rotation is used.
Rotating around a primary axis
The x-, y-, and z-axes are the primary axes. These are defined in the Axis enum. The following snippet rotates the camera 45 degrees around the x-axis:
view.rotate_camera(math.pi / 4, Axis.X)
After making this call, the camera will still be looking towards the same but, but from a different angle.
To rotate the camera 30 degrees about the y-axis:
view.rotate_camera(math.pi / 6, Axis.Y)
To rotate the camera 37 degrees about the Z axis:
view.rotate_camera(math.radians(37), Axis.Z)
The following demonstrates rotating the view 360 degrees around the X axis, then 360 degrees around the Y axis, and finally 360 degrees around the Z axis:
import math
import time

from mapteksdk.data import Axis
from mapteksdk.project import Project
from mapteksdk.operations import active_view

AXES = (
    Axis.X,
    Axis.Y,
    Axis.Z,
)

def main(project: Project):
    view = active_view()
    for axis in AXES:
        for _ in range(16):
            view.rotate_camera(math.pi / 8, axis)
            time.sleep(0.25)

if __name__ == "__main__":
    with Project() as main_project:
        main(main_project)
The following animation shows this script running on a view containing two cubes (download Maptek object file):
Rotating around an arbitrary axis
For more complicated rotations, a three tuple of floats can be supplied to define the axis of rotation. For example, to rotate about the yz-axis:
view.rotate_camera(math.pi / 8, (0, 1, 1))
The following script rotates the camera around the (1, 2, 3) axis, with the z-axis rotation three times larger than the x-axis rotation and the y-axis rotation twice as large:
import math
import time

from mapteksdk.project import Project
from mapteksdk.operations import active_view

def main(project: Project):
    view = active_view()
    for _ in range(16):
        view.rotate_camera(math.pi / 8, (1, 2, 3))
        time.sleep(0.25)

if __name__ == "__main__":
    with Project() as main_project:
        main(main_project)
The following animation shows this script running on a view containing two cubes (download Maptek object file):

Rotating around a given point
To rotate around a point other than the view’s centre of rotation, you can supply the centre parameter. For example, to rotate around the origin, use (0, 0, 0):
view.rotate_camera(math.pi / 8, Axis.Z, (0, 0, 0))
The following script request the user to perform a coordinate pick and then rotates the camera about that point:
import math
import time

from mapteksdk.project import Project
from mapteksdk.data import Axis
from mapteksdk.operations import active_view, coordinate_pick

def main(project: Project):
    view = active_view()
    centre = coordinate_pick(label="Pick a point to rotate the camera about")
    for _ in range(16):
        view.rotate_camera(math.pi / 8, Axis.Z, tuple(centre))
        time.sleep(0.25)

if __name__ == "__main__":
    with Project() as main_project:
        main(main_project)
The following animation shows this script running on a view containing two cubes (download Maptek object file):
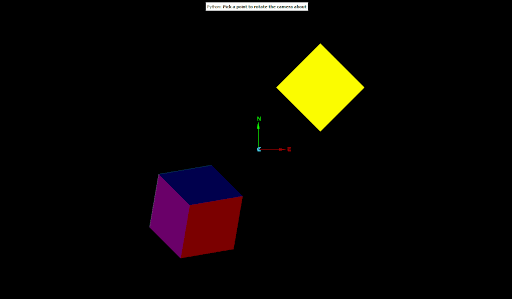
Notice how the picked point remains in the same location as the view rotates around it.
Translating the camera
The ViewController.translate_camera() method allows you to change move the location of the camera in the scene.
For example, to move the camera 1 metre in the x direction:
view.translate_camera((1, 0, 0))
To move the camera 0.5 metres in the X direction, 1.25 metres in the Y direction and -0.75 metres in the z direction:
view.translate_camera((0.5, 1.25, -0.75))
The following script uses some basic trigonometry to translate the camera in a circle of radius equal to half the scene extent around its current position:
import math
import time

from mapteksdk.operations import (
    active_view,
    show_message,
    Severity,
)
from mapteksdk.project import Project
from mapteksdk.view import PredefinedView

def main(project: Project):
    view = active_view()
    if not view:
        show_message("Error", "This operation requires an active view.", Severity.ERROR)
        return
    view.use_predefined_view(PredefinedView.TOP)


    extents = view.scene_extents()
    diameter = extents.length
    radius = diameter / 4
    current_x = 0
    current_y = radius


    for index in range(1, 24):
        theta = (math.pi / 12) * index
        new_x = (math.sin(theta) * radius)
        new_y = (math.cos(theta) * radius)


        vector = (new_x - current_x, new_y - current_y, 0)
        view.translate_camera(vector)
        current_x = new_x
        current_y = new_y
        time.sleep(0.1)

if __name__ == "__main__":
    with Project() as main_project:
        main(main_project)
The following animation shows this script running on a view containing two cubes (download Maptek object file):
![]()
Viewing by extents
The ViewController.view_objects_by_extents() function offers full control over the camera. It supports a wider range of angles but is more complicated to use compared with the methods described above. It takes three parameters:
-
Extent to view: Defines the area visible in the view. If
None, the extent of all objects in the view is used. -
Look direction: Specifies the direction the camera faces.
-
Up direction: Determines the upward direction in the view. For example, (0, 0, 1) sets the z-axis as up.
Viewing the extents of all objects in the view
The following script uses the ViewController.view_objects_by_extents() method to view all objects in the view with the camera pointing in the direction of the vector (-1, -1, -1):
from mapteksdk.operations import (
    active_view,
    show_message,
    Severity,
)
from mapteksdk.project import Project

def main(project: Project):
    view = active_view()
    if not view:
        show_message("Error", "This operation requires an active view.", Severity.ERROR)
        return
    view.view_objects_by_extents(
        None, # Use the extent of all objects in the view.
        (-1, -1, -1),
        (0, 0, 1), # Making the z axis up is usually reasonable.
    )

if __name__ == "__main__":
    with Project() as main_project:
        main(main_project)
Running this script on the triceratops example model will give the following view:
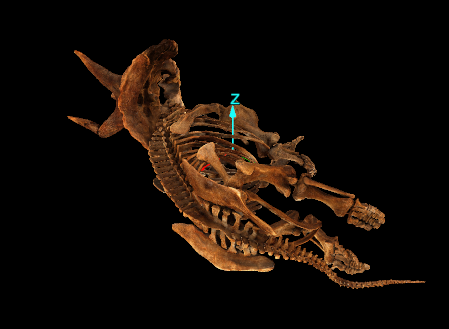
A camera direction of (-1, -1, -1) means the camera is looking along the negative x, y, and z axes:
-
The negative z-axis points downward, so the view is from above.
-
The negative x-axis (east) makes the triceratops’ left side visible.
-
The negative y-axis (north) reveals its tail.
Since all components of the vector are equal, the view is evenly balanced in these three directions.
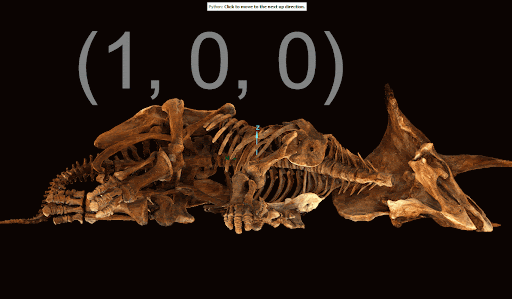
The following animation shows a similar script that cycles between various look directions to show the differences in the resulting view based on the ordinates of the camera look direction:
Viewing a specific extent
In the previous section, setting the extent to None instructed the view to use the combined extent of all objects when determining what should be visible. Alternatively, the caller can specify a particular extent, allowing the view to focus on a subset of objects or specific parts of an object. For example, the following script zooms in on the extent of a picked object, viewing it from above:
from mapteksdk.data import Topology
from mapteksdk.operations import (
    active_view,
    show_message,
    Severity,
    object_pick,
)
from mapteksdk.project import Project

def main(project: Project):
    view = active_view()
    if not view:
        show_message("Error", "This operation requires an active view.", Severity.ERROR)
        return

    oid = object_pick(object_types=Topology, label="Pick an object to view.")
    with project.read(oid) as topology:
        extent = topology.extent
    view.view_objects_by_extents(
        extent,
        (0, 0, -1),
        (0, 1, 0),
    )

if __name__ == "__main__":
    with Project() as main_project:
        main(main_project)
The following animation shows this script on a view containing two cubes:
Manipulation modes
The manipulation mode of a view defines the effect of zooming, panning, and rotating. The following manipulation modes are supported by the SDK:
| In this mode, the z-axis always points up. This is the default manipulation mode. | |
| In this mode, rotation in any orientation is allowed. | |
| In this mode, the data is viewed from above. Rotations are constrained to be around the z-axis. | |
| In this mode, a point can be looked at from the perspective of another point. For example, a scan viewed from its origin. The ViewController.look_at_point() method switches the view to this mode. |
The current manipulation mode can be read by calling the ViewController.get_manipulation_mode() method:
view = active_view()
if view.get_manipulation_mode() is ManipulationMode.LOOK_FROM:
    # This block will only be executed if the manipulation mode is LOOK_FROM.
    pass
Use the ViewController.set_manipulation_mode() to set the manipulate mode:
view = active_view()
view.set_manipulation_mode(ManipulationMode.Z_UP)
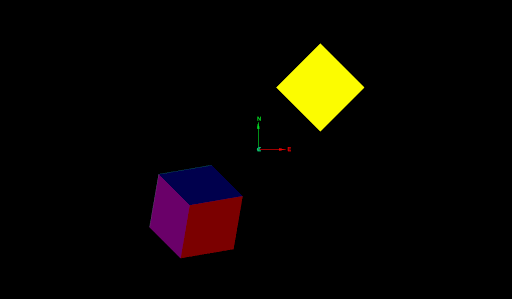
The following example demonstrates creating several polygons in the XY plane and opens a new view in plan view mode so that the user can only view the data from above:
from mapteksdk.project import Project, OverwriteMode
from mapteksdk.data import ObjectID, Polygon
from mapteksdk.operations import open_new_view
from mapteksdk.view import ManipulationMode

import numpy as np

def main(project: Project):
    main_circle = create_circular_polygon(project, 100, 10.0, (0, 0, 0))
    small_circle_left = create_circular_polygon(project, 50, 1.5, (-5, 5, 0))
    small_circle_right = create_circular_polygon(project, 50, 1.5, (-5, -5, 0))
    semi_circle = create_circular_polygon(project, 50, 7.5, (0, 0, 0), max_theta=np.pi)

    project.add_objects(
        "cad/plan_view_data",
        [
            ("main circle", main_circle),
            ("left", small_circle_left),
            ("right", small_circle_right),
            ("semi circle", semi_circle),
        ],
        overwrite=OverwriteMode.UNIQUE_NAME,
    )

    view = open_new_view(
        [main_circle, small_circle_left, small_circle_right, semi_circle]
    )
    view.set_manipulation_mode(ManipulationMode.PLAN_VIEW_MODE)

def create_circular_polygon(
    project: Project,
    resolution: int,
    radius: float,
    centre: tuple[float, float, float],
    max_theta: float = np.pi * 2,
) -> ObjectID[Polygon]:
    """Create a circular polygon and return its ID.

    Warning: This performs no parameter validation. Use with caution, as this
    function does not provide a safety net.

    Parameters
    ----------
    project
      Project to use to create the polygon.
    resolution
      The number of points to use to approximate a circle.
      More points will result in a smoother curve, but more points will result
      in worse viewer performance.
    radius
      The radius of the circle to create. A larger radius will result in a
      larger circle.
    centre
      The centre of the circle to create.
    max_theta
      2 * pi by default. Setting this to less than 2 * pi will result in creating
      only part of a circle.
    """
    with project.new(None, Polygon) as polygon:
        polygon.points = np.zeros((resolution, 3), dtype=np.float64)
        polygon.points[:, 0] = np.sin(np.linspace(0, max_theta, resolution))
        polygon.points[:, 1] = np.cos(np.linspace(0, max_theta, resolution))
        polygon.points[:, 2] = 0

        polygon.points *= radius
        polygon.points += centre
    return polygon.id

if __name__ == "__main__":
    with Project() as main_project:
        main(main_project)
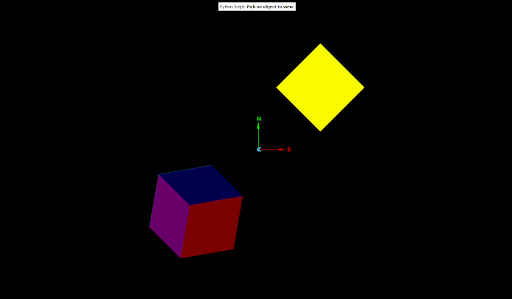
Running this script results in the following view:
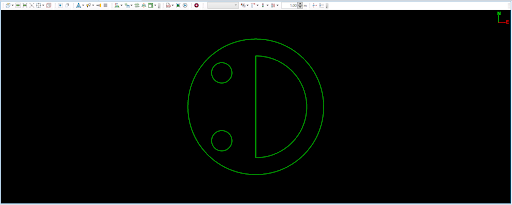
Notice that the axis of rotation is in the top right hand corner of the view. This indicates that the view is in plan view mode.
Sectioning
Sectioning is a way to restrict the view to only show data within a given distance from a defined plane. The plane used in sectioning is the action plane. You can turn sectioning on by setting the action plane on a view (usually the active view) and setting the section mode.
Setting the action plane
There are three ways to construct a plane, which can then be supplied as the action plane for sectioning:
-
From the normal vector and a point on the plane. Use Plane.from_normal_and_point() to define a plane in this way.
-
From three points on the plane and the right-hand rule. Use Plane.from_three_points() to define a plane in this way.
-
From the axis-aligned planes (XY-plane, XZ-plane, and YZ-plane). Use Plane.xy(), Plane.xz(), and Plane.yz() to define an axis-aligned plane. You can supply an offset to these functions so that the returned plane doesn’t pass through the origin, for example Plane.xy(z=126.0), Plane.xz(y=25.0), and Plane.yz(x=129.0).
After creating a plane, you can translate it by a given vector using Plane.translated().
Use the ViewController.set_action_plane() method to set the action plane on a view.
Tip: Be sure to define the action plane near the data in the view, otherwise nothing will be visible.
Turning sectioning on in the view
Sectioning in the view is enabled by setting the section mode. The following section modes are available:
| Turn sectioning off such that all data is visible. | |
| Show only data on the “front side” of the plane. The front side of the plane is the side in the direction of the plane’s normal. | |
| Show only data on the “back side” of the plane. The back side of the plane is the side in the opposite direction of the plane’s normal. | |
| Show data on both sides of the action plane, but within a distance defined by the strip width. |
The action plane is always defined, even if sectioning is not on. The following example does not set the action plane, so it will be set either to where the user last set it in the view or a default location.
from mapteksdk.project import Project
from mapteksdk.operations import active_view
from mapteksdk.view import SectionMode
project = Project()
view = active_view()
view.set_action_plane_section_mode(SectionMode.STRIP)
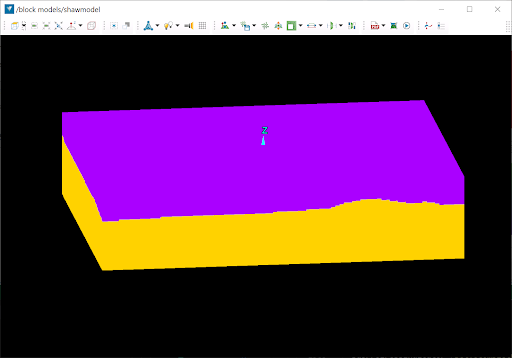
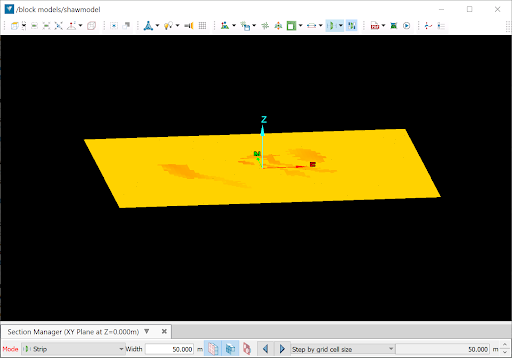
Example: sectioning some data in the XY plane
The following example places the action plane in the centre of the scene extents (i.e. within the data). It works best with a block model or surface that has no holes in the centre.
from mapteksdk.project import Project
from mapteksdk.operations import active_view
from mapteksdk.view import SectionMode
from mapteksdk.geometry import Plane


if __name__ == '__main__':
    with Project() as project:
        view = active_view()
        extents = view.scene_extents()
        view.set_action_plane_section_mode(SectionMode.STRIP)
        xy_plane = Plane.xy(z=extents.centre[2])
        view.set_action_plane(xy_plane)
Tip: In your real-world script, consider capturing the current action plane and restoring it at the end of the script as a convenience to the user. This is important because the action plane controls more than just the sectioning; it also controls how picking points works.
|
|
|
Example data viewed before (left) and after (right) running the script. |
|
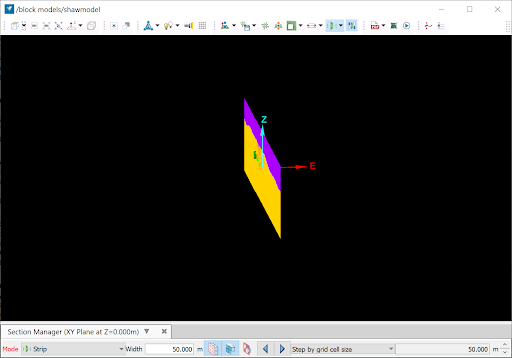
Setting a different action plane, such as the YZ plane, instead of the XY plane, will yield a different section, as shown below.
from mapteksdk.project import Project
from mapteksdk.operations import active_view
from mapteksdk.view import SectionMode
from mapteksdk.geometry import Plane


if __name__ == '__main__':
    with Project() as project:
        view = active_view()
        extents = view.scene_extents()
        view.set_action_plane_section_mode(SectionMode.STRIP)
        yz_plane = Plane.yz(x=extents.centre[0])
        view.set_action_plane(yz_plane)
Turning sectioning off
Turning sectioning off is simply a matter of setting the section mode to SectionMode.NO_MODE, as demonstrated in the following example:
from mapteksdk.project import Project
from mapteksdk.operations import active_view
from mapteksdk.view import SectionMode
project = Project()
view = active_view()
view.set_action_plane_section_mode(SectionMode.NO_MODE)
Stepping the section
The section can be stepped forward or back by a given step distance. This avoids the need to move the entire action plane. It is a good idea to first set the step distance using ViewController.set_action_plane_section_step_distance(), otherwise the script will be stepping by the amount that was last set in the view, which may not be appropriate. When choosing a step distance consider the magnitude of data that is being sectioned.
Use ViewController.step_action_plane_section_forwards() and ViewController.step_action_plane_section_backwards() to step the section forwards or backwards by the current step distance in the direction of the plane normal.
Restoring the action plane
If your script is not opening a new view and is instead operating on the active view, it can be a good idea to remember the action plane and restore it back to what it was when you are done.
if __name__ == '__main__':
    with Project() as project:
        view = active_view()
        original_plane = view.action_plane()

        extents = view.scene_extents()
        view.set_action_plane_section_mode(SectionMode.STRIP)
        yz_plane = Plane.yz(x=extents.centre[0])
        view.set_action_plane(yz_plane)

        # Other changes here.

        view.set_action_plane(original_plane)
Transient geometry
Objects can be added to the view as transient geometry. Transient geometry can be used by scripts as a way of showing a preview of an action being performed or to help the user understand what the script is doing. Use the ViewController.add_transient_object() to add an object as transient geometry to a view, or ViewController.add_transient_objects() to add multiple objects.
By default, transient geometry behaves differently to normal geometry because it is not pickable or selectable. This behaviour can be adjusted by providing transient geometry settings when adding objects to the view. See TransientGeometrySettings for details.
An example of showing a preview of an action would be creating a new polyline whereby as the user picks a point in the view it updates the transient geometry. Once done, the transient geometry can be promoted to a normal object using ViewController.promote_transient_object().
Depending on the type of objects you are creating it may be necessary to start out with transient geometry of one type and then create a new object with a different type once you more information is obtained, after which the old object can be deleted. For example, you might start out with a polyline, which is then replaced with a polygon, and then a block in a block model as more data points are acquired.
Create line example
The following script demonstrates displaying a polyline using transient geometry as the user picks a sequence of points.
"""Ask the user for points to create a line.


The line in progress will be shown as transient geometry."""


from mapteksdk.project import Project, OverwriteMode
from mapteksdk.data import Polyline
from mapteksdk.view import ViewController
from mapteksdk.operations import PickCancelledError, active_view_or_new_view, coordinate_pick


def update_transient_geometry(
        project: Project, points: list, view: ViewController, geometry):
    """Update transient geometry to show the state of the new polyline.

    If geometry does not exist it will be created once there is more than one
    point given and it will be added to the view.
    """
    if geometry:
        # If points is empty then this could delete the geometry instead.
        with project.edit(geometry, Polyline) as polyline:
            polyline.points = points
    elif len(points) > 1:  # At least two points are needed for a polyline.
        with project.new(None, Polyline) as polyline:
            polyline.points = points
        view.add_transient_object(polyline.id)
    return polyline.id


if __name__ == '__main__':
    with Project() as project:
        view = active_view_or_new_view()
        points = [coordinate_pick(label='First point for a line')]
        geometry = None
        while True:
            try:
                points.append(coordinate_pick(label='Next point for a line'))
                geometry = update_transient_geometry(
                    project, points, view, geometry)
            except PickCancelledError:
                break


        # Use is done asking for more points.
        if geometry:
            project.add_object(
                '/cad/line', geometry, overwrite=OverwriteMode.UNIQUE_NAME)
            view.promote_transient_object(geometry)
Saving a view to image
Rendering the view to an image file involves creating a 2D image from a 3D space. The save_to_image() function in the mapteksdk.view module can be used to generate an image of the specified object. The camera's default position is determined by the shape of the data, ensuring that all provided objects are included in the image, as long as they are not obscured by other objects. The image will be captured from a plan-view (top-down) if the data is relatively flat; otherwise, it will most commonly be taken from the front.
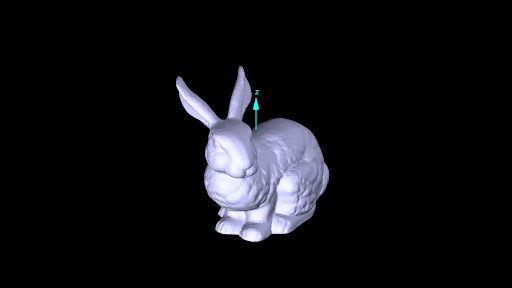
For example, in the following examples, the camera position and orientation differ: the Stanford Bunny (a test model from Stanford University) is viewed from the front, while a polyline is viewed from above.
The default behaviour is to raise an error if there is already a file present at the given path for the image, however the function can be configured to overwrite the existing file or save the image with a unique name. The unique name will insert _<number> in the filename before the file extension. For example, if image.png exists it will use image_2.png, but if that also exists, it will instead name it image_3.png and so on.
Currently, the camera is limited to defaulting to trying to choose the best between the top and front. The intention is to remove this restriction in the future and allow the caller to choose from a preset list of cameras.
This feature works by creating a new view off-screen that is used for rendering and saving the result to the file. An existing view window in the application cannot be saved to an image at this time.
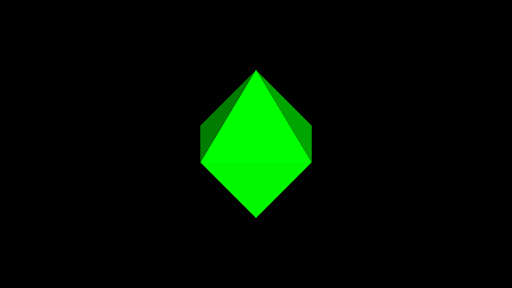
Example: Saving an image of an octahedron
The example script below creates an octohedron and saves an image of it to file.
from mapteksdk.data import Surface
from mapteksdk.overwrite_modes import OverwriteMode
from mapteksdk.project import Project
from mapteksdk.view import save_to_image
import pathlib


def octahedron():
    """An octahedron has eight triangular faces and twelve edges.


    The octahedron is the dual polyhedron to the cube.
    """
    vertices = [
        (0, 0, -1),
        (0, 0, 1),
        (0, -1, 0),
        (0, 1, 0),
        (1, 0, 0),
        (-1, 0, 0),
    ]
    faces = [
        (0, 2, 5),
        (0, 5, 3),
        (0, 3, 4),
        (0, 4, 2),
        (1, 5, 2),
        (1, 2, 4),
        (1, 4, 3),
        (1, 3, 5),
    ]
    return vertices, faces


def create_octahedron(project: Project, path: str):
    """Create a octahedron in the project and insert it at the given path."""
    points, facets = octahedron()
    with project.new_or_edit(path, Surface) as surface:
        surface.points = points
        surface.facets = facets
    return surface.id


if __name__ == "__main__":
    with Project() as project:
        surface = create_octahedron(
            project,
            "/scrapbook/demonstration/octahedron",
        )
        image_path = pathlib.Path.home() / "octahedron.png"
        save_to_image(
            [surface],
            image_path,
            overwrite=OverwriteMode.UNIQUE_NAME,
        )
Running this script produces the following result: