Positioning
Source file: scene-positioning.htm
Sentry does not need to know the specific position of a setup to effectively monitor a site. However, there are two situations where you will need to provide Sentry with positioning information:
-
Exchanging data: When you want to exchange data between Sentry and other systems with the correct position, Sentry will need to know the position of the scene. For example, you may want to transfer zones between two scenes, import or export zones from or to PointStudio, or import existing scans into Sentry. If the positions of the data are not known, they will not match between contexts.
-
Resuming monitoring after scanner removal: When the scanner is temporarily removed—for example, because of a nearby blast—and then you want to resume monitoring from the same location using the same scene, Sentry needs to know the relative change in position between the previous and new scanner positions. This is particularly relevant for Sentry DMS systems as it is very unlikely that the setup can be returned precisely to a previous position.
Sentry allows for a variety of positioning situations. You can start monitoring with an unpositioned scene, to which you could then assign a position, or you can start with a positioned scene. In either case, whether the scene is positioned or unpositioned, you can update the position at any time after creation. There are several ways of supplying the positioning information.
The Update Positioning tool guides you through the process of telling Sentry about changes in positioning.
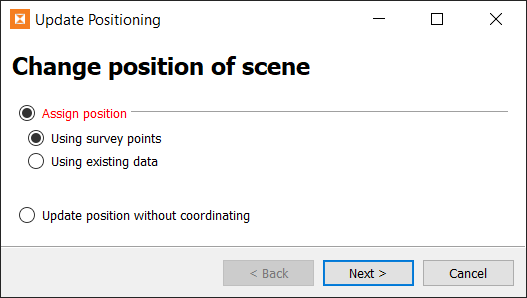
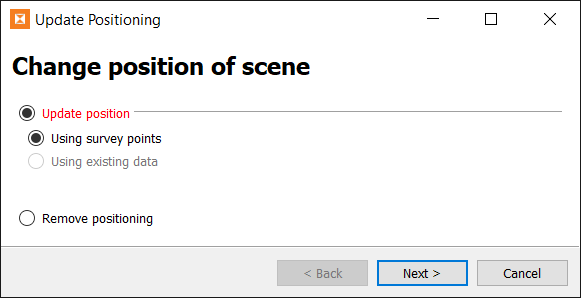
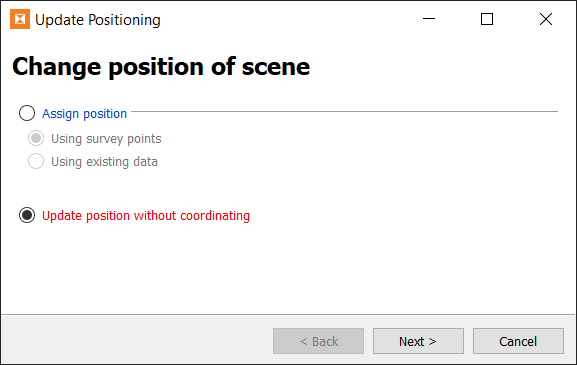
Assigning a position to a scene
Use the Update Positioning tool to assign a position to an unpositioned scene.
![]() Update Positioning.
Update Positioning.
Note: Positioned scenes cannot have a new position assigned (or reassigned) unless their current positioning is first removed. A positioned scene can, however, have its positioning updated if the scanner moves.
-
See Removing positioning
-
See Updating the position of a scene
There are two ways to assign position information to an unpositioned scene:
-
Using survey points
-
Using existing data
These are described below.
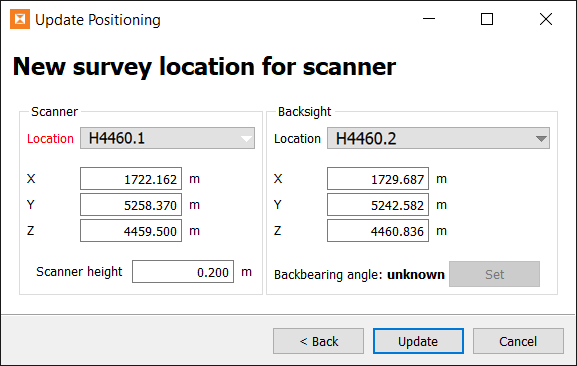
Assigning a position using survey points
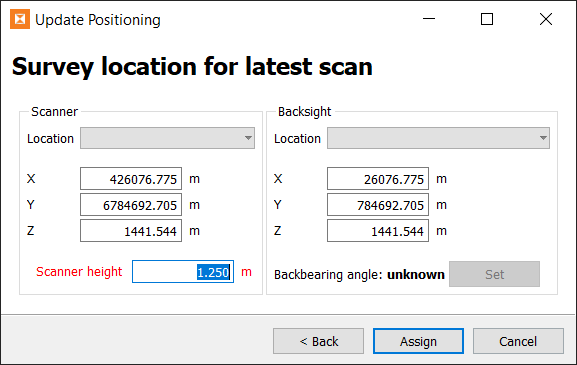
Assign a position to a scene using survey points as follows:
-
Choose Assign position > Using survey points, then click Next >.
-
Specify the survey location for the latest scan by selecting from the Location drop-down list. Otherwise populate the scanner coordinates and backsight coordinates.
-
Enter the scanner height.
-
Click Assign.
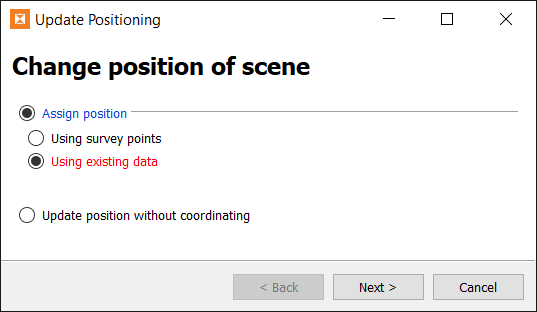
Assigning a position using existing data
A scene’s position can be established by registering it to reference data that is already positioned correctly. The registration process involves moving a scan in the scene’s location until it lines up with the fixed reference data. Once it does, the scanner’s position can be derived and assigned to the scene.
|
|
|
|
Scan data to be registered (left) and after registration (right), compared with fixed reference data. |
|
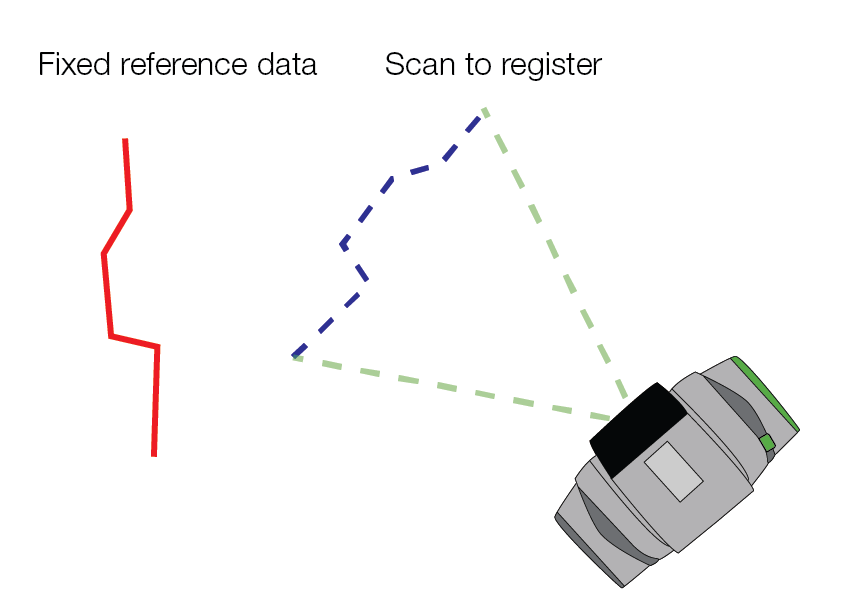

The fixed reference data can be another scan, or point cloud information (for example, from flyover data) stored in a Maptek object file (.maptekobj).
Assign a position to a scene using fixed reference data as follows:
-
Choose Assign position > Using existing data then click Next >.
-
Browse to the fixed reference data location and select the fixed reference data file. The supported file types are
.maptekobj,.3dr,.3dp, and.r3s.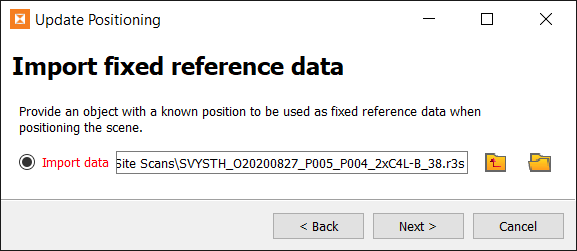
-
Click Next >.
-
Provide a scan to register.
The scan can either be the initial or latest scan from the scene, or a recent scan imported from file.
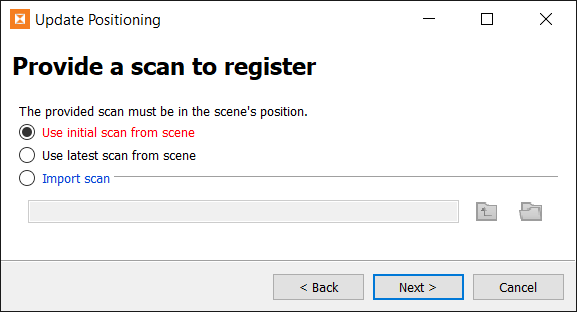
The scan provided here must be in the scene’s position. The initial and latest scans from the scene are already available in the project as these are used in Sentry’s normal registration. These can be selected without needing to acquire or import a scan.
If importing a scan, it must be in the same position as the last scan that was processed into the scene.
-
Click Next .
The tool will prompt you to register the scan to the fixed reference data. See Registering the scene
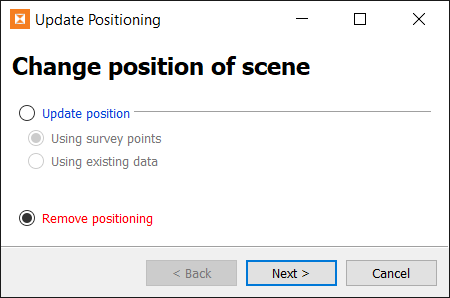
Removing positioning
You can remove the positioning from a positioned scene. This may be required if the current positioning is incorrect, or you wish to apply a different positioning method.
Remove the positioning of a scene as follows:
-
 Update Positioning
 -
Select Remove Positioning and click Next >.
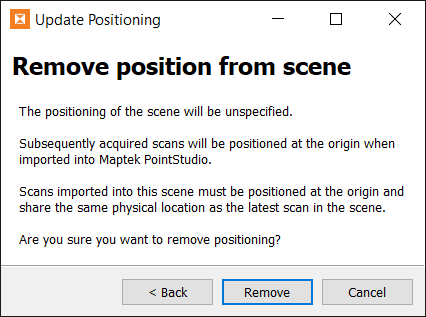
This confirmation dialog will appear:
-
Click Remove to proceed with removing the positioning.
-
To reassign a position after removing one, see Assigning a position to a scene
Updating the position of a scene
If the scanner has moved, you will need to tell Sentry to update the scene’s position.
![]() Update Positioning.
Update Positioning.
-
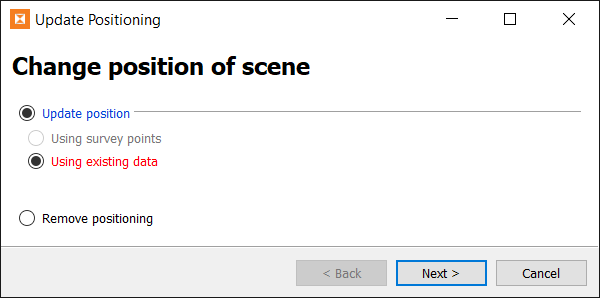
If you have a positioned scene, there are two methods for supplying the updated position information:
-
Using survey points. See Updating the position using survey points
-
Using existing data. See Updating the position using existing data
Note: The Update Positioning tool will require you to use the same method for updating the positioning that was used to initially assign the position, unless you first remove the positioning and assign an equivalent positioning using the alternative method before updating. See Removing positioning, above.
-
-
If you have an unpositioned scene, you can tell Sentry to update the scene’s position without coordinating. This means that you update the relative position of the scanner without specifying any absolute coordinates. See Updating the position without coordinating
Updating the position using survey points
If a scene has been positioned using survey points, you can update the position with these steps:
-
Choose Update position > Using survey points.
-
Click Next >.
-
Select the scanner and backsight locations from the Location drop-downs, if populated. Otherwise enter coordinates manually.
Note: The Location drop-downs are normally blank. To populate them, copy the
survey.txtfile (exported from the scanner controller) into the project’s parent folder (C:\sentryby default). -
Enter the scanner height.
-
Click Update.
Updating the position using existing data
Sentry can determine the new position of the scanner by registering a scan from the new location to existing reference data. The reference data can be a scan from the scene or any other reference data.
To update the position of a scene using existing reference data:
-
Choose Update position > Using existing data.
-
Click Next >.
-
Choose a scan or other data to act as the fixed reference data.
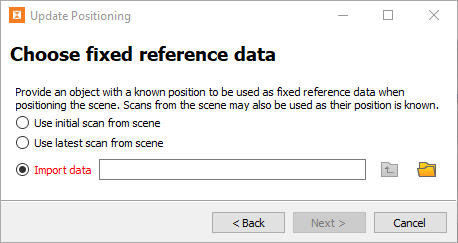
If you choose Import data, the file types supported are
.maptekobj, .3dr, .3dp, and .r3s. -
Click Next >.
-
Provide a scan to register to the fixed reference data.

-
Click Next >.
The tool will prompt you to register the scan to the fixed reference data. See Registering the scene
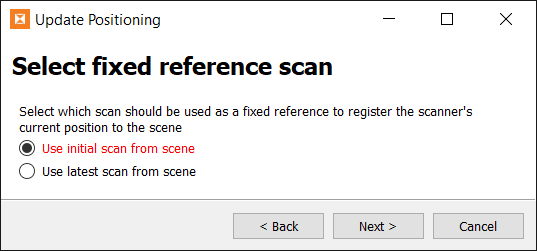
Updating the position without coordinating
If the scanner is moved for any reason and the scene hasn’t been positioned, then the scene can
Update positioning on an unpositioned scene without coordinating as follows:
-
Update Positioning. Choose Update position without coordinating and click Next >.
-
Select either the initial scan or latest scan from the scene to act as the fixed reference, then click Next >.
-
You will need to provide a new scan to register to the fixed reference scan.
The scan to register must be from where the scanner is currently placed. Browse to locate the new scan and click Open.
-
Click Next >.
The tool will prompt you to register the new scan to the fixed reference scan (from the previous scanner location). See
Registering the scene
Registration is the process of moving a scan to match up as closely as possible to some fixed reference data. This process is required when assigning or updating scene positioning using existing data. Sentry will prompt you to register a scan in the following contexts:
-
Assigning a position to an unpositioned scene using existing data (see Assigning a position using existing data
-
Updating either a positioned or an unpositioned scene’s position using existing data (see Updating the position of a scene
There are two methods of registering a scan:
-
Using matching point pairs
-
Using global registration.
You can use one or both methods to register the scan. The recommended approach is to first register using matching point pairs to perform a rough registration, then switch to global registration to fine-tune the registration to an optimal result.
Registration using matching point pairs
Registration using matching point pairs involves a manual step and an automated step. In the manual step, you identify matching features between the scan to register and the fixed reference data. The automated step then moves the scan being registered until the identified feature points match up as closely as possible.
Register using matching point pairs as follows:
-
Select the Matching point pairs tab. The panel will look similar to this:
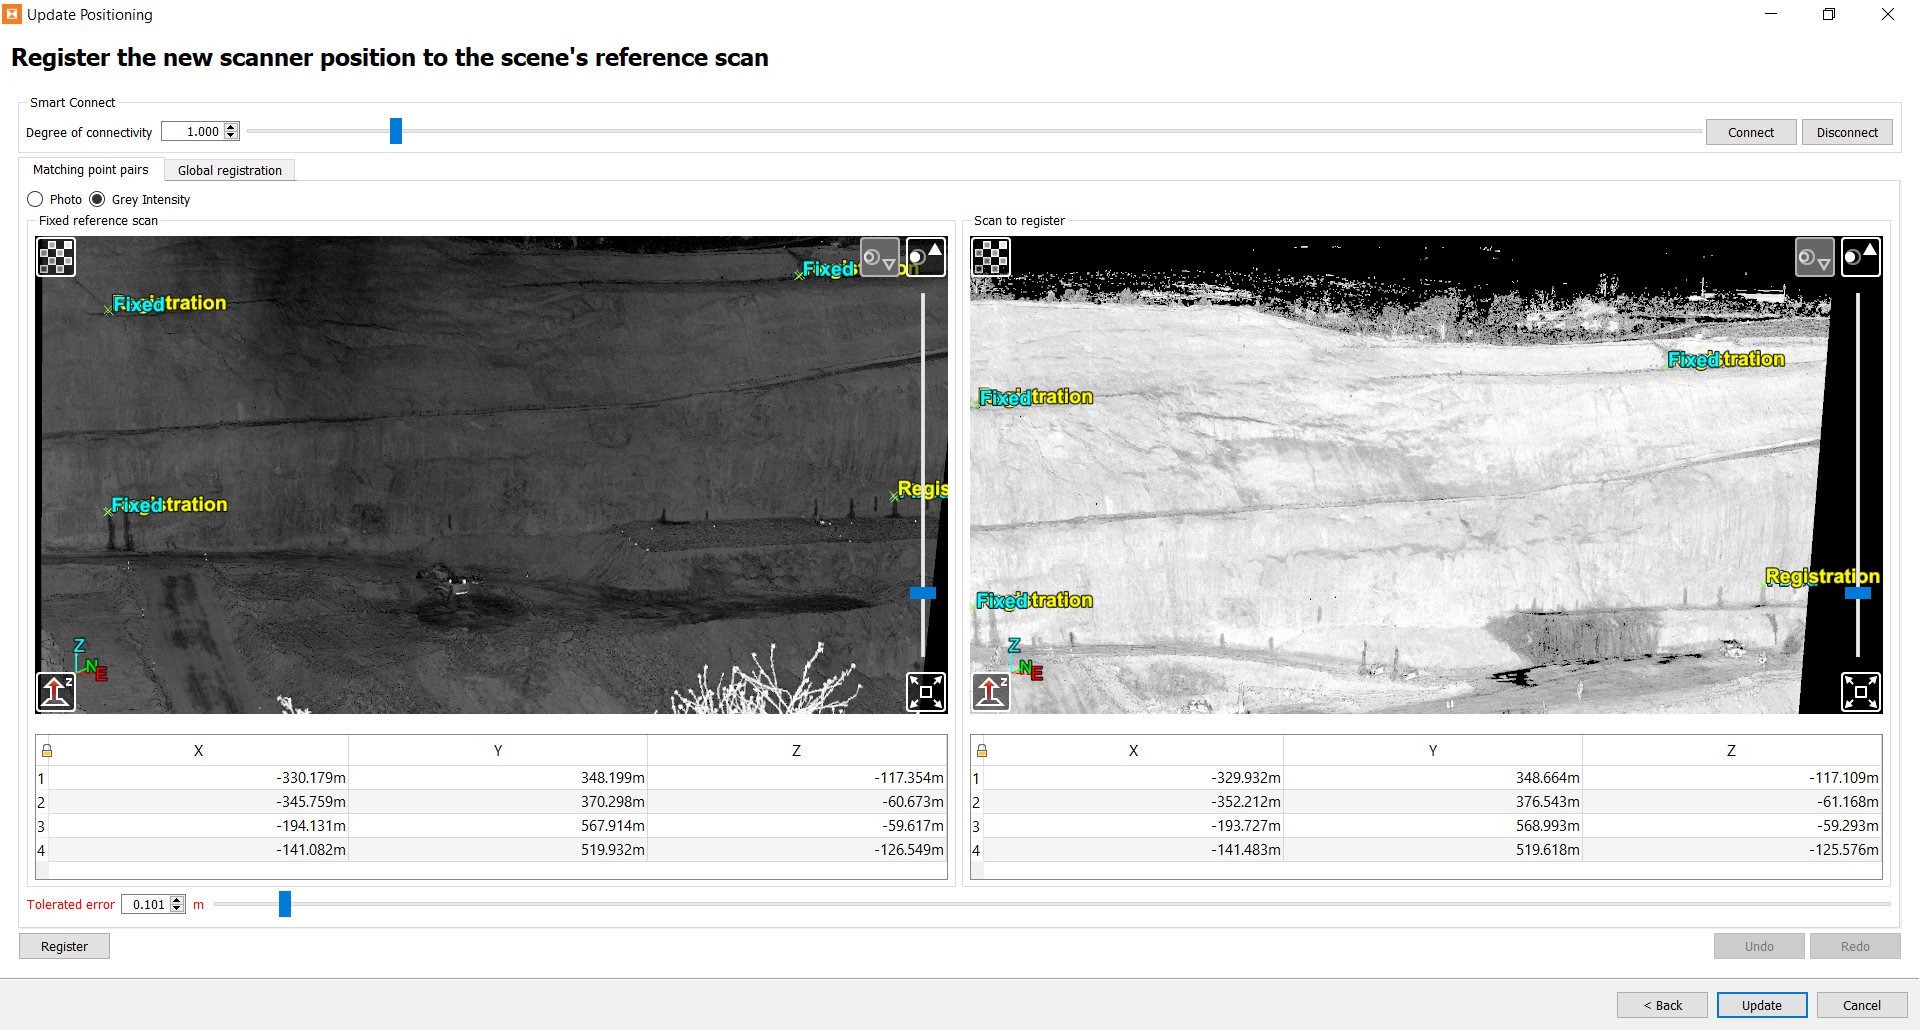
The fixed reference data appears in the view on the left. The scan to be moved (registered) appears in the view on the right.
Use the following controls to adjust the views:

Hide all controls

View data in Z-up mode

View scan from origin

Set the centre of rotation

Increase point size

Decrease point size

Toggle full screen mode
Interact with the data using the following mouse controls:
-
Left-click and drag to rotate the data
-
Right-click and drag to zoom
-
Click and hold the middle mouse button to pan
-
-
Pick matching point pairs. This involves finding some obvious features that appear in both the fixed reference data and the scan to register. You need to pick at least three pairs of matching features for registration to work, as follows:
-
Click on a point in the left view to pick a feature on the fixed reference data. Click on the same feature in the right view to identify the matching point in the scan to register.
-
When you pick a point in either view, that point will appear in both views labelled as either Fixed or Registration, depending on which view you picked in. The coordinates of the picked point will appear in the table below the view in which the pick was made.
-
To delete a point, right-click on its coordinates in the table and select Delete point.
Tip: Avoid picking features that are all in the same plane (for example, on the same flat surface), as this can lead to a poor registration result.
Note: You do not need to pick matching features between the views in order. You also do not need to have the same number of features identified in the left and right views. Sentry will automatically match close fixed and registration point pairs together.
-
-
Set Tolerated error. Sentry uses this to decide whether a candidate registration is a success or not. Only point pairs within this distance of each other will be considered a match.
Note: Setting the tolerated error to too small a value will make it harder for the registration algorithm to succeed. Setting the error to too large a value may cause a poor registration to be accepted. Choose the minimum error that would be acceptable.
-
Click Register.
Sentry will attempt to move the scan to register until the features between the scan and the reference data match up to within the specified tolerance. Sentry will try to match as many point pairs as possible. At least three point pairs must be matched within the tolerance for the registration to succeed.
-
If registration does not succeed, you can make changes and try again. If registration succeeded, but you are not satisfied with the result, you can click Undo and try again with any of the following options to increase the probability of a good result:
-
Identify more features in the scans that can be matched.
-
Remove poorly matched features.
-
Adjust the tolerated error.
After making changes, click Register again to re-attempt registration.
-
-
When the registration result is satisfactory, you can do one of the following:
-
Switch to the Global registration tab to fine-tune the registration (recommended—see below for the steps).
-
Click Assign to use the current registration. Sentry will use the registration result to correct the position of all future scans.
Or
-
Registration using global registration
The global registration tool automatically identifies matching features to find the best registration result. Global registration performs best when the scan to register and the fixed reference data are already somewhat overlapping. For this reason, we recommend registering using matching point pairs before attempting global registration, especially when the data are initially significantly out of alignment.
Register using global registration as follows:
-
Select the Global registration tab. The panel will look similar to this:
Both the fixed reference data (blue) and the scan to register (red) appear in a single view.
The view has the following controls:
Hide all controls

Show fixed data only

Show scan to register only

Show both the fixed and registration data
View data in Z-up mode
View scan from origin
Set the centre of rotation
Increase point size
Decrease point size
Toggle full screen mode
Interact with the data using the following mouse controls:
-
Left-click and drag to rotate the data
-
Right-click and drag to zoom
-
Click and hold the middle mouse button to pan
-
-
Optionally, connect scans. If you connect scans, global registration will register the scans as surfaces rather than points. We recommended connecting scans when the scan to register and the fixed reference data are already closely matching. Connected scans in this case will help global registration to lock the registration to a tighter fit. To connect scans:
-
Under Smart Connect, enter a degree of connectivity. The lower the degree of connectivity, the fewer the connections that are made.
-
Click Connect.
-
-
Enable any global registration options you would like to apply:
-
Use registration region: Select to use only points from the fixed reference data that lie within the scene’s registration region. See Configuring > Setting the registration region.
-
Smart sampling: Select to use an edge detection algorithm to determine sample points instead of using uniform sampling. This option can improve registration with clearly defined edges, such as buildings.
-
Smart filtering: Select to apply a minimum separation filter to the scan points before registering. This can help improve the performance when registering unconnected scans.
-
Disable convergence detection: Select this checkbox to cause the registration algorithm to run indefinitely. The algorithm must be stopped manually.
-
Range: Select this checkbox to use only points in the scan to register that lie within the range specified in the From and To fields.
-
-
Click Register to perform the global registration.
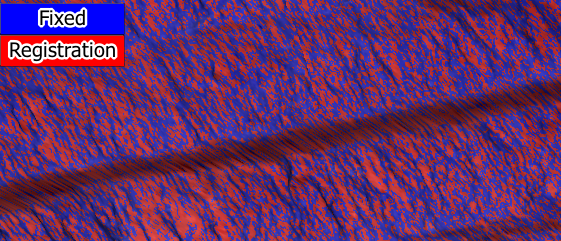
Well registered data will result in a marbling effect when the fixed and registration surfaces are viewed together. An example is shown below:
-
If registration does not succeed, you can change the setup and try again. If registration succeeded, but you are not satisfied with the result, you can click Undo and try again. Either change your selected options and click Register to reattempt registration, or switch back to the Matching point pairs tab to see if a better initial registration can be achieved.
-
When the registration result is satisfactory, click Assign.
Sentry will use the registration result to correct the position of all future scans.
