Category Reserves
Weight Blocks by Mass
Use Category Reserves to weight blocks by mass.
The output fields are broken down in the following order: Region, Bench, Classification Field, Fraction Field, Category.
Instructions
On the Block menu, point to Advanced Reserves, and then click Category Reserves to display the Category Reserves panel.
The panel has six sub panels; configure the settings in each.
Specification
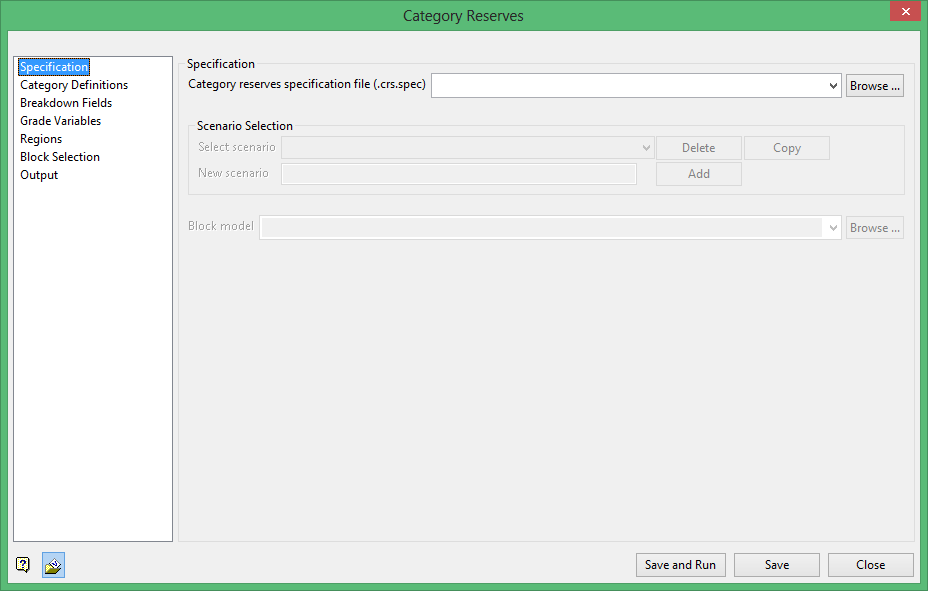
Category reserves specification file (.crs.spec)
Enter, or select from the drop-down list, the name of the specification file that you want to open. The drop-down list contains all of the .crs.spec files found in your current working directory. Click Browse... to select a file from another location.
If you want to create a new specification file, enter the name of the new file. The file name, including the file extension (.crs.spec), can be up to 512 alphanumeric characters in length.
Scenario Selection
Scenarios allow you to create multiple versions of a reserve estimation within the same specification file.
Select an existing scenario from the drop-down list. All fields in the Category Reserves panel will be populated with the input settings that were saved when the scenario was last used.
To add a New scenario, enter the name into the space provided, then click Add button. Adding a new scenario will clear any inputs and require you to select new parameters.
Delete an existing scenario by clicking the Delete button.
Copy an existing scenario by clicking the Copy button. This is useful when only a few input parameters need to be changed for a new reserve estimation.
Block model
Select the desired block model from the drop-down list. The drop-down list displays all block models found in your current working directory. Click Browse... to select a file from another location. Ensure that the selected block model structure is appropriate for the saved reserves specification parameters.
Category Definitions
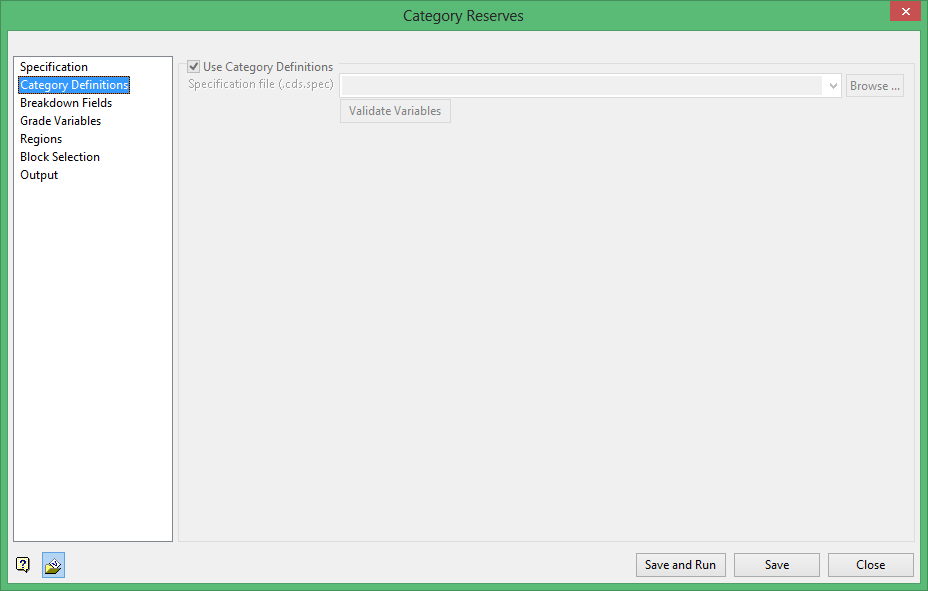
Use Category Definitions
Select this checkbox to use category definitions. Choose the file from the drop-down list, click Browse... to select a file from another location, or enter the name of a new one.
Click Validate Variables to ensure all variables are legitimate.
Breakdown Fields
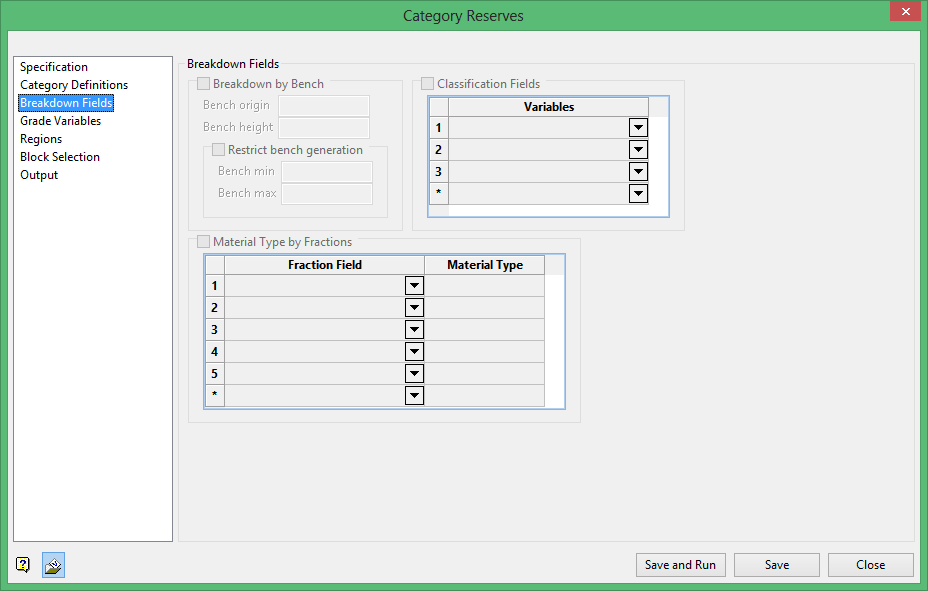
These fields allow the specification of a breakdown variable so that reserves can be broken down according to fields, such as GEOLOGY or ORE_TYPE. Up to 20 fraction fields can be specified.
Example: GEOLOGY could be a field in the block model with the values: TQ1, TQ2, TQ3. Each of these different geology types could form the basis of a breakdown of reserves, with grades reported for each type.
Breakdown by bench
Select this checkbox to breakdown a reserve by bench levels. You will be required to specify the bench origin, that is, the starting RL, as well as the bench height.
Note: This option cannot be used with plunging or dipping block models or with smooth (HARP) models.
Restrict bench generation
Select this option to limit bench generation to a defined area. Enter the Bench min and Bench max values to define the area.
Classification Fields / Material Type by Fractions
These fields allow the specification of a breakdown variable so that reserves can be broken down according to fields, such as GEOLOGY or ORE_TYPE. Up to 20 classification and fraction fields can be specified.
Example: GEOLOGY could be a field in the block model with the values: TQ1, TQ2, TQ3. Each of these different geologies could form the basis for a breakdown of the reserves, with grades reported for each of the three geological types.
A breakdown variable may be of data type Name, Byte, Short or Integer but not of type Float or Double. Refer to the Addition Parameters option (under the Block > Transfer submenu) for an explanation on data types. If the breakdown variable is of data type Name, then it is left justified in the dump file, otherwise it is right justified.
Some block models have a number of fields that define the fraction of each material type. For example, two fields FORE and FWST might contain the fraction (0.0 to 1.0) of ORE and WASTE in each block respectively.
The reserves for material ORE are calculated based on the fraction of the volume (for each block) specified in the FORE field, and the reserves for material WASTE would be calculated using the fraction of the volume (for each block) specified in the FWST field. These fields can therefore be used to classify reserves according to material type. The fields can be manually entered or selected from a list.
Classifying reserves according to material type will also be affected by the use of the mined out field. If a block has been mined out, then the volume is adjusted correspondingly before the fraction field value is applied to the volume. Blocks with unknown (missing) values for the fraction field contains unknown material in the material column of the dump file.
The remaining options on this panel apply to fields in the block model that contain percentages or fractions related to the volume of each block. The options are typically used to process the results of the Mine option (under the Block > Manipulation submenu) or the Regularise Model option (under the Block > Transfer submenu).
Grade Variables
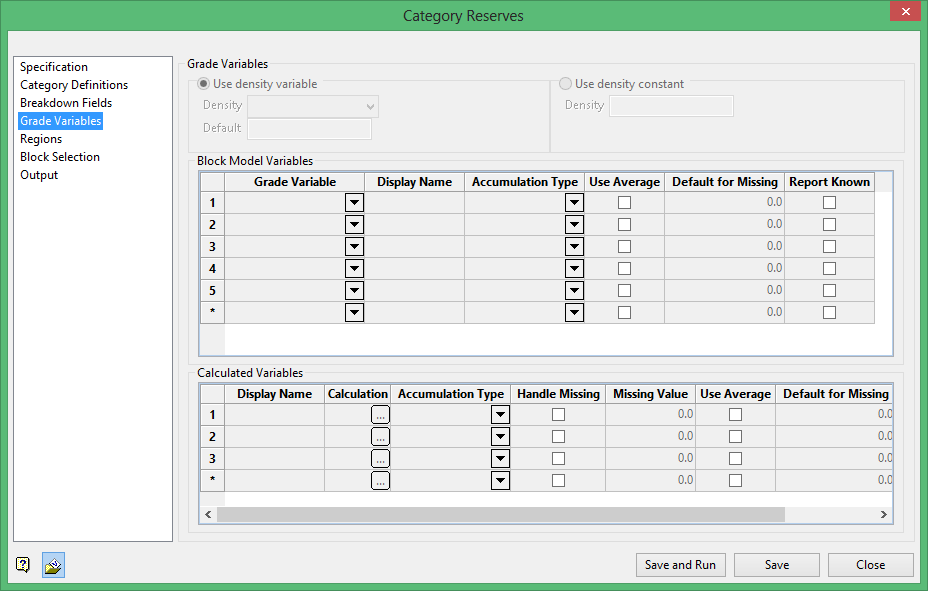
Use density variable
Select this option to use the values contained in a specific block model variable when calculating the tonnage. Select the density block model variable from the drop-down list.
Use density constant
Select this option to use a constant value when calculating the tonnage. You will need to specify the density value.
Block Model Variables table
Use this section to define what variables you want to reserve in the output.
-
Grade Variable
Select the grade variables from the drop-down list. There is no limit regarding how many grade variables can be specified for the calculation of reserves.
-
Display Name
Use this column to define the name for the output in the spreadsheet.
-
Accumulation Type
Each variable can be specified as wt by mass, wt by vol or sum. Grade values are sent to the dump file according to type and appropriate entries are placed in the VARIABLE_TOTALS block.
Type Definition Sum Used for variables containing units (for example, grams of gold) that should be cumulated rather than averaged. Wt by Vol Used for grade variables containing values based on volume weighted average (for example, grams of gold per cubic metre). Wt by Mass Used for grade variables that should be treated as a weighted average based on mass (for example, grams per tonne of gold). -
Use Average / Default for Missing
This is useful if you do not know the value of a block. You can either use the average, or specify a default.
Select the Use Average checkbox if you want the average grade value of the selected blocks to be used for the reserve calculation.
Supply a Default for Missing value if you want to replace the construction default of the selected blocks during the reserve calculation. The construction default value is reported in a block model header. It can also be named the missing value.
-
Report Known
Select this checkbox if you want the report to reflect known values in addition to the average or default value.
Calculated Variables table
This operation functions as if you are creating a temporary variable using a block script file (.bcf), and then reserving that variable.
-
Display Name
Use this column to define the name for the output in the spreadsheet.
These names are relevant to calculated output because values are calculated based on this display name.
-
Calculation
See also: bcalc for calculation syntax.
Can reference block model variables directly.
Additional functions:
-
GetBlockMass() -
GetBlockVolume()
"au_royalty" if (royalty_zone eqs "A") then royalty = 0.025 else if (royalty_zone eqs "B") then royalty = 0.03 else royalty = 0 end if au * (1 - royalty)
This sets value for royalty adjustment.
-
-
Accumulation Type
Each variable can be specified as wt by mass, wt by vol or sum. Grade values are sent to the dump file according to type and appropriate entries are placed in the VARIABLE_TOTALS block.
Type Definition Sum Used for variables containing units (for example, grams of gold) that should be cumulated rather than averaged. Wt by Vol Used for grade variables containing values based on volume weighted average (for example, grams of gold per cubic metre). Wt by Mass Used for grade variables that should be treated as a weighted average based on mass (for example, grams per tonne of gold). -
Handle Missing / Missing Value
There may be cases when the calculations do not assign a value to a variable. To account for those circumstances, you have the option to assign a value to those variables. Put another way, you can handle the missing value. Select the Handle Missing checkbox, then enter the default value in the Missing Value column.
-
Use Average / Default for Missing
This is useful if you do not know the value of a block. You can either use the average, or specify a default.
Select the Use Average checkbox if you want the average grade value of the selected blocks to be used for the reserve calculation.
Supply a Default for Missing value if you want to replace the construction default of the selected blocks during the reserve calculation. The construction default value is reported in a block model header. It can also be named the missing value.
-
Report Known
Select this checkbox if you want the report to reflect known values in addition to the average or default value.
Regions
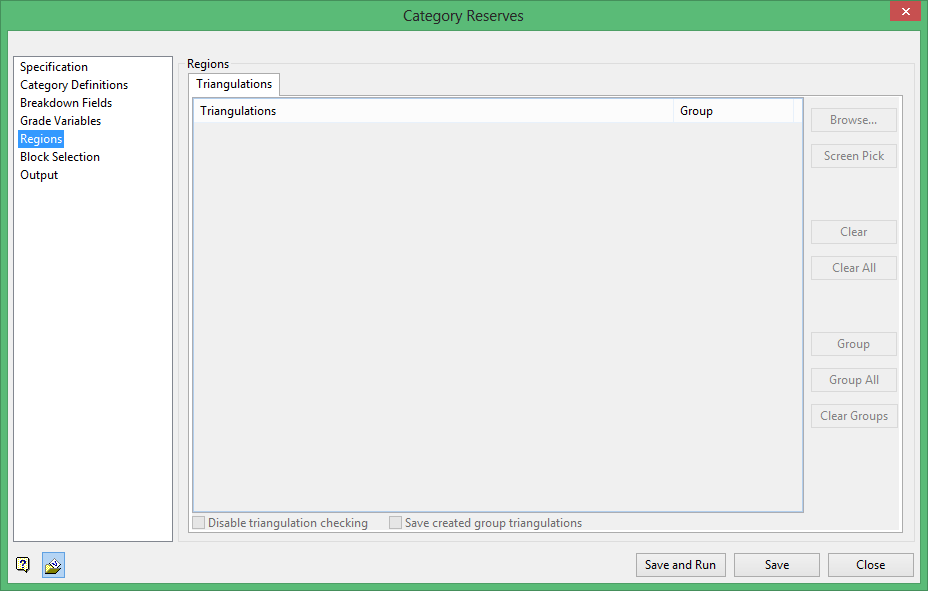
Use this section to include triangulations as regions in the reserves calculations. The nominated regions can be grouped together.
Example: If you have 100 triangulations on a pit bench where 60 are high grade and 40 are low grade, then grouping can be used to report all the high and low grade regions thus resulting in two separate breakdowns rather than the total 100 regions.
-
Browse...
Click to display the Open panel and select the triangulations you want to load.
-
Screen Pick
Click to select triangulations from the screen.
-
Clear
Click to remove a highlighted item from the list.
Tip: To highlight multiple list items, hold the Shift key while left-clicking for consecutive items in the list, or hold the Ctrl key while left-clicking for non-consecutive items.
-
Clear All
Click to remove all items in the list.
-
Group
Click to create a union among selected triangulations.
-
Group All
Click to create a single group from all of the triangulations listed.
-
Clear Groups
Click to clear all groups.
-
Disable triangulation checking
Select this option to disable triangulation checking. This is useful to speed up the processing of multiple triangulations.
-
Save created group triangulations
Select this option to view the union in groups. This will allow you to verify that you are seeing the results you intend.
Block Selection
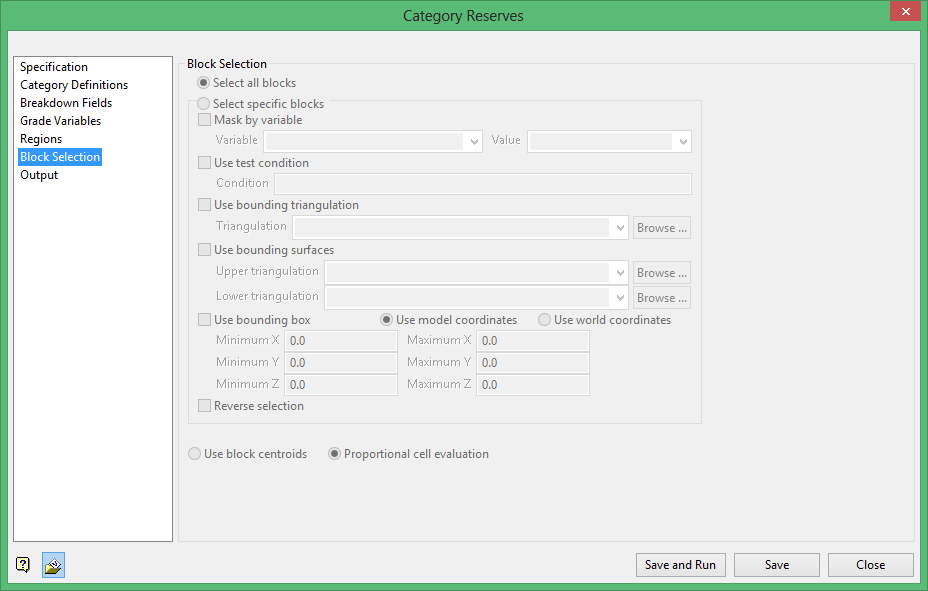
-
Choose either Select all blocks or Select specific blocks. If you choose Select specific blocks, then you must enter one or more of the following selection criteria:
-
Mask by variableSelect the Mask by variable checkbox if you want to restrict the blocks by a block model variable. You will need to select the variable and value to mask by from the Variable and Value drop-down lists.
Example: To restrict blocks to those where Material equals Ore, select Material as the variable and
Oreas the value. The block model variable may be numeric, such as the grade variable Au or character, such as Geology variables. -
Use test condition
Select the Use test condition checkbox if you want to use a further constraint upon a numeric block model variable and enter the condition in the Condition field. The maximum size of the condition is 132 alphanumeric characters.
Refer to the appendix, Operators and Functions, for a full list of available operators and functions.
Example: To select only blocks that have an iron value greater than 10.0, you would select the Use condition checkbox and enter
Fe GT 10.0in the Conditions field. -
Use bounding triangulation
Select the Use bounding triangulation checkbox if you want to restrict the blocks by a triangulation. Select the bounding triangulation to use from the Triangulation drop-down list, or click Browse... to select a triangulation from a location other than your working directory.
Note: This option is not applicable to open or 2D triangulations.
-
Use bounding surfaces
Select the Use bounding surfaces checkbox if you want to restrict the blocks by bounding surfaces. Select triangulations from the Upper triangulation and Lower triangulation drop-down lists, or click Browse... to select triangulations from a location other than your working directory.
-
Use bounding box
Select the Use bounding box checkbox if you want to restrict the blocks by a box. Choose either Use model coordinates or Use world coordinates, then enter the minimum and maximum X, Y, and Z coordinates as opposite vertices of the bounding box.
Note: If the block model origin is set at 0,0,0, then select Use world coordinates for the minimum and maximum X, Y, and Z coordinates. If the block model origin is set at real world coordinates, then enter coordinates for the bounding box that are offset a certain distance from the origin. The distance of offset will be determined by the dimensions of your bounding box. It will be the distance to the minimum and the distance to the maximum X, Y and Z from the origin of the block model.
-
-
Reverse selection
Select the Reverse selection checkbox if you want to exclude the selected blocks within the slice. If this checkbox is not selected, the entire block is included within the slice by default.
-
Use block centroids / Proportional cell evaluation
Select Use block centroids to include any blocks whose centroids are within the region, or select Proportional cell evaluation to include blocks that touch the region and evaluate reserves according to the proportion of the block's volume that lies within the region.
Output
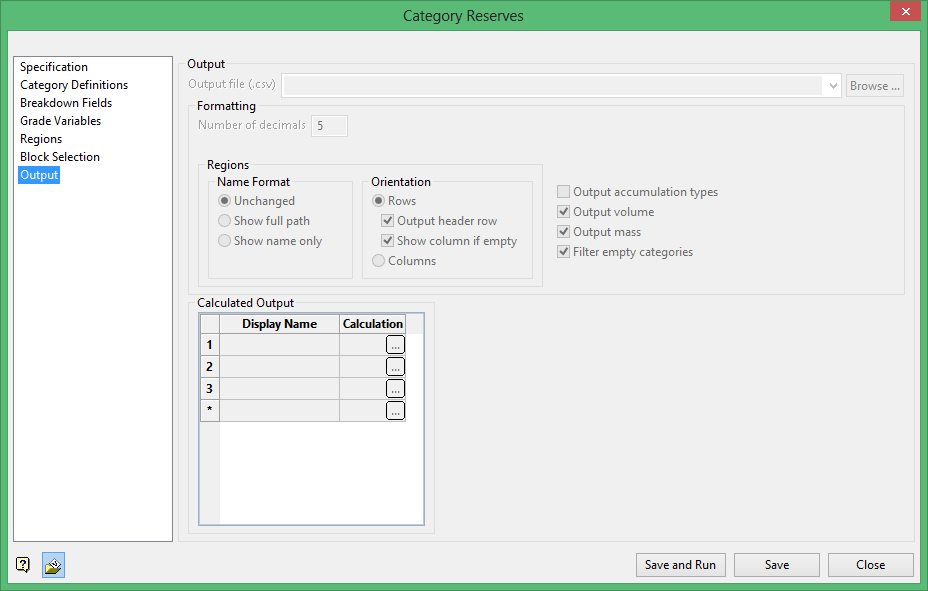
Output file
Enter a name for the output file, or select an existing file from the drop-down list. To select a file from a location other than your working directory, click Browse....
Formatting
-
Number of decimals
Enter the number of decimals to use for the output.
Note: Calculations are completed using the decimal precision specified here.
-
Regions
-
Name format
Select the name format for the output.
-
Orientation
Select the orientation for the output.
-
-
Output accumulation types
Select this checkbox to include the Accumulation Types defined on the Grade Variables branch.
-
Output volume
Select this checkbox to include the total volume of everything being reserved.
-
Output mass
Select this checkbox to include the total mass of everything being reserved. This includes a breakdown of mass and volume for each variable.
-
Filter empty categories
Select this option to remove empty categories from the output. If this checkbox is not selected, empty categories will be present in the output.
Calculated output
Use this table to create new columns from your reserving output so that it is not necessary to complete calculations in the output spreadsheet.
See also: bcalc for calculation syntax.
Note: This process does not reference block model variables directly.
Addition functions:
-
GetGrade("displayName") -
GetKnownMass("displayName") -
GetKnownVolume("displayName") -
GetKnownBlockAmount("displayName") -
GetTotalMass() -
GetTotalVolume() -
GetTotalBlockAmount()
"au_dollar_after_royalty"
 price = 1200
 royalty = 0.025
 GetGrade("au") * GetTotalMass() * price * (1 - royalty)
"ore/waste"
 if (GetGrade("au") lt 0.01) then
     "waste"
 else
     "ore"
 endif
