Import MicroStation Data
Importing Design Strings (dgn v7)
Importing Design Strings (dgn v8)
Importing Design Strings (dgn v7)
On the File menu, click Import to display the Import panel.

Click MicroStation in the File Format column on the left.
Select Design Strings (dgn v7) from the File Type field on the right side of the panel.
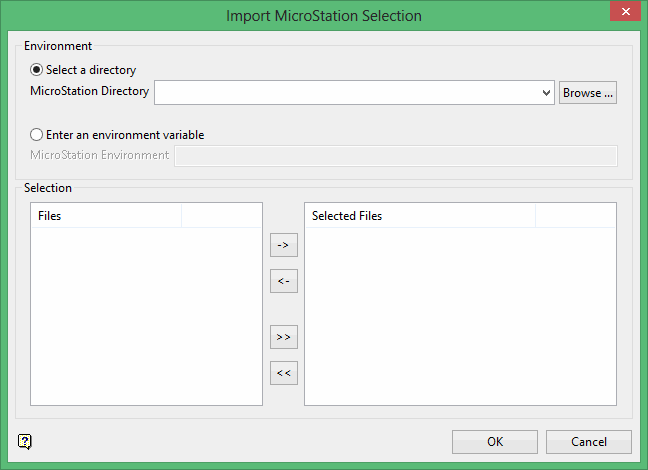
Click OK to display the Import MicroStation Selection panel.
MicroStation files are user-definable therefore there is no one step method to import text, ellipses, solids or colour tables. Text or ellipses for example: should be imported as layers; solids by 'dropping' them from MicroStation; and colour tables by working out the numbers of the colours in MicroStation and then creating a matching colour table in Vulcan. For the best results, we recommend that you use the following export settings on the Files > Export > 3D panel in MicroStation:
- Select all default options except the Z Depth options. Change this to 'element Z high'.
- Ensure that 'no conversions' is set as the default.
Environment
Select the directory in which to store the resulting MicroStation file. You can either specify the actual directory or use an environment variable that points to the applicable location.
File Selection
Select the files that you want to import.
-
To move a single file from one column to the other, click on the file name click the > or < button.
-
To move all files from one column to the other, click the >> or << button.
-
To move multiple files from one column to the other, hold the Ctrl key while clicking on the file names (or hold the Shift key to select a group of adjacent files). Once all the desired files are selected, click the > or < button.
Click OK.
The following panel is then displayed. This panel displays for each of the selected files.
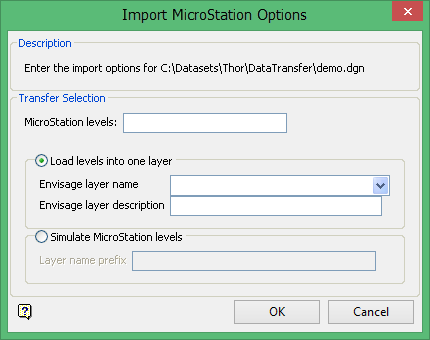
MicroStation levels
Enter the levels in the MicroStation file that you want to transfer to Vulcan layers. The maximum number of levels that a MicroStation file can have is 63. Individual levels can be specified by separating them with a ',' (comma) while ranges can be specified by a '-' (dash).
| Levels | Result |
| 1,4,6 | Transfers levels 1, 4 and 6. |
| 1,4-6 | Transfers levels 1, 4, 5 and 6. |
| 1-63 | Transfers all levels. |
The following two options allow you to specify whether you want the selected levels to be placed in one or more Vulcan layers.
Load levels into one layer
Select this option to load all of the specified levels into a single Vulcan layer. The drop-down list contains the names of all layers found in the currently open design database. If you select an existing layer, then the resulting data will be appended to the nominated layer. If you enter the name of an existing layer that is not currently loaded, then you will need to confirm whether you want to load the layer or replace it, that is overwrite its contents.
To create a new layer, enter the layer name. The layer name:
-
- may contain up to forty characters.
- must begin with an alphanumeric character [0-9] or [a-z].
- cannot include spaces.
- can include hyphens [ - ], plus signs [ + ], underscores [ _ ], periods/dots [ . ].
- can include the special characters of ÃÂÃÀÇÉÊÃÓÔÕÚÜÑ that are used in the Spanish and Portuguese languages.
You will also have the ability to assign a description to further describe the contents of this layer. The maximum size is 80 alphanumeric characters (spaces are allowed). If a description is not entered, then the default "Created layer <date><time>" will be used instead. If the chosen layer already has an assigned description, then this displays when the layer is selected. Existing layer descriptions can be overwritten.
Simulate MicroStation levels
Select this option to load all of the specified levels into separate Vulcan layers. In order to distinguish between these layers and the layers created from in Vulcan, you will need to specify a prefix for the layer name. The prefix can be up to 38 alphanumeric characters in length (spaces are not allowed). The resulting layers will be named <prefix>n where n is the MicroStation level.
Click OK.
A dialog box will show the amount of strings and points transferred so far.
Note A triangulation or grid that has been exported from Vulcan to MicroStation and then imported back into Vulcan again, will be imported as string data.
Importing Design Strings (dgn v8)
On the File menu, click Import to display the Import panel.
Click MicroStation in the File Format column on the left.
Select Design Strings (dgn v8) from the File Type field on the right side of the panel.
Click OK to display the Import MicroStation Selection panel.
Click OK to display the Import Micromine String panel.
This panel consists of two tabbed sections:
- Selection
- Options
Selection tab
Select the Micromine files (.str) that you want to import.
-
To move a single file from one column to the other, click on the file name click the > or < button.
-
To move all files from one column to the other, click the >> or << button.
-
To move multiple files from one column to the other, hold the Ctrl key while clicking on the file names (or hold the Shift key to select a group of adjacent files). Once all the desired files are selected, click the > or < button.
Options tab
Load layers straight into a dgd
Select this check box to load the contents of the selected files into a nominated design database. The drop-down contains the names of all design databases (.dgd.isis) found in your current working directory. Click Browse to select a file from another location. If this check box is not selected, then the data will be imported into the currently open design database.
Maintain exact positioning for multiline text
Select this check box to maintain the exact location of all lines when importing a multiline text object. The imported text object will be separated into single line objects that will preserve the positioning based on the line spacing in the corresponding data file.
If this check box is not selected, then the lines of the multiline object will be imported as a single object. In this case only the first line is ensured to be at the right location whereas the position for subsequent lines of text will be based on the line spacing and font size.
Load objects into a single layer
Select this check box to load the contents of the selected filed into a nominated layer. The drop-down list contains the names of all layers found in the currently open design database.
If you selected the Load layers straight into a dgd check box, then the drop-down list contains the names of all layers found in the nominated design database.
If the layer exists, a dialog box displays where you can choose whether to append the imported data to the layer, choose the replace (overwrite) the existing layer, or cancel. You can also select the Always perform this action check box to continue the action for this import instance. The setting will not remain for future import instances.
Ignore the units defined in the DGN files
Select this check box to ignore the unit settings stored in the chosen files. We recommend that you use this option to prevent coordinates from being converted because of mismatching unit settings.
Modelling options
Select this check box to extrude entities.
Coordinate options
Use this option to change signs on the X, Y, or Z axis, or to swap the X and Y coordinates.
Click OK.
